Posts | Comments

Planet Arduino

Archive for the ‘Morse Code’ Category

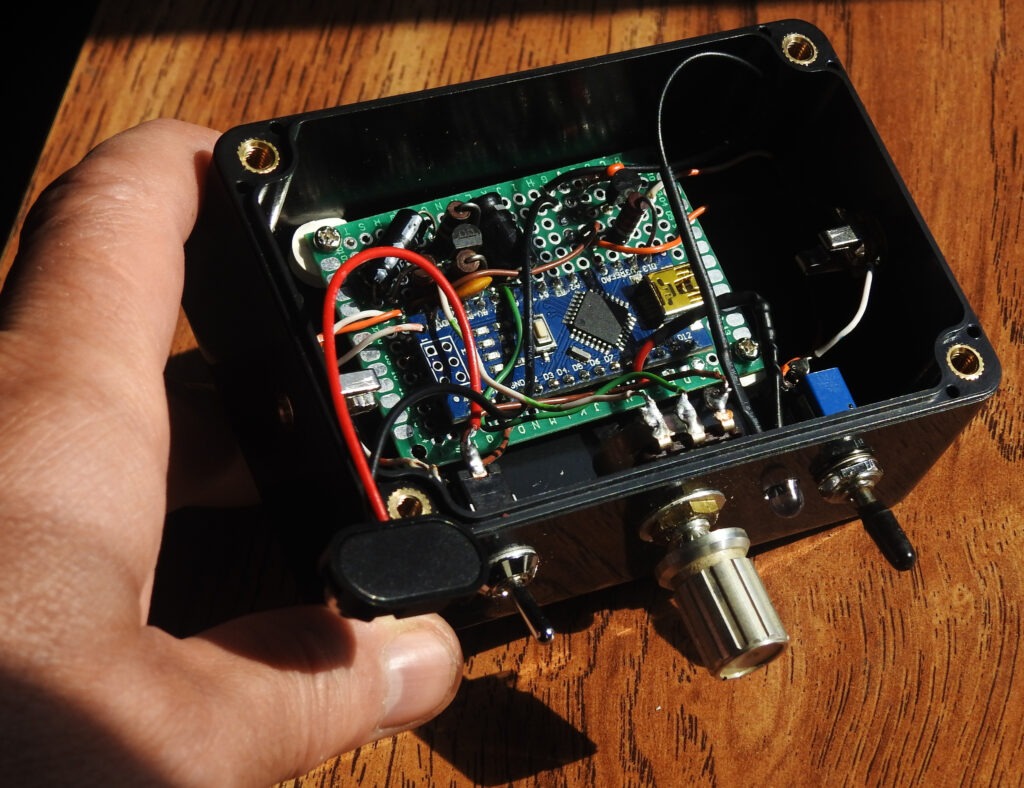
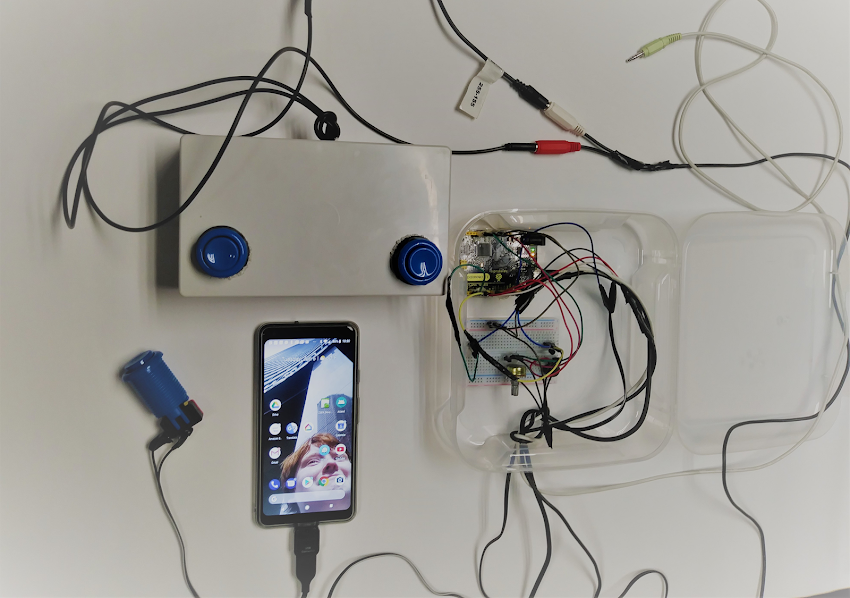
While most of us associate Morse code with old-timey telegraphs, it is still in use today. The benefits now are the same as they were a hundred and fifty years ago: it is an incredibly resilient way to encode information that works with a variety of different transmission methods. But what if you have trouble operating a standard Morse code key? This CWvox device, designed by Kevin Loughin (AKA KB9RLW), translates voice commands into Morse code keying.

CWvox could be useful for people with disabilities and for people who have trouble getting Morse code timing right. Morse code relies on tone length to convey information and it isn’t always easy to hold a key for the proper amount of time. CWvox takes care of that for you. Just speak out loud either a “dah” sound or a “dit” sound at something close to the right timing. The device will interpret those utterances and then output perfect keying.

The components to make this work include an Arduino Nano board, an audio input jack, a small transistor amplifier, a potentiometer, an LED, and an output transistor. Users can connect a headset with a condenser microphone, which feeds into the audio jack to the amplifier and then to the Arduino. The Arduino analyzes the incoming audio signal to detect “dahs” and “dits,” then keys the radio using the output transistor. The potentiometer lets the user adjust the sensitivity.

The post The CWvox is a simple device that converts voice commands into Morse code keying appeared first on Arduino Blog.

[Rostislav Persion] wrote a simple Morse Code decoder to run on his Arduino and display the text on an LCD shield. This is probably the simplest decoder possible, and thus its logic is pretty straightforward to follow. Simplicity comes at a price — changing the speed requires changing constants in the code. We would like to see this hooked up to a proper Morse code key, and see how fast [Rostislav] could drive it before it conks out.

In an earlier era of Morse code decoders, one tough part was dealing with the idiosyncrasies of each sender. Every operator’s style, or “fist”, has subtle variations in the timings of the dots, dashes, and the pauses between these elements, the letters, and the words. In fact, trained operators can recognize each other because of this, much like we can often recognize who is speaking on the phone just by hearing their voice. The other difficulty these decoders faced was detecting the signal in low signal-to-noise ratio environments — pulling the signal out of the noise.

A Morse decoder built today is more likely to be used to decode machine-generated signals, for example, debugging information or telemetry. This would more than likely be sent at fixed, known speeds over directly connected links with very high S/N ratios (a wire, perhaps). In these situations, a simple decoder like [Rostislav]’s is completely sufficient.

We wrote about a couple of Morse code algorithms back in 2014, the MorseDetector and the Magic Morse algorithm. While Morse code operators usually rank their skills by speed — the faster the better — this Morse code project for very low power transmitters turns that notion on its head by using speeds more suitably measured in minutes per word (77 MPW for that project). Have you used Morse code in any of your projects before? Let us know in the comments below.

You really should learn to read Morse code. But if you can’t — or even if you can, and just want a break — you can always get a computer to do it. For example, [jmharvey1] has a decoder that runs on a cheap Bluepill dev board.

The device uses a touchscreen and a few common components. The whole thing cost about $16. You can see it at work along with a description of the project in the video below.

The code uses the Arduino-style setup for the Blue pill — something we’ve talked about before. As for the decoding method, the software employs the Goertzel algorithm which is akin to a single frequency Fourier transform. That is, while a full transform gives you information about the frequency component of a signal across a wide range, the Goertzel algorithm probes the signal for one or a small number of distinct frequencies.

The decoder table looks confusing at first until you realize that each “decode” value consists of a 1 as a start bit followed by a 1 for a dash and a zero for a dot. All bits to the left of the start bit don’t count. So an “E” codes as 02 hex — a start bit followed by a single zero or dot. A “C” is 1A hex (1 + -.-.). Once you find the matching code, you apply the same index to another table to look up the actual letter or string of letters.

If you buy a Bluepill to make one of these, you might as well get two and build something to send code, too.

[W8BH] attended a talk by another ham, [W8TEE] that showed a microcontroller sending and receiving Morse code. He decided to build his own, and documented his results in an 8 part tutorial. He’s using the Blue Pill board and the resulting device sends code with paddles, sends canned text, provides an LCD with a rotary knob menu interface, and even has an SD card for data storage.

All the code is on GitHub. If you are interested in Morse code or in learning how to write a pretty substantial application using the Blue Pill and the Arduino IDE (or any other similar processor), this is a great exposition that is also a practical tool.

[W8BH] takes good advantage of breakout boards with things such as the displays and jacks on them. Of course, you don’t absolutely have to use those, but it does make life easier. You can see [W8TEE’s] version posted in an online forum.

The parts of the tutorial all build on each other, so you start out simple and get deeper and deeper. The tutorials are PDF files, but they are well organized and easy to read.

We’ve done our tutorials and videos on the Blue Pill. If you don’t want to rely on the Arduino IDE, there are ways around that, too.

Blue Pill header pic: Popolon [CC BY-SA 4.0]

Puff and Suck (or Sip and Puff) systems allow people with little to no arm mobility to more easily interact with computers by using a straw-like unit as an input device. [Ana] tells us that the usual way these devices are used to input text involves a screen-based keyboard; a cursor is moved to a letter using some method (joystick, mouse emulator, buttons, or eye tracking) and that letter is selected with a sip or puff into a tube.

[Ana] saw such systems as effective and intuitive to use, but also limited in speed because there’s only so fast that one can select letters one at a time. That led to trying a new method; one that requires a bit more work on the user’s part, but the reward is faster text entry. The Puff-Suck Interface for Fast Text Input turns a hollow plastic disk and a rubber diaphragm into bipolar pressure switch, able to detect three states: suck, puff, and idle. The unit works by having an IR emitter and receiver pair on each side of a diaphragm (one half of which is shown in the image above). When air is blown into or sucked out of the unit, the diaphragm moves and physically blocks one or the other emitter-receiver pair. The resulting signals are interpreted by an attached Arduino.

How does this enable faster text input? By throwing out the usual “screen keyboard” interface and using Morse code, with puffs as dots and sucks as dashes. The project then acts as a kind of Morse code keyboard. It does require skill on the user’s part, but the reward is much faster text entry. The idea got selected as a finalist in the Human-Computer Interface Challenge portion of the 2018 Hackaday Prize!

Morse code may seem like a strange throwback to some, but not only does the bipolar nature of [Ana]’s puff-suck switch closely resemble that of Morse code input paddles, it’s also easy to learn. Morse code is far from dead; we have pages of projects and news showing its involvement in everything from whimsical projects to solving serious communication needs.

Those that need a text entry method other than a traditional keyboard and mouse often use a method where a character is selected, then input using a sip or puff of air from the user’s mouth. Naturally this is less than ideal, and one alternative interface shown here is to instead use sip/puff air currents to indicate the dots and dashes of Morse code.

The system—which can be seen in action in the video below—uses a modified film container, along with a pair of infrared emitters and detectors to sense air movement. The device was prototyped on an Arduino Mega, and its creators hope to eventually use a Leonardo for direct computer input. 

A tube connected to a custom made bipolar pressure switch drives an Arduino which translates puffing and sucking into Morse code and then into text.

Puffs make repeating short pulses (dots) and sucks repeating longer pulses (dashes) just like ham radio amateurs do with a dual-lever paddle.

Code for this open source project can be found on GitHub.

Morse code may not be as widely used as in its heyday, but it still certainly has its adherents. One avid user is Tanya Finlayson, who has been using this as her method of communication for roughly 40 years. Now, with the Gboard phone keyboard supporting input via dots and dashes, the world of Android computing has been opened up to her as well.

In order to get button presses to the phone, Ken Finlayson used an Arduino Leonardo to read inputs from a trio of buttons, indicating dot, dash, and mode select. The third button allows for phone navigation in addition to text input. Because of its built-in HID capabilities via the ATmega32U4 chip, the Leonardo is a great choice for this application, demonstrated in the video below. 

Many people cannot use keyboards and touchscreens to control their digital devices. Instead, they use custom hardware switches that emulate typing, swiping, and tapping. The Android operating system provides software that allows these switches to control Android devices, and recently Google provided a new Morse Keyboard within the Gboard keyboard for people who find this method easier for text entry.

This experiment is a DIY hardware adapter that enables assistive tech developers to connect existing switch based input systems to their Android device. Once connected, 2 switch assistive systems (with an additional switch for mode switching) can control both the standard Android accessibility functions as well as text entry through Morse on Gboard.

This experiment is built using Arduino and is compatible with most standard assistive 2 switch systems with 1/8” mono outputs.

TinyLilyThumbnail
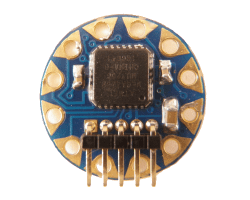
[Rob Bailey] likes to build things and he likes ham radio. We are guessing he likes mints too since he’s been known to jam things into Altoids tins. He had been thinking about building a code practice oscillator in a Altoids Smalls tin, but wasn’t sure he could squeeze an Arduino Pro Mini in there too. Then he found the TinyLily Mini. The rest is history, as they say, and 1CPO was born.

The TinyLily Mini is a circular-shaped Arduino (see right) about the size of a US dime. most of the pads are arranged around the circle and there is a small header that takes a USB programmer. A small rechargeable battery can run the device for a long time.

If you’ve ever written Morse code software, one challenge is to compute the actual sending speed in words per minute (WPM). If you are doing a serial port, for example, the speed is easy because the sent elements are the same length. However, with Morse code, some things are very short (like an E, for example) and some are much longer (like a zero). In fact, the code tries to reflect the frequency certain letters occur. E is the shortest character and the most common in English texts.

You might think [Samuel Morse] was responsible for this, but his original code was only numbers. The idea is you would get numbers and look them up in a code book. Presumably, some of the codes would have been single letters forming an early coding like ASCII, Baudot, or EBCDIC. [Alfred Vail] expanded the system to include letters and other characters and assigned lengths based on the examination of type cases at the local newspaper. That code also used dots, dashes, and long dashes, but it is almost recognizable as the Morse code in use today.

So [Rob] looked for a way to determine the speed and found that the ARRL uses the timing of the word PARIS as an average word. [Rob] wasn’t quite convinced that was the right way to go, so he compiled a list of the 1,000 most common English words, the 100 largest cities in the word, and a few other groups of words and computed the average element length of the words. PARIS has 50 elements total. The average of [Rob’s] list was 49.489. Pretty close.

If you think Morse code is dead, there are still a number of hams who enjoy it. Also, the US Air Force trains 10 Morse code operators every year. Morse has been used to transfer data over cell phones cheaply, and we’ve seen plenty of larger practice devices.


Filed under: Arduino Hacks

For her science fair project, [David]’s daughter had thoughts about dipping eggs in coffee, or showing how dangerous soda is to the unsuspecting tooth. Boring. Instead she employed her father to help her build a Morse Code waterfall.

A more civilized wea-- tool from a more elegant age. Young Jed--engineer.
A more civilized wea– tool from a more elegant age. Young Jed–Engineer.

[David] worked with his daughter to give her the lego bricks of knowledge needed, but she did the coding, building, and, apparently, wire-wrapping herself. Impressive!

She did the trick with two Arduinos. One controls a relay that dumps a stream of water. The other watches with an optical interrupt made from an infrared emitter and detector pair to get the message.

To send a message, type it in the keyboard. The waterfall will drop spurts of water, and then show the message on the decoder display. Pretty cool. We also liked the pulse length dial. The solution behind the LEDs is pretty clever. Video after the break.


Filed under: Arduino Hacks, news

You may wonder why anyone would want to learn Morse code. You don’t need it for a ham license anymore. There are, however, at least three reasons you might want to learn it anyway. First, some people actually enjoy it either for the nostalgia or the challenge of it. After all, . Another reason is that Morse code can often get through when other human-readable schemes fail. Morse code can be sent using low power, equipment built from simple materials or even using mirrors or flashlights. Finally, Morse code is a very simple way to do covert communications. If you know Morse code, you could privately talk to a concealed computer on just two I/O lines. We’ll let you imagine the uses for that.

In the old days, you usually learned Morse code from an experienced sender, by listening to the radio, or from an audio tape. The state of the art today employs a computer to randomly generate practice text. [M0TGN] wanted a device to generate practice code, so he built it around an Arduino. The device acts like an old commercial model, the Datong D70, although it can optionally accept an LCD screen, something the D70 didn’t have.

You can see the project in operation in the video below. Once you learn how to read Morse code, you might want to teach your Arduino to understand it, too. Or, you can check out some other Morse-based projects.


Filed under: Arduino Hacks


  • Newsletter

    Sign up for the PlanetArduino Newsletter, which delivers the most popular articles via e-mail to your inbox every week. Just fill in the information below and submit.

  • Like Us on Facebook