Now here’s a really cool home hack. [Luis Rodrigues] has automated his garage door to open, simply by flashing his headlights at it.
But wait, doesn’t that mean anyone could break into his house? Nope. At first we thought he had just added some photo-sensors and a bit of computer logic in order to turn a pattern of lights into an output to open the garage, but no, it’s actually specific to his car only. Which is awesome because if anyone ever tried to copy him to break in, all they break into is a very confused state of mind.
You see how it actually works is the headlight output is connected to a control box under the hood of his car. A Moteino (RF Arduino variant) reads the input signal of the headlights flashing three times, and then communicates wirelessly to the garage door in order to open it.
But [Luis] also has a gate outside his property — so if you hold the lights on for a second, both the garage door and the external gate will open as well.
Pretty awesome — mind you, is a garage door button really that much harder to use? This is definitely safer if someone steals your car and happens to have your address though!
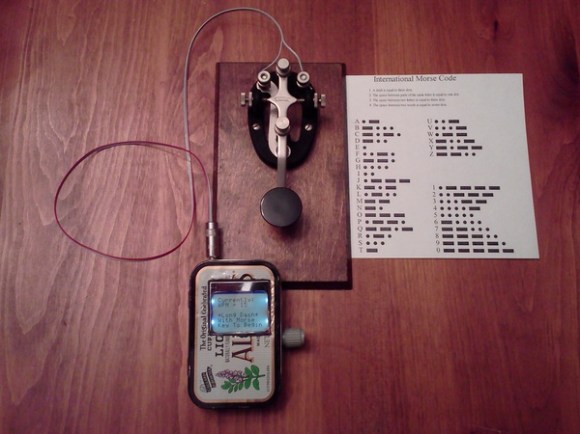
Morse code used to be widely used around the globe. Before voice transmissions were possible over radio, Morse code was all the rage. Nowadays, it’s been replaced with more sophisticated technologies that allow us to transmit voice, or data much faster and more efficiently. You don’t even need to know Morse code to get an amateur radio license any more. That doesn’t mean that Morse code is dead, though. There are still plenty of hobbyists out there practicing for the fun of it.
[Dan] decided to take a shortcut and use some modern technology to make it easier to translate Morse code back into readable text. His project log is a good example of the natural progression we all make when we are learning something new. He started out with an Arduino and a simple microphone. He wrote a basic sketch to read the input from the microphone and output the perceived volume over a Serial monitor as a series of asterisks. The more asterisks, the louder the signal. He calibrated the system so that a quiet room would read zero.
He found that while this worked, the Arduino was so fast that it detected very short pulses that the human ear could not detect. This would throw off his readings and needed to be smoothed out. If you are familiar with button debouncing then you get the idea. He ended up just averaging a few samples at a time, which worked out nicely.
The next iteration of the software added the ability to detect each legitimate beep from the Morse code signal. He cleared away anything too short. The result was a series of long and short chains of asterisks, representing long or short beeps. The third iteration translated these chains into dots and dashes. This version could also detect longer pauses between words to make things more readable.
Finally, [Dan] added a sort of lookup table to translate the dots and dashes back into ASCII characters. Now he can rest easy while the Arduino does all of the hard work. If you’re wondering why anyone would want to learn Morse code these days, it’s still a very simple way for humans to communicate long distances without the aid of a computer.
If you’re walking around town and you see a light suddenly start to switch on and off seemingly at random, don’t discount it as a loose wire so quickly. [René] has been hard at work on a project to use city lights of all shapes and sizes for Morse messages, and a way for anyone to easily decode these messages if they happen upon one while out and about.
The lights can tell any story that is programmed into them. The code on the site is written for an Arduino-style microcontroller but it could be easily exported to any device that can switch power to turn a light on and off. Any light can work, there’s even video of a single headlight on a van blinking out some dots and dashes.
The other part of this project is a smartphone app that can decode the messages using the camera, although any Morse code interpreter can translate the messages, or if you’re a ham radio enthusiast you might recognize the messages without any tools whatsoever!
The great thing about this project is that it uses everyday objects to hide messages in plain sight, but where only some will be able to find them. This is indeed true hacker fashion! If you’re interested in making your own Morse code light, the code is available on the project site.
The HackPhx Winter 2014 hackathon was held at Heatsync Labs hackerspace in Mesa, Arizona, USA. The advertised theme was “Arduino Wearables”. Participating attendees were randomly placed on teams evenly distributed by their disclosed skills across all teams. There were 10 teams with 4 to 5 members per team competing for two winning spots.
Each team had to build an amazing wearable project utilizing the secret ingredient which was Seedstudio’s Arduino-compatible Xadow wearable platform and add-ons. The Xadow is similar to the Arduino Leonardo and participants used an Arduino cross compatibility and pin mapping chart to assist in development.
Top prize was the Judges’ prizes for the best completed and documented Xadow wearable team project. The second prize was the Jury’s prize given to the team project that the other teams liked the most regardless of event criteria.
Read more about the winning teams and watch their presentations after the break.
I was already planning on attending the hackathon. When I mentioned this to the Hackaday team they also put me on assignment to film and write about the winning teams. Full disclosure: I couldn’t resist signing up as a team member for some hacking fun.
No team members had experience using the Xadow platform so the playing field was quite level. The range of Xadow add-ons was extensive, but teams could only blindly select from a bucket of donated Xadow add-on modules such as OLED display, LED arrays, motors, accelerometers, GPS, NFC and BLE. Bartering between teams was encouraged as teams developed their final project plans.
The event really began the night before the hackathon with a 4 hour meet and greet to divide into teams and finalize hardware trades. The real event started at 8 am the next morning and lasted for 12 straight hours of mad hacking using any tools and supplies available at Heatsync Labs. Heatsync Labs provided experienced volunteers to assist teams that needed to use lab equipment such as the Laser cutter, 3D printers, welders, metal lathes or any power tools.
All team code, photos and final documentation had to be uploaded to each team’s GitHub repository before judging started at 8 pm.
After the smoke cleared the Judges’ winner was Team 8 with “Morse Code Earrings”. This really was an amazing wearable hack especially if you take into account they scrapped their first project and started over on the winning project halfway through the hackathon. Team 8 utilized the Xadow Bluetooth LE module to send text messages from a phone to a stealth receiving necklace containing an Xadow which modulated the message in Morse code over flashing “Jelly Friend” LED earrings. The earrings were also made by Team 8 using clear acrylic laser cut in the shape of jellyfish and having a base of LEDs and some old Christmas tree fiber-optic lighting parts. The big advantage to having such decorative communication is to send SOS requests to nearby girlfriends when you find yourself entangled in scary company. Or to scream covertly flash profanity at your boss.
Team 8 members:
Mattie Finney – GossamerLights
James Brooks – pyrobrooks
Nate Plamondon – meznak
Brett Warner – brettwarner
Team 4 with “Over 9000” won the Jury’s prize. This prize winner was picked by all the other teams and I must say my team members were amazing; yes I was on Team 4. My team members were extremely talented at learning this new hardware platform. Almost effortlessly, and with time to spare, they quickly integrated the hardware, code and bits of scrap into a wearable head mounted heads-up Google Glass style interactive and fully functioning augmented reality head unit. I say “they” because I only worked on the glove unit and cabling. The glove unit retrieves distance measurements in feet and inches from a Parallax ultrasonic ping sensor mounted on the back of the glove and is cabled into the back of the head unit.
The project name comes from the accelerometer output mounted in the head unit. Once the accelerometer’s power unit output tops 9000 all the LEDs on the side will turn red indicating max power level activity. This power unit value along with distance measurements to objects in front of the glove unit are internally reflected into the wearer’s right eye from an OLED display mounted at the back of the head unit. If the glove detects objects closer than 3 feet, a front mounted red LED also lights to warn innocent bystanders. The back of the head unit is prewired for jacking in auxiliary off board sensors and equipment to simplify integration and assimilation.
Magic Morse is a mathematical algorithm that [Ray Burnette] wrote a few years ago to make it easy to send and receive Morse code. When he first wrote it, he designed it for a PIC, but since then he has re-written it to use as a training program for the Arduino platform.
It can run on the Uno, Nano, Pro Micro, or even home-brew Arduino boards. He’s demonstrating the program with a Nokia 5110 LCD, but has also included code for the typical 2×16 LCD displays. The Magic Morse algorithm is copyrighted, but he has released the Arduino code as open source in an effort to get people using Morse code once again — it is pretty awesome.
So how does it work? The algorithm assigns weights to the “dits” and “dahs” as received — when there is a longer pause, the algorithm creates a pointer which calls the character out of an array stored in the EEPROM. He’s included an example of this in Excel on his page.
Spikenzie Labs has a reputation for making innovative, wonderfully designed kits and their new Telegraph Decoder and Calculator Kits are no exception! Both are available now in the Maker Shed.
Planet Arduino is, or at the moment is wishing to become, an aggregation of public weblogs from around the world written by people who develop, play, think on Arduino platform and his son. The opinions expressed in those weblogs and hence this aggregation are those of the original authors. Entries on this page are owned by their authors. We do not edit, endorse or vouch for the contents of individual posts. For more information about Arduino please visit www.arduino.cc
You are currently browsing the archives for the Morse Code category.