Posts | Comments

Planet Arduino

Archive for the ‘green hacks’ Category

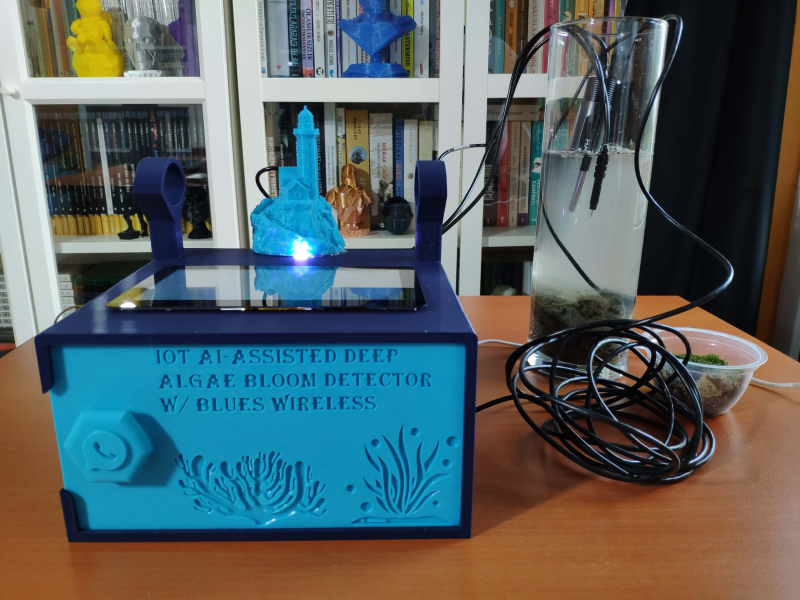
A blue enclosure with "IoT AI-assisted Deep Algae Bloom Detector w/Blues Wireless" written on the front. Two black cables run over a wooden desk to a cylinder with rocks on the bottom and filled with murky water. A bookshelf lurks in the background.

Harmful Algal Blooms (HABs) can have negative consequences for both marine life and human health, so it can be helpful to have early warning of when they’re on the way. Algal blooms deep below the surface can be especially difficult to detect, which is why [kutluhan_aktar] built an AI-assisted algal bloom detector.

After taking images of deep algal blooms with a boroscope, [kutluhan_aktar] trained a machine learning algorithm on them so a Raspberry Pi 4 could recognize future occurrences. For additional water quality information, the device also has an Arduino Nano connected to pH, TDS (total dissolved solids), and water temperature sensors which then are fed to the Pi via a serial connection. Once a potential bloom is spotted, the user can be notified via WhatsApp and appropriate measures taken.

If you’re looking for more environmental sensing hacks, check out the OpenCTD, this swarm of autonomous boats, or this drone buoy riding the Gulf Stream.

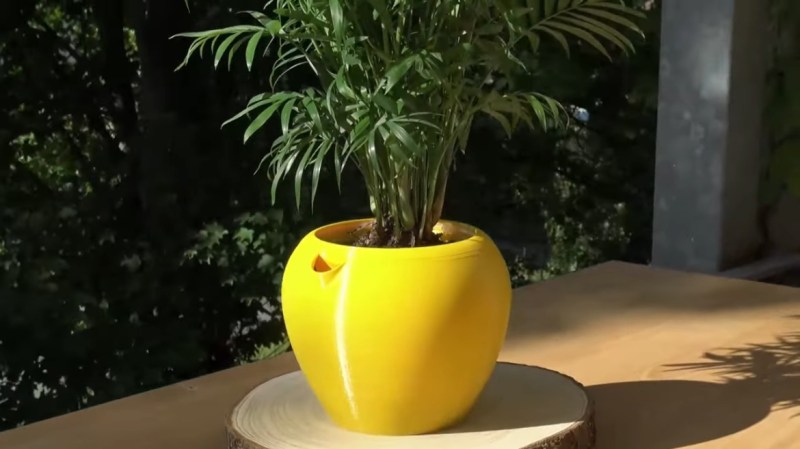
While it’s true that some plants thrive on neglect, many of them do just fine with a few ounces of water once a week, as long as the light level is right. But even that is plenty to remember and actually do in our unprecedented times, so why bother trying? [Martin] has solved this problem for us, having given every aspect of automatic plant care a lot of thought. The result of his efforts is Flaura, a self-watering open-source plant pot, and a YouTube channel to go with it.

The 3D-printed pot can easily be scaled up or down to suit the size of the plant, and contains a water reservoir that holds about 0.7 L of water at the default size. Just pour it in through the little spout, and you’re good for about three months, depending on the plant, the light it’s in, and how much current water it draws. You can track the dryness level in the companion app.

Whenever the capacitive soil moisture sensor hidden in the bottom of the dirt detects drought conditions, it sends a signal through the Wemos LOLIN32 and a MOSFET to a small pump, which sends up water from the reservoir.

The soil is watered uniformly by a small hose riddled with dozens of tiny holes that create little low-pressure water jets. This is definitely our favorite part of the project — not just because it’s cool looking, but also because a lot of these types of builds tend to release the water in the same spot all the time, which is. . . not how we water our plants. Be sure to check out the project overview video after the break.

No printer? No problem — you could always use an old Keurig machine to water a single plant, as long as the pump is still good.

Thanks for the tip, [Keith]!

We’re not exactly what you’d call naturalists here at Hackaday, so to us, the idea that hot pepper seeds need to germinate in hot conditions sounds suspiciously like a joke. The sort of thing somebody might tell you right before they try to sell you an elevator pass, or cram you into a locker. But we don’t think [Dean] would have gone through so much trouble if it wasn’t true. You’re still not going to sell us an elevator pass, though. Not again.

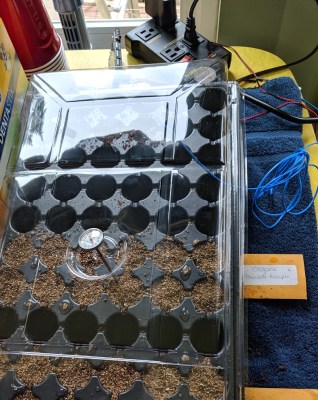
According to [Dean], the Carolina Reaper pepper seeds he bought from Puckerbutt Pepper Company (truly a name you can trust) recommend that they be germinated at a temperature between 80 and 85 degrees Fahrenheit for up to eight weeks. To make sure they were maintained at the optimal temperature for as long as possible, he decided to get a heating pad he could place under the seeds to keep them warm. He just needed some way to make sure the heat only kicked on once the soil temperature fell out of the sweet spot.

To get an accurate reading, [Dean] ended up going with a waterproof K-type thermocouple connected to a SainSmart MAX6675 module that could be buried amongst the seeds. When the soil temperature drops below 82.5 F, it kicks on the heating mat through an IoT Relay by Digital Loggers. He even added in a capacitive soil moisture sensor and a couple of LEDs so he could tell from across the room if he needed to water what he loving refers to as his “Hell Berries”

Looking back through the archives, we see a considerable overlap between hacking and gardening. Since success demands the careful control and monitoring of a myriad of variables, it seems the sort of thing that’s ripe for gloriously over-engineered automation. Especially if you’re trying to get the things to sprout off-world.

Our five rounds of Hackaday Prize 2018 challenges have just wrapped up, and we’re looking forward to see where the chips fall in the final ranking. While we’re waiting for the winners to be announced at Hackaday Superconference, it’s fun to take a look back at one of our past winners. Watch [Reinier van der Lee] give the latest updates on his Vinduino project (video also embedded after the break) to a Hackaday Los Angeles meetup earlier this year.

Vinduino started with [Reinier]’s desire to better understand what happens to irrigation water under the surface, measuring soil moisture at different depths. This knowledge informs more efficient use of irrigation water, as we’ve previously covered in more detail. What [Reinier] has been focused on is improving usability of the system by networking the sensors wirelessly versus having to walk up and physically attach a reader unit.

His thought started the same as ours – put them on WiFi! But adding WiFi coverage across his entire vineyard was not going to be cost-effective. After experimenting with various communication schemes, he has settled on LoRa. Designed to trade raw bandwidth for long range with low power requirements, it is a perfect match for a network of soil moisture sensors.

In the video [Reinier] gives an overview of LoRa for those who might be unfamiliar. Followed by results of his experiments integrating LoRa functionality into Vinduino, and ending with a call to action for hackers to help grow the LoRa network. It sounds like he’s become quite the champion for the cause! He’s even giving a hands-on workshop at Supercon where you can build your own LoRa connected sensor. (Get tickets here.)

We’re always happy to see open-source hardware projects like Vinduino succeed, transitioning to a product that solve real world problems. We know there are even more promising ideas out there, which is why Hackaday’s sister company Tindie is funding a Project to Product program to help this year’s winners follow in Vinduino’s footsteps. We look forward to sharing more success stories yet to come.

Housing exotic plants or animals offer a great opportunity to get into the world of electronic automation. When temperature, light, and humidity ranges are crucial, sensors are your best friend. And if woodworking and other types of crafts are your thing on top, why not build it all from scratch. [MagicManu] did so with his Jurassic Park themed octagonal dome built from MDF and transparent polystyrene.

With the intention to house some exotic plants of his own, [MagicManu] equipped the dome with an Arduino powered control system that regulates the temperature and light, and displays the current sensor states on a LCD, including the humidity. For reasons of simplicity regarding wiring and isolation, the humidity itself is not automated for the time being. A fan salvaged from an old PC power supply provides proper ventilation, and in case the temperature inside the dome ever gets too high, a servo controlled set of doors that match the Jurassic Park theme, will automatically open up.

[MagicManu] documented the whole build process in a video, which you can watch after the break — in French only though. We’ve seen a similar DIY indoor gardening project earlier this year, and considering its simple yet practical application to learn about sensors, plus a growing interest in indoor gardening itself (pun fully intended), this certainly won’t be the last one.

Rain barrels are a great way to go green, as long as your neighborhood doesn’t frown upon them. [NikonUser]’s barrel sits up high enough that he has to climb up on an old BBQ and half-dangle from the pipe to check the water level, all the while at the risk of encountering Australian spiders.

Arachnophobia, it turns out, is a great motivator. At first, [NikonUser] dreamed up a solar-powered IoT doodad that would check the level and report the result on a web page. He battled the Feature Creep and decided to build a handheld device that pings the water level with an ultrasonic sensor and displays it on a 7-segment.

Everything is contained in a water-resistant box and driven by an Arduino Pro. The box is mounted on a piece of scrap lumber that lays across the top of the barrel. This allows the HC-SR04’s eyes to peer over the edge and send pings toward the bottom. It also helps to keep the readings consistent and the electronics from taking a swim.

Operation is simple: [NikonUser] reaches up, sets the plank across the barrel, and pushes the momentary. This activates the Arduino, which prompts the HC-SR04 to take several readings. The code averages these readings, does a little math, and displays the percentage of water remaining in the barrel.

Interested in harvesting rain water, but not sure what to do with it? You can use it for laundry, pour it in the toilet tank instead of flushing, or make an automated watering system for your garden.

Gardening is a rewarding endeavour, and easily automated for the maker with a green thumb. With simplicity at its focus,  Hackaday.io user [MEGA DAS] has whipped up a automated planter to provide the things plants crave: water, air, and light.

[MEGA DAS] is using a TE215 moisture sensor to keep an eye on how thirsty the plant may be, a DHT11 temperature and humidity sensor to check the airflow around the plant, and a BH1750FVI light sensor for its obvious purpose. To deliver on these needs, a 12V DC water pump and a small reservoir will keep things right as rain, a pair of 12V DC fans mimic a gentle breeze, and a row of white LEDs supplement natural light when required.

The custom board is an Arduino Nano platform, with an ESP01 to enable WiFi capacity and a Bluetooth module to monitor the plant’s status while at home or away. Voltage regulators, MOSFETs, resistors, capacitors, fuses — can’t be too careful — screw header connectors, and a few other assorted parts round out the circuit. The planter is made of laser cut pieces with plenty of space to mount the various components and hide away the rest. You can check out [MEGA DAS]’ tutorial video after the break!

[MEGA DAS] has made his Arduino code and phone app available to download for anyone else wanting to build their own. Once assembled, he can ensure his plant is well taken care of wherever he is with a few taps on his phone. Not too shabby for a seven day build.

For those preferring gardening outdoors, here’s a hack to jump-start the germinating process of your seeds. Even if you call the concrete jungle your home, that doesn’t mean you can’t have your own robot farm and automated compost bin on hand too!

There are many different ways to keep your plants watered on a schedule. [Luca Dentella] just created a new one by building the irrighino watering system. He used standard off the shelf, hardware to keep it simple. Irrighino is a complete watering system based on the Arduino Yun, featuring a user friendly AJAX interface. This allows scheduling in a manner similar to creating appointments in Outlook. It’s also possible to manually control the various water solenoids. The code is fully customizable and open source, with code available from [Luca’s] github repository. The web interface is divided in to three tabs – “runtime” for manual control, “setup” to configure the scheduling, and “events” to view system logs.

The Arduino Yun activates solenoid valves via a relay shield. A switch panel has indicator Status LED’s and three position switches. These allow the outputs to be switched off or on manually, or controlled via the Yun when in auto mode. [Luca] describes how to read three states of the switch (On-Off-On) when connected to a single analog input of the Arduino. He’s also got another tutorial describing how to connect a USB WiFi adapter to the Yun. This is handy since the Yun is mounted inside an enclosure where the signal strength is very weak. While the Yun has on-board WiFi, there is no possibility to attach an external antenna directly to the test SMA socket.

One interesting part is the commercial rain sensor. It’s a switch surrounded by a spongy material. When this material absorbs rain water, it begins to expand and triggers the switch. The Arduino sees the sensor as a simple digital input.

Check a short demo of his system in the video after the break.


Filed under: Arduino Hacks, green hacks


  • Newsletter

    Sign up for the PlanetArduino Newsletter, which delivers the most popular articles via e-mail to your inbox every week. Just fill in the information below and submit.

  • Like Us on Facebook