Hospitality professionals are constantly looking for ways to offer guests an enhanced experience while improving operational efficiency and optimizing energy management. To achieve this, they require cost-effective solutions that are easy to install and maintain while also providing the scalability of future-ready systems – such as automating hotel rooms or B&B rentals to increase safety, comfort, and energy savings.
Indeed, automation can be integrated seamlessly in various aspects including climate control, lighting, security, and entertainment. Upgrading these functions allows guests to enjoy customization and convenience throughout their stay, and staff to efficiently manage room settings remotely. Moreover, hoteliers can achieve substantial energy savings through optimized control and scheduling, contributing to sustainability goals.
Long-term scalability and future-proofing of automation systems, however, can be an issue. As hotels and rental properties undergo renovations or expansions, the ideal solution should accommodate changes without requiring substantial modifications or replacements. Adopting open and standardized protocols, as well as selecting flexible and modular automation projects, can help mitigate these challenges and provide a foundation for future enhancements.
Our solution
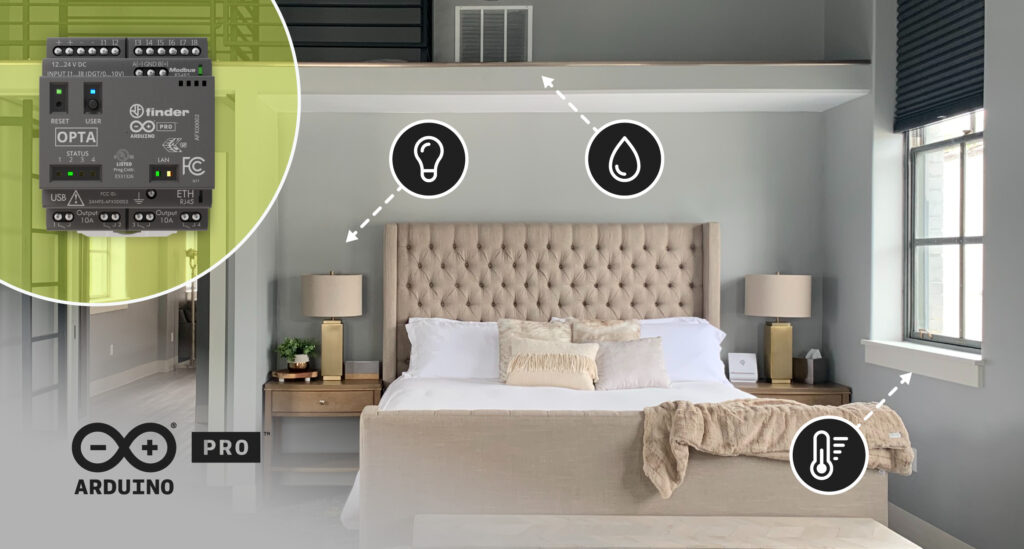
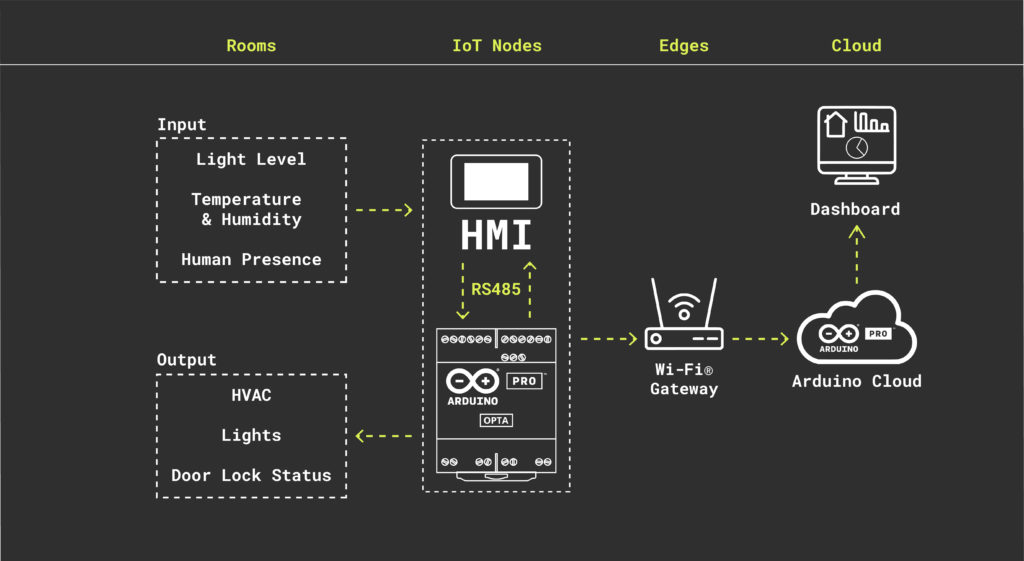
A comprehensive IoT automation solution can address these challenges effectively by aggregating sensor and user data and then intelligently managing lighting, cooling/heating and more – for a smart, connected experience. The elements required to achieve this kind of outcome are environmental sensors, a programmable logic controller (PLC), a human-machine interface (HMI), and cloud connectivity.
Programmable logic controller (PLC)
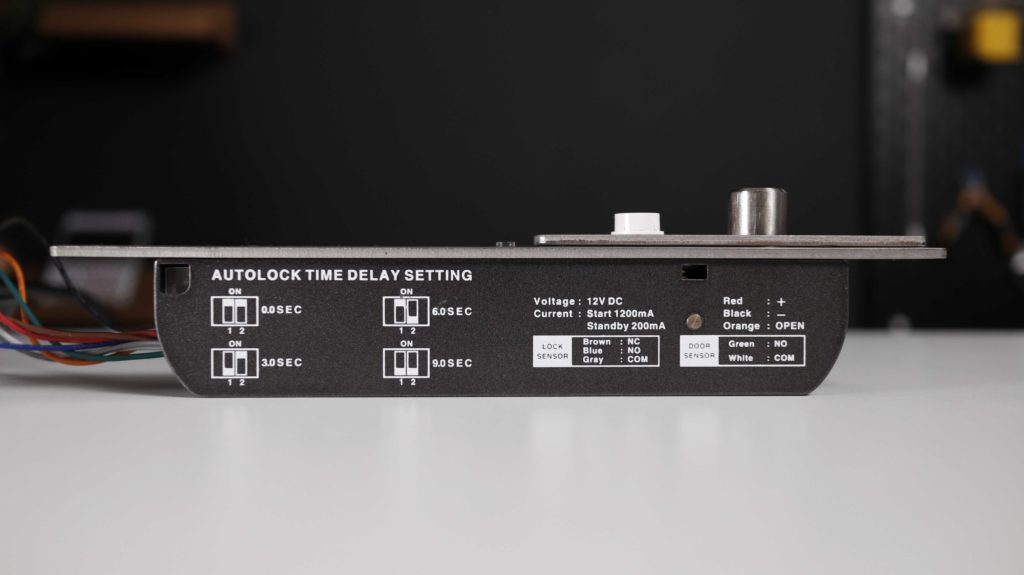
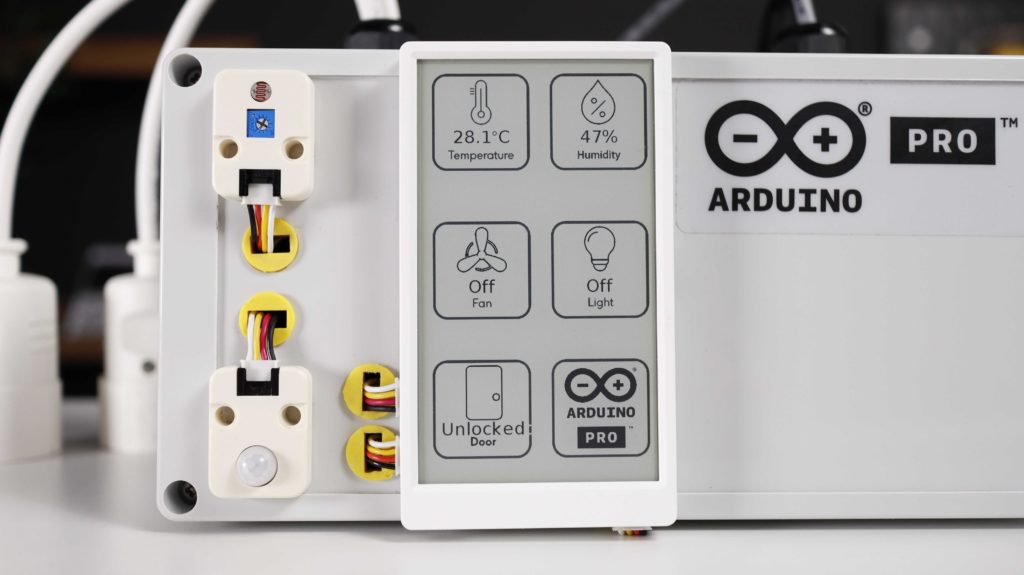
PLC-based automation systems are widely used due to their reliability, flexibility, and ability to handle complex tasks. Arduino Pro’s Opta microPLC can serve as the central control unit for hotel room automation by connecting and monitoring various devices and subsystems such as HVAC (heating, ventilation, and air conditioning), lighting and door locks. The microPLC receives data from sensors and users and processes them to trigger appropriate actions or adjustments in the room.
Human-machine interface (HMI)
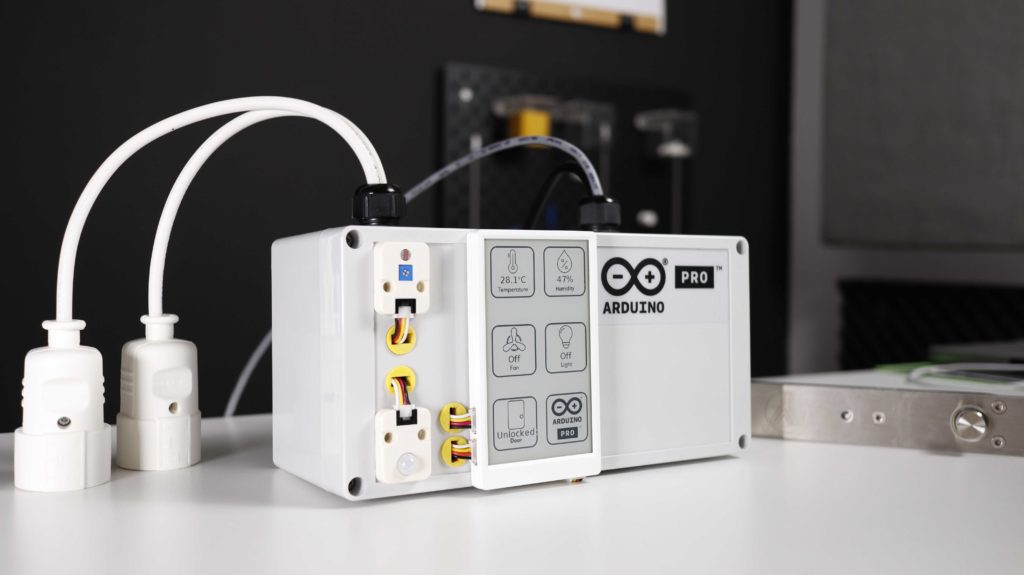
A touchscreen panel through which guests and staff can control various room parameters – such as lighting status, fan status, and door lock status – provides a user-friendly and intuitive interface to interact with the automation system. This HMI also communicates data to the microPLC for execution.
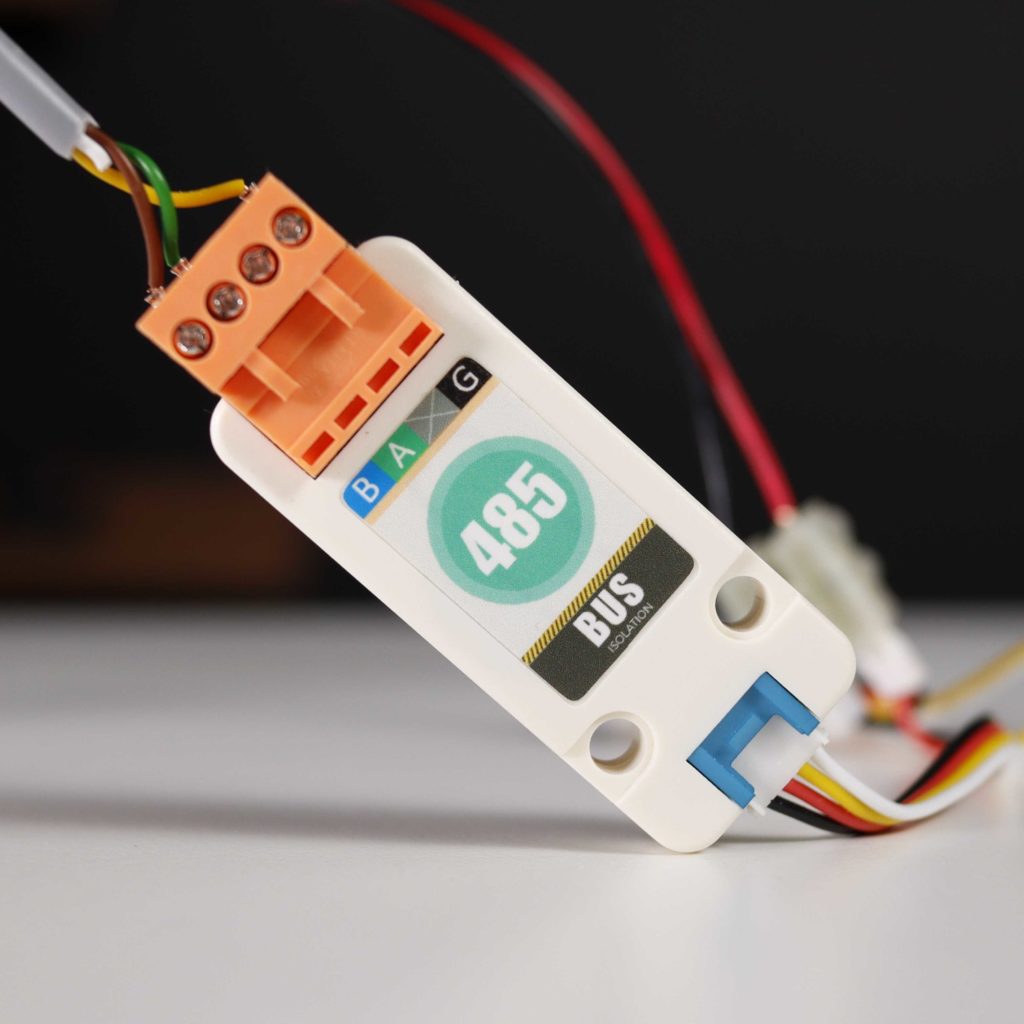
The Modbus communication protocol
The HMI and Opta PLC communicate via Modbus RTU over RS-485. Modbus RTU communication protocol is widely adopted in industrial applications due to its reliability, provided by the physical layer strength and by the cyclic redundancy check included in the data packets. It allows for multiple devices to be connected to the same bus, forming a multidrop network where each device has a unique address, used to identify the recipient of the transmitted data. The Arduino Opta can communicate with other Modbus devices, such as sensors, actuators, or traditional PLCs, by addressing them individually.
IoT Cloud solution
Cloud connectivity enables seamless communication between the hotel room or rental property’s automation system and the central management system. The Opta and HMI connect to the cloud infrastructure, allowing remote access, monitoring, and control of multiple locations. The solution also enables data logging and analytics for better energy management, predictive maintenance, and guest experience personalization.
Solving it with Arduino Pro
Let’s get into the details of how this solution can be put into action, and identify the hardware and software resources needed for deployment. Arduino Opta is a great option for deploying building automation solutions, as it offers simple integration with current systems, real-time control capabilities, support for Over-The-Air (OTA) firmware updates, and Hardware-To-Cloud data security. The Arduino Pro ecosystem allows users to benefit from easy integration, along with a range of scalable, secure, and professionally supported services.
The Arduino IDE 2.0 can be used to program Opta using C/C++. Opta acts as the main controller, communicating with the HMI via the Modbus RTU protocol. The HMI gathers data from various sensors – including light, temperature and humidity, and PIR (movement sensor) – as well as user inputs from its interface buttons related to room climate, lights, and door lock status. It then forwards this data to Opta, which controls the relay outputs that will activate the lights, thermostat or door lock.
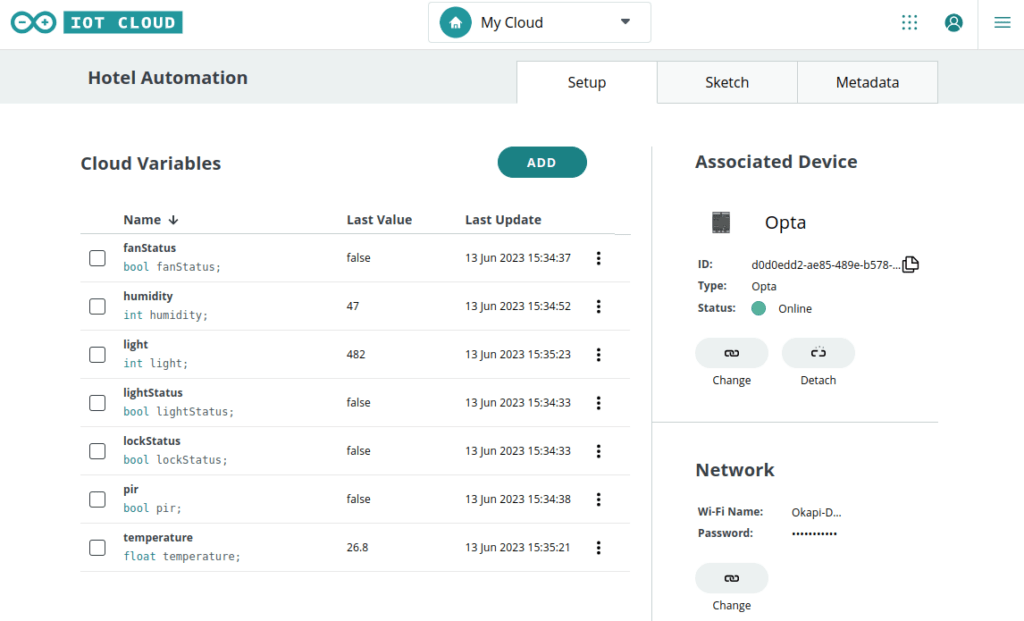
Opta also sends this data via Wi-Fi® to the Arduino IoT Cloud. After connecting it to the Arduino Cloud using the Arduino Create Agent, cloud variables corresponding to the sensor data being monitored can be defined.
Arduino Pro’s Opta microPLC offers an ideal solution for the automation of hotel rooms and B&Bs or rental properties. By leveraging standard communication protocols, easy integration, real-time control capabilities, secure hardware-to-cloud data exchange and remote access to multiple rooms from a centralized location, Opta provides the cornerstone of a comprehensive platform for smart hospitality.
In today’s fast-paced world, the convenience and comfort of a smart home have become paramount. Monitoring systems offer us a way to streamline daily tasks, optimize energy usage, and ultimately lead to more comfortable and cost-effective living. One of the key areas where smart systems shine is in heating control, allowing us to optimize temperature levels while keeping energy consumption in check and our bill under control.
In this blog post, we will delve into the benefits of using monitoring systems at home, with a particular focus on how integrating the Honeywell Evohome system, the Arduino Cloud, and Node-RED can revolutionize the way you control your heating, ensuring optimum temperature, enhanced comfort, and significant savings.
Optimizing temperature and comfort with Honeywell Evohome
The Honeywell Evohome system is a cutting-edge smart heating solution designed to provide individual room-by-room temperature control. Unlike traditional thermostats, which often focus on a single temperature setting for the entire house, Evohome empowers users to customize heating schedules for each room, tailoring comfort according to specific preferences and occupancy patterns. This level of personalized control ensures that every family member enjoys their ideal climate, enhancing overall comfort at home while also offering significant cost savings.
Moreover, the precise and responsive nature of the Evohome system enables it to adapt quickly to changing conditions. By utilizing multiple wireless radiator controllers and a central hub, the system ensures that the desired temperatures are maintained accurately, even in large or multi-story houses. This optimized heating control not only provides enhanced comfort but also contributes to reduced energy consumption, leading to valuable savings on heating bills.
Cloud platforms are a must-have for smart heating
Cloud integration is a big deal for modern smart systems. It lets you access and control your devices remotely from anywhere in the world. But here’s the thing: with so many smart home gadgets from different brands, each having its own way of doing things, it can get pretty chaotic. That’s where the Arduino Cloud comes to the rescue! The Arduino Cloud is an all-in-one intuitive IoT platform, supporting a wide range of hardware and backed by the trusted Arduino community. The Arduino Cloud removes complexity to empower users from all levels of expertise to create from anywhere, and control and share their projects with stunning dashboards. It’s a super reliable cloud service that connects all your devices to the internet and makes remote control a breeze.
Empowering integration with Node-RED
Node-RED, an open-source automation tool, acts as a middleware between different smart systems. It enables seamless integration and communication between devices and services, making it an ideal platform to tie together various IoT components. Through Node-RED, you can create sophisticated automation flows that trigger actions based on specific events or data received from different sources.
With the help of Node-RED, you can integrate almost everything into the Arduino Cloud. The set of Node-RED nodes allow you to inject or retrieve data from the Arduino Cloud emulating a device. The best part? You don’t have to juggle multiple apps or interfaces anymore! Every system that is supported by Node-RED can be integrated with the Arduino Cloud. Furthermore, thanks to the Arduino Cloud device-to-device feature, you can use the data from all these systems in any other device that is connected to the Arduino Cloud.
Integrate Honeywell Evohome and Arduino Cloud with Node-RED
The following project shows how simple it is to integrate your Honeywell Evohome system with the Arduino Cloud using Node-RED as a middleware. The only thing you need is a spare PC or Raspberry Pi where you can run Node-RED.
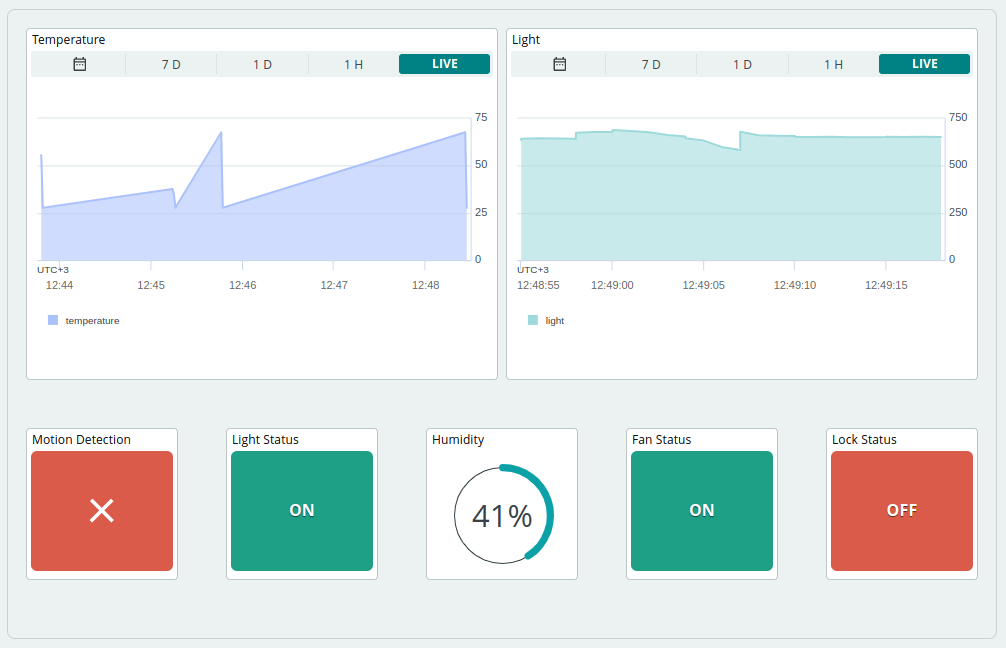
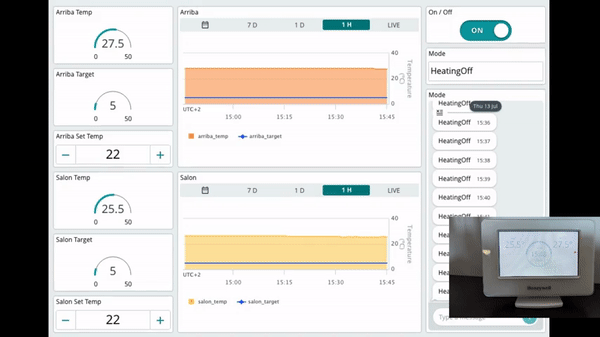
With the Arduino Cloud dashboard, you can monitor the evolution of the temperature and set points in all the zones of your home, establish the set points and turn the heating system on and off.
The process is really straightforward:
Get your Honeywell getconnected credentials
Create the Device and Thing in the Arduino Cloud
Install Node-RED in a machine and import the Node-RED flow
By embracing the power of smart home monitoring systems, such as Honeywell Evohome, and combining it with cloud platforms like the Arduino Cloud and the flexible integration capabilities of Node-RED, you can create an ecosystem that optimizes temperature, enhances comfort, and significantly reduces energy consumption. This convergence of technology empowers you to take control of your heating system like never before, ultimately leading to a more comfortable, efficient, and sustainable home. So, why wait? Embrace the future of smart heating today!
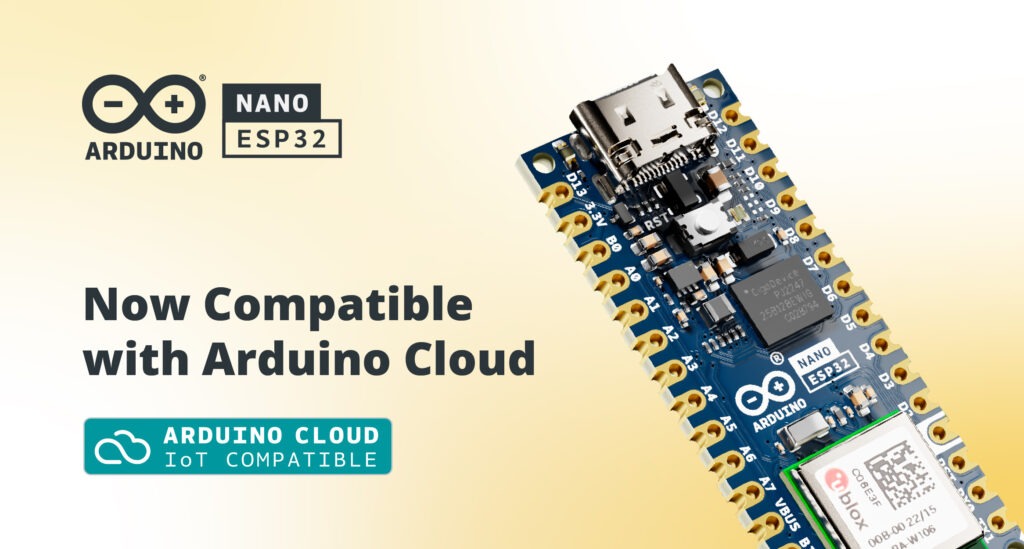
Great news for Arduino enthusiasts! The new Nano ESP32, just released on July 17th, is now officially supported by the Arduino Cloud. This powerful combo brings MicroPython and IoT capabilities right to your fingertips, simplifying all your smart devices projects.
The Nano ESP32‘s native MicroPython support empowers you to code in Python effortlessly. It opens up a world of possibilities for all skill levels, from simple scripts to complex IoT applications.
Nano ESP32 and Arduino Cloud, the power couple of IoT
Pairing the Nano ESP32 with the Arduino Cloud enhances your projects even further! The Arduino Cloud expands its existing ESP32-based hardware compatibility by including the Nano ESP32, allowing you to publish data from your Nano ESP32, monitor and control your devices from anywhere with ease, and update their firmware wirelessly.
About Arduino Cloud
The Arduino Cloud is the next exciting journey for IoT enthusiasts to bring their projects to life quickly. It is an all-in-one intuitive IoT platform, supporting a wide range of hardware and backed by the vibrant Arduino community. The Arduino Cloud removes complexity to enable users from all levels of expertise to create from anywhere, then control and share their projects with stunning dashboards.
Sign up for the Arduino Cloud now and unleash the full potential of your Nano ESP32 board.
Our smartphones go pretty much everywhere with us, and we use them for more things than we even realize. From literally the very moment we’re startled into life in the morning, until the one final doom scroll through social media before bed, our phones are with us.
It makes sense, then, to think about ways to connect your smartphone to your Arduino projects, adding another layer of user-friendliness and convenience. In this article, we’ll take a look at some of the best tips and hacks for bringing your phone and your home automation projects closer together, and we’ll share some examples from the Arduino community. Arduino Cloud is the perfect companion for building automated projects, and the IoT Cloud Remote mobile app makes things a lot easier. In this article we’ll see some companion apps and you can check out more compatible projects in our Home Automation website.
Use the iRobbie app
The iRobbie app is designed specifically to connect your smartphone to your Arduino projects. It’s actually a fairly simple concept, using Bluetooth to connect your phone to the Arduino board. Once connected, you can access a ton of features like object recognition and tracking, all via the phone’s camera. iRobbie allows your Arduino projects to recognise and track over 60 objects.
You can learn more about iRobbie and how to get started with it here.
Notification IoT Using NeoPixel and Smartphone
If there’s one thing phones are good for, it’s receiving updates. But what about when you miss important updates? What about when your phone is on the other side of the room, or the TV is playing loud, or you just missed that vibration?
Speaking of vibrations, wouldn’t it be cool if there were a slightly less annoying way to get notifications from your phone?
Well, step forward Arduino user notiduin, who used NeoPixel and Arduino to find a solution. This project allows you to get notifications in the form of LED lights of different colours. By combining HC-06 Bluetooth, Arduino Uno, Neo Pixel and an Android App, it’s possible to have all your phone’s notifications sent to an Arduino where they can turn on different colours of LED.
You can even assign a certain colour to each type of notification. For example, a Facebook notification can light up the blue LED, an SMS message can trigger the yellow light, and a new email can cause the red light to flash — it’s entirely up to you. The project works with any of the apps on your smartphone.
Getting the perfect smartphone photo can be a tougher task than it first appears. Stores across the world now have their shelves lined with tripods, stands, and other gadgets to make snapping that perfect shot more manageable than ever… but sometimes you just need to take matters into your own hands.
That’s what Reddit user u/careyi4 did. He 3D-printed his very own smartphone camera slider, powered by an Arduino, to make it easier than ever to line up pro-level smartphone photoshoots. Check out the video for more information.
Make any Arduino smartphone-controlled with just a few lines of code
You don’t need to be a programming genius to make your own Arduino projects smartphone-controlled. Reddit user u/TylerTimoj used just a few lines of simple code to make their projects easily controlled from their smartphone, and anyone can emulate it.
You can check out the full project here, along with a video where u/TylerTimoj shows you how it’s done.
Did you know that your phone is an IoT device?
The Arduino IoT Remote app (available for Android and iOS) was created to enable you to remotely manage and monitor your devices through the Arduino Cloud dashboards, offering complete control at your fingertips from anywhere you are. Arduino has gone a BIG step further and enabled you to use the app as an IoT device, utilizing some of the sensors in your mobile phone such as accelerometer, GPS, microphone, compass or barometer to collect data and transmit it to the Arduino Cloud. This feature automatically creates in the Arduino Cloud everything needed to monitor the sensors (the Device, the Thing and a dashboard) and share the data with other devices.
Starting to play with real hardware can be tricky for non-experienced users, so this feature enables users to get familiar with the Arduino Cloud device management environment using their own phone. Easy, right?
But you can also use the data from your phone sensors in your projects. Imagine the endless possibilities using that information. For instance, you can use virtual geographic boundaries for geofencing to initiate actions based on your location. You can also automate home-based tasks such as turning off lights when you depart and turning them on when you return, securing doors, and adjusting home climate control. Moreover, you can track your loved ones with geofencing and receive immediate notifications if they leave a designated area. The accelerometer in your phone can also be utilized to detect accidents or falls, and you can even use your phone as a remote control for games or robots.
Only your imagination sets the boundaries of what you can do with this new feature.
If you want to learn more about the “Phone as Device” feature, don’t miss this article on the documentation.
Unlock a whole new side to your smartphone
With Arduino, a few basic components, and a bit of knowledge, anyone can bring entirely new capabilities to their smartphone and start doing a whole range of new tasks with it. I mean, if it’s going to be with you all day, you might as well get as much out of it as possible, right?
3D printing, the stuff of science fiction only a few short years ago, is becoming more widely available all the time. Buying your own 3D printer to keep in your home is now fairly accessible, with entry-level printers available for just a few hundred dollars.
But why would you buy one? It’s easy to think 3D printers are still a niche toy, exciting for a few enthusiasts but largely useless for the general population. But this couldn’t be more wrong — 3D printers have a wide range of very practical uses for everyday households.
In this article, we’ll take a look at why 3D printing is so useful and some of the many reasons to consider adding a 3D printer to your own smart home.
Why 3D printing is so useful
It’s fast and convenient. With a 3D printer, you can produce simple objects, creations, and components for existing items in a fairly short amount of time — much quicker than ordering the same things online or heading to a local store.
You get a ton of control over what you print. Need a very specific shaped object to repair a broken item in your home? It may be impossible to buy what you need anywhere, but a 3D printer allows you to create exactly the right size and shape you need.
It’s relatively affordable. As mentioned, basic 3D printers can be had for fairly cheap nowadays, and printing — for smaller objects, at least — costs very little.
It’s sustainable. It’s much more sustainable to print your own things than order them across large distances, and this is especially true for niche items that might need to be shipped across the globe to reach you.
Using 3D printing in your smart home
So what can you use a 3D printer for? There are many potential uses for a 3D printer in your smart home, and they range from practical tasks like repairing broken furniture to more creative hobbies. Let’s take a look at some of the main reasons to own a 3D printer.
Create useful items for your home
3D printers are perfect for creating small, useful items to use around the home. Some examples are coasters, decorations, lampshades, stationery, and small kitchen tools. This is a great way to combine practical use with a fun creative hobby, putting your own personal spin on the little items you use every day.
Repair items
You know that table you have that just never sits right? The door handle that doesn’t quite match the others in the house? The light switch that doesn’t fit exactly flush with the wall?
3D printing is the perfect solution to many of these small defects and faults. Because you have so much control over what you print — 3D printers can print according to virtually any instructions — it’s easy to create components to fix and spruce up the objects and appliances around your smart home.
Education
3D printers aren’t a regular fixture in classrooms around the world just yet, but it’s only a matter of time. These machines allow students to take a more hands-on and creative approach to their learning. Some examples could be:
Science projects like creating models of the solar system of the structure of an atom
Geography work like printing detailed models of mountains or volcanoes
All kinds of product design work
Creative work like art
Arts and creative projects
Creative projects aren’t just for the classroom — many people own 3D printers purely for their own artistic work. There’s almost no limit to what a 3D printer can do in this area, and with a little experience, it’s possible to create truly beautiful and incredibly detailed works of art at home.
Build your own smart home with Arduino
3D printing is just one aspect of a smart home. There’s an almost endless list of things you can do with the right home automation tools — from growing a smart garden to keeping your pets entertained and fed.
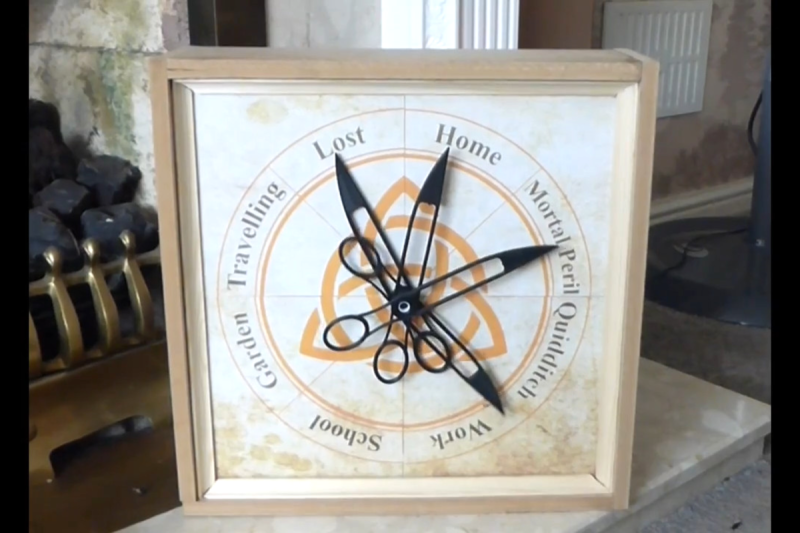
For those unfamiliar with the details of the expansive work of fiction of Harry Potter, it did introduce a few ideas that have really stuck in the collective conscious. Besides containing one of the few instances of time travel done properly and introducing a fairly comprehensive magical physics system, the one thing specifically that seems to have had the most impact around here is the Weasley family clock, which shows the location of several of the characters. We’ve seen these built before in non-magical ways, but this latest build seeks to drop the price tag on one substantially.
To do this, the build relies on several low-cost cloud computing solutions and smartphone apps to solve the location-finding problem. The app is called OwnTracks and is an open-source location tracker which can report data to any of a number of services. [Simon] sends the MQTT data to a cloud-based solution called HiveMQCloud, but you could send it anywhere in principle. With the location tracking handled, he turns to some very low-cost Arduinos to control the stepper motors which point the clock hands to the correct locations on the face.
While the build does rely on a 3D printer for some of the internal workings of the clock, this does bring the cost down substantially when compared to other options. Especially when compared to this Weasley family clock which was built into a much larger piece of timekeeping equipment, having an option for a lower-cost location-tracking clock face like this one is certainly welcome.
Keeping the air in your home in the right condition is incredibly important. Your home is your safe haven from the outside world, a place where you can control your environment and enjoy the comfort and peace of a secure space.
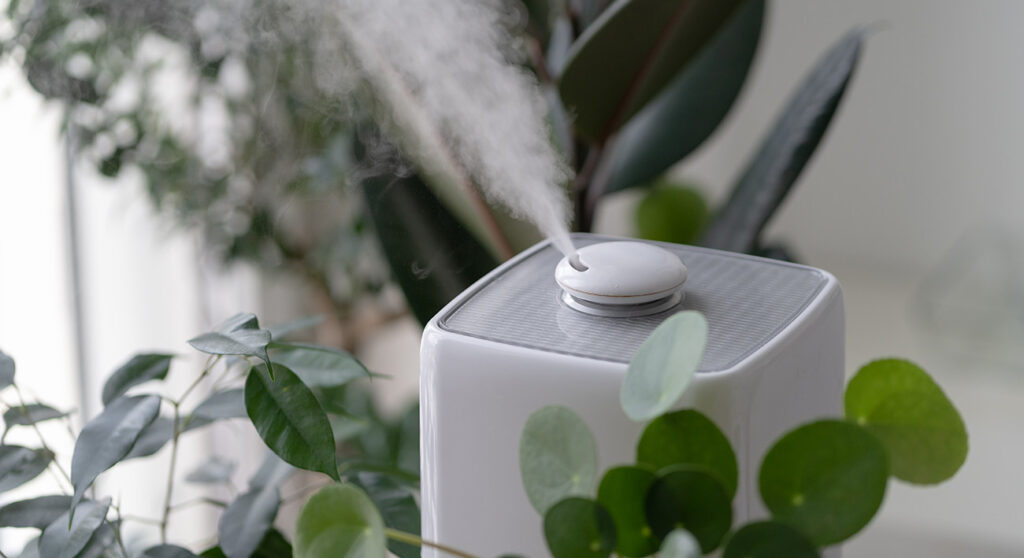
Humidifiers are an excellent way to keep the atmosphere of your home in exactly the right balance for your health and enjoyment. Traditional humidifiers work well, but automated humidifiers can work even better.
In this article, we’ll look at why humidifiers are so useful and how you can use home automation to create your own smart home humidifiers.
Why home humidification is important
Stay moisturized. Humidifiers keep the air in your home sufficiently full of moisture, which helps counteract the effects of artificial heating systems. This prevents dry skin — especially on the lips and hands — as a result of dry indoor air.
Keep your sinuses in good condition. Dry air, over time, can cause your sinuses to become irritated. It’s a feeling most people are aware of and can result in discomfort, headaches, and even nosebleeds. A good humidifier helps avoid this, ensuring your sinuses are lubricated and healthy at all times.
Make it easier to recover from illness. The right humidifier can ease the path to recovery from illnesses like the flu or a cold by helping your sinuses recover.
Minimise snoring. A noisy bed partner, over many months, can be the source of much stress and frustration. Snoring is a complex issue that can be difficult to solve, but a good humidifier can often ease the problem significantly by providing enough moisture to keep the throat and nose clear.
Living in Boston, Arduino user chenwei19940207 found that the air was so dry, especially in the evening, that a solution was needed. As a result, they decided to develop their own humidifier to turn on and off automatically, ensuring a consistent level of humidity in the air all year round and all day long.
Healthy air has three components — be fresh, clean, and the right humidity. The third factor is important because humans use evaporative cooling (sweating) to rid our bodies of excess heat. This is why humans can be comfortable and safe within a fairly wide range of humidity — between 30 to 70 percent at a push.
But we still struggle at lower levels of humidity. It can result in great discomfort, trouble breathing, and aggravated allergies, and anything below 20% humidity is especially difficult. As a result, it’s best to keep our homes at the right level of humidity.
Recognizing this, Arduino member Md. Khairul Alam developed a project to keep the home sufficiently humidified year round. His device senses the temperature and humidity in your home, checks if it is in the ideal humidity range, and turns on the humidifier to ensure you stay in the right zone.
Arduino “having11” Guy developed this project to regulate the humidity of their home. It involves attaching a dht11 temperature and humidity sensor to an Arduino, letting you modify your humidifier in a way that allows you to automatically turn the device on whenever the humidity in your home drops below a set level, for example 30%.
You also have the ability to set a “cooling down” period, avoiding the humidifier becoming overheated.
NOTE: It’s worth noting that this project uses high voltage and amperage, and doing any of these steps incorrectly could result in serious injury or even death. So be careful and don’t attempt this without any prior experience or skill!
Build a healthier smart home with Arduino
With Arduino, controlling the humidity of your home is just the beginning. Our Project Hub is filled with examples of home automation projects, using all kinds of technology to make their homes smarter, safer, and easier to live in.
Check out our site to find out more uses for Arduino and how you can get started with your own home automation projects.
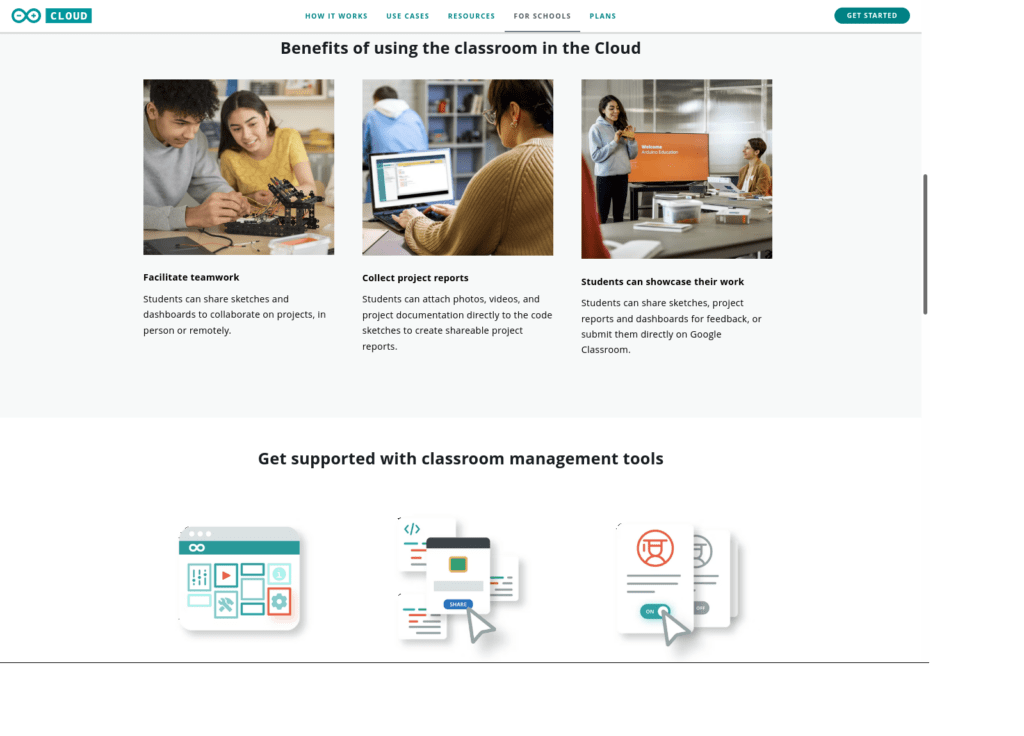
As Arduino Cloud continues to evolve and we see more and more people adopting the platform, we wanted to make sure there was a strong focal point for newcomers to find out what it’s all about. Which is why we just released cloud.arduino.cc, to give you a one-stop shop for learning everything about Arduino Cloud.
cloud.arduino.cc
There’s a lot rapid development around Arduino Cloud since the webpage was first launched. Excitement both inside and outside Arduino for delivering new Cloud features and improvements has, admittedly, overtaken our efforts to keep the webpage spick and span. The cobbler’s shoes always has holes in them, as the saying goes!
But no longer. Our web team has been working hard since well before Christmas to give Arduino Cloud the webpage it deserves. It’s a place where newcomers can easily learn what it’s all about and what it offers, and it’s somewhere that experienced Cloud users can stay up to date.
Everything About Arduino Cloud
The new page is broken down into a variety of different sections, intended to make it as easy as possible to learn when you want, and find what you need.
Whether it’s info about features, the different plans, getting started or news about new developments, it’s all found a home at cloud.arduino.cc. All the resources you need are gathered together there, including learning how you can use Arduino Cloud in the classroom.
There’s also a whole section dedicated to use cases, which we’re particularly excited about. Use cases are an excellent place to learn what you can do with the Cloud, and to get inspiration. But they’re also an excellent showcase of what people in the Arduino Community have achieved.
So to that end, we’re always keen to hear from anyone out there who has a working example of an Arduino Cloud project, and wants to show it off. Get in touch if you think your project might be suitable for an official Arduino Cloud use case.
In the meantime, please take a look at the brand new home for Arduino Cloud, and share it far and wide with the rest of the community.
In our quest for a fully integrated online experience, Arduino Create has been expanded over the years to include many additional features. It enables everyone to write code, compile and upload directly from the browser, connect IoT devices, and build real-time dashboards. As it grew, it called for a new name: the Create platform became the Arduino Cloud. This change will be gradually applied, so you’ll still see the old name around for a bit.
Apart from this, we have big news today. Based upon your feedback, we’re happy to announce two new Cloud plans and significant free upgrades to the existing ones.
If you’re a new explorer, you can start with the Free plan. Use it to build your IoT project and easily control it from yoursmartphone with the Arduino IoTRemote app (available for iOS and Android). Now you can connect two devices rather than just one, as well as creating unlimited dashboards.
Check out the new Arduino Cloud plans
Or, for just $2.99/month, benefit from unlimited storage and compilation time with the new Entry plan. Access advanced features, up to 10 things, 15 days of data retention and over the air updates.
If you need more control and power, the Maker plan has everything from the Entry plan, and is increasing from five to 25 things. It has shared dashboards and 90 days of data retention (previously 15) for the same great price of $6.99/month. Existing users will receive this upgrade automatically.
For those managing small fleets, things can get serious! Jump into the new Maker Plus plan at $23.99/month. This solution gives you up to 100 things, one year of data retention, and all features from the other plans.
Plans can be subscribed tomonthly or yearly. With a one-off yearlypayment,you can save up to 30% off your subscription and receive a $30 voucher for your next purchase on theArduino store.
That’s not all. We’re working around the clock to enhance your experience on our existing platforms while cooking up new cloud-based solutions, services and community features. They’ll be available in the future to all Arduino users, sostay tuned.
Note for existing Free plan users: You can now use third-party devices such as ESP8266, which previously required a paid plan subscription. API usage now requires an Entry plan; if you have existing API keys, those will continue to work until June 1st, 2021.
Planet Arduino is, or at the moment is wishing to become, an aggregation of public weblogs from around the world written by people who develop, play, think on Arduino platform and his son. The opinions expressed in those weblogs and hence this aggregation are those of the original authors. Entries on this page are owned by their authors. We do not edit, endorse or vouch for the contents of individual posts. For more information about Arduino please visit www.arduino.cc
You are currently browsing the archives for the cloud category.