Posts | Comments

Planet Arduino

Archive for the ‘usbasp’ Category

An ISP dongle is a very common piece of equipment on a maker’s bench. However, its potential as a hackable device is generally overlooked. The USBASP has an ATmeg8L at its heart and [Robson] decided that this humble USB device could be used as an interface between his PC and a SNES Joypad.

A SNES controller required three pins to communicate with a host: clock, data and latch. In his hack, [Robson]  connects the controller to the ISP interface using a small DIY adaptor and programs the AVR using the V-USB library. V-USB is a software USB library for small microcontrollers and comes in pretty handy in this instance.

[Robson] does a pretty good job of documenting the entire process of creating the interface which includes the USB HID code as well as the SNES joypad serial protocol. His hack works on both Windows and Linux alike and the code is available on GitHub for download.

Simple implementation like this project are a great starting point for anyone looking to dip their toes in the DIY USB device pool. Veterans may find a complete DIY joystick more up their alley and will be inspired by some plastic techniques as well.


Filed under: Arduino Hacks, hardware
Sep
11

Using a USBASP v2.0 as a cheap ATmega8 Arduino platform

arduino, ATMEGA8, usbasp Comments Off on Using a USBASP v2.0 as a cheap ATmega8 Arduino platform 

usbasp-600x406

JohnLittle writes:

I finally got round playing with my AVRASP v2.0 boards. The ones Sleepwalker3 mentioned. Thanks mate!
I bought three USBASP v2.0 on ebay for under £1.50 each. They each came with a short cable (5×2 sockets at each end). However, they do not come with the JP2 header soldered on. Solder it or you won’t be able to re-flash the on-board ATmega8 chip. JP3 on the other hand has been deprecated. It may still have some use in your own projects. You decide!

Then download some software (this is for Windows): To use the USBASP programmer with the Arduino IDE, you will need to download the driver, latest firmware and WinAVR-20100110-install.

Using a USBASP v2.0 as a cheap ATmega8 Arduino platform - [Link]

Jan
12

SquareWear 2.0 a Wearable Opensource Arduino

arduino hacks, SquareWear, usbasp, V-USB Comments Off on SquareWear 2.0 a Wearable Opensource Arduino 

squarewear2_annotation-1024x577

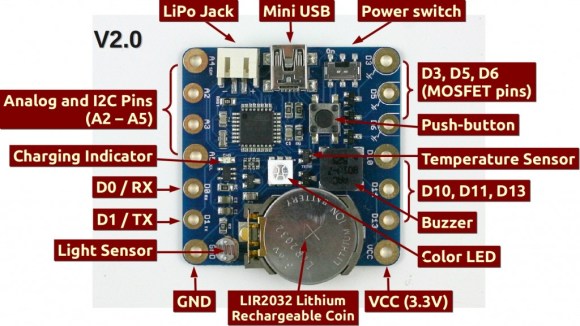
Are you guys tired of redesigned Arduinos yet? Usually we are, but [Ray] just released the SquareWear 2.0, and we have to admit, it’s a pretty slick design.

It’s an update to SquareWear 1.1 which we covered a year ago. That version made use of a 18F14K50 microcontroller, measured a tiny 1.6″ x 1.6″ and could easily be sewn into wearable circuits. But after receiving lots of requests to design a new Arduino based board, [Ray] obliged and made v2.0.

The new SquareWear is slightly bigger, measuring in at 1.7″ x 1.7″, but it packs a much bigger and more functional punch — just check out the image schematic above! The only catch is it doesn’t actually have a USB-to-serial chip on-board, which is why [Ray] was able to get the board so small and inexpensive. Instead it simulates USB in the software using the V-USB library. That method is much slower but still functional. To perform serial communication through the USB port it uses the onboard USBasp bootloader.

The board also features large through-holes to accommodate sew-able pin pads, making it super easy to integrate this into fabric!

For a complete explanation of the SquareWear 2.0, check out the video after the break.


Filed under: Arduino Hacks

Introduction

For those of you prototyping with larger Atmel AVR microcontrollers such as the ATmega32, it can be inconvenient to continually assemble a circuit onto a solderless breadboard that includes power, programming header and a few basics – or you might want to create a one-off product without waiting for a PCB to be made. If these are issues for you, or you’re interested in working with AVRs  then the subject of this review may be of interest – the ATmega32 Development Kit from Protostack. The kit is one of a range that spans from the ATmega8, and gives you almost everything needed to work with the microcontroller. We’ve assembled and experimented with the ATmega32 kit, so read on to find out more.

Assembly

The kit arrives in a typical anti-static package with the contents and URL on the front:
packaging

The PCB is large, measuring 127 x 94 mm, made from heavy 1.6 mm FR4 PCB and all the holes are through-plated. And as you can see from the images below, there’s plenty of prototyping space and power/GND rails:
pcbtop

pcbbottom

The included parts allow you to add a power supply, polyfuse, smoothing capacitors for the power, programmer socket, external 16 MHz crystal, a DC socket, IC socket, a lonely LED and of course the ATmega32A (which is a lower-power version of the ATmega32):
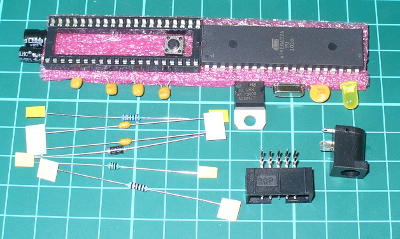
parts

You can download the user guide from the product page, which details the board layout, schematic and so on. When soldering the parts in, just start with the smallest-profile parts first and work your way up. There’s a few clever design points, such as power regulator – there’s four holes so you can use both “in-GND-output” and “GND-output-input” types:
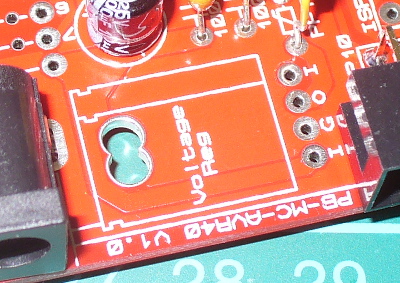
igo

… and the layout of the prototyping areas resemble that of a solderless breadboard, and the power/GND rails snake all around – so transferring projects won’t be difficult at all:
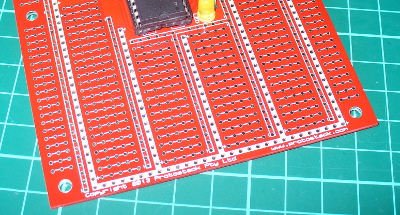
protoarea

If you need to connect the AVcc to Vcc, the components and board space are included for a low-pass filter:
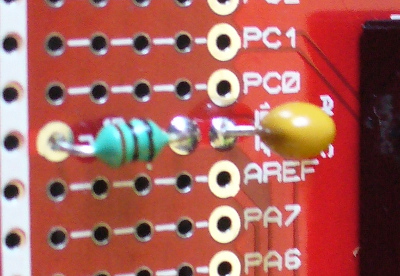
lowpass

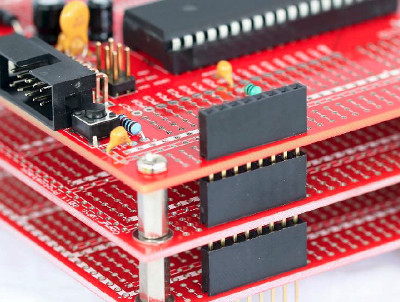
And if you get carried away and need to use two or more boards at once – they’re stackable:
stacking

Moving forward

After assembling the board and inserting the ATmega32, you can use an AVR programmer to check it’s all working (and of course program it). With a 10-pin interface USBASP inserted, I headed over to the AVRdude folder on my PC and entered:

avrdude -c usbasp -p m32

which (as all was well) resulted with:

avrdudetest

Awesome – it’s nice to have something that just works. Let the experimenting begin!

Competition

Would you like the chance to win a kit? It’s easy. Clearly print your email address on a postcard, and mail it to:

Protostack Competition, PO Box 5435, Clayton 3168, Australia

Entries must be received by the 4th of  August 2013. One postcard will then be drawn at random, and the winner will receive one ATmega32 kit delivered by Australia Post standard air mail. You can enter as many times as you like. We’re not responsible for customs or import duties, VAT, GST, postage delays, non-delivery or whatever walls your country puts up against receiving inbound mail.

Conclusion

It’s a solid kit, the PCB is solid as a rock, and it worked. However it could really have used some spacers or small rubber feet to keep the board off the bench. Otherwise the kit is excellent, and offers a great prototyping area to work with your projects. If you order some, Protostack have a maximum delivery charge of $9 so you won’t get burned on delivery to far-flung places.  Larger photos available on flickr. And if you made it this far – check out my new book “Arduino Workshop” from No Starch Press.

Please note that the ATMEGA32A Development Kit in this review is a promotional consideration from Protostack.

In the meanwhile have fun and keep checking into tronixstuff.com. Why not follow things on twitterGoogle+, subscribe  for email updates or RSS using the links on the right-hand column? And join our friendly Google Group – dedicated to the projects and related items on this website. Sign up – it’s free, helpful to each other –  and we can all learn something.


Introduction

For those of you prototyping with larger Atmel AVR microcontrollers such as the ATmega32, it can be inconvenient to continually assemble a circuit onto a solderless breadboard that includes power, programming header and a few basics – or you might want to create a one-off product without waiting for a PCB to be made. If these are issues for you, or you’re interested in working with AVRs  then the subject of this review may be of interest – the ATmega32 Development Kit from Protostack. The kit is one of a range that spans from the ATmega8, and gives you almost everything needed to work with the microcontroller. We’ve assembled and experimented with the ATmega32 kit, so read on to find out more.

Assembly

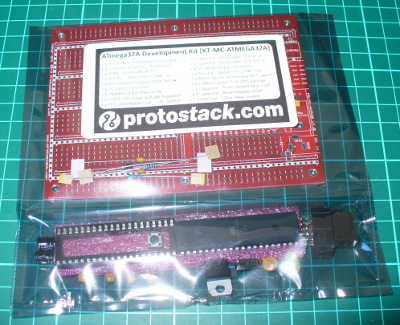
The kit arrives in a typical anti-static package with the contents and URL on the front:

packaging

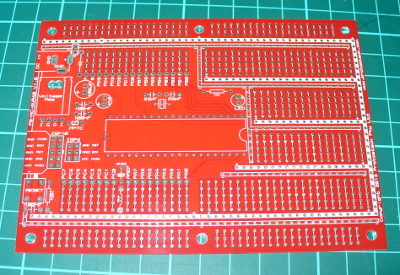
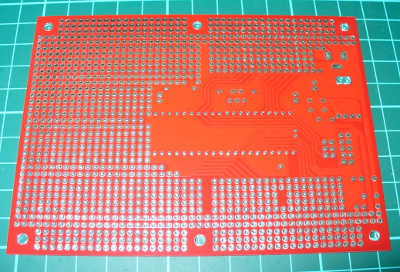
The PCB is large, measuring 127 x 94 mm, made from heavy 1.6 mm FR4 PCB and all the holes are through-plated. And as you can see from the images below, there’s plenty of prototyping space and power/GND rails:

pcbtop

pcbbottom

The included parts allow you to add a power supply, polyfuse, smoothing capacitors for the power, programmer socket, external 16 MHz crystal, a DC socket, IC socket, a lonely LED and of course the ATmega32A (which is a lower-power version of the ATmega32):

parts

You can download the user guide from the product page, which details the board layout, schematic and so on. When soldering the parts in, just start with the smallest-profile parts first and work your way up. There’s a few clever design points, such as power regulator – there’s four holes so you can use both “in-GND-output” and “GND-output-input” types:

igo

… and the layout of the prototyping areas resemble that of a solderless breadboard, and the power/GND rails snake all around – so transferring projects won’t be difficult at all:

protoarea

If you need to connect the AVcc to Vcc, the components and board space are included for a low-pass filter:

lowpass

And if you get carried away and need to use two or more boards at once – they’re stackable:

stacking

Moving forward

After assembling the board and inserting the ATmega32, you can use an AVR programmer to check it’s all working (and of course program it). With a 10-pin interface USBASP inserted, I headed over to the AVRdude folder on my PC and entered:

avrdude -c usbasp -p m32

which (as all was well) resulted with:

avrdudetest2

Awesome – it’s nice to have something that just works. Let the experimenting begin!

Conclusion

It’s a solid kit, the PCB is solid as a rock, and it worked. However it could really have used some spacers or small rubber feet to keep the board off the bench. Otherwise the kit is excellent, and offers a great prototyping area to work with your projects. If you order some, Protostack have a maximum delivery charge of $9 so you won’t get burned on delivery to far-flung places.  Larger photos available on flickr. And if you made it this far – check out my new book “Arduino Workshop” from No Starch Press.

LEDborder

Please note that the ATMEGA32A Development Kit in this review is a promotional consideration from Protostack.

In the meanwhile have fun and keep checking into tronixstuff.com. Why not follow things on twitterGoogle+, subscribe  for email updates or RSS using the links on the right-hand column? And join our friendly Google Group – dedicated to the projects and related items on this website. Sign up – it’s free, helpful to each other –  and we can all learn something.

The post Kit review – Protostack ATmega32 Development Kit appeared first on tronixstuff.


  • Newsletter

    Sign up for the PlanetArduino Newsletter, which delivers the most popular articles via e-mail to your inbox every week. Just fill in the information below and submit.

  • Like Us on Facebook