Posts | Comments

Planet Arduino

Archive for the ‘gas sensor’ Category

Home monitoring gas sensor light temperature Arduino Cloud Nano RP2040 Connect

Home monitoring is a big part of home automation, but it’s often overshadowed. Our attention tends to get hijacked by cool projects that perform physical actions. Whether it’s turning the lights on, changing their color, running a robot vacuum cleaner, pulling on the blinds or watering the garden. All these actions are very cool and very visible. Which makes it easy to ignore the background tasks that are the backbone of great home automation.

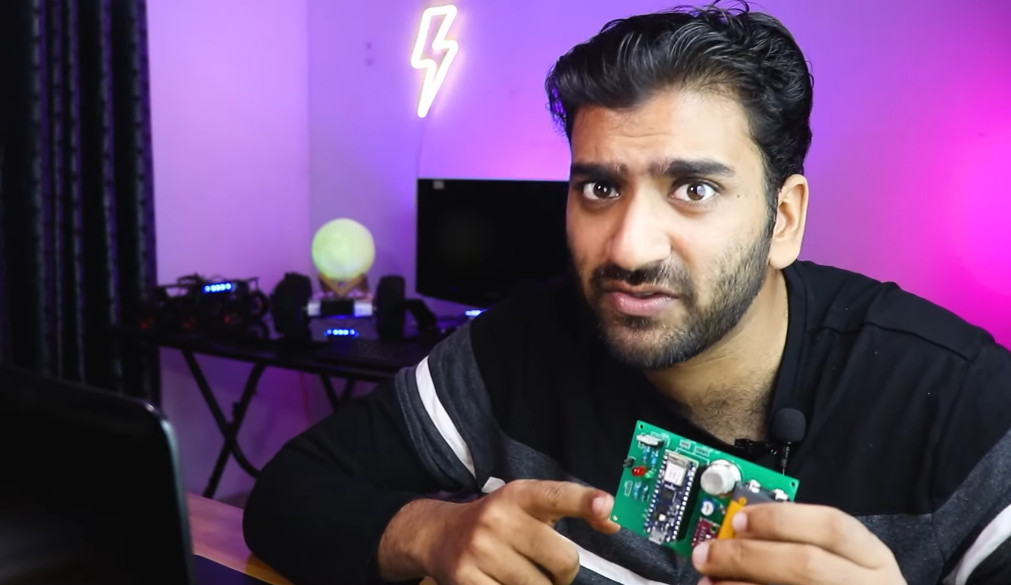
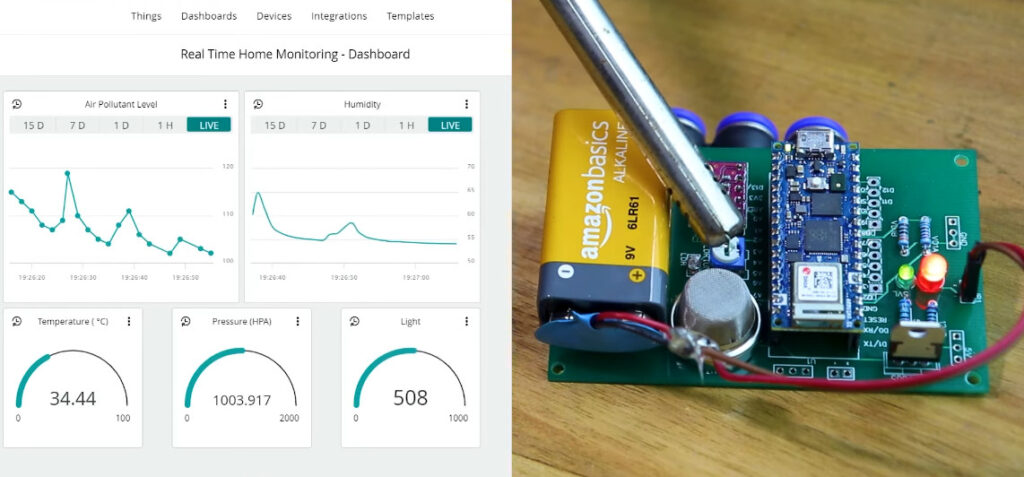
YouTuber and robotics maker RootSaid has been giving this a lot of thought. He’s put together an excellent tutorial on creating a self contained, real-time home monitoring module. It’s built around the excellent Nano RP2040 Connect, and sends everything to Arduino Cloud.

Home Monitoring for You, and Your Family

His objective was to create a compact bundle of sensors to keep an eye on various conditions around the home. This battery powered system can then be positioned anywhere, and monitored from Arduino Cloud. His idea is to install the module in an elderly relative’s home. That way, he can keep an eye on their environment from anywhere.

Of course, this doesn’t have to be used purely as a care system. That’s a great application for his environment monitoring platform, but it’s just as useful for your own home automation system. Too often, sensors (temperature, for example) are physically connected to other automation devices, like Wi-Fi mains switches. But chances are you want to know the temperature over by your sofa. Not down the back of the TV cabinet.

RootSaid to the rescue.

A Compact Home Automation Sensor Module

Let’s take a look at the sensors bundled into this compact package.

He’s got an LDR in there to monitor the light levels. This is perfect for bigger home automation projects, as it can trigger lights all around the house. Even outdoor lighting, if you wanted.

There’s a Bosch BME280 to keep an eye on the environment. This is becoming a popular device among the home automation crowd. It’s small, very low power, cheap, accurate, and gives you temperature, humidity and air pressure data.

Finally we have a gas sensor, which is a really interesting addition. Especially as part of his original brief for monitoring an elderly relative’s environment. It keeps a check on air quality, but being able to get alerts for gas leaks or rising carbon monoxide levels could be life saving.

Home monitoring gas sensor Arduino Cloud Nano RP2040 Connect

Home Monitoring in Arduino Cloud, for Free

Finally he takes you through the Arduino Cloud set up, including a monitoring dashboard. Which is more good news, since all this is running from a single Nano RP2040 Connect. That means you’re only adding one Thing (with five variables), so the free tier is a practical option. If you want to begin comparing the data the module collects over time, you can then easily bump up to a subscription for longer data retention options.

Because he’s collecting data through Arduino Cloud, he’s automatically got smartphone access to it, as well. Or, if he wanted to share the data with members of the family or household, it only takes a click.

Although RootSaid is running his module from a 9V battery, there’s nothing to stop you using other power sources. The Nano RP2040 Connect will accept all kinds of voltage inputs. From USB to 12v PSUs, your power options are wide open here.

This is a project that no home automation enthusiast should overlook. It’s small, simple and very easy to build. But it’s also the gateway to creating a great home automation system. If you’re only just getting started, this is the project to begin with. It’s the tiny module where all the important data comes from to make your home truly autonomous. RootSaid’s excellent tutorial also makes it easy to see how you can expand on the project in lots of ways.

Check it out, and make sure you subscribe to his channel.

The post Self Contained, Cloud Connected Home Monitoring Module appeared first on Arduino Blog.

Apr
28

What’s an Arduino? Jimmy Fallon knows it…

arduino, Featured, gas sensor, jimmy fallon, sensors, temperature, Tv, video, Wildfire Comments Off on What’s an Arduino? Jimmy Fallon knows it… 

Show1

An Arduino Uno appeared at The Tonight Show thanks to a project called Wildfire Warning System created by a 14 years old girl from California. Take a look at the video to discover how  you can detect fires  using a gas sensor and a temperature sensor.

And guess what? Jimmy Fallon knows what an Arduino is! Watch the video:

Show2

Oct
20

A digital nose detecting air pollution and dust particles

arduino, arduino nano, bluetooth, dust sensor, Featured, gas sensor, pollution Comments Off on A digital nose detecting air pollution and dust particles 

digioxide

After Anywhere, Turbo-gusli and Solaris, Dmitry Morozov shared with us Digioxide, a new interactive work using Arduino Nano, hc-06 bluetooth module, gas and dust sensors, LG mobile printer :

This project aims to raise public awareness of the environmental pollution by artistic means.
Digioxide is a portable wireless device equipped with sensors of air pollution gases and dust particles that is connected to computer via bluetooth. This allows a person with digioxide to freely move around a city, seek out ecologically problematic places and turn their data into digital artworks.

The information about the concentration of dust and harmful gases, such as CO, CO2, HCHO, CH4 and C3H8 and spme others is algorithmically transformed into generative graphics, forming an abstract image. The device’s mobile printer allows instant printing of this air “snapshot” that can be left as an evidence on the place, or given as a present to a passerby.


Oct
18

MQ-3 Alcohol Sensor, Breakout Board + Arduino

adafruit, alcohol, alcohol sensor, arduino, Gas, gas sensor, sparkfun, tutorials Comments Off on MQ-3 Alcohol Sensor, Breakout Board + Arduino 

A lot has happened since our last article was published and to celebrate the continuance of bildr we’ll be playing with the MQ-3 Alcohol Gas Sensor. Coupled with the SparkFun Gas Sensor Breakout Board, connecting the MQ-3 to your Arduino is a breeze.

The MQ-3 is a heater-driven alcohol sensor that outputs an analog signal (usually interpreted somewhere between 150 and 1023 depending on how long you let the sensor warm up), which through the use of your Arduino code and calibration, can be interpreted for whatever use you need.

Putting The Pieces Together

When attaching your MQ-3 to the SparkFun Breakout Board, it should be noted that it doesn’t matter which way the MQ-3 alcohol sensor is pressed in. Both the A pins are electronically the same as well as the B pins. The center pins on both sides are the heater element pins. Since the circuit will be running on +5V DC it doesn’t matter which way the sensor is soldered to the board. As long as you have the SparkFun logos and pin labels facing downward, so you can still see them when the sensor is flipped over, you are good to go!

Note: Again, the MQ-3 is heater-driven so be aware that the sensor will become warm and may even emit a smell at first. This is completely normal.

Calibration: If you take your time, you can find out what values equate to specific percentages or even blood alcohol concentration in the case of a breathalyzer. You will of course need to calibrate your MQ-3 based on your specific Arduino code since sensor readings will vary. Although I can’t help with your specific calibration scenario, the best advice I can give you is to use several isopropyl alcohol bottles at different percentages for your testing. Do NOT get the sensor wet with alcohol! Simply squeeze to breathe the vapors of the alcohol into the sensor and take your readings.

mq3-arduino-hookup

Code

The Arduino code for this is very simple if you just want to view the raw data.

int mq3_analogPin = A0; // connected to the output pin of MQ3 

void setup(){
  Serial.begin(9600); // open serial at 9600 bps
}

void loop()
{
  // give ample warmup time for readings to stabilize

  int mq3_value = analogRead(mq3_analogPin);
  Serial.println(mq3_value);

  delay(100); //Just here to slow down the output.
}
Unless otherwise stated, this code is released under the MIT License – Please use, change and share it.
Jun
27

Measuring ketosis with an Arduino

arduino hacks, gas sensor, keto, ketosis, Medical hacks, TGS822 Comments Off on Measuring ketosis with an Arduino 

key

A bit of biology and nutrition before we roll into this: Ketosis is when your body runs on fat reserves instead of carbohydrates. This is the basis of diets such as Atkins, and despite the connotations of eating hamburger patties and butter, you can actually lose weight on these diets. One problem with a keto diet is the difficulty of measure how many ketones your liver is processing; this can be done with a urine sample, but being able to measure small amounts of acetone in your breath would be the ideal way to measure ketosis. [Jens] came up with a device that does just that. It’s called Ketosense, and it will tell you how well your keto diet is doing by just having you blow into a sensor.

[Jens]‘ device consists of an Arduino, LCD display, and two sensors – one for acetone, and another for temperature and humidity. By carefully calibrating a TGS822 sensor, [Jens] was able to measure the acetone content of an exhaled breath along with temperature and pressure. This gave him a reading in parts per million, and with a short bit of math was able to convert that into something that made sense when talking about ketosis, mmol/l.

Without access to a lab that can measure blood ketone levels, it’s difficult to say if [Jens] device really works as intended. If he were to find his way into a lab, though, it would be possible to correlate his sensor’s values with blood ketone results and improve the accuracy of his sensor.


Filed under: Arduino Hacks, Medical hacks


  • Newsletter

    Sign up for the PlanetArduino Newsletter, which delivers the most popular articles via e-mail to your inbox every week. Just fill in the information below and submit.

  • Like Us on Facebook