[Nick] does a lot of custom work with vacuum tubes. So much so that he builds his own vacuum tubes of various shapes, sizes, and functions right on his own workbench. While the theory of vacuum tubes is pretty straightforward, at least to those of us who haven’t only been exposed to semiconductors, producing them requires some specialized equipment. A simple vacuum won’t get you all the way there, and the complexity of the setup that’s needed certainly calls for some automation.
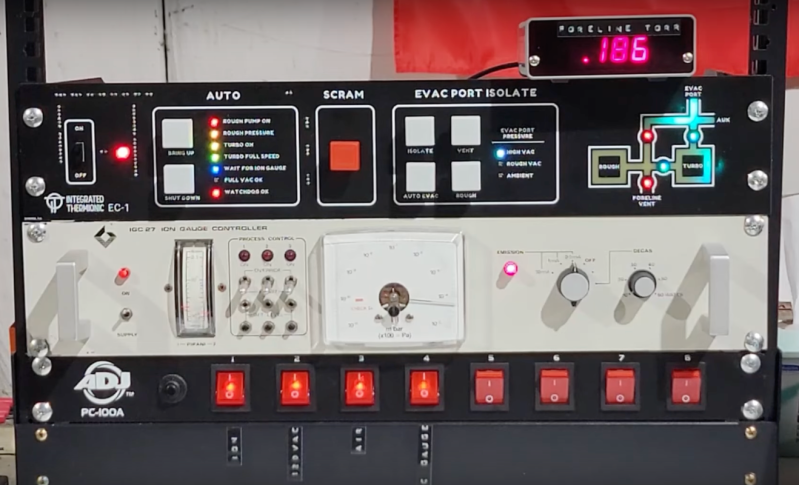
The vacuum system that [Nick] uses involves three sections separated by high-vacuum valves in order to achieve the pressures required for vacuum tube construction. There’s a rough vacuum section driven by one pump, a high vacuum section driven by a second pump, and a third section called the evac port where the tube is connected. Each second must be prepared properly before the next section can be engaged or disengaged. An Arduino Pro is tasked with all of this, chosen for its large amount of ADC inputs for the instrumentation monitoring the pressures in each section, as well as the digital I/O to control the valves and switches on the system.
The control system is built into a 19-inch equipment rack with custom faceplates which outline the operation of the vacuum system. A set of addressable LEDs provide the status of the various parts of the system, and mechanical keyboard switches are used to control everything, including one which functions as an emergency stop. The automation provided by the Arduino reduces the chances for any mistakes to be caused by human error, allows the human operator to focus on other tasks like forming the glass, and can also react much faster to any potentially damaging situations such as the high-pressure pump being exposed to atmospheric pressure.
[Nick] might look a little familiar to some of us as well. If you can’t quite place him, he did a talk at Hackaday Supercon 2022 detailing all of the intricacies of building one’s own vacuum tubes. Since getting into the somewhat niche field of constructing vacuum tubes, he’s gone on to produce all kinds of specialty devices and his YouTube channel is definitely worth a watch.
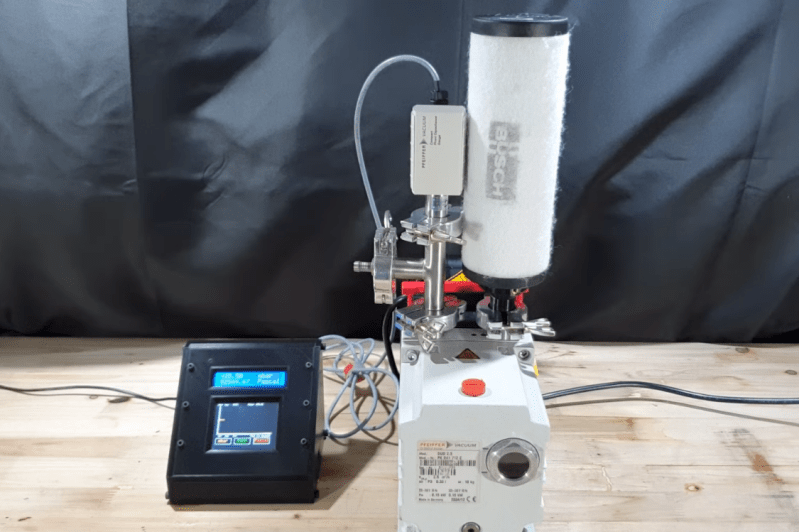
Necessity might be the mother of all invention, but we often find that inventions around here are just as often driven by expensive off-the-shelf parts and a lack of willingness to spend top dollar for them. More often than not, we find people building their own tools or parts as if these high prices are a challenge instead of simply shrugging and ordering them from a supplier. The latest in those accepting the challenge of building their own parts is [Advanced Tinkering] who needed a specialty pressure gauge for a vacuum chamber.
In this specific case, the sensor itself is not too highly priced but the controller for it was the deal-breaker, so with a trusty Arduino in hand a custom gauge was fashioned once the sensor was acquired. This one uses an external analog-to-digital converter to interface with the sensor with 16-bit resolution, along with some circuitry to bring the ~8 V output of the sensor down to the 5 V required by the microcontroller. [Advanced Tinkering] wanted a custom live readout as well, so a 3D printed enclosure was built that includes both an LCD readout of the pressure and a screen with a graph of the pressure over time.
Building a robot arm is fun, but no longer the challenge it once was. You can find lots of plans and kits, and driving the motors is a solved problem. However, there is always one decision you have to make that can be a challenge: what effector to put on the end of it. If you are [MertArduino] the answer is to put suction at the end. If you need to grab the right things, this could be just the ticket for reliably lifting and letting go. You can see a video of the arm in action, below.
The arm itself is steel with four servo motors and comes in a kit. The video shows the arm making a sandwich under manual control. We suspect he might have put it under Arduino control but there’s no sudo for making sandwiches.
An air pump and a solenoid valve round out the arm. An Arduino reads some pots to control the servo motors on the arm. However, the air pickup is manually controlled. It wouldn’t be very hard to use a FET or a transistor to put that under Arduino control, as well.
[Amitabh] was frustrated by the lack of options for controlling air pressure in soft robotics. The most promising initiative, Pneuduino, seemed to be this close to a Shenzhen production run, but the creators have gone radio silent. Faced with only expensive alternatives, he decided to take one for Team Hacker and created Programmable Air, a modular system for inflatable and vacuum-based robotics.
The idea is to build the cheapest, most hacker-friendly system he can by evaluating and experimenting with all sorts of off-the-shelf pumps, sensors, and valves. From the looks of it, he’s pretty much got it dialed in. Programmable Air is based around $9 medical-grade booster pumps that are as good at making vacuums as they are at providing pressurization. The main board has two pumps, and it looks like one is set to vacuum and the other to spew air. There’s an Arduino Nano to drive them, and a momentary to control the air flow.
Programmable Air can support up to 12 valves through daughter boards that connect via right-angle header. In the future, [Amitabh] may swap these out for magnetic connections or something else that can withstand repeated use.
Blow past the break to watch Programmable Air do pick and place, control a soft gripper, and inflate a balloon. The balloon’s pressurization behavior has made [Amitabh] reconsider adding a flow meter, but so far he hasn’t found a reasonable cost per unit. Can you recommend a small flow meter that won’t break the bank? Let us know in the comments.
[Mr_GreenCoat] is studying engineering. His thermodynamics teacher agreed with the stance that engineering is best learned through experimentation, and tasked [Mr_GreenCoat]’s group with the construction of a vacuum chamber to prove that the boiling point of a liquid goes down with the pressure it is exposed to.
His group used black PVC pipe to construct their chamber. They used an air compressor to generate the vacuum. The lid is a sheet of lexan with a silicone disk. We’ve covered these sorts of designs before. Since a vacuum chamber is at max going to suffer 14.9 ish psi distributed load on the outside there’s no real worry of their design going too horribly wrong.
The interesting part of the build is the hardware and software built to boil the water and log the temperatures and pressures. Science isn’t done until something is written down after all. They have a power resistor and a temperature probe inside of the chamber. The temperature over time is logged using an Arduino and a bit of processing code.
In the end their experiment matched what they had been learning in class. The current laws of thermodynamics are still in effect — all is right in the universe — and these poor students can probably save some money and get along with an old edition of the textbook. Video after the break.
Initial testing. Ignore the humidity sensor, that was for something else.
The vacuum gauge outputs 0-10VDC. This had to be changed to a 0-5VDC range using a potential divider so it was compatible with the Arduino. Initial build used a 10k pot in place of a vacuum gauge to make it simpler.
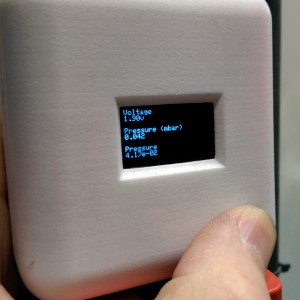
Arduinos! They’re a great tool that make the world of microcontrollers pretty easy, and in [cptlolalot]’s case, they also give us an alternative to buying expensive, proprietary parts. [cptlolalot] needed a gauge for an expensive vacuum pump, and rather than buying an expensive part, built a circuit around an Arduino to monitor the vacuum.
This project goes a little beyond simple Arduino programming though. A 12V to 5V power supply drives the device, which is laid out on a blank PCB. The display fits snugly over the circuit which reduces the footprint of the project, and the entire thing is housed in a custom-printed case with a custom-printed pushbutton. The device gets power and data over the RJ45 connection so no external power is needed. If you want to take a look at the code, it’s linked on [cptlolalot]’s reddit thread.
This project shows how much easier it can be to grab an Arduino off the shelf to solve a problem that would otherwise be very expensive. We’ve been seeing Arduinos in industrial applications at an increasing rate as well, which is promising not just because it’s cheap but because it’s a familiar platform that will make repairs and hacks in the future much easier for everyone.
Now and again you come across interesting parts on ebay, from friends or just rooting around in second-hand stores. One example of this was a huge Noritake Itron 40 x 2 character vacuum-fluorescent display from 1994 (or earlier) which was passed on from a client. Originally it looked quite complex, however after spending some time the data sheets were found and it was discovered to have a simple serial interface – and with a little work we’ve got it working, so read on if you’re interested in classic VFDs or have a similar unit.
Getting Started
The model number for our display is CU40026SCPB-T20A. Here’s a quick walk-around, the front:
… the back:
… the interfaces:
… and configuration jumpers:
The serial interface baud rate is determined by the jumpers (above), for example:
So comparing the table above against the jumpers on our module gives us a data speed of 19200 bps with no parity. Great – we can easily create such a connection with a microcontroller with a serial output and 5V logic levels; for our examples we’ll use an Arduino-compatible board.
Wiring up the VFD is simple – see the white jumpers labelled CN2 as shown previously. Pin 1 is 5V (you need an external supply that can offer up to 700 mA), pin 2 to Arduino digital pin 7, and pin 3 to Arduino and power supply GND. We use Arduino D7 with software serial instead of TX so that the display doesn’t display garbage when a sketch is being uploaded. Then it’s a matter of simply sending text to the display, for example here’s a quick demonstration sketch:
// Working with Noritake Itron VFD modules - model CU40026SCPB-T20A
// John Boxall 2013

#include <SoftwareSerial.h>
SoftwareSerial VFD(6,7); // RX, TX

void setup()
{
  VFD.begin(19200);
}

void loop()
{
  VFD.print("Hello, world. This is a Noritake VFD "); // You can blast out text
  do {} while (1);
}
… and the results:
If you’re not keen on the colour or intensity of the display, try some Perspex over the top – for example:
Controlling the display
At this point you’ll need the data sheet, there’s a couple you can download: data sheet one, data sheet two. As you saw previously, writing text is very simple – just use .print functions. However you may want to send individual characters, as well as special commands to control aspects of the display. These are outlined in the data sheet – see the “Software Commands” and “Character Fonts” tables.
If you need to send single commands – for example “clear display” which is 0x0E, use a .write command, such as:
VFD.write(0x0E); // clear display
Some commands are in the format of escape codes (remember those?) so you need to send ESC then the following byte, for example to change the brightness to 50%:
Armed with that knowledge and the data sheets you can now execute all the commands. According to the data sheet it is possible to change fonts however no matter what the hardware jumper or command we tried it wouldn’t budge from the Japanese katakana font. Your screen may vary. If you use the “screen priority write” function heed the data sheet with respect to the extended “busy” time by delaying subsequent writes to the display by a millisecond.
Putting it all together
Instead of explaining each and every possible command, I’ve put the common ones inside documented functions in the demonstration sketch below, which is followed by a quick video of the sketch in operation.
// Working with Noritake Itron VFD modules - model CU40026SCPB-T20A
// John Boxall 2013
#include <SoftwareSerial.h>
SoftwareSerial VFD(6,7); // rx, tx
void setup()
{
VFD.begin(19200); // set speed for software serial port
resetVFD();
VFDclearsceen();
// VFD.write(0x12); // vertical scroll mode (on)
}
void resetVFD()
// performs a software reset on the VFD controller
{
VFD.write(0x1B); // ESC
VFD.write(0x49); // software reset
}
void VFDnewline()
// moves cursor to start of next line
{
VFD.write(0x0D); // carriage return
VFD.write(0x0A); // line feed
}
void VFDclearsceen()
// moves cursor to top-left and clears display
{
VFD.write(0x0E); // clear display
VFD.write(0x0C); // form feed - cursor to top-left
}
void VFDbrightness(int amount)
// sets VFD brightness - 25/50/75/100%
// uses ESC sequences
{
switch(amount)
{
case 25:
VFD.write(0x1B); // ESC
VFD.write(0x4C); // brightness
VFD.print(0); // 25% brightness
break;
case 50:
VFD.write(0x1B); // ESC
    VFD.write(0x4C); // brightness
    VFD.write(0x40); // 50% brightness
break;
case 75:
VFD.write(0x1B); // ESC
VFD.write(0x4C); // brightness
VFD.write(0x80); // 75% brightness
break;
case 100:
VFD.write(0x1B); // ESC
VFD.write(0x4C); // brightness
VFD.write(0xC0); // 100% brightness
}
}
void VFDchars()
// run through characters for selected font
{
for (int i = 21 ; i < 256; i++)
{
VFD.write(0x16); // underline cursor off
VFD.write(i);
delay(100);
}
}
void moveCursor(byte position)
// moves the cursor - top row is 0~39, bottom row is 40~79
// vertical scroll mode must be turned off if used
{
VFD.write(0x1B); // ESC
VFD.write(0x48); // move cursor
VFD.write(position); // location
}
void loop()
{
VFD.write(0x16); // underline cursor off
VFD.print("Hello, world - line one."); // You can blast out text
delay(1000);
VFDnewline();
VFD.print("Hello, world - line two.");
delay(1000);
VFDclearsceen();
VFDbrightness(25);
VFD.print("*** 25% brightness ***");
delay(1000);
VFDclearsceen();
VFDbrightness(50);
VFD.print("*** 50% brightness ***");
delay(1000);
VFDclearsceen();
VFDbrightness(75);
VFD.print("*** 75% brightness ***");
delay(1000);
VFDclearsceen();
VFDbrightness(100);
VFD.print("*** 100% brightness ***");
delay(1000);
VFDclearsceen();
VFDchars();
VFDclearsceen();
for (int i = 0; i < 80; i++)
{
VFD.write(0x16); // underline cursor off
moveCursor(i);
VFD.print("X");
delay(100);
moveCursor(i);
VFD.print(" ");
}
VFDclearsceen();
}
Conclusion
We hope you found this interesting and helpful. And if you have an inexpensive source for these old displays, let us know in the comments. Full-sized images are on flickr. And if you made it this far – check out my new book “Arduino Workshop” from No Starch Press.
In the meanwhile have fun and keep checking into tronixstuff.com. Why not follow things on twitter, Google+, subscribe for email updates or RSS using the links on the right-hand column? And join our friendly Google Group – dedicated to the projects and related items on this website. Sign up – it’s free, helpful to each other – and we can all learn something.
Planet Arduino is, or at the moment is wishing to become, an aggregation of public weblogs from around the world written by people who develop, play, think on Arduino platform and his son. The opinions expressed in those weblogs and hence this aggregation are those of the original authors. Entries on this page are owned by their authors. We do not edit, endorse or vouch for the contents of individual posts. For more information about Arduino please visit www.arduino.cc
You are currently browsing the archives for the vacuum category.


 This project goes a little beyond simple Arduino programming though. A 12V to 5V power supply drives the device, which is laid out on a blank PCB. The display fits snugly over the circuit which reduces the footprint of the project, and the entire thing is housed in a custom-printed case with a custom-printed pushbutton. The device gets power and data over the RJ45 connection so no external power is needed. If you want to take a look at the code,


