Posts | Comments

Planet Arduino

Archive for the ‘gears’ Category

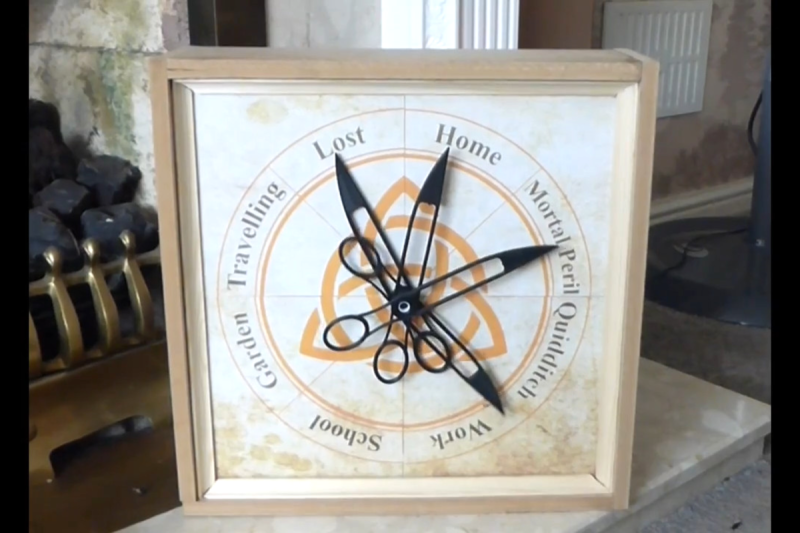
For those unfamiliar with the details of the expansive work of fiction of Harry Potter, it did introduce a few ideas that have really stuck in the collective conscious. Besides containing one of the few instances of time travel done properly and introducing a fairly comprehensive magical physics system, the one thing specifically that seems to have had the most impact around here is the Weasley family clock, which shows the location of several of the characters. We’ve seen these built before in non-magical ways, but this latest build seeks to drop the price tag on one substantially.

To do this, the build relies on several low-cost cloud computing solutions and smartphone apps to solve the location-finding problem. The app is called OwnTracks and is an open-source location tracker which can report data to any of a number of services. [Simon] sends the MQTT data to a cloud-based solution called HiveMQCloud, but you could send it anywhere in principle. With the location tracking handled, he turns to some very low-cost Arduinos to control the stepper motors which point the clock hands to the correct locations on the face.

While the build does rely on a 3D printer for some of the internal workings of the clock, this does bring the cost down substantially when compared to other options. Especially when compared to this Weasley family clock which was built into a much larger piece of timekeeping equipment, having an option for a lower-cost location-tracking clock face like this one is certainly welcome.

[gocivici] threatened us with a tutorial on positional astronomy when we started reading his tutorial on a Arduino Powered Star Pointer and he delivered. We’d pick him to help us take the One Ring to Mordor; we’d never get lost and his threat-delivery-rate makes him less likely to pull a Boromir.

As we mentioned he starts off with a really succinct and well written tutorial on celestial coordinates that antiquity would have killed to have. If we were writing a bit of code to do our own positional astronomy system, this is the tab we’d have open. Incidentally, that’s exactly what he encourages those who have followed the tutorial to do.

The star pointer itself is a high powered green laser pointer (battery powered), 3D printed parts, and an amalgam of fourteen dollars of Chinese tech cruft. The project uses two Arduino clones to process serial commands and manage two 28byj-48 stepper motors. The 2nd Arduino clone was purely to supplement the digital pins of the first; we paused a bit at that, but then we realized that import arduinos have gotten so cheap they probably are more affordable than an I2C breakout board or stepper driver these days. The body was designed with a mixture of Tinkercad and something we’d not heard of, OpenJsCAD.

Once it’s all assembled and tested the only thing left to do is go outside with your contraption. After making sure that you’ve followed all the local regulations for not pointing lasers at airplanes, point the laser at the north star. After that you can plug in any star coordinate and the laser will swing towards it and track its location in the sky. Pretty cool.


Filed under: Arduino Hacks, cnc hacks, news, solar hacks

[Rjeuch] liked a wooden clock he saw on the Internet, but the gears were produced with a proprietary software tool. So he built his own version. Unlike the original, however, he chose to use a stepper motor to drive the hands.

The clock’s gears aren’t just for show, and the post does a good job explaining how the gears work, how you might customize them, and how they fit together. The clock’s electronics rely on an Arduino.

The issue with an Arduino, of course, is that the time base isn’t always good enough to keep time over long periods. To fix that problem [Rjeuch] used a ChronoDot which is a real-time clock that uses temperature compensation and claims to be accurate to a minute a year.

Of course, no plan goes off without a hitch. Owing to bad stepper mode specs, the original version of the clock was gaining time overnight. Although the stepper claimed to have a 1:64 reduction gear, the actual ratio wasn’t that precise ([Rjeuch] estimates it as 1:63.876. The steps he took to fix this are worth a read.

You can see a video of the clock below. We’ve seen lots of other clocks, of course. Some of them even make this one looks simple.


Filed under: Arduino Hacks
Sep
17

Going Kinetic With Sculptor Eric Hagan

arduino, Art, Art & Design, Design, eric hagan, gears, kinetic sculpture, Maker Faire, Makers Comments Off on Going Kinetic With Sculptor Eric Hagan 

267939_598439077140_798464_nI took some time to talk to kinetic sculptor Eric Hagan and what he'll be up to at Maker Faire NY this year.

Read more on MAKE


  • Newsletter

    Sign up for the PlanetArduino Newsletter, which delivers the most popular articles via e-mail to your inbox every week. Just fill in the information below and submit.

  • Like Us on Facebook