Posts | Comments

Planet Arduino

Archive for the ‘how-to’ Category

mauwb dw3000 st tag test

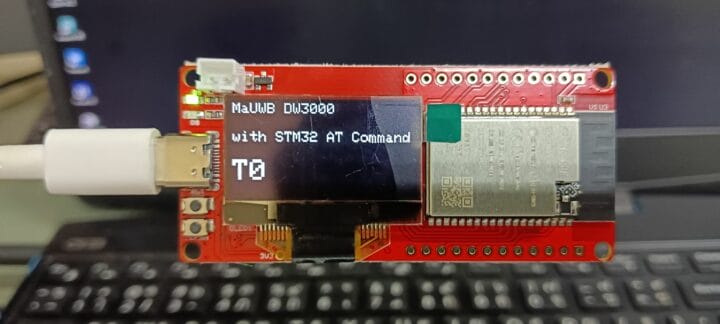
Hello, the device I am going to review is the MaUWB_DW3000 with STM32 AT Command. This is an Ultra-wideband (UWB) module from MakerFabs. The core UWB module on this board is the DW3000 UWB transceiver, and it is also equipped with an ESP32 microcontroller programmable with the Arduino IDE, as well as OLED display. The manufacturer claims that this UWB board resolves multiple anchors and tags mutual conflicts and supports up to 8 anchors and 64 tags. Additionally, the manufacturer has added an STM32 microcontroller to handle UWB multiplexing, allowing users to control the core UWB module by simply sending AT commands from an ESP32 microcontroller to the STM32 microcontroller. More information about this UWB board can be found on the manufacturer’s website. “MaUWB_DW3000 with STM32 AT Command” unboxing MakerFabs sent the package to me from China. Inside the package, there were 4 sets of the MaUWB_DW3000 with STM32 AT [...]

The post “MaUWB_DW3000 with STM32 AT Command” Review – Using Arduino to test UWB range, precision, indoor positioning appeared first on CNX Software - Embedded Systems News.

Even though it seems the worst of COVID has passed, October generally kicks off cold and flu season, so why not continue to pass out Halloween treats in a socially-distanced fashion?

That is, of course the idea behind [Gord Payne]’s Halloween Treat Trough of Terror. Lay a treat at the top of the trough and it will activate the LED strips that follow the treat down to the end, as well as some spooky sounds. The treat in question is detected by an SR-04 ultrasonic distance sensor connected to an Arduino Nano.

All in all this was a highly successful build as far as neighborhood entertainment value goes. Toddlers stared in awe at the blinkenlights, teenagers proclaimed it ‘sick’, and we can only assume that the adults were likely happy to see something aimed at kids that’s not scary.

[Gord] has a nice how-to if you want to build your own, and of course, the Arduino sketch is available. Be sure to check it out in action after the break.

Don’t have room to build a treat slide? Here’s a socially-distanced dispenser that lets them stomp a giant button.


Fritzing diagram of connections between the Wemos D1 board, the TP4056 board, the pushbutton and the LiIon battery

Say, you’re starting your electronics journey with a few projects in mind. You have an ESP8266 board like the Wemos D1, a LiIon battery, you want to build a small battery-powered sensor that wakes up every few minutes to do something, and you don’t want to delve into hardware too much for now. Well then, does [Mads Chr. Olesen] have a tutorial for you! Here, you’ll learn the quick and easy way to get your sensor up and running, learn a few tricks for doing sleep Arduino environment, and even calculate how long your specific battery could last.

You’ll need a TP4056 board, providing charging and battery protection features, a jumper, and maybe a pushbutton – the Fritzing diagram shows everything you’d like to know. From there, you have examples on using deep sleep, do pushbutton or sensor-driven wakeup, manage WiFi, and even read the battery voltage – all of these are a single line of code away, and you learn the few important caveats there are. In the end, there’s even an embedded calculator for how long your Wemos D1 board can survive on a single charge – enter your capacity, the amount of time between wakeups, and see just how long your board will last.

This tutorial is truly accessible if you never touched ESP8266 deep sleep before but would like to start – it’s short and sweet, and you’ll have your battery-powered sensor up and running in no time. It doesn’t go into topics like optimizing the onboard hardware, but in all fairness, you don’t have to do that until you’re ready, and sometimes, it’s really software optimizations that will have a hefty payoff . And, if you ever want to learn more about LiIon-powered devices, our tutorials are there for you.

Yet another Day of the Chocolate Bunnies has passed by, and what did you do to mark the occasion? You likely kicked back and relaxed, surrounded by whatever you gave up for Lent, but good for you if you mixed chocolate and electronics like [Repeated Failure] did. They created a completely edible chocolate Easter bunny that screams when bitten.

So obviously, the hardest part is figuring out something to build the circuit with that is both conductive and safe to eat. [Repeated Failure] spent a lot of time with carbon oleogel paste, which is made from natural oils and waxes. Not only was it less conductive than [Repeated Failure]’s skin, it came out pitch black and tasted like nothing, which kind of a bonus, when you think about it.

Then came the cake paint, which [Repeated Failure] laced with trace amounts of silver powder. While that worked somewhat better, a successful circuit would have likely required near-fatal amounts of the stuff. Yikes!

The winner turned out to be edible silver leaf, which is like gold leaf but cheaper. Ever had Goldschläger? Gold leaf is what’s suspended inside. The really nice thing about silver leaf is that it comes in thin sheets and can easily be cut into circuit traces with scissors and connected to I/O pins with copper tape. Be sure to check it out after the break, including [Repeated Failure]’s friend’s reaction to innocently biting the chocolate bunny’s ears off, as one tends to do first.

Think you’d rather hear plants giggle? Sure, it sounds cute, but it’s actually kind of creepy.

A 3D-printed mini laser engraver made from DVD-RW drive motors.

Got a couple of old DVD-RW drives lying around, just collecting dust? Of course you do. If not, you likely know where to find a pair so you can build this totally adorable and fully dangerous laser engraver for your desk. Check out the complete build video after the break.

[Smart Tronix] doesn’t just tell you to salvage the stepper motors out of the drives — they show you how it’s done and even take the time to explain in writing what stepper motors are and why you would want to use them in this project, which is a remix of [maggie_shah]’s design over on Thingiverse. As you might expect, the two steppers are wired up to an Arduino Uno through a CNC shield with a pair of A4988 motor drivers. These form the two axes of movement — the 250mW laser is attached to x, and the platform moves back and forth on the y axis. We’d love to have one of these to mess around with. Nothing that fits on that platform would be safe! Just don’t forget the proper laser blocking safety glasses!

Need something much bigger that won’t take up a lot of space? Roll up your sleeves and build a SCARA arm to hold your laser.

Robert Dunn holds a button in his hand for controlling a spot welder

Raise you’re hand if you’ve ever soldered directly to a battery even though you know better. We’ve all been there. Sometimes we get away with it when we have a small pack and don’t care about longevity. But when [Robert Dunn] needed to build a battery pack out of about 120 Lithium Ion cells, he knew that he had to do it The Right Way and use a battery spot welder. Of course, buying one is too simple for a hacker like [Robert]. And so it was that he decided to Build a Spot Welder from an old Microwave Oven and way too much mahogany, which you can view below the break.

A Battery Cell with a spot welding tab attached
Spot Welding leaves two familiar divots in the attached tab, which can be soldered or welded as need.

For the unfamiliar, a battery spot welder is the magical device that attaches tabs to rechargeable batteries. You’ll notice that all battery packs with cylindrical cells have a tab with two small dimples. These dimples are where high amperage electricity quickly heats the battery terminal and the tab until they’re red hot, welding them together. The operation is done and over in less than a second, well before any heat damage can be done. The tab can then be soldered to or spot welded to another cell.

One of the most critical parts of spot welding batteries is timing. While [Robert Dunn] admits that a 555 timer or even just a manual switch and relay could have done the job, he opted for an Arduino Uno with a 4 character 7 segment LED display that shows the welding time in milliseconds. A 3d printed trigger and welder handle wrap up the hardware nicely.

The build is topped off by a custom mahogany enclosure that is quite a bit overdone. But if one has the wood, the time, the tools and skills (and a YouTube channel perhaps?) there’s no reason not to put in the extra effort! [Robert]’s resulting build is almost too nice, but it’ll certainly get the job done.

Of course, spot welders are almost standard fare here at Hackaday, and we’ve covered The Good, The Bad, and The Solar. Do you have a battery welder project that deserves a spot in Hackaday’s rotation? By all means, send it over to the Tip Line!

A couple of joysticks wired up to a Teensy for prototyping.

Over the last two years, [benkster] has been perfecting their ideal flight controller. Like many people, they started out with a keyboard and mouse and eventually moved on to a joystick. While a HOTAS (hands on throttle-and-stick — e.g. a yoke controller with inputs right there on the sides) might have been the next logical step, those things cost too much. Naturally, the answer is to build one, ideally for less money. Hey, it could happen.

The design went from just an idea to a cardboard prototype, and then to a wooden enclosure and later, a 3D-printed case. Since [benkster] learned a great deal along the way, they want to give back to the community with a comprehensive joystick design/build guide so that others don’t have to start from zero, overwhelmed with information.

[benkster] wanted three joysticks, a bunch of big buttons, a throttle, a display to show component status (as in, is joystick #3 a joystick right now or a WASD keyboard?), and immersive details everywhere — you know, a million buttons and switches to give it that cockpit feel. [benkster] is using a Teensy 4 to control two 3-axis joysticks and one 2-axis stick. Since this adds up to too many axes for Windows/DirectX to read in, the 2-axis stick is used as a WASD keyboard.

This guide is a great place to start, especially for folks who may be newer to electronics. There are nice introductions to many types of components and tidbits that are relevant outside the world of joysticks.

You want immersive flight simulation away from the PC? Here’s a printable flexure-based ‘stick that snaps right on your Xbox controller and pushes the buttons.

It’s 2021. Everyone and their mother is filming themselves doing stuff, and a lot of it is super cool content. But since most of us have to also work the video capture devices ourselves, it can be difficult to make compelling footage with a single, stationary overhead view, especially when there are a lot of steps involved. A slider rig is a good start, but the ability to move the camera in three dimensions programmatically is really where it’s at.

[KronBjorn]’s excellent automated overhead camera assistant runs on an Arduino Mega and is operated by typing commands in the serial monitor. It can pan ±20° from straight down and moves in three axes on NEMA-17 stepper motors. It moves really smoothly, which you can see in the videos after the break. The plastic-minimal design is interesting and reminds us a bit of an ophthalmoscope — that’s that main rig at the eye doctor. There’s only one thing that would make this better, and that’s a dedicated macro pad.

If you want to build your own, you’re in luck — there’s quite a lot of detail to this project, including a complete BOM, all the STLs, code, and even assembly videos of the 3D-printed parts and the electronics. Slide past the break to check out a couple of brief demo videos.

Not enough room for a setup like this one? Try the pantograph version.

[Blake]’s interest in building keyboards happened naturally enough — he was looking for a new project to work on and fell into the treasure chest that is the mechanical keyboard community. It sounds like he hasn’t built anything but keyboards since then, and we can absolutely relate.

This tidy 40% ortholinear is [Blake]’s third build, not including macro keebs. It’s based on an open source case and plate from Thingiverse, and uses an Arduino Pro Micro running the popular QMK firmware to read input from 47 Gateron blues and a rotary encoder.

We particularly like the double rainbow ribbon cable wiring method [Blake] used to connect each row and column to the controller. It looks beautiful, yes, but it’s also a great way to maintain sanity while programming and troubleshooting.

Keyboard builds can look daunting, even at 40% of standard size. But as [Blake] discovered, there are some really good guides out there with fantastic tips for hand-wiring in small spaces. And now there is another well-written guide with clear pictures to point to.

Looking to split from the standard rectangle form factor but don’t know what to go with? Divine your next clacker with this split keyboard finder.

Thanks for the tip, [jrdsgl]!


  • Newsletter

    Sign up for the PlanetArduino Newsletter, which delivers the most popular articles via e-mail to your inbox every week. Just fill in the information below and submit.

  • Like Us on Facebook