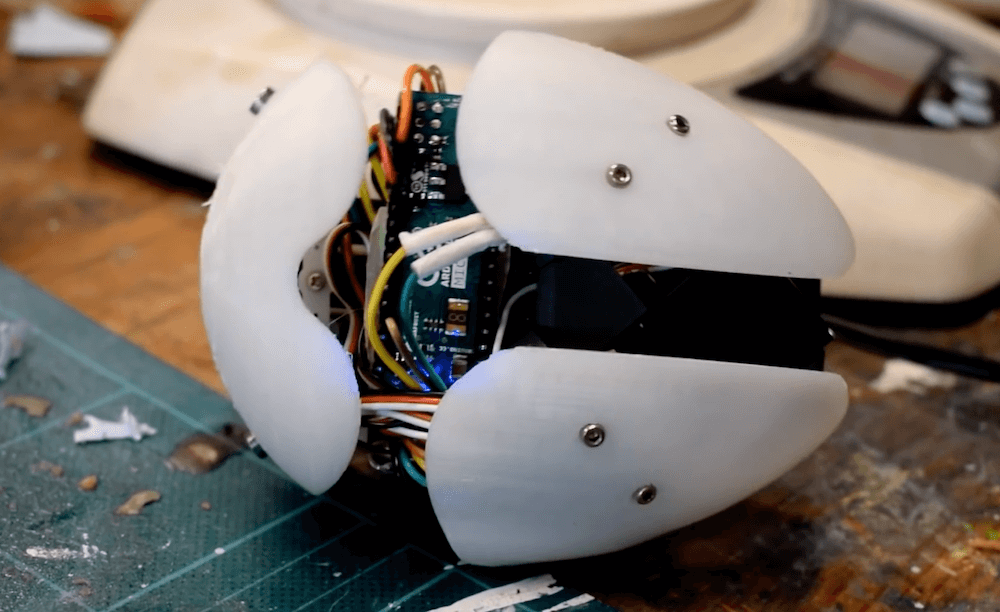
In his latest video, Will Cogley has created an animatronic heart so realistic that you might wonder if it’s the actual thing.
The device is made out of molded silicon with fake blood poured on top to enhance the effect, and inside a trio of servo motors push the lower and upper sections of the prop out in a very lifelike pattern.
Control is via an Arduino Micro along with an I2C servo controller, while power is provided by an external tether. A potentiometer on the back is used to vary heartbeat speed.
He also made a simpler — and less potentially terrifying — version with a cloth exterior. This one is battery-operated and runs on a motor and linkage system, perhaps making it good for a nice portable joke!
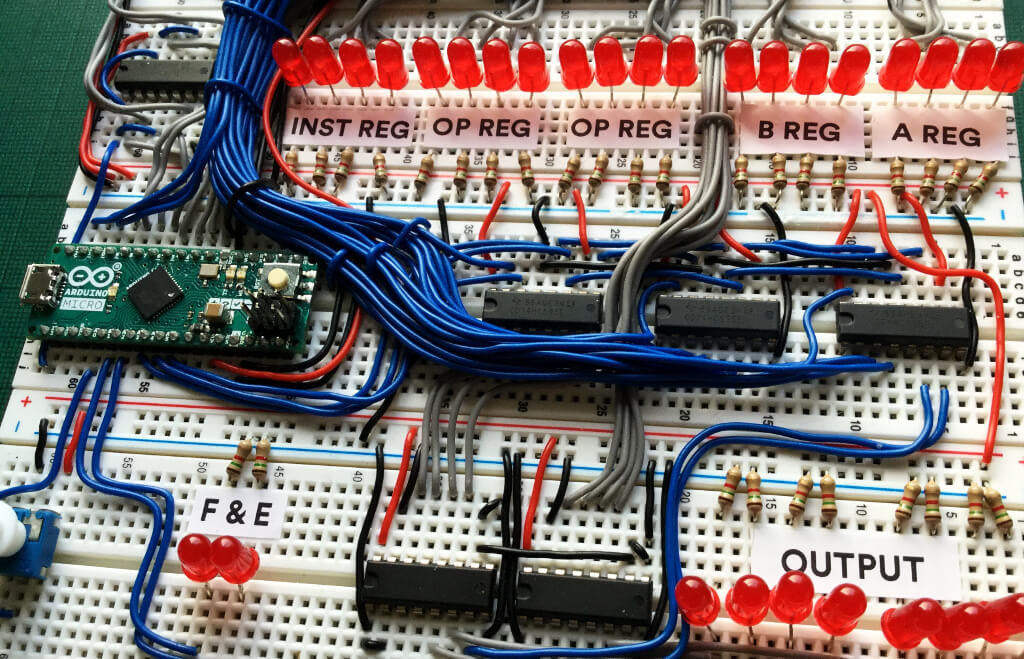
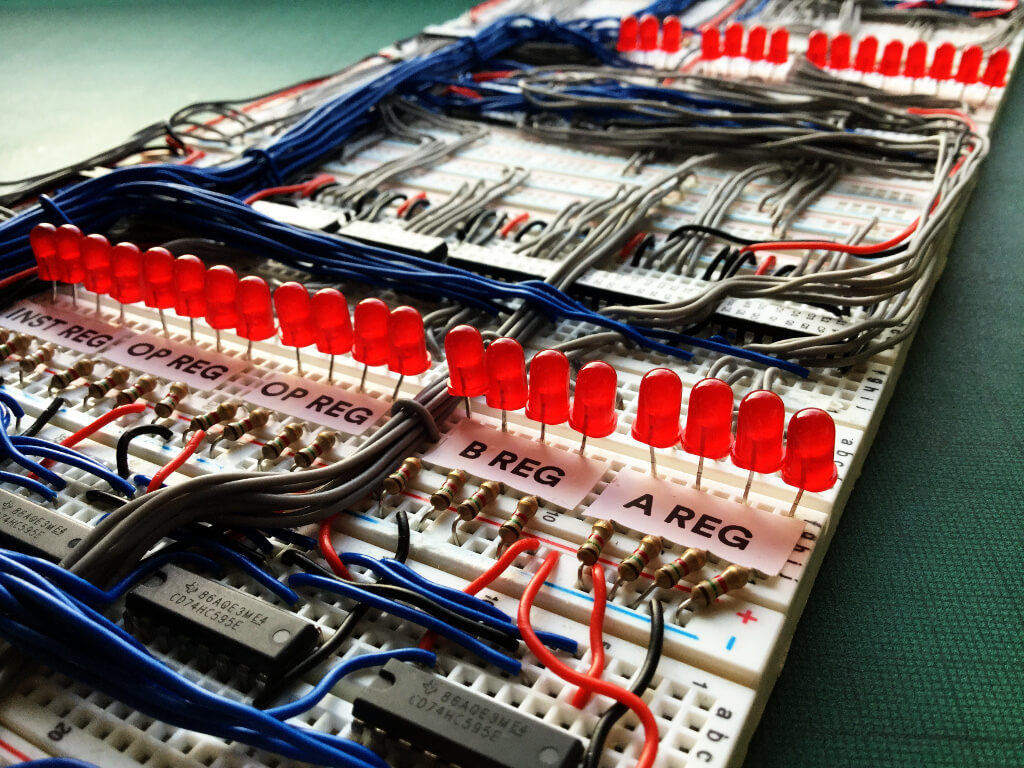
Richard of ARITH-MATIC had the idea to build a 4-bit computer based on 7400 series ICs (like the 74HC273, 74HC193, and 74HC125), but other responsibilities got in the way of this becoming a reality for quite some time. Finally, with the Retro Computer Festival at the Centre for Computing History in Cambridge, England held earlier this month, he went ahead and started the project in hopes of creating a working computer in under 30 days.
The resulting homebrew CPU is known as the ‘Cambridge-1,’ comprised mostly of 7400 series ICs, wiring, and an SRAM chip for storage carefully arranged on a set of breadboards. In addition to the other components, an Arduino Micro is also implemented. While not technically a retro device, the Arduino allowed him to “change the control logic on-the fly,” and gave him the flexibility to finish the project in his compressed time scale.
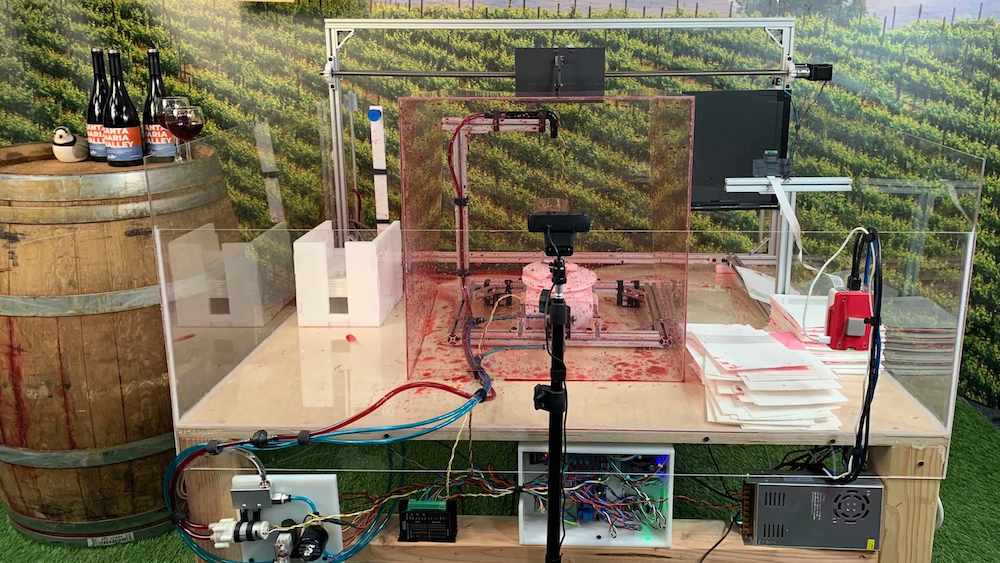
Spilled wine may be a hassle to clean up, but you might also observe that it makes interesting patterns. Marketing firm KPS3 had the same sort of thought process when they created “The Santa Maria Swirl Machine” to promote the Santa Maria Valley wine industry.
The machine takes the form of a tabletop display, where a vacuum gripper first picks up a piece of paper and transports it into a clear “swirl area.” A glass is then automatically filled with wine, spun up to speed, and flung at the paper in order to create art.
Visitors to the website can watch the current splash art being made, or register to join the queue to use the service—once their turn arrives, they are given a full-screen view and options to control their creation. Specialized watercolor paper is picked up by a servo equipped with a suction cup attached to a venturi (itself attached to an air compressor), which proceeds to hand off to a custom gripper to hold the paper in place for the wine to be spilled.
From there, the Arduino-controlled stepper motor turns the lead screw, moving the paper into the splash zone, and fills the glass to the user-selected level, and begins to swirl the glass at the user-selected speed. Once the proper speed is attained, an actuator tips the glass forward, spilling the wine onto the paper. All of this is streamed by two cameras, with the final result photographed by a third. This photo is then processed in Lambda to clean up the photograph, detecting corners, applying filters and branding for the Santa Maria Valley Chamber of Commerce.
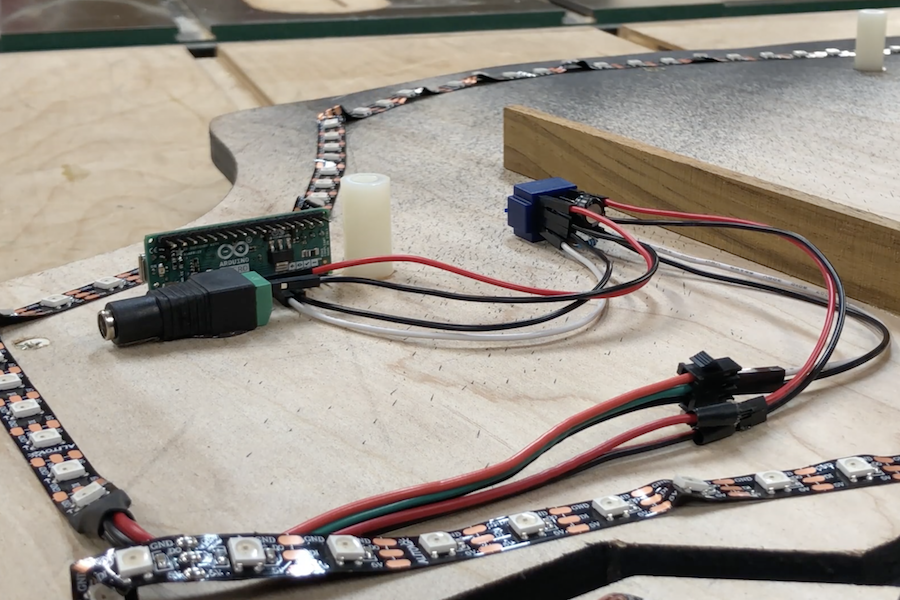
While you may or may not want a gigantic backlit skull cutout haunting the wall of your workshop, this was perfect for Jay and Jamie of the “Wicked Makers” YouTube channel.
Their device is cut of two 30” squares of plywood with a CNC router. This forms a base layer that holds everything off the wall, while an outer layer provides a nice circuit/skull texture.
They affixed WS2812B LED strips to the base layer, controlled by an Arduino Micro. These strips shine off the wall for a glow through the edges, along with circuit board style cutouts inside the skull, diffused using wax paper.
Arduino code and the circuit diagram are found in the project’s write-up if you’d like to construct your own!
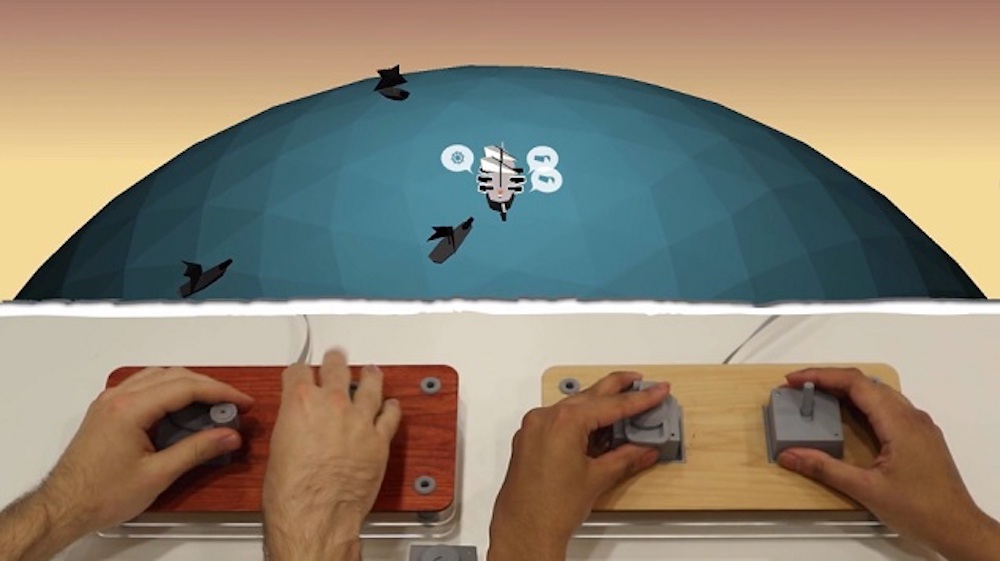
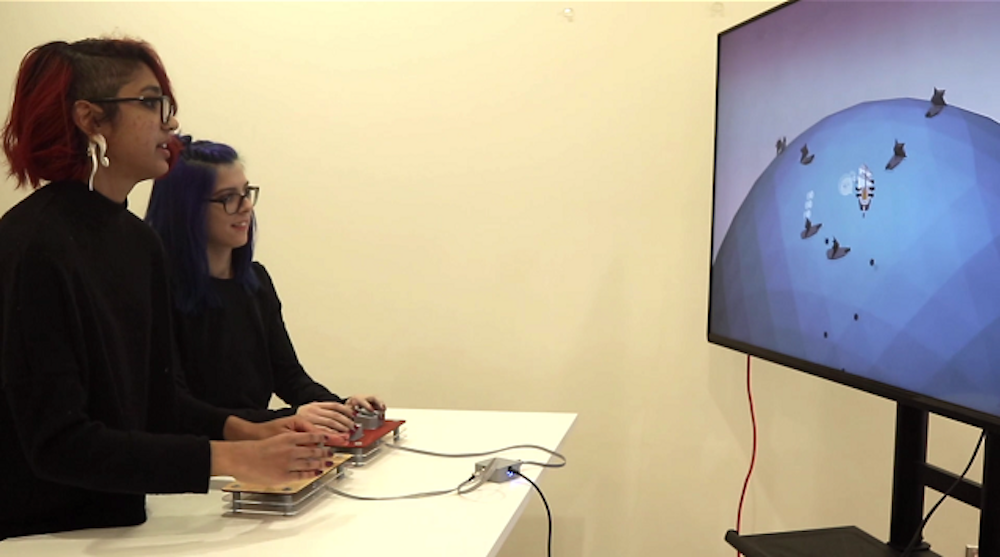
Interactive video games take many forms, but for the most part, each player has a separate controller that manipulates an onscreen character, vehicle, or other singular element. What if, as in real life, multiple players have to work together with physical objects to control a sailing ship?
That’s the idea behind HOT SWAP: All Hands On Deck by Peter Gyory and Celment Zheng. In it, two players guide various parts of a ship using five different control elements. What makes this really interesting is that each player’s input device has room for two of these control elements, which must be swapped for actions such as steering and to load cannons. Input information is passed to the game via an Arduino Micro.
It’s like if we took a regular game controller, popped off all of the inputs, and made it so you could only use a couple of them at a time. There are two controllers, with each consisting of two input slots. Each controller controls one side of the ship, port or starboard. There are five actions total in the game, each executed with a dedicated physical input: a crank to raise and lower the sails, a wheel for turning the rudder, a hatch for loading the cannons, a wick for firing the cannons, and a flame button for dousing the fire.
There is only one of each input, which makes them a shared resource that players must trade back and forth as they play. There is this old Milton Bradley kids board game from the ’90s called Perfection where players must fit shapes into holes before a timer is up and the board shakes to make everything pop out. HOT SWAP is like if Perfection had a screen attached and had a goal outside of putting shapes into slots.
All of the code is done with JavaScript and the library Three.js, which we bundle into a desktop application using Github’s Electron. The brain of the controller is an Arduino Micro, which mostly just passes data along.
The inputs are created with the Mechamagnets technique that Clement has been developing through his research; all 3D-printed in PLA with neodymium magnets embedded in them. The actual “hot swapping” is facilitated by pogo pins that line up with our custom PCBs for each input. Also, lots of chocolate croissants.
More details on the build are available via this interview as well as in the video below.
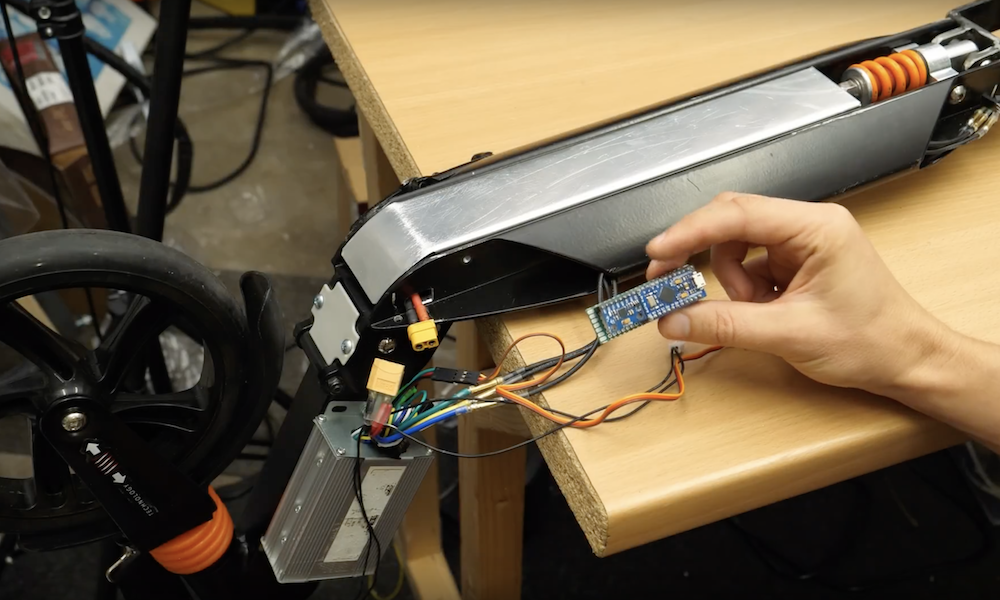
Maker Bitluni wanted an electric scooter, but he lives in Germany, where electric vehicles of that type are illegal. Motor-assisted bicycles, however, are not. So he set to work making a sort of hybrid that is controlled not by a throttle directly, but provides assistance when the rider kicks the scooter forward.
The scooter uses an accelerometer to sense forward pushes, along with an Arduino Micro that regulates speed via PWM output. A brake assembly is also implemented as a secondary input, starting up the device and powering it down as needed.
Bitluni’s build and testing process can be seen in the videos below, and Arduino code is available on GitHub.
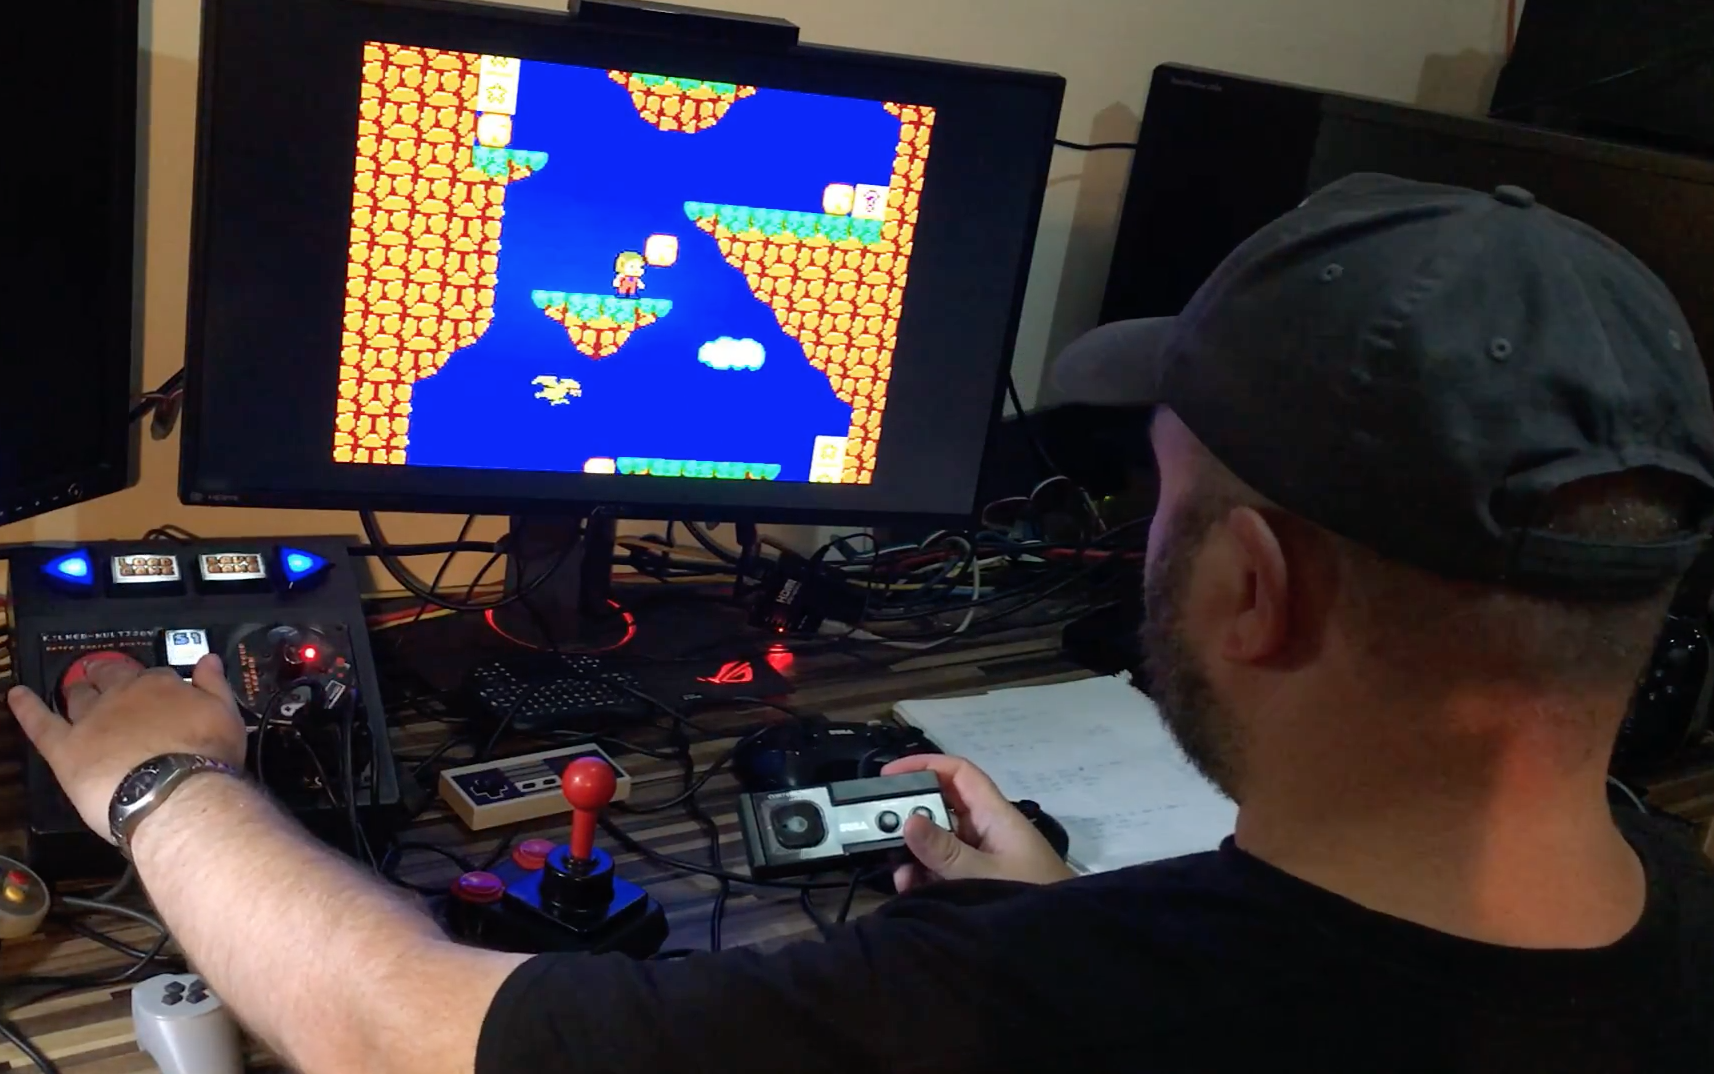
IT professional (and Arduino cap fan) John Milner had a minor problem. While his retro gaming setup could emulate a wide variety of systems and games, it was still missing the tactile feedback of the original controllers. Rather than “submit” to playing with only an Xbox 360 controller, he developed the Multijoy Retro Gaming System that can change gamepads with the turn of a knob using an Arduino Micro.
The resulting system lets him not only choose the original controller for each game, but if you want to mix things up and see how Super Mario Bros. would feel on a PlayStation 1, or even a Genesis controller, you can do that too! It also features shortcut buttons on the new console.
The Arduino presents itself as two joypads with native plug-and-play support for Microsoft Windows 7+ and Linux/RetroPie. The selector is simply a ring of LEDs with a potentiometer in the center, using the knob will move the lit LED to the desired controller pictured in that position, a simple system with an unexpected bonus of being a little retro in its appearance.
You can check it out in the video below, and see more of the project on his blog and on GitHub.
Using an Arduino Micro for control, French teenager “Joebarteam” came up with a way to biometrically secure his garage.
If you need to get into your locked garage, what could be better than using your fingerprint? To this end, Joe’ came up with a system that unlocks his door using a fingerprint scanner, and a bistable relay to disable communication between the scanner and the Arduino if there’s a problem.
It’s a really professional-looking build, and the locking mechanism is especially interesting. Two rack-and-pinion devices plunge shafts into the ground, making the door impossible to open (it has to pull out before going up). If there is an issue with the system, the pins can be physically unlocked and disabled as needed.
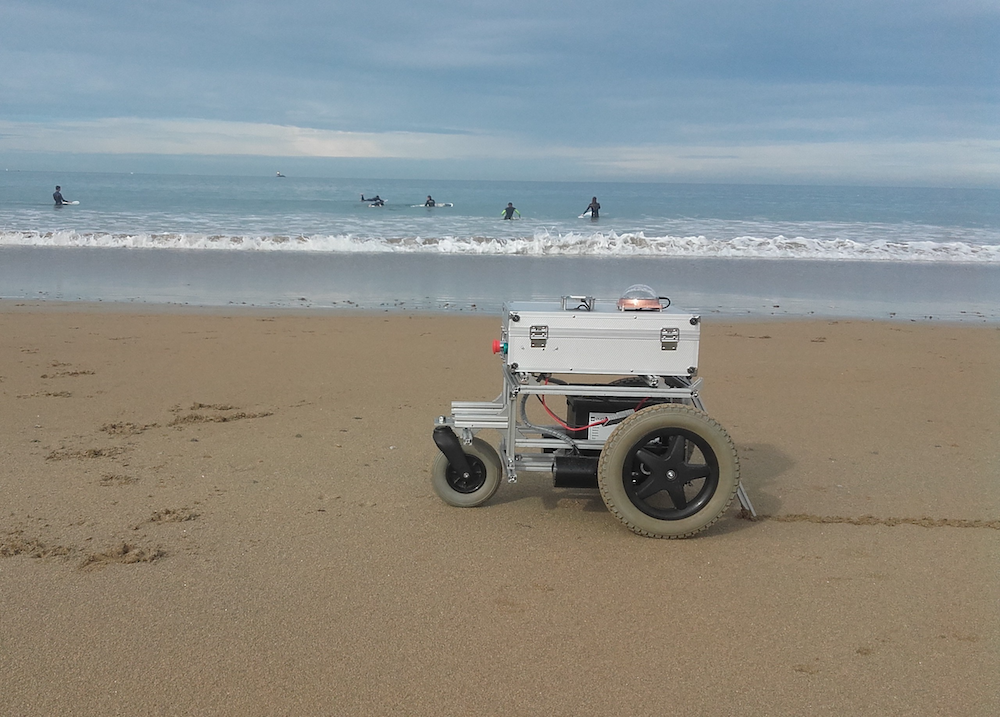
For this year’s Hackaday Prize, hacker “Ulysse” has designed an autonomous beach art rover using an Arduino Mega and a pair of Micros.
While walking along the shore, the footprints you leave behind are mildly interesting, and perhaps you might go to the effort of scraping a pattern in the sand if you were feeling rather creative. If, however, you wanted to make drawings on a massive scale, Ulysse’s robot “Pablo Odysseus” looks like an elegant solution.
The Arduino-powered rover uses two wheelchair motors to propel it along the beach, as well as a rake to leave a mark as to where it’s been. Navigation is provided by a GNSS receiver (a more general term for “GPS”), a digital compass, and an odometer set up on each of the motors. Meanwhile, USB dongles enable it to communicate wirelessly with a smartphone and laptop.
Now, Ulysse can simply program in an artistic pattern, and Pablo will take care of the rest! You can see more about this project on Hackaday.io and GitHub.
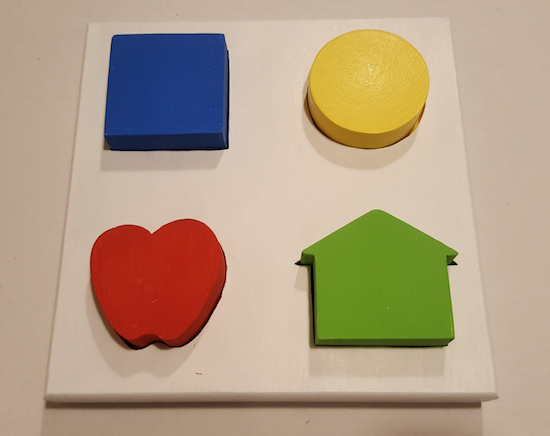
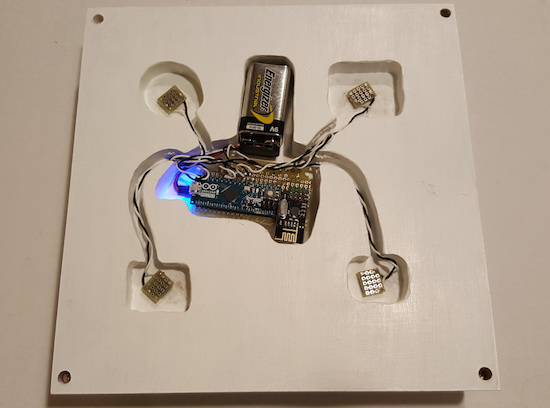
Using two Arduino Micros, these parents created a unique Lea shapes puzzle for their daughter Rebecca.
Because of a medical condition, Rebecca will need to have her vision assessed at the age of two or younger. This means that she’ll have to be tested without yet knowing her alphabet, and instead need to be familiar with Lea shapes which can act as a substitute for letters in a vision test. Unfortunately, her hearing is also impaired, meaning that a non-visual type of stimulus is needed to encourage a correct response.
To accomplish this, her parents came up with an excellent puzzle system, where when one of these shapes is dropped into the correct slot, the smart lights in the room change to the corresponding color. It’s an interesting project that will hopefully help with a pressing need.
In terms of hardware, a Raspberry Pi 3 is used as a central hub along with a Hue smart lights bridge, which is paired with a couple of Arduinos and 2.4GHz radio modules that handle the wireless communication between the two devices.
Planet Arduino is, or at the moment is wishing to become, an aggregation of public weblogs from around the world written by people who develop, play, think on Arduino platform and his son. The opinions expressed in those weblogs and hence this aggregation are those of the original authors. Entries on this page are owned by their authors. We do not edit, endorse or vouch for the contents of individual posts. For more information about Arduino please visit www.arduino.cc
You are currently browsing the archives for the micro category.