Posts | Comments

Planet Arduino

Archive for the ‘prop’ Category

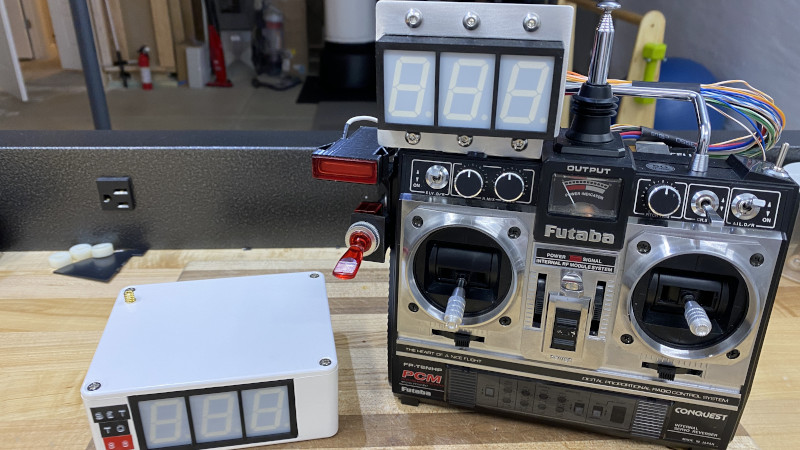
Obviously, the most iconic piece of fictional hardware from the Back to the Future films is Doc Brown’s DeLorean DMC-12 time machine. But we’d have to agree with [Jason Altice] of CodeMakesItGo that the second-most memorable gadget is the modified Futaba remote control used to control the DeLorean from a distance. Now, thanks to his detailed build guide, you can build your own version of the time machine’s controller — complete with working speed readout.

Now to be clear, [Jason] isn’t claiming that his build is particularly screen accurate. It turns out that the actual transmitter used for the prop in the film, the Futaba PCM FP-T8SGA-P, has become difficult to find and expensive. But he argues that to the casual observer, most vintage Futaba transmitters are a close enough match visually. The more important part is recreating the extra gear Doc Brown bolted onto his version.

All but four of the display wires are fake.

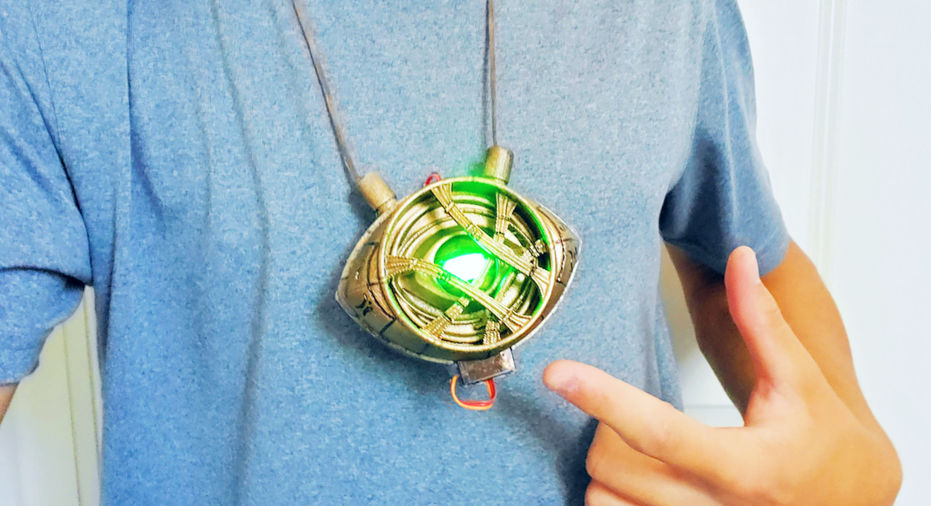
To that end, [Jason] was able to source some screen accurate hardware to kit out his transmitter, such as the Unibox 140 project box and the metal 9 V battery clips. Other components, like the lighted Molex 1820 switch, were harder to track down. Luckily we live in the age of cheap desktop 3D printers, and he was able to run off an impressively accurate replica without too much trouble.

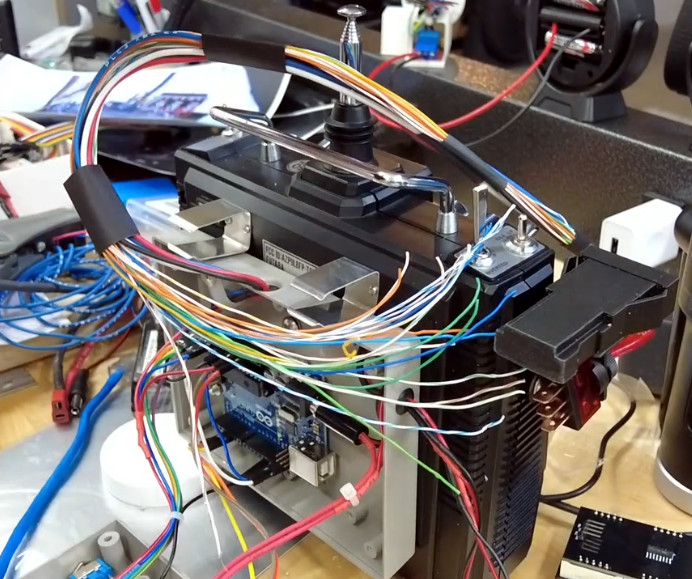
Of course, the stand out feature is the seven-segment LED speed indicator. Each digit is a separate 25 mm (1 inch) SC10-21SRWA display, which have been mounted together on a custom PCB along with a TM1650 controller. An Arduino Uno inside the Unibox 140 drives the display, and receives speed data from the transmitter in the car using a long-range Reyax LoRa RYLR998 module.

[Jason] built the GPS-equipped “speed box” to closely resemble the movie version, albeit with three functional digits compared to only two in the original prop. Internally it’s using the same LED display, LoRa module, and Arduino Uno as the transmitter. We liked the approach of keeping the hardware more or less the same on both sides of the link, keeps things nice and simple.

Now you certainly don’t need a DeLorean time machine to test out your finished remote control, but we appreciate that [Jason] went through the trouble of renting one so he could show off his creation in style. The final product looks great, and ranks right up there with the replica time circuits on the list of BttF props we’d love to have up on the shelf.

Eye of Agamotto with Arduino Every

We’ve not released a time travel shield for Arduino yet. But when we do, this Eye of Agamotto project will be a perfect fit. So even though it may not bend time yet, it does everything else we’ve seen in Doctor Strange.

Eye of Arduino. Er… Agamotto

Just in case you’re not up to speed with the events of the Marvel universe (or have totally lost track of them), the Eye of Agamotto is a magical device worn by the Sorcerer Supreme. Currently, that’s Doctor Stephen Strange.

Maker Bradley Campbell is in the running to become the next Sorcerer Supreme. To get himself in the running, he’s built his own Eye of Agamotto using an Arduino Nano Every.

The housing of the prop is mostly 3D printed. It features a working “eye” mechanism, that’s opened and closed by a servo motor and printed, beveled gears. It’s a slick design, that creates the perfect housing for the bright, RGB LED mounted inside. A diffuser then gives it the appropriate infinity stone vibe.

Although his Eye of Agamotto prop is a pretty small piece, and is worn around the neck, all the electronics are built into the medallion itself. It’s a great example of a compact build. A small, low profile Li-Po battery on the back to drive the servo and LED. An equally slim combo of a charging module and DC-to-DC converter keep the lights on, and the power constant.

Like all good prop makers, he doesn’t just show us how to put the electronics together. There are some excellent tips on finishing the 3D printed parts, painting them, and adding texture. The weathering is essential to giving the medallion an ancient gold finish, and bringing the prop to life.

All in all, including spray paint (and excluding the 3D printer), the cost of Bradley’s prop runs to around $150.

Take a look at Bradley’s full build over on Instructables.

The post Working Eye of Agamotto from Doctor Strange (excluding time travel) appeared first on Arduino Blog.

There’s an interesting side effect of creating a popular piece of science fiction: if you wait long enough, say 30 or 40 years, there’s a good chance that somebody will manage to knock that pesky “fiction” bit off the end. That’s how we got flip phones that looked like the communicators from Star Trek, and rockets that come in for a landing on a tail of flame. Admittedly it’s a trick that doesn’t always work, but we’re not in the business of betting against sufficiently obsessed nerds either.

Coming in right on schedule 32 years after the release of Metroid on the Nintendo Entertainment System, we now have a functional laser arm cannon as used by the game’s protagonist Samus Aran, courtesy of [Hyper_Ion]. It’s not quite as capable as its video game counterpart, but if your particular corner of the solar system is under assault from black balloons you should be in good shape. Incidentally no word yet on a DIY Power Suit that folds the wearer up into a tiny ball, but no rush on that one.

Modeled after the version of the weapon Samus carried in 2002’s iconic Metroid Prime, [Hyper_Ion] 3D printed the cannon in a number of pieces that screw together in order to achieve the impressive final dimensions. He printed it at 0.3 mm layers to speed up the process, but as you can probably imagine, printing life-size designs like this is not for the faint of heart or short of time. While the use of printed threads does make the design a bit more complex, the fact that the cannon isn’t glued together and can be broken down for maintenance or storage is a huge advantage.

Ever popular NeoPixel strips give the cannon a bit of flash, and a speaker driven by a 2N2222 transistor on an Arduino Nano’s digital pin allows for some rudimentary sound effects with nothing more than a PWM signal. In the video after the break you can see how the lights and sounds serve as a warning system for the laser itself, as the cannon can be seen “charging up” for a few seconds before emitting a beam.

Of course, this is the part of the project that might have some readers recoiling in horror. To provide some real-world punch, [Hyper_Ion] has equipped his arm cannon with a 2.5W 450nm laser module intended for desktop engraving machines. To say this thing is dangerous is probably an understatement, so we wouldn’t blame you if you decided to leave the laser module off your own version. But it certainly looks cool, and as long as you’ve got some proper eye protection there’s (probably) more dangerous things you can do in the privacy of your own home.

Shame this kind of technology wasn’t really practical back when [Ryan Fitzpatrick] made this fantastic Power Suit helmet for a Metroid fan production.

[rudolph] was at a loss on what to get his niece for Christmas. It turns out she’s a huge fan of Stranger Things, so the answer was obvious: make her an alphabet wall she can control!

Downsizing the scale to fit inside a document frame, [rudolph] calls their gift rudLights, and a key parameter of this build was to make it able to display any phrases sent from their niece’s Amazon Fire tablet instead of constantly displaying hard-coded phrases. To do so, it has a HC-05 Bluetooth module to forward the commands to the NeoPixel LEDs running on a 5V DC power supply.

[rudolph] enlisted the help of their son to draw up the alphabet display — printed straight onto thematically decorative wallpaper — and cut out holes in the light bulbs for the LEDs.  Next up was cut some fibre board as a firm backing to mount the electronics inside the frame and drill holes for the NeoPixels. It was a small odyssey to cut and solder all the wires to the LEDs, but once done, [rudolph] divided their rudLight alphabet into three rows and added capacitors to receive power directly.

[rudolph] has provided the code they used for this project — just be sure to change the output pin or any other modifications as relevant to your build. They’ve even created an app to make controlling the rudLights easier. If Bluetooth isn’t your thing then [rudolph] is working on building an Arduino Pro Mini version, but no word on when that will be done.

We love a good prop or inspired replica here at Hackaday, so this framed Alphabet Wall is in good company.

We love our props here at Hackaday, and whenever we come across a piece from the Back To The Future fandom, it’s hard to resist showcasing it. In this case, [Xyster101] is showing of his build of Doc Brown’s Flux Capacitor.

[Xyster101] opted for a plywood case — much more economical than the $125 it would have cost him for a proper electrical box. Inside, there’s some clever workarounds to make this look as close as possible to the original. Acrylic rods and spheres were shaped and glued together to replicate the trinity of glass tubes, 3/4″ plywood cut by a hole saw mimicked the solenoids, steel rods were sanded down for the trio of points in the centre of the device and the spark plug wires and banana connectors aren’t functional, but complete the look. Including paint, soldering and copious use of hot glue to hold everything in place, the build phase took about thirty hours.

The LEDs have multiple modes, controlled by DIP switches hidden under a pipe on the side of the box. There’s also motion sensor on the bottom of the case that triggers the LEDs to flicker when you walk by. And, if you want to take your time-travel to-go, there’s a nine volt plug to let you show it off wherever — or whenever — you’re traveling to. Check out the build video after the break.

With this flux capacitor in hand, grab this time circuit display and cram them both into eD, the electric DeLorean, and you’re well on your way to living in the future.

[Via Imgur]


Filed under: Arduino Hacks

[John Fin] put a lot of work into his Ghostbuster’s proton pack prop with full-featured user control and effects. What appealed to us well beyond the exquisite build is the extra effort taken to write down the whole process in a PDF for anyone wishing to imitate him.

Mr. Fusion is just a Krups Coffee Grinder. Also, Santa isn't real.
Mr. Fusion is just a Krups Coffee Grinder. Also, Santa isn’t real.

We all know that a lot of famous props are creatively rearranged household items. The famous Mr. Fusion from Back to The Future is actually a Krups coffee grinder with some logos adhered.

[John]’s prop is no different. The cyclotron is a five gallon bucket. A garlic powder container fills another function. As you look at it more and more items can be picked out. Is that a spark plug wire? The handles on that are suspiciously similar to a power tool case’s. It all comes together, and while it’s not screen accurate you’d have to be an extreme prop fanatic to tell.

Naturally, the core of [John]’s prop is an Arduino. It stores the sound files on a SD Card shield. It controls all the lights sounds and motors on the prop. This isn’t quite a point and shoot. You must toggle on the power, generator, and arming mechanisms before actually firing. If you do it out of order, the electronics will issue an alarm as warning, and each step in the process has its own unique audio and animated lighting.

Since the Proton Pack went so well, he also built a PKE meter and Ghost Trap to go along with his backpack. He’s ready to take on Vigo at anytime. You can see a video of his prop in action after the break.


Filed under: Arduino Hacks
Nov
03
BX_OgX9CAAAf3Vh.jpg-largeNootropic Design's Arduino-powered Defusable Clock was featured as a prop in the CW's "The Tomorrow People" drama.

Read more on MAKE

Oct
12
IMG_6682When automating special effects, the most important part is making sure that they are well timed.  For live events such as a haunted house, the best way to get the timing right is to use sensors to detect where your guests are and when they reach various locations. So for […]

Read more on MAKE


  • Newsletter

    Sign up for the PlanetArduino Newsletter, which delivers the most popular articles via e-mail to your inbox every week. Just fill in the information below and submit.

  • Like Us on Facebook