Posts | Comments

Planet Arduino

Archive for the ‘adafruit’ Category

Sparkfun Thing Plus - RA6M5

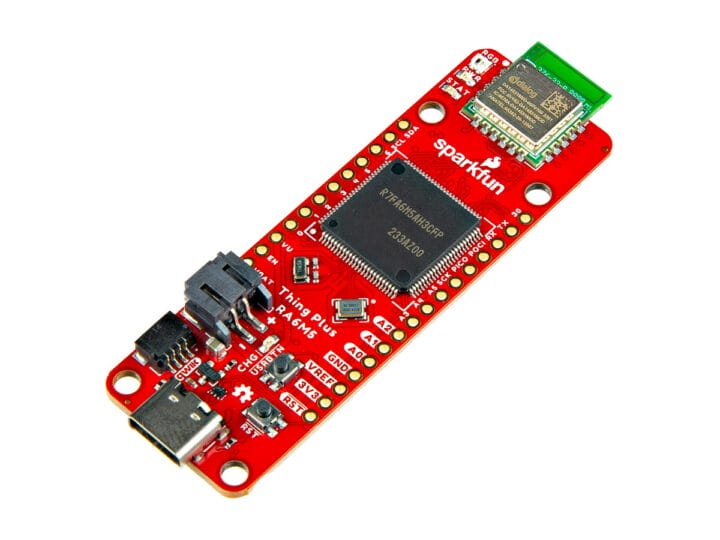
SparkFun Thing Plus – RA6M5 is a small MCU board based on a 200 MHz Renesas RA6M5 Cortex-M33 microcontroller and a Renesas DA14531MOD Bluetooth 5.1 LE module that follows Adafruit Feather/Sparkfun Thing Plus form factor. The module can transmit data over BLE with just 4mA (at 3.3V) power consumption and the company claims the board to be powered by a coin-cell battery. A LiPo battery can also be connected to the board through a 2-pin JST battery connector, and the Things Plus – RA6M5 board also features a single-cell charger and LiPo fuel gauge. Sparkfun Thing Plus – RA6M5 specifications: Microcontroller – Renesas R7FA6M5AH3CFP Core – Arm Cortex-M33 microcontroller @ up to 200 MHz Memory – 512KB SRAM Storage – 2MB Flash Security – Arm TrustZone, and Secure Crypto Engine 9 Wireless – Renesas DA14531MOD module for Bluetooth 5.1 LE connectivity with support for CodeLess AT command Datapump Radio Transmit [...]

The post SparkFun Thing Plus – RA6M5 board supports Bluetooth 5.1 LE through Renesas DA14531MOD module appeared first on CNX Software - Embedded Systems News.

When a new board drops, makers around the planet immediately start hacking new projects with it. Here are 17 fun projects to try on fresh hardware.

The post 17 Fun Projects for New Boards from Raspberry Pi, Arduino, Micro:Bit, and More appeared first on Make: DIY Projects and Ideas for Makers.

So Many Choices: Our Favorite Makers Weigh in on Their Go-To Dev Boards

Dev boards give makers limitless options for their projects. Some of our high-tech pals share their personal processes to pick a board.

The post So Many Choices: Our Favorite Makers Weigh in on Their Go-To Dev Boards appeared first on Make: DIY Projects and Ideas for Makers.

Recently [Imran Haque]’s family bought the quite popular Peloton bike. After his initial skepticism melted to a quiet enthusiasm, [Imran] felt his hacker curiosity begin to probe the head unit on the bike. Which despite being a lightly skinned android tablet, has a reputation for being rather locked down. The Peloton bike will happily collect data such as heart rate from other devices but is rather reticent to broadcast any data it generates such as cadence and power. [Imran] set out to decode and liberate the Peleton’s data by creating a device he has dubbed PeloMon. He credits the inspiration for his journey to another hacker who connected a Raspberry Pi to their bricked exercise bike.

As a first step, [Imran] step began with decoding the TRRS connector that connects the bike to the head unit. With the help of a multi-meter and a logic analyzer, two 19200bps 8N1 RS-323 channels (TX and RX) were identified. Once the basic transport layer was established, he next set to work decoding the packets. By plotting the bytes in the packets and applying deductive reasoning, a rough spec was defined. The head unit requested updates every 100ms and the bike responded with cadence, power, and resistance data depending on the request type (the head unit did a round-robin through the three data types).

Once the protocol was decoded, the next step for [Imran] was to code up an emulator. It seems a strange decision to write an emulator for a device with a simple protocol, but the reasoning is quite sound. It avoids a 20-minute bike ride every time a code change needs to be tested. [Imran] wrote both an event-driven and a timing-accurate emulator. The former runs on the same board as the PeloMon and the latter runs on a separate board (an Arduino).

The hardware chosen for the PeloMon was an Adafruit Feather 32u4 Bluefruit LE. It was chosen for supporting Bluetooth LE as well as having onboard EEPROM. A level shifter allows the microcontroller to talk directly to the RS-323 on the bike. After a few pull requests to the Adafruit Bluetooth libraries and a fair bit of head-banging, [Imran] has code that advertises two Bluetooth services, one for speed and another for power. A Bluetooth serial console is also included for debugging without having to pull the circuit out.

The code, schematics, emulators, and research notes are all available on GitHub.

[minh7a6] loves the Adafruit Feather, but sees some room for improvement.

First is the matter of 5V tolerance. While just about everything is available in a 3.3v range these days, sometimes it’s just nice not to have to care. The main controller on the Feather is plenty powerful, but its intolerant pins just wouldn’t do so it was swapped for a chip from the ever popular STM32F4 line.

Then he wanted better energy efficiency when running from battery. In order to achieve this he switched from a linear regulator to a buck-boost converter. He also felt that the need for a separate SWD adapter for debugging seemed unnecessary, so he built a Black Magic Probe right in.

He’s just now finishing up the Arduino IDE support for the board, which is pretty cool. There’s no intention to produce this souped up Feather, but all the files are available for anyone interested.

Ever hear of Microsoft Soundscape? We hadn’t, either. But apparently it and similar apps like Blindsquare provide people with vision problems context about their surroundings. The app is made to run in the background of the user’s mobile device and respond to media controls, but if you are navigating around with a cane, getting to media controls on a phone or even a headset might not be very convenient. [Jazzang] set out to build buttons that could control apps like this that could be integrated with a cane or otherwise located in a convenient location.

There are four buttons of interest. Play/pause, Next, Back, and Home. There’s also a mute button and an additional button you can use with the phone’s accessibility settings. Each button has a special function for Soundscape. For example, Next will describe the point of interest in front of you. Soundscape runs on an iPhone so Bluetooth is the obvious choice for creating the buttons.

To simplify things, the project uses an Adafruit Feather nRF52 Bluefruit board. Given that it’s Arduino compatible and provides a Bluetooth Human Interface Device (HID) out of the box, there’s almost nothing else to do for the hardware but wire up the switches and some pull up resistors. That would make the circuit easy to stick almost anywhere.

Software-wise, things aren’t too hard either. The library provides all the Bluetooth HID device trappings you need, and once that’s set up, it is pretty simple to send keys to the phone. This is a great example of how simple so many tasks have become due to the availability of abstractions that handle all of the details. Since a Bluetooth HID device is just a keyboard, you can probably think of many other uses for this setup with just small changes in the software.

We covered the Bluefruit back when it first appeared. We don’t know about mounting this to a cane, but we do remember something similar attached to a sword.

Historically, getting files on to a microcontroller device was a fraught process. You might have found yourself placing image data manually into arrays in code, or perhaps repeatedly swapping SD cards in and out. For select Arduino boards, that’s no longer a problem – thanks to the new TinyUSB library from Adafruit (Youtube link, embedded below).

The library is available on Github, and is compatible with SAMD21 and SAMD51 boards, as well as Nordic’s NRF52840. It allows the Arduino board to appear as a USB drive, and files can simply be dragged and dropped into place. The library can set up to use SPI flash, SD cards, or even internal chip memory as the storage medium.

Potential applications include images, audio files, fonts, or even configuration files. Future plans include porting the TinyUSB library to the ESP32-S2 as well. Being able to drag a settings file straight on to a board could make getting WiFi boards online much less of a hassle.

We’ve seen other nifty USB libraries before, VUSB is a great option if you need USB on your AVR microcontroller. Video after the break.

Music, food, and coding style have one thing in common: we all have our own preferences. On the other hand, there are arguably more people on this planet than there are varieties in any one of those categories, so we rarely fail to find like-minded folks sharing at least some of our taste. Well, in case your idea of a good time is calling a service hotline for some exquisite tunes, [Fuzzy Wobble] and his hold music jukebox, appropriately built into a telephone, is just your guy.

Built around an Arduino with an Adafruit Music Maker shield, [Fuzzy Wobble] uses the telephone’s keypad as input for selecting one of the predefined songs to play, and replaced the phone’s bell with a little speaker to turn it into a jukebox. For a more genuine experience, the audio is of course also routed to the handset, although the true hold music connoisseur might feel disappointed about the wide frequency range and lack of distortion the MP3s used in his example provide. Jokes aside, projects like these are a great reminder that often times, the journey really is the reward, and the end result doesn’t necessarily have to make sense for anyone to enjoy what you’re doing.

As these old-fashioned phones gradually disappear from our lives, and even the whole concept of landline telephony is virtually extinct in some parts of the world already, we can expect to see more and more new purposes for them. Case in point, this scavenger hunt puzzle solving device, or the rotary phone turned virtual assistant.

As an avid fan of the show Dr Who, [Adam Sifounakis] saw a model for a laser-cut TARDIS that piqued his curiosity that eventually grew into a multi-week project involving multiple setbacks, missteps, revamps and — finally — gratification. Behold, his sound activated TARDIS.

First and foremost, assembling and painting the model was a fun puzzle — despite a few trips to the store — with a little backtracking on the painting due to impatience. Next, the creation of a pulsing soft white LED circuit timed with an audio clip to really sell the image of a mini-TARDIS proved to be a tedious ordeal, paying off in the end with a satisfying glow through the vellum-diffused windows on the model.

How to trigger the lights? [Sifounakis] initially wanted a capacitive sensor to trigger the sound effects, but that way lay dragons — and madness — so he went with snap-activated effect to activate the TARDIS like the Doctor himself. After struggling with building his own microphone setup, he switched to an electret mic with adjustable gain which worked like a charm. Setting up this TARDIS’ Adafruit Pro Trinket brain involved a snag or two, and after that it was smooth sailing!

Until he hit another hitch with the power circuit too, that is. Luckily enough, adding a capacitor to give the circuit a bit more juice on boot solved the issue. All that was left to do was dismantle and rebuild his circuit after all this troubleshooting and substitutions, and — finally — install it in his model.

With much satisfaction and a final rework of the LED pulsing effect, it was done. Check it out!

Be it in the shape of an infrasonic subwoofer, a motion-sensing alarm, or topping Christmas trees, the TARDIS never fails to amaze.


Filed under: Arduino Hacks, hardware

Ok, this one is a bit bizarre, but in perfect keeping with the subject matter: a talking toilet ripped from the pages of the Captain Underpants children’s books. Hackaday.io user [hamblin.joe]’s county fair has a toilet decorating contest and at the suggestion of their neighbour’s son, [hamblin.joe] hatched a plan to automate the toilet using an Arduino in the fashion of the hero’s foes.

Two Arduinos make up this toilet’s brains, an Adafruit Wave Shield imbues it with sound capabilities, and a sonic wave sensor will trigger the toilet’s performance routine when someone approaches. A windshield wiper motor actuates the toilet bowl lid via a piece of flat iron bar connected to a punched angle bracket. Installing the motor’s mount was a little tricky, since it had to be precisely cut so it wouldn’t shift while in the toilet bowl. A similar setup opens the toilet tank’s lid, but to get it working properly was slightly more involved. Once that was taken care of there was enough room left over for a pair of 12V batteries and a speaker. Oh, and a pair of spooky eyes and some vicious looking teeth.

If you have a limited number of bathrooms at home or at work, some signage would be useful to know when it’s free and how dangerous it is to enter.


Filed under: Arduino Hacks, Uncategorized


  • Newsletter

    Sign up for the PlanetArduino Newsletter, which delivers the most popular articles via e-mail to your inbox every week. Just fill in the information below and submit.

  • Like Us on Facebook