Bedeck your Feather project with a beautiful Adafruit TFT FeatherWing, 3.5″ 480×320 Capacitive Touchscreen. This TFT display is 3.5″ diagonal with a bright white-LED backlight and a built-in microSD card socket. You get a massive 480×320 pixels with individual 16-bit color pixel control. This display comes with a multi-touch capacitive touchscreen to detect up to 5 finger presses anywhere on the screen.
The Adafruit 3.5″ Capacitive Touch TFT FeatherWing guide has everything you need to get started with using this FeatherWing. There’s pages for overview, pinouts, CircuitPython, Arduino and resources for download.
Add some jazz & pizazz to your project with a color touchscreen LCD. This TFT display is big (3.5″ diagonal) bright (6 white-LED backlight) and colorful! 480×320 pixels with individual RGB pixel control, this has way more resolution than a black and white 128×64 display, and double our 2.8″ TFT. As a bonus, this display has a capacitive touchscreen attached to it already, so you can detect finger presses anywhere on the screen.
The Adafruit 3.5″ 320×480 Color TFT breakout guide has been updated for rev B of the breakout. We’ve updated this hardware to use the FT5336 capacitive touch screen controller. The screen and micro SD card are the same but any touchscreen code will need to be updated to use our Arduino or CircuitPython library. We’ve also updated the reset button to be right-angle and added a STEMMA QT port. There’s also an EYESPI connector for easy interfacing with the SPI pins. We have a new Pinouts page, new Arduino example, new CircuitPython example and updated resources on the Downloads page.
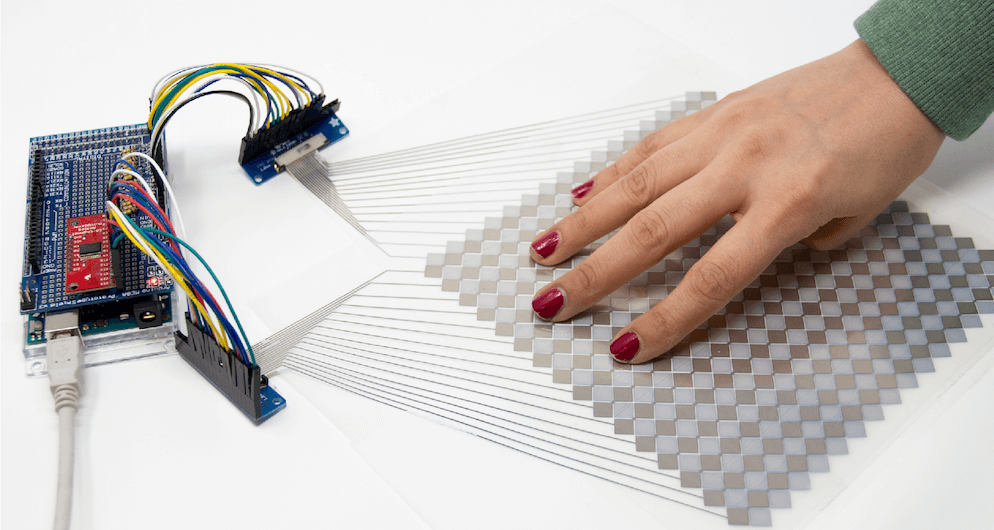
You likely use touchscreens every day when interacting with your phone — perhaps even to read this article — but prototyping your own capacitive matrix is unfortunately out of reach for most makers and electronics novices. As seen here, researchers have devised a new technique that will allow for easier prototyping of this type of interface, which can function on both flat and curved surfaces, over a variety of materials.
To accomplish this, the team developed an Arduino library, as well as one for Processing, and used OpenCV to track multiple finger positions. Interactions have been tested with an Uno, Mega and LilyPad, and would presumably work with almost any other Arduino board as needed!
We introduce Multi-Touch Kit, a low-cost do it-yourself technique to enable interaction designers, makers, and electronics novices alike to rapidly create and experiment with high-resolution multi-touch sensors of custom sizes, ge ometries, and materials.
In contrast to existing solutions, the Multi-Touch Kit is the first technique that works with a commodity microcontroller (our implementation uses a standard Arduino) and does not require any specialized hardware. As a technical enabler, we contribute a modified multi-touch sensing scheme that lever ages the human body as a transmission channel of MHz range signals through a capacitive near-field coupling mechanism. This leads to a clean signal that can be readily processed with the Arduino’s built-in analog-to-digital converter, resulting in a sensing accuracy comparable to industrial multi-touch con trollers. Only a standard multiplexer and resistors are required alongside the Arduino to drive and read out a touch sensor matrix.
The technique is versatile and compatible with many types of multi-touch sensor matrices, including flexible sensor films on paper or PET, sensors on textiles, and sensors on 3D printed objects. Furthermore, the technique is compatible with sensors of various scale, curvature, and electrode materials (silver, copper, conductive yarn) fabricated using conductive printing, hand-drawing with a conductive pen, cutting, or stitching.
We all have a gaming system in our pocket or purse and some of us are probably reading on it right now. That pocket space is valuable so we have to budget what we keep in there and adding another gaming system is not in the cards, if it takes up too much space. [Kevin Bates] budgeted the smallest bit of pocket real estate for his full-size Arduboy clone, Arduflexboy. It is thin and conforms to his pocket because the custom PCB uses a flexible substrate and he has done away with the traditional tactile buttons.
Won’t a flexible system be hard to play? Yes. [Kevin] said it himself, and while we don’t disagree, a functional Arduboy on a flexible circuit makes up for practicality by being a neat manufacturing demonstration. This falls under the because-I-can category but the thought that went into it is also evident. All the components mount opposite the screen so it looks clean from the front and the components will not be subject to as much flexing and the inputs are in the same place as a traditional Arduboy.
cost = low, practicality = extremely low, customer service problems = high
~[Kevin Bates]
These flexible circuit boards use a polyimide substrate, the same stuff as Kapton tape, and ordering boards is getting cheaper so we can expect to see more of them popping up. Did we mention that we currently have a contest for flexible circuits? We have prizes that will make you sing, just for publishing your flex PCB concept.
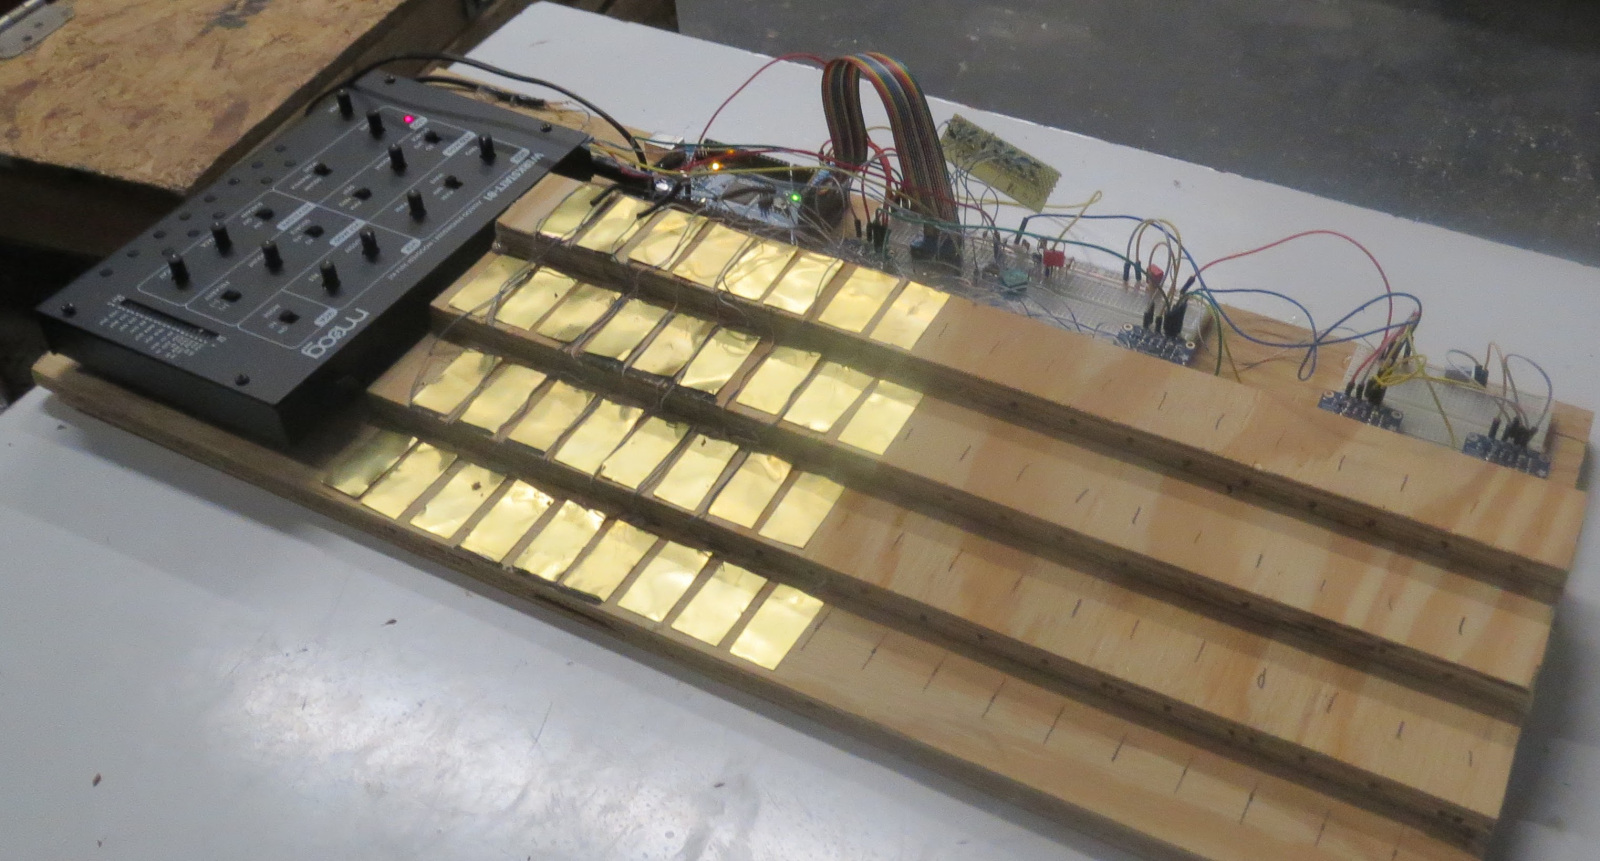
If you have even a passing familiarity with how to play a piano, you know that there are a bunch of long white keys, with a lesser number of black keys in a nearly-universal arrangement. On the other hand, like the standard and much lesser-known Dvorak keyboard for typing, there are alternatives. One such alternative is the Jankó keyboard, which Ben Bradley decided to reconstruct for the Moog Werkstatt using a capacitive touch sensor setup.
His new instrument, which as of his write-up only had 13 keys connected, was constructed for the 2017 Moog Hackathon at Georgia Tech. It uses an Arduino Mega for control along with four MPR121 capacitive touch breakout boards, and as seen in the video below, can be played quite well after only one day of practice!
[sab-art], a collaboration between [Sophia Brueckner] and [Eric Rosenbaum], has created a touch-sensitive musical painting. Initially, basic acrylic paint is used for the majority of the canvas. Once that is dry, conductive paint is used to make the shapes that will be used for the capacitive touch sensing. As an added step to increase the robustness, nails are hammered through each painted shape and connected with wiring in the back of the painting. These wires are then connected to the inputs of a Teensy++ 2.0, using Arduino code based on MaKey MaKey to output MIDI. The MIDI is then sent to a Mac Mini which then synthesizes the sound using Ableton Live. Any MIDI-processing software would work, though. For this particular painting, external speakers are used, but incorporating speakers into your own composition is certainly possible.
A nice aspect of this project is that it can be as simple or as complex as you choose. Multiple conductive shapes can be connected through the back to the same Teensy input so that they play the same sound. While [sab-art] went with a more abstract look, this can be used with any style. Imagine taking a painting of Dogs Playing Poker and having each dog bark in its respective breed’s manner when you touch it, or having spaceships make “pew pew” noises. For a truly meta moment, an interactive MIDI painting of a MIDI keyboard would be sublime. [sab-art] is refining the process with each new painting, so even more imaginative musical works of art are on the horizon. We can’t wait to see and hear them!
We’ve seen capacitive touch organs manifest in pumpkin form. Though they are a neat idea, there’s something about groping a bunch of gourds that stirs a feeling of mild discomfort every time I play one. [mcreed] probably felt the same way and thus created this light-up Jello organ, so he can jiggle-slap Christmas carols, removing any sense of doubt that touching food to play music is weird…
This take on the capacitive tone producing instrument makes clever use of the transparent properties of Jello as well as its trademark wiggling. [mcreed] fills several small mold forms with festively colored strawberry and lime mix. One end of a wire connection is submerged in the liquid of each cup before it has a chance to solidify along with a bright LED. Once chilled and hardened, the gelatinous mass acts as a giant light emitting contact pad. An Arduino is the micro-controller used for the brain, assigning each Jello shape with a corresponding note. By holding onto a grounding wire and completing the acting circuit, one can play songs on the Jello by poking, spanking, or grazing the mounds.
Though I’m not entirely sure if the video is Jello propaganda or not, the idea is applaudable. I prompt anyone to come up with a more absurd item to use for a capacitive organ (zucchinis have already been done).
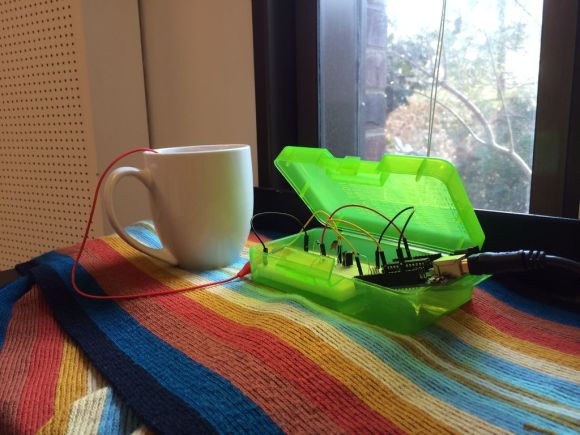
[Bonnie] is majoring in CS at Princeton and minoring in Awesome. She is taking an electronic music class and had to produce a digital instrument for her midterm project. She and her friend [Harvest] came up with Mug Music, which turns a ceramic mug of water into an instrument.
The circuit is very easy to replicate with an Arduino, a coil, and a few resistors and capacitors. [Bonnie] wanted to experiment with Disney Research Lab’s Touché method of touch detection, and Mug Music is based on this Touché for Arduino Instructable. The inputs are turned into MIDI notes with ChucK, a real-time sound synthesis language developed at Princeton.
As you may have guessed and will see in the demonstration video after the jump, you aren’t limited to touching the water. The entire mug will produce sounds as well. [Bonnie] says you can trigger a thunderclap if you touch the water and a grounded surface simultaneously.
This would be a great project to explore with kids, especially as a music therapy vehicle for kids on the autism spectrum. It isn’t as physical as these portable musical stairs, but it may draw less attention from lawyers.
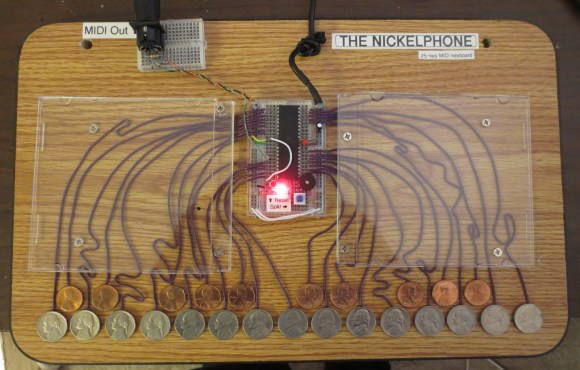
[Tyler Bletsch] sent us a tip about his new build: a keyboard that redefines “coin-operated.” The Nickelphone can emit square wave tones via a piezo buzzer, but [Tyler] made this 25-key piano as a MIDI keyboard capable of driving a full synthesizer.
He chose an ATMega644 as the brain because it’s Arduino-friendly but has more data pins—32—than the usual ATMega328 chip, which allows him to provide each key with its own pin. Each coin was soldered to its own wire and connects up to a 1MΩ resistor array. Coin-presses are recognized by the simple capacitive sensing technique outlined here, but [Tyler] needed to take advantage of a workaround to accurately detect multiple presses.
Check out [Tyler's] detailed project guide for more information as well as the source code. Check out the video of the Nickelphone after the break, then browse through some other capacitive touch hacks, like the Capacitive Touch Business Card or the Capacitive Touch Game Controller.
Planet Arduino is, or at the moment is wishing to become, an aggregation of public weblogs from around the world written by people who develop, play, think on Arduino platform and his son. The opinions expressed in those weblogs and hence this aggregation are those of the original authors. Entries on this page are owned by their authors. We do not edit, endorse or vouch for the contents of individual posts. For more information about Arduino please visit www.arduino.cc
You are currently browsing the archives for the capacitive touch category.


 [Bonnie] is majoring in CS at Princeton and minoring in Awesome. She is taking an electronic music class and had to produce a digital instrument for her midterm project. She and her friend [Harvest] came up with