Posts | Comments

Planet Arduino

Archive for the ‘keypad’ Category

Like so many of us, [EducatedAce] has been quelling the quarantine blues by resurrecting old projects and finding new challenges to fill the days. He’s just finished building this blocky macro keypad to hold a bunch of shortcuts for Photoshop, thus continuing and compounding the creative spree.
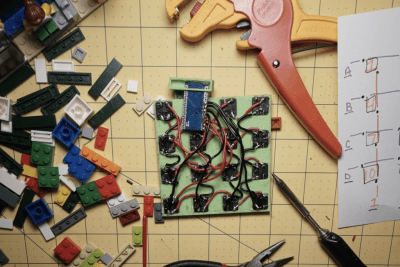
[EducatedAce] already had everything on hand except the Arduino Micro. Instead of standard key switches, this macro block uses 16 of the loudest, crunchiest tactile buttons out there — those big ones with the yellow stems that sound like small staplers.

And don’t worry — no LEGO or LEGO accessories were harmed in the making of this macro pad — the base plate and switch plate are 3D printed. [EducatedAce] has the STL files posted along with great build instructions if you want to wire one up for yourself.

This is a great project because it’s sturdy, it gets the job done without a lot of expense, and still looks like something you’d want on your desk. [EducatedAce] plans to rebuild it with uniformly colored bricks, but we think it looks great as-is, especially with those vented 1×2 pieces. If it were ours, we might use a different color for each row or column to help keep the shortcuts straight.

What? You’ve never printed your own interlocking building blocks before? Well, don’t limit yourself to 1:1 scale, otherwise the minifigs have won. Build a go-kart big enough for humans!

In the heat of the moment, gamers live and die by the speed and user-friendliness of their input mechanisms. If you’re team PC, you have two controllers to worry about. Lots of times, players will choose a separate gaming keyboard over the all-purpose 104-banger type.

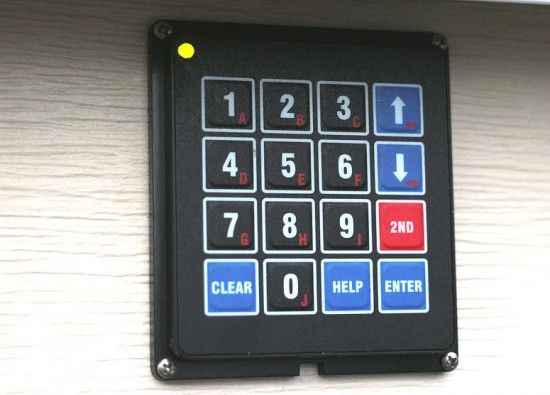
When [John Silvia]’s beloved Fang game pad went to that LAN party in the sky, he saw the opportunity to create a custom replacement exactly as he wanted it. Also, he couldn’t find one with his desired layout. Mechanical switches were a must, and he went with those Cherry MX-like Gaterons we keep seeing lately.

This 37-key game pad, which [John] named Eyetooth in homage to the Fang, has a couple of standout features. For one, any key can be reprogrammed key directly from the keypad itself, thanks to built-in macro commands. It’s keyboard-ception!

One of the macros toggles an optional auto-repeat feature. [John] says this is not for cheating, though you could totally use it for that if you were so inclined. He is physically unable to spam keys fast enough to satisfy some single-player games, so he designed this as a workaround. The auto-repeat’s frequency is adjustable in 5-millisecond increments using the up /down macros. There’s a lot more information about the macros on the project’s GitHub.

Eyetooth runs on an Arduino Pro Micro, so you can either use [John]’s code or something like QMK firmware. This baby is so open source that [John] even has a hot tip for getting quality grippy feet on the cheap: go to the dollar store and look for rubber heel grippers meant to keep feet from sliding around inside shoes.

If [John] finds himself doing a lot of reprogramming, adding a screen with a layout map could help him keep track of the key assignments.

If you want to add a keypad to your Arduino project, the options are pretty limited. There’s that red and blue 4×4 membrane we’ve all seen in password-protected door lock projects, and the phone layout version that does pretty much all the same tricks. Isn’t it time for a full Arduino-compatible keyboard? [ELECTRONOOBS] thinks so.

This 41-button Arduino keyboard PCB is a stepping stone to his next project, a pair of two-way texting machines. (Which is nice, because we were totally going to suggest that). It’s based on that ubiquitous red/blue keypad, but it has a full QWERTY layout. There’s also a shift button that opens up special characters and uppercase, and the addition of return, ok, and send keys puts it over the top. The best part of this keyboard, hands down, is the soft, soundless buttons. Though you trade clicky feedback for comfort, it will be well worth it after a few dozen presses.

The keypad uses an onboard ATMega328P to scan the matrix for button presses, decode them, and send them via UART or I²C to an Arduino. [ELECTRONOOBS] has the PCB files available via Patreon for now, though they will be open in the future. The code is already available for download on his website.

Future plans include an LED to indicate when shift is pressed, and adding the special characters next to the numbers on the silkscreen (whoops!). Be sure to check out the build video after the break.

Want an Arduino-driven keyboard for longer hauls across the alphabet? Saddle up and ride this candy-colored mechanical unicorn.

[Sam Horne] adapted an old school landline phone to deliver clues to birthday party guests. When guests find a numerical clue, they type it into the keypad to hear  the next clue, which involves decoding some Morse code.

The phone consists of an Arduino Pro Mini, a MP3/WAV trigger, and the phone itself, of which the earpiece and keypad have been reused. [Sam] had to map out the keypad and solder leads connecting the various contact points of the phone’s PCB to the Arduino’s digital pins. He used a digitally-generated voice to generate the audio files, and employed the Keypad and Password Arduino libraries to deliver the audio clues.

This seems like a great project to do for a party of any age of attendee, though the keying speed is quick. Hopefully [Sam]’s guests have a high Morse WPM or are quick with the pen! For more keypad projects check out this custom shortcut keyboard and printing a flexible keyboard.


Filed under: Arduino Hacks

keypad

Arduino user SamJBoz needed a way to quickly gain access to his garage when he did not have the remote. He designed a simple entry system with 4 digit access codes to allow himself, family and friends to gain quick access to the garage when a remote is not at hand, running on a 5V Arduino Pro Mini. The keypad allows for up to 10 4-digit pin numbers, has a user set master pin number to create and delete user pin numbers and flashes 2 color error codes if something goes wrong.

The hardware BoM consists of a 4×4 keypad, an Arduino Pro Mini, a small custom PCB and a few external electronic parts to complete the design.

He’s been using it flawlessly for a year and you could try to build one too: all the documentation is on github comprehensive of Eagle PCB files for the main board, the Arduino code, BoM, a user manual and some useful construction tips.

promini

Jan
26

Make a Custom Membrane Keypad for Arduino

arduino, keypad, matrix Comments Off on Make a Custom Membrane Keypad for Arduino 

IMG_3660-1024x768

by paulbleisch.com:

My son got one of these Leap Frog toys a few years ago as a gift. He enjoys playing with it very much. I am not sure how much counting and learning he is doing but it makes funny noises and sings to him so its a lot of fun.

Recently the unthinkable happened. It died. Not the batteries but something else. I took the back off to look at what might be wrong (which was very easy for a toy). Unfortunately, other than the speaker, a switch, battery compartment, and a ribbon cable to the front, there wasn’t much to investigate. A couple of glop tops and nothing else. I fiddled a bit more with it but everything “external” seemed fine.

Make a Custom Membrane Keypad for Arduino - [Link]

Jun
04

Simple digital code lock using arduino

arduino, code, keypad, matrix Comments Off on Simple digital code lock using arduino 

digital-codelock

by praveen @ circuitstoday.com:

Digital code lock or digital combination lock are a type of digital locks where a combination of digits/characters or both are used for unlocking the lock. This article is about a simple digital code lock using arduino. Here the code consists of a combination of digits from 1 to 6. There are separate keys for locking and unlocking the system. The system can be unlocked by pressing the unlock button after entering the correct combination of digits. A hex key pad is used as the input device. Only the first two rows of key (1, 2, 3, A, 4, 5, 6, B) are used in this project. A is used for locking the system and B is used for unlocking the system. Read this article Interfacing hex keypad to arduino for knowing more about hex keypad and its interfacing to the arduino. The circuit diagram of the digital code lock using arduino is shown in the figure below.

Simple digital code lock using arduino - [Link]

Jun
04

Simple digital code lock using arduino

arduino, code, keypad, lock, matrix Comments Off on Simple digital code lock using arduino 

digital-codelock

by praveen @ circuitstoday.com:

Digital code lock or digital combination lock are a type of digital locks where a combination of digits/characters or both are used for unlocking the lock. This article is about a simple digital code lock using arduino. Here the code consists of a combination of digits from 1 to 6. There are separate keys for locking and unlocking the system. The system can be unlocked by pressing the unlock button after entering the correct combination of digits. A hex key pad is used as the input device. Only the first two rows of key (1, 2, 3, A, 4, 5, 6, B) are used in this project. A is used for locking the system and B is used for unlocking the system. Read this article Interfacing hex keypad to arduino for knowing more about hex keypad and its interfacing to the arduino. The circuit diagram of the digital code lock using arduino is shown in the figure below.

Simple digital code lock using arduino - [Link]

May
27

Keypad Input Validation using State Machine Programming

arduino, keypad, State Machine Comments Off on Keypad Input Validation using State Machine Programming 

IMG_6697

by Tony Keith:

You have a project that accepts commands using a 16 button keypad and want to perform validation on the commands as each character is typed. But how? Use state machine logic / programming to solve the problem. If you aren’t familiar with or haven’t used state machine logic in programming, it is the easiest way to to break complex problems into manageable states and state transitions especially for handling serial input. One of the easiest ways to implement a state machine is to use a switch statement. In my opinion it is the only way to implement serial input commands.

Keypad Input Validation using State Machine Programming - [Link]

arduino door pad

[Andrea] just sent us this great student hack he made for his room. He’s constructed an Arduino keypad door lock – without using any proper fastening hardware!

The entire build is made out of scrap parts he had lying around: some DVD’s, a bit of wood, an allen key, a motor and belt from a broken printer, an old hard drive enclosure, and a few power supplies. As you can see the entire setup is held up rather artistically using good old duct tape.

The system auto-locks after 5 seconds, and just in case, [Andrea] has hard-coded in a few safety codes into the firmware to allow him to forcefully open the door — you know, if it malfunctions or something. Not overly confident in his code, he also has it reset every 5 minutes of idling to safeguard against potential memory leaks — probably a good idea! All in all it’s a very cool build, and we have to give him props for not damaging the door to mount it! Down the road he’s also planning on adding a knock sensor using the small speaker that is already part of the circuit, because, why not?

Stick around after the break to see this magnificent contraption that would make Red Green proud.


Filed under: Arduino Hacks, home hacks


  • Newsletter

    Sign up for the PlanetArduino Newsletter, which delivers the most popular articles via e-mail to your inbox every week. Just fill in the information below and submit.

  • Like Us on Facebook