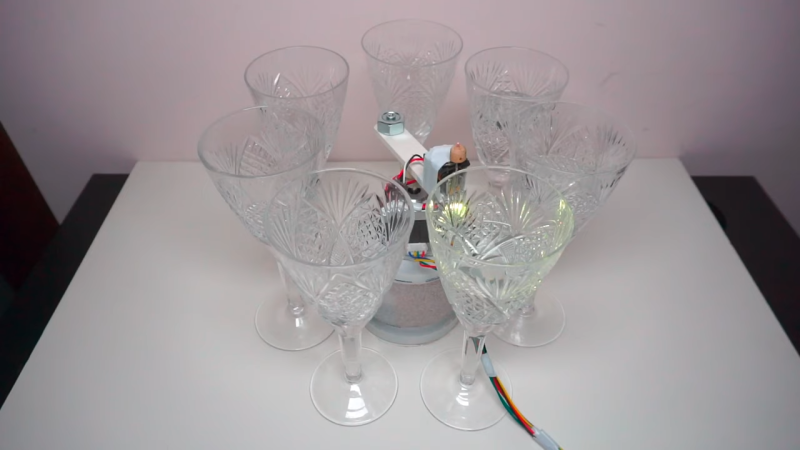
Have you ever been on a city street and seen a busker playing music on glasses? Each glass has a different amount of water and produces a different note when tapped. [Cyberlab] must have seen them and created an Arduino robot to play tunes on glasses. You can see the result in the video below.
If we had done this, we might have had a solenoid per glass or used some linear component like a 3D printer axis to pick different glasses. [Cyberlab] did something smarter. The glasses go in a circle and a stepper motor points at the correct glass and activates a solenoid. The result is pretty good and it is a lot simpler than any of our ideas.
If you aren’t musically inclined, you might wonder how you’d program the songs. There’s an example of taking a music box score from a website — apparently, there are lots of these — and removing any polyphony from it. The site mentioned even has an editor where you can import MIDI files and work with them to produce a music box strip that you could then convert. Then you encode each note as a number from 0 to 6.
Of course, you also have to fill your glasses with the right amount of water. A piano tuning phone app should be useful. We’ve seen this done in a linear fashion before. You can even use a single glass for many notes with a little ingenuity.
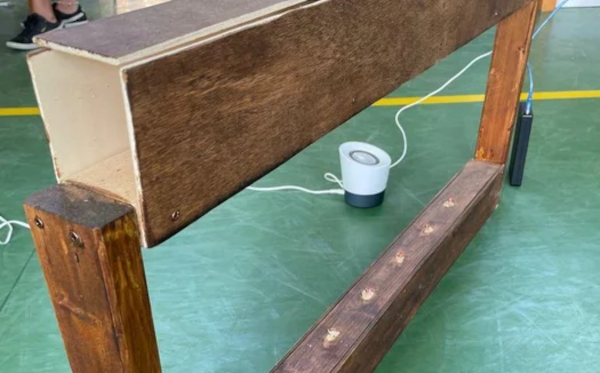
We aren’t sure if you really need lasers to build [HoPE’s] laser harp. It is little more than some photocells and has an Arduino generate tones based on the signals. Still, you need to excite the photocells somehow, and lasers are cheap enough these days.
Mechanically, the device is a pretty large wooden structure. There are six lasers aligned to six light sensors. Each sensor is read by an analog input pin on an Arduino armed with a music-generation shield. We’ve seen plenty of these in the past, but the simplicity of this one is engaging.
We’ve used the copper tape writing trick ourselves and it is quite effective. The tape is often used for stained glass work and sticks to many surfaces. You can solder to it and solder overlaps where you need connections. The results are often as good as a simple single-sided PCB.
The code attached to the post is fairly straightforward and the MIDI shield does the bulk of the work. It should also make it easy to create some really impressive musical effects with a bit of extra coding.
Step sequencers are fantastic instruments, but they can be a little, well, repetitive. At it’s core, the step sequencer is a pretty simple device: it loops through a series of notes or phrases that are, well, sequentially ordered into steps. The operator can change the steps while the sequencer is looping, but it generally has a repetitive feel, as the musician isn’t likely to erase all of the steps and enter in an entirely new set between phrases.
Enter our old friend machine learning. If we introduce a certain variability on each step of the loop, the instrument can help the musician out a bit here, making the final product a bit more interesting. Such an instrument is exactly what [Charis Cat] set out to make when she created the After Eight Step Sequencer.
The After Eight is an eight-step sequencer that allows the artist to set each note with a series of potentiometers (which are, of course, housed in an After Eight mint tin). The potentiometers are read by an Arduino, which passes MIDI information to a computer running the popular music-oriented visual programming language Max MSP. The software uses a series of Markov Chains to augment the musician’s inputted series of notes, effectively working with the artist to create music. The result is a fantastic piece of music that’s different every time it’s performed. Make sure to check out the video at the end for a fantastic overview of the project (and to hear the After Eight in action, of course)!
[Charis Cat]’s wonderful creation reminds us of some the work [Sara Adkins] has done, blending human performance with complex algorithms. It’s exactly the kind of thing we love to see at Hackaday- the fusion of a musician’s artistic intent with the stochastic unpredictability of a machine learning system to produce something unique.
In many parts of the world the COVID-19 pandemic is causing shortages in hospital space, staff, medical supplies, and equipment. Severe cases may require breathing support, but there are only so many ventilators available. With that in mind, MIT is working on FDA approval of an emergency ventilator system (E-Vent). They have submitted the design to the FDA for fast track review. The project is open source, so once they have approval the team will release all the data needed to replicate it.
The design is actually made simple by using something that is very common: a manual resuscitator. You have doubtlessly seen these on your favorite medical show. It is the bag someone squeezes while the main character struggles valiantly to save their patient. Of course, having someone sit and squeeze the bag for days on end for thousands of people isn’t very practical and that’s where they’ve included an Arduino-controlled motor to automate the process.
The tricky thing is that, forcing air into your lungs isn’t always good for them. Even healthy lungs can be stressed by too much inflation and people who already have lung problems may be able to handle only a tenth of what a healthy set can manage. That’s why the device needs a closed loop control system that monitors pressure from the patient and modifies the flow.
Any solution should be utilized only in a healthcare setting with direct monitoring by a clinical professional. While it cannot replace an FDA-approved ICU ventilator, in terms of functionality, flexibility, and clinical efficacy, the MIT E-Vent is anticipated to have utility in helping free up existing supply or in life-or-death situations when there is no other option.
Further, any low-cost ventilator system must take great care regarding providing clinicians with the ability to closely control and monitor tidal volume, inspiratory pressure, bpm, and I/E ratio, and be able to provide additional support in the form of PEEP, PIP monitoring, filtration, and adaptation to individual patient parameters. We recognize, and would like to highlight for anyone seeking to manufacture a low-cost emergency ventilator, that failing to properly consider these factors can result in serious long-term injury or death.
This isn’t a unique idea, and the MIT team provides links to other similar projects. The team’s work is not totally online yet, because they are still testing. For example, the acrylic apparatus that squeezes the bag may not hold up to the repetitive stress very well. The team may look to other projects that predated the crisis. For example, have a look at the AIR device presented at a conference last year in the video below. There’s also this interesting document from a Johns Hopkins resident.
Almost as interesting as the device itself is the comments people are leaving about the design. It is a great example of how the Internet opens up totally new ways to collaborate on a critical problem like this one.
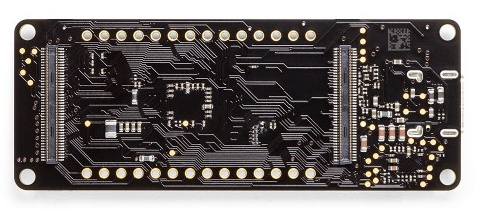
The Consumer Electronics Show in Las Vegas is traditionally where the big names in tech show off their upcoming products, and the 2020 show was no different. There were new smartphones, TVs, and home automation devices from all the usual suspects. Even a few electric vehicles snuck in there. But mixed in among flashy presentations from the electronics giants was a considerably more restrained announcement from a company near and dear to the readers of Hackaday: Arduino is going pro.
While Arduino has been focused on the DIY and educational market since their inception, the newly unveiled Portenta H7 is designed for professional users who want to rapidly develop robust hardware suitable for industrial applications. With built-in wireless hardware and the ability to run Python and JavaScript out of the box, the powerful dual-core board comes with a similarly professional price tag; currently for preorder at $99 USD a pop, the Portenta is priced well outside of the company’s traditional DIY and educational markets. With increased competition from other low-cost microcontrollers, it seems that Arduino is looking to expand out of its comfort zone and find new revenue streams.
That’s a Lot of Pins
The Portenta H7 is obviously a far cry from the relatively dinky 8-bit Arduinos that we’ve all got filling up our parts drawers. Developed for high performance edge computing applications, the new board is powered by a 32-bit STM32H747XI that utilizes both an ARM Cortex M7 and an M4 running at 480 MHz and 240 MHz respectively. The two cores can work independently, allowing for example one core to run interpreted Python while the other runs code compiled in the Arduino IDE. When they need to work together, the cores can communicate with each other via a Remote Procedure Call (RPC) mechanism.
The new 80-pin connectors on the Portenta
Outwardly, the new board doesn’t look far removed from the modern Arduino form factor we’re used to. The USB connector has been upgraded to a Type-C, but the Portenta still retains the dual rows of pads ready for hand-soldered headers — that’s their more recent pinout that they call the Arduino MKR form factor.
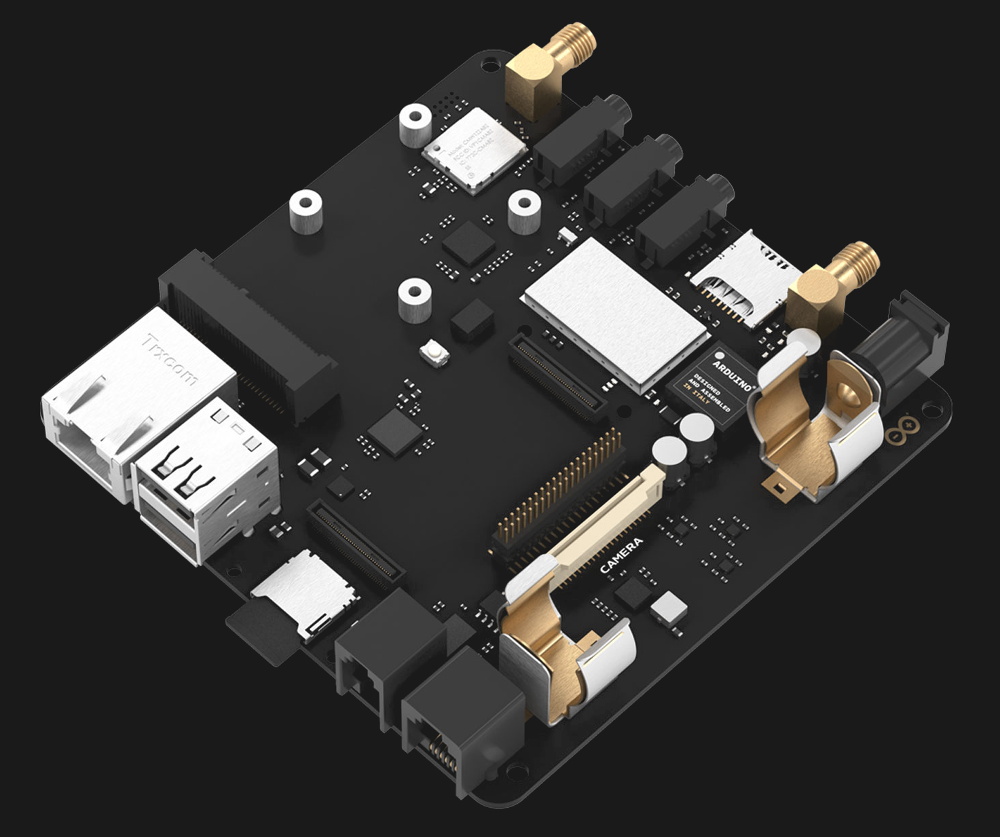
If you look on the back of the board however, you’ll see that they’ve added two 80-pin high density connectors. According to the product page, these are intended to allow the Portenta to simply be plugged into a device as a removable module. The idea being that devices in the field can easily have their Portenta swapped out for an upgraded model. Some digging into the product page documentation section turns up a schematic that lists the connectors as Hirose DF40C-80DP-0.4V(51).
The base model Portenta features 8 MB SDRAM and 16 MB NOR flash, but it can be custom ordered with up to 64 MB of memory and 128 MB of flash should you need it. It’s also possible to delete various interfaces from the board when ordering, so if you don’t want network connectivity or the NXP SE050C2 crypto chip, they can simply be left off. However as of this writing it is unclear as to what minimum order quantity is necessary to unlock this level of customization, or or how much these modifications will change the unit cost.
Year of the Arduino Desktop?
The Portenta Carrier Board
The Portenta H7 is an impressive enough piece of hardware on its own, but when it’s plugged into the optional Carrier Board, things really start to get interesting. The Carrier Board provides full size connectors for all of the onboard peripherals, and according to documentation, turns the Portenta into an eNUC-class embedded computer. There’s even support for DisplayPort to connect a monitor, and miniPCI for expansion cards.
With a fully loaded Portenta H7 slotted into the Carrier Board, it would seem you have the makings of a low-power ARM “desktop” computer. Albeit one that wouldn’t outperform the Raspberry Pi Zero, and which costs several times more.
The Arduino press release and product page doesn’t make any mention of what kind of software or operating system said computer would run, so presumably that’s left as an exercise for the customer. While not particularly well suited to it, the ARM Cortex-M family of processors is capable of running the Linux kernel, so spinning up a “real” OS image for it should be possible. Of course with a maximum of just 64 MB of RAM, you’ll want to keep your performance expectations fairly low.
Where Does Portenta Fit?
We can’t even speculate what a maxed out Portenta would cost, and there’s no pricing or release date for the Carrier Board. But even at $99, the base model Portenta H7 would be a tough sell for hackers and makers who are used to buying dual-core ESP32 boards at 1/10 of the price, or the Teensy 4.0 which has a 600 MHz Cortex-M7 at 1/4 of the price. Which is fine, since this board isn’t intended for the traditional core Arduino audience.
Seeing the carrier board, we can’t help but notice some parallels here with the Raspberry Pi Compute Module. With connections broken out to a SODIMM header, the idea of the Computer Module was to help bridge the gap between the DIY community and the commercial one by offering up a Raspberry Pi in a more rugged form factor that would be easier to integrate into end-user products. But since it wasn’t any cheaper than the stock Pi, there wasn’t a whole lot of incentive to switch over. We haven’t seen consumer products advertising “Raspberry Pi Inside!” so it’s hard to tell if there has been any meaningful adoption from industry.
One has to wonder why any company that has the resources to integrate such an expensive board into their products wouldn’t just come up with their own custom design around the Portenta’s STM32H747XI chip, which even in single quantities, can currently be had for less than $15. The difference may end up coming down to the world-renowned community that surrounds the Arduino brand, and the company’s efforts to modernize their toolchain.
The Consumer Electronics Show in Las Vegas is traditionally where the big names in tech show off their upcoming products, and the 2020 show was no different. There were new smartphones, TVs, and home automation devices from all the usual suspects. Even a few electric vehicles snuck in there. But mixed in among flashy presentations from the electronics giants was a considerably more restrained announcement from a company near and dear to the readers of Hackaday: Arduino is going pro.
While Arduino has been focused on the DIY and educational market since their inception, the newly unveiled Portenta H7 is designed for professional users who want to rapidly develop robust hardware suitable for industrial applications. With built-in wireless hardware and the ability to run Python and JavaScript out of the box, the powerful dual-core board comes with a similarly professional price tag; currently for preorder at $99 USD a pop, the Portenta is priced well outside of the company’s traditional DIY and educational markets. With increased competition from other low-cost microcontrollers, it seems that Arduino is looking to expand out of its comfort zone and find new revenue streams.
That’s a Lot of Pins
The Portenta H7 is obviously a far cry from the relatively dinky 8-bit Arduinos that we’ve all got filling up our parts drawers. Developed for high performance edge computing applications, the new board is powered by a 32-bit STM32H747XI that utilizes both an ARM Cortex M7 and an M4 running at 480 MHz and 240 MHz respectively. The two cores can work independently, allowing for example one core to run interpreted Python while the other runs code compiled in the Arduino IDE. When they need to work together, the cores can communicate with each other via a Remote Procedure Call (RPC) mechanism.
The new 80-pin connectors on the Portenta
Outwardly, the new board doesn’t look far removed from the modern Arduino form factor we’re used to. The USB connector has been upgraded to a Type-C, but the Portenta still retains the dual rows of pads ready for hand-soldered headers — that’s their more recent pinout that they call the Arduino MKR form factor.
If you look on the back of the board however, you’ll see that they’ve added two 80-pin high density connectors. According to the product page, these are intended to allow the Portenta to simply be plugged into a device as a removable module. The idea being that devices in the field can easily have their Portenta swapped out for an upgraded model. Some digging into the product page documentation section turns up a schematic that lists the connectors as Hirose DF40C-80DP-0.4V(51).
The base model Portenta features 8 MB SDRAM and 16 MB NOR flash, but it can be custom ordered with up to 64 MB of memory and 128 MB of flash should you need it. It’s also possible to delete various interfaces from the board when ordering, so if you don’t want network connectivity or the NXP SE050C2 crypto chip, they can simply be left off. However as of this writing it is unclear as to what minimum order quantity is necessary to unlock this level of customization, or or how much these modifications will change the unit cost.
Year of the Arduino Desktop?
The Portenta Carrier Board
The Portenta H7 is an impressive enough piece of hardware on its own, but when it’s plugged into the optional Carrier Board, things really start to get interesting. The Carrier Board provides full size connectors for all of the onboard peripherals, and according to documentation, turns the Portenta into an eNUC-class embedded computer. There’s even support for DisplayPort to connect a monitor, and miniPCI for expansion cards.
With a fully loaded Portenta H7 slotted into the Carrier Board, it would seem you have the makings of a low-power ARM “desktop” computer. Albeit one that wouldn’t outperform the Raspberry Pi Zero, and which costs several times more.
The Arduino press release and product page doesn’t make any mention of what kind of software or operating system said computer would run, so presumably that’s left as an exercise for the customer. While not particularly well suited to it, the ARM Cortex-M family of processors is capable of running the Linux kernel, so spinning up a “real” OS image for it should be possible. Of course with a maximum of just 64 MB of RAM, you’ll want to keep your performance expectations fairly low.
Where Does Portenta Fit?
We can’t even speculate what a maxed out Portenta would cost, and there’s no pricing or release date for the Carrier Board. But even at $99, the base model Portenta H7 would be a tough sell for hackers and makers who are used to buying dual-core ESP32 boards at 1/10 of the price, or the Teensy 4.0 which has a 600 MHz Cortex-M7 at 1/4 of the price. Which is fine, since this board isn’t intended for the traditional core Arduino audience.
Seeing the carrier board, we can’t help but notice some parallels here with the Raspberry Pi Compute Module. With connections broken out to a SODIMM header, the idea of the Computer Module was to help bridge the gap between the DIY community and the commercial one by offering up a Raspberry Pi in a more rugged form factor that would be easier to integrate into end-user products. But since it wasn’t any cheaper than the stock Pi, there wasn’t a whole lot of incentive to switch over. We haven’t seen consumer products advertising “Raspberry Pi Inside!” so it’s hard to tell if there has been any meaningful adoption from industry.
One has to wonder why any company that has the resources to integrate such an expensive board into their products wouldn’t just come up with their own custom design around the Portenta’s STM32H747XI chip, which even in single quantities, can currently be had for less than $15. The difference may end up coming down to the world-renowned community that surrounds the Arduino brand, and the company’s efforts to modernize their toolchain.
People who were subscribed to updates on the Alexa Connect Kit (ACK) would recently have received an email informing that this kit is now available for sale. Last time we covered the ACK was back in September of 2018, the ‘release’ moniker meant ‘preview’ and there wasn’t any hardware one could actually purchase.
Over a year a later it seems that we can now finally get our grubby mitts on this kit that should enable us to make any of our projects Alexa-enabled. What this basically seems to mean is that one can spend close to 200 US dollars on an Arduino Zero and an Arduino shield-mounted WM-BN-MT-52 module from USI (though not listed on their site, but similar to the WM-BN-BM-22?) that integrates a 192 MHz Cortex-M MCU and a WiFi/Bluetooth module, as summarized on the Amazon Developer page for the ACK.
Getting Started with ACK
The idea behind the kit is that one uses the Arduino IDE to program the Cortex-M0+-based Arduino board with the application firmware. The fully assembled kit will listen on the network for any service discovery broadcast from an Alexa app (on a smartphone or similar), responding to such a broadcast with a summary of its capabilities, following the Smart Home Skill API protocol. This is essentially the application of mDNS with DNS-SD (Service Discovery).
After the Alexa app on one’s smarthome has found all Alexa-enabled devices, you can then use the Alexa voice interface to control those devices, such as turning them on and off, or adjusting parameters like the speed of a PWM-controlled fan. The Amazon Developer site provides an overview of what kind of devices are supported by the Alexa system for reference.
Welcome to the Amazon Walled Garden
For those who already rushed out to get an ACK, they will have run into the unfortunate realization that the ACK is not merely a fun piece of hardware to play around with. By purchasing it, you are literally signing up to become a part of the Amazon ecosystem, starting by registering the Amazon Developer Account. As noted by the intrepid reporters over at The Register last year, part of the cost of the ACK is you paying for the Amazon cloud services that enable the ACK to work, with Amazon’s Alexa servers doing the heavy lifting of interpreting customer utterances for you.
The WiFi/Bluetooth module that one gets with the ACK also seems rather secretive, with no datasheet or detailed information available on the internet at the time of writing. It appears to be limited to 802.11 b/g/n (2.4 GHz single-band) WiFi with no mention of anything newer than Bluetooth 4.1 support, meaning it misses out on the energy-saving features in Bluetooth 5 (and BLE).
So then there is the cool thing on one hand that with a bit of Arduino wrangling and the use of the Alexa Android app (or that Echo in your living room), you can make that smart toaster you have always dreamed of, allowing you to burn toast with a simple voice command. On the other hand it means that you fully rely on Amazon’s Alexa infrastructure and the continued existence of ACK support.
We Have Been Here Before
Those with a few years of Internet-of-Things news under their belt may remember Apple’s Homekit, which from a distance at least looks to be a carbon copy of the Alexa Connect Kit, with Apple-blessed hardware and SDK that people would have to integrate into their product to enable Smart Home goodness. Homekit is now pretty much on life-support.
Apple Homekit on iPad, iPhone and iWatch.
Apple decided to throw in the proprietary towel last year, instead joining the Thread Group, which was started by Google and ARM, and which focuses on creating a low-power wireless networking protocol, suitable for connecting smart devices within the home. Thread is built around IEEE 802.15.4, which specifies a low-rate wireless personal area network (LR-WPAN). This same standard underlies Zigbee. Networks supporting this standard are low-power and feature data rates of <1 Mb.
The skeptical view then is that WiFi-based home automation like what ACK offers is beating the same dead horse which Apple seemed to have been beating with Homekit, merely with Alexa instead of Siri. The same skeptic is also likely to note that the Thread protocol is not the open and free panacea some may see it as, with one having to be a (paying) member of the Thread Group to be allowed to have any input on its development, and to be allowed to ship Thread-enabled devices. But if you’re still itching to jump on the Alexa-enabled bandwagon and can live with the spectre of Amazon rule, the door is now open.
While the Arduino has a very vocal fan club, there are always a few people less than thrilled with the ubiquitous ecosystem. While fans may just dismiss it as sour grapes, there are a few legitimate complaints you can fairly level at the stock setup. To address at least some of those concerns, Arduino is rolling out the Arduino Pro IDE and while it doesn’t completely address every shortcoming, it is worth a look and may grow to quiet down some of the other criticisms, given time.
For the record, we think the most meaningful critiques fall into three categories: 1) the primitive development environment, 2) the convoluted build system, and 3) the lack of debugging. Of course, there are third party answers for all of these problems, but now the Pro IDE at least answers the first one. As far as we can tell, the IDE hides the build process just like the original IDE. Debugging, though, will have to wait for a later build.
We were happy to see a few things with the new IDE. There’s some autocompletion support, Git is integrated, and there’s still our old friend the serial monitor. The system still uses the Arduino CLI, so that means there isn’t much danger of the development getting out of sync. The actual editor is Eclipse Theia. People typically either love Eclipse or hate it, however, it is at least a credible editor. However, Theia uses Electron which makes many people unhappy because Electron applications typically eat a lot of resources. We’ll have to see how taxing using the new Pro IDE is on typical systems with normal workloads.
On the future feature list is our number one pick: debugging. They are also promising support for new languages, third party plugins, and synchronization with the Web-based editor. All good features.
This is just an alpha preview release, but it is a great start. Our only question is will existing users really care? Most people already write code in another editor. Many use an external build system like PlatformIO. Eclipse already has a plug in for Arduino that supports debugging with the right hardware. So while new users may appreciate the features, advanced users may be wondering why this is so late to the party.
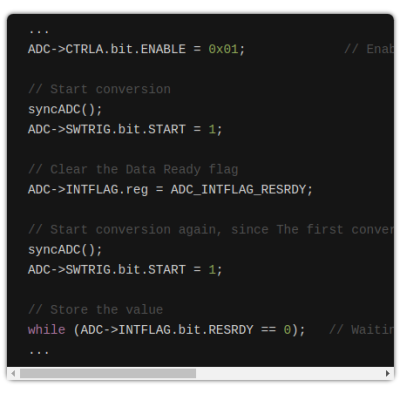
One of the great things about the Arduino environment is that it covers a wide variety of hardware with a common interface. Importantly, this isn’t just about language, but also about abstracting away the gory details of the underlying silicon. The problem is, of course, that someone has to decode often cryptic datasheets to write that interface layer in the first place. In a recent blog post on omzlo.com, [Alain] explains how they found a bug in the Arduino SAMD21 analogRead() code which causes the output to be offset by between 25 mV and 57 mV. For a 12-bit ADC operating with a reference of 3.3 V, this represents a whopping error of up to 70 least-significant-bits!
Excerpt from the SAMD wiring_analog.c file in the Arduino Core repo.
While developing a shield that interfaces to 24 V systems, the development team noticed that the ADC readings on a SAMD21-based board were off by a consistent 35 mV; expanding their tests to a number of different analog pins and SAMD21 boards, they saw offsets between 25 mV and 57 mV. It seems like this offset was a known issue; Arduino actually provides code to calibrate the ADC on SAMD boards, which will “fix” the problem with software gain and offset factors, although this can reduce the range of the ADC slightly. Still, having to correct for this level of error on a microcontroller ADC in 2019 — or even 2015 when the code was written — seems really wrong.
After writing their own ADC read routine that produced errors of only between 1 mV and 5 mV (1 to 6 LSB), the team turned their attention to the Arduino code. That code disables the ADC between measurements, and when it is re-enabled for each measurement, the first result needs to be discarded. It turns out that the Arduino code doesn’t wait for the first, garbage, result to finish before starting the next one. That is enough to cause the observed offset issue.
It seems odd to us that such a bug would go unnoticed for so long, but we’ve all seen stranger things happen. There are instructions on the blog page on how to quickly test this bug. We didn’t have a SAMD21-based Arduino available for testing before press time, but if you’ve got one handy and can replicate these experiments to verify the results, definitely let us know in the comments section below.
Sometimes it seems like Arduino is everywhere. However, with a new glut of IoT processors, it must be quite a task to keep the Arduino core on all of them. Writing on the Arduino blog, [Martino Facchin], Arduino’s chief of firmware development, talks about the problem they faced supporting two new boards from Nordic.
The boards, the Nano 33 BLE and Nano 33 BLE Sense are based on an ARM Cortex M4 CPU from Nordic. The obvious answer, of course, is to port the Arduino core over from scratch. However, the team didn’t want to spend the time for just a couple of boards. They considered using the Nordic libraries to interact with the hardware, but since that is closed source, it didn’t really fit with Arduino’s sensitivities. However, in the end, they took a third approach which could be a very interesting development: they ported the Arduino core to the Mbed OS. There’s even an example of loading a sketch on top of Mbed available from [Jan Jongboom].
On the one hand, this has two big advantages: in theory, Arduino can now run on anything that supports Mbed, which is quite a lot. Second, even though the system retains the simplicity of Arduino, the entire Mbed system is available to Arduino developers and vice versa.
On the other hand, you could argue that if you have Mbed, you don’t really need Arduino. While much is made about Arduino’s simplicity, it is really a C++ program with two predefined functions and an IDE that builds your code without as much explicit help as you’d expect. However, the wide variety of code that supports Arduino should be of interest since you could just use it from either an Arduino or Mbed program without much effort.
This might make some of our favorite Mbed labs projects more popular. If you want to see our take on an Mbed project, you can turn it into a signal generator.
Planet Arduino is, or at the moment is wishing to become, an aggregation of public weblogs from around the world written by people who develop, play, think on Arduino platform and his son. The opinions expressed in those weblogs and hence this aggregation are those of the original authors. Entries on this page are owned by their authors. We do not edit, endorse or vouch for the contents of individual posts. For more information about Arduino please visit www.arduino.cc
You are currently browsing the archives for the News category.