Posts | Comments

Planet Arduino

Archive for the ‘battery’ Category

ESP32-S3 PowerFeather

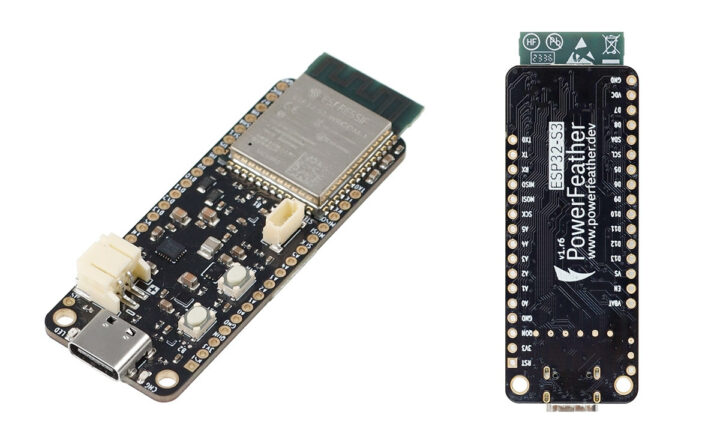
The ESP32-S3 PowerFeather board is an Adafruit Feather-shaped ESP32-S3 WiFi and BLE IoT board that can be powered by a Li-Ion or LiPo battery and supports up to 18V DC input for direct connection to a solar panel. The developer told CNX Software that the main differentiating factor from other ESP32-S3 development boards was “its extensive power management and monitoring features” with a wide DC input range, supply and battery monitoring, and battery protection features. ESP32-S3 PowerFeather specifications: ESP32-S3-WROOM-1-N8R2 MCU – ESP32-S3 dual-core Tensilica LX7 up to 240 MHz with 512KB SRAM, 16 KB RTC SRAM Memory – 2MB QSPI PSRAM Storage – 8MB QSPI flash Wireless – WiFi 4 and Bluetooth 5 LE + Mesh; PCB antenna USB – 1x USB-C 1.1 OTG port for power and programming Expansion 2x 16-pin 2.54 mm pitch headers with 23x multi-function GPIO: UART, I2C, SPI, I2S, SDIO, PWM, CAN, RMT, Camera, LCD [...]

The post ESP32-S3 PowerFeather board supports up to 18V DC for solar panel input appeared first on CNX Software - Embedded Systems News.

Sparkfun Thing Plus - RA6M5

SparkFun Thing Plus – RA6M5 is a small MCU board based on a 200 MHz Renesas RA6M5 Cortex-M33 microcontroller and a Renesas DA14531MOD Bluetooth 5.1 LE module that follows Adafruit Feather/Sparkfun Thing Plus form factor. The module can transmit data over BLE with just 4mA (at 3.3V) power consumption and the company claims the board to be powered by a coin-cell battery. A LiPo battery can also be connected to the board through a 2-pin JST battery connector, and the Things Plus – RA6M5 board also features a single-cell charger and LiPo fuel gauge. Sparkfun Thing Plus – RA6M5 specifications: Microcontroller – Renesas R7FA6M5AH3CFP Core – Arm Cortex-M33 microcontroller @ up to 200 MHz Memory – 512KB SRAM Storage – 2MB Flash Security – Arm TrustZone, and Secure Crypto Engine 9 Wireless – Renesas DA14531MOD module for Bluetooth 5.1 LE connectivity with support for CodeLess AT command Datapump Radio Transmit [...]

The post SparkFun Thing Plus – RA6M5 board supports Bluetooth 5.1 LE through Renesas DA14531MOD module appeared first on CNX Software - Embedded Systems News.

SparkFun Thing Plus ESP32-C6

SparkFun has launched yet another ESP32-C6 board with the “Thing Plus – ESP32-C6”  based on the ESP32-C6-WROOM-1-N16 module with 16MB flash and a PCB antenna and  range of I/Os and power options. The board features 28 through holes with up to 23 multi-function GPIOs and a Qwicc connector for expansion, and supports 5V or LiPo battery power through respectively a USB-C port a 2-pin JST connector combined with a charging chip, and a fuel gauge. SparkFun Thing Plus – ESP32-C6 specifications: Wireless module – ESP32-C6-WROOM-1-N16 MCU – ESP32-C6 32-bit single-core RISC-V microcontroller with 2.4 GHz WiFI 6, Bluetooth 5 LE, and 802.15.4 radio (Zigbee and Thread); Matter-compatible Storage – 16 MB flash PCB Antenna Storage – MicroSD card slot USB – 1x USB Type-C port for power and programming Expansion 12-pin + 16-pin headers with 23x multifunctional GPIOs Up to 7x 12-bit ADC channels Up to 2x UART channels (with [...]

The post SparkFun Thing Plus – ESP32-C6 board comes with 16MB flash, LiPo battery support appeared first on CNX Software - Embedded Systems News.

[Trent M. Wyatt]’s CPUVolt library provides a fast way to measure voltage using no external components, and no I/O pin. It only applies to certain microcontrollers, but he provides example Arduino code showing how handy this can be for battery-powered projects.

The usual way to measure VCC is simple, but has shortcomings.

The classical way to measure a system’s voltage is to connect one of your MCU’s ADC pins to a voltage divider made from a couple resistors. A simple calculation yields a reading of the system’s voltage, but this approach has two disadvantages: one is that it constantly consumes power, and the other is that it ties up a pin that you might want to use for something else.

There are ways to mitigate these issues, but it would be best to avoid them entirely. Microchip application note 2447 describes a method of doing exactly that, and that’s precisely what [Trent]’s Arduino library implements.

What happens in this method is one selects Vbg (a fixed internal voltage reference that is temperature-independent) as Vin, and selects Vcc as the ADC’s voltage reference. This is essentially backwards from how the ADC is normally used, but it requires no external hookup and is only a bit of calculation away from determining Vcc in millivolts. There is some non-linearity in the results, but for the purposes of measuring battery power in a system or deciding when to send a “low battery” signal, it’s an attractive solution.

Being an Arduino library, CPUVolt makes this idea very easy to use, but the concept and method is actually something we have seen before. If you’re interested in the low-level details, then check out our earlier coverage which goes into some detail on exactly what is going on, using an ATtiny84.

Ever on the lookout for creative applications for tech, [Andres Leon] built a solar powered battery system to keep his Christmas lights shining. It worked, but — pushing for innovation — it is now capable of so much more.

The shorthand of this system is two, 100 amp-hour, deep-cycle AGM batteries charged by four, 100 W solar panels mounted on an adjustable angle wood frame. Once back at the drawing board, however, [Leon] wanted to be able track real-time statistics of power collected, stored and discharged, and the ability to control it remotely. So, he introduced a Raspberry Pi running Raspbian Jessie Lite that publishes all the collected data to Home Assistant to be accessed and enable control of the system from the convenience of his smartphone. A pair of Arduino Deuemilanoves reporting to the Pi control a solid state relay powering a 12 V, 800 W DC-to-AC inverter and monitor a linear current sensor — although the latter still needs some tinkering. A in-depth video tour of the system follows after the break!

All the electronics are housed in a climate-controlled box which kicks on when the Pi’s CPU heats up — this is in a Florida backyard, folks — and powered off the battery system, with a handful of 40amp breakers between the components keep things safe. [Leon] has helpfully provided links to all the resources he used, as well as his code on GitHub.

We love homebrew solar power systems, but if only there was some way to take them on the road with us.


Filed under: Arduino Hacks, Raspberry Pi, solar hacks
Mar
03

Qduino Mini: Arduino Compatible + Battery Charger & Monitor

arduino, battery, fuel gauge, Qduino Comments Off on Qduino Mini: Arduino Compatible + Battery Charger & Monitor 

5be3a19d70fc806c83a3c5823976de5e_large

The Qduino Mini is the first tiny Arduino compatible that has a built-in battery charger & fuel gauge.

The Qduino Mini is perfect to embed in your electronics projects, it’s super small, inexpensive, has a battery connector & charger built-in, & a fuel gauge that can tell you when to charge the battery!

The Qduino Mini is Arduino-compatible & 100% open source, hardware and software meaning that making and programming your first circuit is a breeze. Hardware is hard, so we decided to make it a little bit easier. The day that the first Qduino Mini ships, all of the design files, including EAGLE board files, schematic, and code will be released under an open source license. Here’s what it includes:

Qduino Mini: Arduino Compatible + Battery Charger & Monitor - [Link]

Jan
27

Bag movement alarm for theft prevention

alarm, arduino, battery Comments Off on Bag movement alarm for theft prevention 

F7YN572I5BN8B9W.MEDIUM

by micahmelnyk @ instructables.com:

In short: I developed a portable, battery powered device that sounds an alarm when your bag or purse is moved. Once armed, can only be turned off by your secret code.

The device is built off an Arduino compatible Trinket Pro, using an off-the-shelf project box with PCB.

Bag movement alarm for theft prevention - [Link]

We’re surprised we haven’t seen this kind of clock before, or maybe we have, but forgot about it in the dark filing cabinets of our minds. The above picture of [danjhamer’s] Matrix Clock doesn’t quite do it justice, because this is a clock that doesn’t just tick away and idly update the minutes/hours.

matrix clock

Instead, a familiar Matrix-esque rain animation swoops in from above, exchanging old numbers for new. For the most part, the build is what you would expect: a 16×8 LED Matrix display driven by a TLC5920 LED driver, with an Arduino that uses a DS1307 RTC (real-time clock) with a coin cell battery to keep track of time when not powered through USB. [danjhamer] has also created a 3D-printed enclosure as well as added a piezo speaker to allow the clock to chime off customizable musical alarms.

You can find schematics and other details on his Hackaday.io project page, but first, swing down below the jump to see more of the clock’s simple but awesome animations.


Filed under: Arduino Hacks, clock hacks

Surely you need yet another way to charge your lithium batteries—perhaps you can sate your desperation with this programmable multi (or single) cell lithium charger shield for the Arduino?! Okay, so you’re not hurting for another method of juicing up your batteries. If you’re a regular around these parts of the interwebs, you’ll recall the lithium charging guide and that rather incredible, near-encyclopedic rundown of both batteries and chargers, which likely kept your charging needs under control.

That said, this shield by Electro-Labs might be the perfect transition for the die-hard-’duino fanatic looking to migrate to tougher projects. The build features an LCD and four-button interface to fiddle with settings, and is based around an LT1510 constant current/constant voltage charger IC. You can find the schematic, bill of materials, code, and PCB design on the Electro-Labs webpage, as well as a brief rundown explaining how the circuit works. Still want to add on the design? Throw in one of these Li-ion holders for quick battery swapping action.

[via Embedded Lab]


Filed under: Arduino Hacks, Microcontrollers
Nov
13

DIY Lithium Battery Charger Shield for Arduino

arduino, battery, Charger, Li-Ion, LT1510, Nokia 5110 LCD Comments Off on DIY Lithium Battery Charger Shield for Arduino 

intrologo-lithium-battery-charger

by electro-labs.com:

In this project, we are building a programmable single/multi cell lithium battery charger shield for Arduino. The shield provides LCD and button interface which let the user set the battery cut-off voltage from 2V to 10V and charge current from 50mA to 1.1A. The charger also provides the ability to monitor the battery status before and during charge.

The charger is based on LT1510 Constant Current/Constant Voltage Battery charger IC and controlled by Arduino UNO. The display on the shield is Nokia 5110 LCD which is very simple to use and still available on the market. There are two different battery connectors available on the shield, a two contact screw terminal block and a right angle 2mm JST-PH connector.

DIY Lithium Battery Charger Shield for Arduino - [Link]


  • Newsletter

    Sign up for the PlanetArduino Newsletter, which delivers the most popular articles via e-mail to your inbox every week. Just fill in the information below and submit.

  • Like Us on Facebook