[David Hopkins] built a seven segment clock, but not in a way you would think. Typically, if one wants to make something like this, one would start off with some seven segment LEDs. [David] wanted to kick it up a notch and use RGB LEDs to get access to the wide array of different colors, but found off the shelf assemblies cost prohibitive. So, he did what any good hacker would do. He made his own.
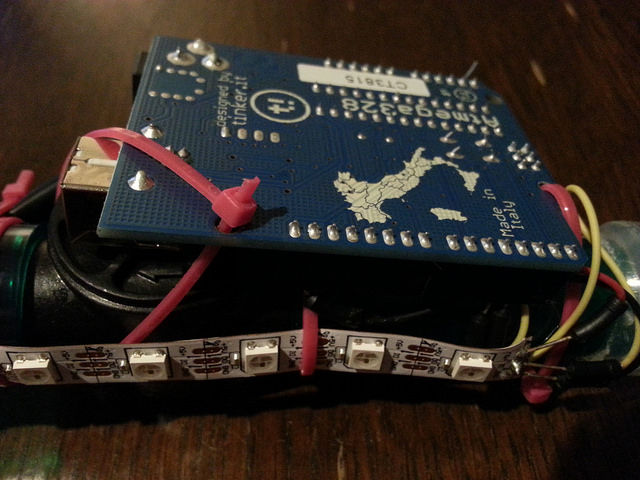
The easy part consists of Neopixals, an Arduino Nano and a DS3231 Real Time Clock. The hard part consists of Plasticard and a polymorph diffuser. Plasticard also goes by the name of Polystyrene and comes in sheets. [David] describes Polymorph as a type of moldable nylon that softens with heat, with a working temperature low enough that boiling water will suffice.
He was able to cut out the individual segments to make an impressive looking desk clock.
[John] is working on his PhD in experimental earthquake physics, and with that comes all the trials of becoming a PhD; tuning students into the cool stuff in the field, and demonstrating created after 1970 to his advisers. One of the biggest advancements in his line of work in the last 30 or 40 years is all those sensors you can find in your cell phone. The three-axis magnetometer in your phone is easily capable of measuring the Earth’s magnetic field, and this chip only costs a few dollars. To demonstrate this, [John] built a 3D compass to show off the capability of these sensors, and have a pretty light show for the undergrads.
The magnetometer [John] is using is just a simple I2C magnetometer that can be found on Adafruit or Sparkfun. It’s not really anything special, but with a little bit of code, [John] can read the magnetic field strength in the x, y, and z axes.
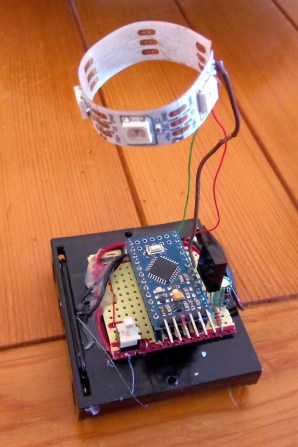
Having a microcontroller spit out a bunch of numbers related to the local magnetic field just doesn’t seem fun, so [John] picked up two neopixel rings – one inside the other, and set 90 degrees out of plane with each other. This turns his magnetometer and Arduino setup into a real 3D compass. With this device, the local magnetic field can be visualized in the x, y, and z axes. It looks cool, which is great for undergrads, and it’s a great demonstration of what you can do with small, cheap electronic sensors.
[John] put up a screencast of a talk he gave at the American Geophysical Union meeting last year. You can check that out below.
A couple of years ago, [philo mech] came across [David Ratliff]’s NeoPixel compass project. Ever since then, he’s wanted to make his own. To his delight, [philo mech] was able to find time to do just that.
An Arduino Pro Mini drives an LSM303DLHC compass/accelerometer breakout board and a 12-LED NeoPixel ring. The heading is indicated with a red ‘Pixel between two yellow ones. In the video after the break, [philo mech] gives several demonstrations of the ring’s red indicator in relation to a standard compass arrow.
This colorful compass currently boasts two very useful modes: one to track the whereabouts of North, and the other for determining the user’s current heading. Mk. II will compensate for tilt and will employ a 16-Pixel ring to display finer degrees of directional change. Want to make your own? The code is pasted in the video’s comments.
Regular candles can be awfully boring at times. They can only produce one color and the flicker is so… predictable. They can’t even be controlled by an infrared remote control, not to mention the obvious fire hazard. Now, however, [Jose] has come up with an LED candle that solves all of these problems. (Original link to the project in Spanish.)
The heart of the project is an Arduino Pro Mini, which is especially suited for this project because of its size. [Jose] put the small form-factor microcontroller in the base of a homemade wax enclosure and wired it to a Neopixel WS2812b LED strip. The strip can produce any color, and has some programmed patterns including flicker, fade, rainbow, and fire.
The artificial candle is controlled with an infrared remote control, and all of the code for the project is available on the project site if you want to build your own. [Jose] has been featured here before for his innovative Arduino-driven RGB lighting projects, and this is another great project which builds on that theme!
My idea of an ideal vacation includes time with my family – exploring and learning about some new part of the world, with a little time to play with new Maker toys. Last year, I took our Fireball HD pinball electronics to the beach along with a bunch of new connectors. […]
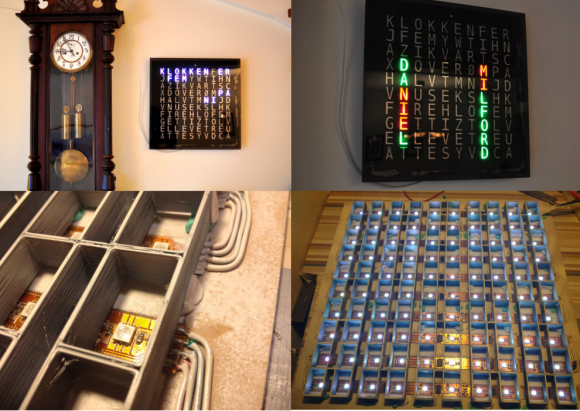
[Joakim] has built a clock that spells out the time in words. Wait a second – word clock, what is this, 2009? Word clocks are one of those projects that have become timeless. When we see a build that stands out, we make sure to write it up. [Joakim's] clock is special for a number of reasons. The time is spelled out in Norwegian, and since the clock is a birthday gift for [Daniel], [Joakim] added the his full name to the clock’s repertoire.
One of the hard parts of word clock design is controlling light spill. [Joakim] used a simple 3D printed frame to box each LED in. This keeps the spill under control and makes everything easier to read. The RGB LED’s [Joakim] used are also a bit different from the norm. Rather than the WS2812 Neopixel, [Joakim] used LPD8806 LED strips. On the controller side [Joakim] may have gone a bit overboard in his choice of an Arduino Yun, but he does put the ATmega328 and Embedded Linux machine to good use.
The real magic happens at boot. [Daniel's] name lights up in red, with various letters going green as each step completes. A green ‘D’ indicates an IP address was obtained from the router’s DHCP server. ‘N’ switches to green when four NTP servers have been contacted, and the Linux processor is reasonably sure it has the correct time. The last letter to change will be the ‘E’, which reports ambient light.
[Joakim] added a web interface to trigger his new features, such as a rainbow color palette, or the ability to show minutes by changing the color of the letters K,L,O,K. The final result is a slick package, which definitely brings a 2009 era design up to 2014 standards!
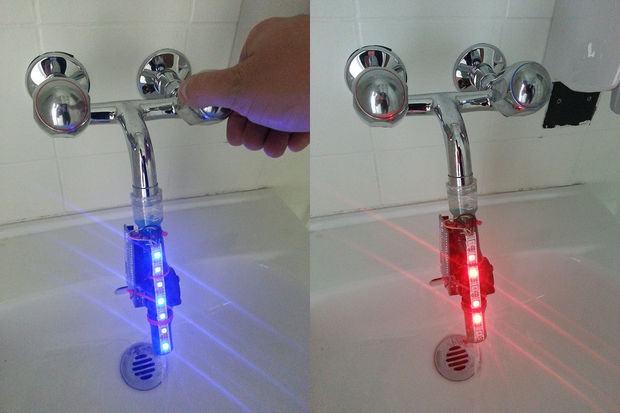
The Augmented Water device helps you save water by turning red after one Liter and helping you not to waste it unnecessarily.
The ingredients you need to reach the results are the following: an Arduino Uno, Adafruit Neopixels, Flow sensor, LiPo battery, LiPo charger, jumper wires, tube fitting the sensor, plastic test tube and some zip ties. You can easily make one in 6 steps with his tutorial on Instructables.
[Pete Mills] recently bought the all-new Ford Fiesta, which offers impressive fuel economy over that of his Jeep. He soon figured out that he has real time access to a wealth of engine and chassis data through Ford’s OpenXC platform and used it to build blueShift, a neopixel tachometer. The car already has a tach, but this one is more visual, can be seen in periphery, and is just plain fun.
In case you hadn’t heard, the OpenXC platform is Ford’s consumer key to the kingdom of OBD2 treasures. It unlocks the magic through its Vehicle Interface, which plugs into the OBD2 port and translates the CAN bus messages to OpenXC format. These messages are packaged into JSON format and can be sent over Bluetooth or Ethernet/Wi-Fi to an Android, Python, or iOS device.
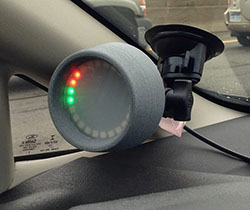
[Pete] went with Bluetooth and used a BlueSMiRF with an Arduino Pro Mini. He derives power from the car’s on-board USB port, but has future plans to use the OpenXC VI port. blueShift reads the RPM data and displays a green trail as the engine revs up. At the peak revolution, it shows a red LED. This one is sticky and will persist for the lesser of three seconds or the time elapsed to a new positive RPM. [Pete] is also reading the headlight status of the car. As soon as they come on, the RGB LEDs dim to avoid blinding him at night.
[Pete] wanted to make an enclosure more finished-looking than a Tupperware box. He nearly detoured into 3D-printer design, but ended up putting together a Prusa i3v and came up with this RAM mount-compatible enclosure. His fantastic write-up and code are on his blog, but you can make the jump to see a short demo and a full explanation video. You can also make smart brake lights or even create art with OpenXC.
Planet Arduino is, or at the moment is wishing to become, an aggregation of public weblogs from around the world written by people who develop, play, think on Arduino platform and his son. The opinions expressed in those weblogs and hence this aggregation are those of the original authors. Entries on this page are owned by their authors. We do not edit, endorse or vouch for the contents of individual posts. For more information about Arduino please visit www.arduino.cc
You are currently browsing the archives for the neopixel category.

 Riffing off of the word clock idea, this Maker created a backlit display for the local weather forecast.
 The easy part consists of Neopixals, an Arduino Nano and a DS3231 Real Time Clock. The hard part consists of Plasticard and a polymorph diffuser. Plasticard also goes by the name of Polystyrene and comes in sheets. [David] describes Polymorph as a type of moldable nylon that softens with heat, with a working temperature low enough that boiling water will suffice.


 [Pete Mills] recently bought the all-new Ford Fiesta, which offers impressive fuel economy over that of his Jeep. He soon figured out that he has real time access to a wealth of engine and chassis data through Ford’s OpenXC platform and used it to build

