Posts | Comments

Planet Arduino

Archive for the ‘ws2812b’ Category

It wouldn’t be much of a stretch to say that here at Hackaday, we’re about as geeky as they come. Having said that, even we were surprised to hear that there are people out there who collect elements. Far be it from us to knock how anyone else wishes to fill their days, but telling somebody at a party that you collect chemical elements is like one step up from saying you’ve got a mold and fungus collection at home. Even then, at least a completed mold and fungus collection won’t be radioactive.

But if you’re going to spend your spare time working on a nerdy and potentially deadly collection, you might as well put it into an appropriate display case. You can’t just leave your Polonium sitting around on the kitchen counter. That’s the idea behind the interactive periodic table built by [Maclsk], and we’ve got to admit, if we get to put it in a case this awesome we might have to start our own collection.

A large portion of this project is building the wooden display case itself as, strangely enough, IKEA doesn’t currently stock a shelving unit that’s in the shape of the periodic table. The individual cells and edge molding are made of pine, the back panel is MDF, and the front of the display is faced off with thin strips of balsa to cover up all the joints. Holes were then drilled into the back of each cell for the LED wiring, and finally the entire frame was painted white.

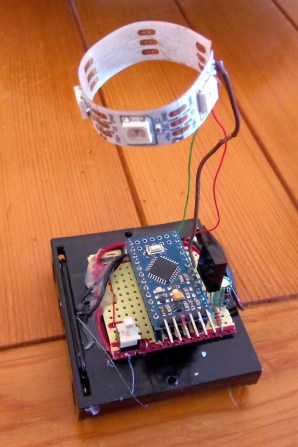
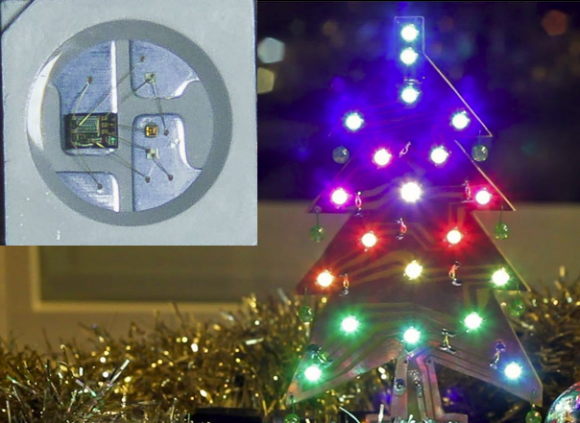
Each cell contains an WS2812B RGB LED, which at maximum brightness draws 60mA. Given the 90 cells of the display case, [Maclsk] calculated a 5.4A power supply would be needed to keep everything lit up. However, he found a 4A power supply that made his budget happier, which he reasons will be fine as long as he doesn’t try to crank every cell up to maximum at the same time. Control for the display is provided by an Arduino Nano and HC05 Bluetooth module.

The final piece of the project was the Android application that allows the user to control the lighting. But it doesn’t just change colors and brightness, it’s actually a way to visualize information about the elements themselves. The user can do things like highlight certain groups of elements (say, only the radioactive ones), or light up individual cells in order of the year each element was discovered. Some of the information visualizations are demonstrated in the video below, and honestly, we’ve seen museum displays that weren’t this well done.

We last caught up with [Maclsk] when he created a very slick robotic wire cutting machine, which we can only assume was put to work for this particular project. Too bad he didn’t have a robot to handle the nearly 540 soldering joints it took to wire up all these LEDs.

[via /r/DIY]

Give kids some responsible and challenging tasks, and you’d be surprised at the results. The “Anything Goes” exhibit at the National Museum in Warsaw was aimed as a museological and educational experiment. A group of 69 children aged 6–14 was divided into teams responsible for preparing the main temporary exhibition at the museum. Over six months, they worked on preparing the exhibition during weekly four-hour meetings. They prepared scripts, provided ideas for multimedia presentations, and curated almost 300 works for display. One of those was [Robert Mordzon]’s Giant Interactive Crossword.

The build is in two parts. The letter tiles, which have embedded RFID tags, obviously look like the easiest part of the build. The table, looking at the video (after the break), probably needed a lot more effort and labour. It is built in two halves to make construction easier. There are a 130 boxes that need to be filled in with the right letters to complete the crossword. Each box contains a bunch of electronics consisting of an Arduino Nano, a RFID Reader and a bunch of sixteen WS2812B LEDs, all assembled on a custom PCB. Do the math, and you’ll figure out that there’s 2080 LEDs, each capable of sipping 60 mA at full brightness. That’s a total current requirement of almost 125 amps at 5 V. Add in all the Arduino’s, and [Robert] needed a beefy 750 W of power, supplied via four switch mode power supplies.

Each Arduino Nano is a slave on the I²C bus. The I²C master is an Arduino Mega 2560, which in turn communicates with a computer over serial. When a box is empty, the LEDs are dim, when a wrong letter is placed, they turn Red, and when the right letter is placed, they turn Green. If a word gets completed, a special word animation is played. This information is also passed on to the computer, which then projects an animation related to the word on a giant wall screen. Upon the crossword getting completed, the table erupts in to a sound (via the computer) and light “disco” show and also reveals the main motto of this section of the exhibit – “Playing the Hero”.


Filed under: Arduino Hacks

It’s an ambitious build for sure — you don’t start with $500 worth of wood if you don’t intend for the finished product to dazzle. And this 240-pixel touch-sensitive light box coffee table does indeed dazzle.

Sometimes when we see such builds as these, fit and finish take a back seat to function. [dasdingo89] bucks that trend with a nicely detailed build, starting with the choice of zebrawood for the table frame. The bold grain and the frosted glass top make for a handsome table, but what lurks beneath the glass is pretty special too. The 240 WS2812 modules live on custom PCBs, each thoughtfully provided with connectors for easy service. There’s also an IR transmitter-receiver pair on each board to detect when something is placed over the pixel. The pixel boards are connected to custom-built shift register boards for the touch sensors, and an Arduino with Bluetooth runs the whole thing. Right now the table just flashes and responds to hand gestures, but you can easily see this forming the basis of a beautiful Tetris or Pong table.

This build reminds us a little of this pressure-sensitive light floor we featured recently, which also has some gaming possibilities. Maybe [dasdingo89] and  [creed_bratton_] should compare notes and see who can come up with the best games for their platform.

[via r/DIY and a tip from emptycanister]


Filed under: Arduino Hacks, led hacks
Apr
27

An Introduction To Individually Addressable LED Matrices

arduino, arduino hacks, LED, led hacks, LED matrix, ws2812, ws2812b Comments Off on An Introduction To Individually Addressable LED Matrices 

The most fascinating project you can build is something with a bunch of blinky hypnotic LEDs, and the easiest way to build this is with a bunch of individually addressable RGB LEDs. [Ole] has a great introduction to driving RGB LED matrices using only five data pins on a microcontroller.

The one thing that is most often forgotten in a project involving gigantic matrices of RGB LEDs is how to mount them. The enclosure for these LEDs should probably be light and non-conductive. If you’re really clever, each individual LED should be in a light-proof box with a translucent cover on it. [Ole] isn’t doing that here; this matrix is just a bit of wood with some WS2812s glued down to it.

To drive the LEDs, [Ole] is using an Arduino. Even though the WS2812s are individually addressable and only one data pin is needed, [Ole] is using five individual data lines for this matrix. It works okay, and the entire setup can be changed at some point in the future. It’s still a great introduction to individually addressable LED matrices.

If you’d like to see what can be done with a whole bunch of individually addressable LEDs, here’s the FLED that will probably be at our LA meetup in two weeks. There are some crazy engineering challenges and several pounds of solder in the FLED. For the writeup on that, here you go.


Filed under: Arduino Hacks, led hacks
Nov
23

IcosaLEDron: A 20-Sided Light Up Ball

arduino hacks, ball, icosahedron, LED, rgbLED, ws2812, ws2812b Comments Off on IcosaLEDron: A 20-Sided Light Up Ball 

Tired of balls that are just balls, and not glowing geometric constructions of electronics and wonderment? Get yourself an IcosaLEDron, the latest in Platonic solids loaded up with RGB LEDs.

The folks at Afrit Labs wanted a fun, glowy device that would show off the capabilities of IMUs and MEMS accelerometers. They came up with a ball with a circuit board inside and twenty WS2812B RGB LEDs studded around its circumference

The frame of the ball is simply a set of twenty tessellated triangles that can be folded up during assembly. The outer shell of the ball is again printed in one piece, but fabricated out of transparent NinjaFlex, an extraordinarily odd, squishy, and likely indestructible material.

Inside the IcosaLEDron is a PCB loaded up with an ATMega328p, an accelerometer, a LiPo battery charger, and quite a bit of wiring. Once the ball is assembled and locked down, the squishy outer exterior is installed and turned into a throwable plaything.

If 20 sides and 20 LEDs aren’t enough, how about a an astonishing 386-LED ball that’s animated and knows its orientation? That’s a project from Null Space Labs, and looking at it in person is hypnotic.

via Makezine


Filed under: Arduino Hacks
Sep
13

Candle with remote control and Arduino Pro Mini

arduino, arduino pro mini, IR, LED, ws2812b Comments Off on Candle with remote control and Arduino Pro Mini 

20140901_171702

by Jose Daniel Herrera:

Here I present another project based on a addressable LEDs strip, based on WS2812b leds.

It consists of an ‘electronic’ candle, which lets you select set colors, adjust the intensity, and have different effects like rainbow, fade and fire. The project arose from the purchase of an IKEA lantern model BORBY … the idea was to replace a candle of considerable size, for something more … modern.

Candle with remote control and Arduino Pro Mini - [Link]

Sep
09

arduino ir candle

Regular candles can be awfully boring at times. They can only produce one color and the flicker is so… predictable. They can’t even be controlled by an infrared remote control, not to mention the obvious fire hazard. Now, however, [Jose] has come up with an LED candle that solves all of these problems. (Original link to the project in Spanish.)

The heart of the project is an Arduino Pro Mini, which is especially suited for this project because of its size. [Jose] put the small form-factor microcontroller in the base of a homemade wax enclosure and wired it to a Neopixel WS2812b LED strip. The strip can produce any color, and has some programmed patterns including flicker, fade, rainbow, and fire.

The artificial candle is controlled with an infrared remote control, and all of the code for the project is available on the project site if you want to build your own. [Jose] has been featured here before for his innovative Arduino-driven RGB lighting projects, and this is another great project which builds on that theme!


Filed under: Arduino Hacks
Dec
18

christmasshield

Nothing reminds us that it’s the holiday season more than an LED Christmas Tree submission. This obviously is not the first of its kind, but [Jose] does offer up a new technique using addressable RGB LEDs.

[Jose] decided to use 20 WS2812B RGB LEDs, which if you haven’t seen before, are RGB LEDs with an integrated controller. Yep, that’s right, just power/ground and 1 data line is all that is needed to control hundreds of RGB LEDs. This LED tree’s design is simple: a custom-etched PCB cut it in to the shape of a Christmas tree. The WS2812B LEDs helped keep everything clean, so the tree lacks any ‘ugly’ ornaments, except for the required bypass cap here and there. For an added bonus, the tree’s LEDs are synchronized to music generated by an Arduino via a piezo buzzer. Why is it a shield?  Well, the whole tree plugs in nicely to a standard Arduino interface. This looks like the perfect starter project to familiarize yourself with addressable LEDs, or at least to get you warmed up before building your own infinity portal.


Filed under: Arduino Hacks, Holiday Hacks, led hacks


  • Newsletter

    Sign up for the PlanetArduino Newsletter, which delivers the most popular articles via e-mail to your inbox every week. Just fill in the information below and submit.

  • Like Us on Facebook