Posts | Comments

Planet Arduino

Archive for the ‘flash’ Category

After covering a few of his builds at this point, we think it’s abundantly clear that [Igor Afanasyev] has a keen eye for turning random pieces of antiquated hardware into something that’s equal parts functional and gorgeous. He retains the aspects of the original which give it that unmistakable vintage look, while very slickly integrating modern components and features. His work is getting awfully close to becoming some kind of new art form, but we’re certainly not complaining.

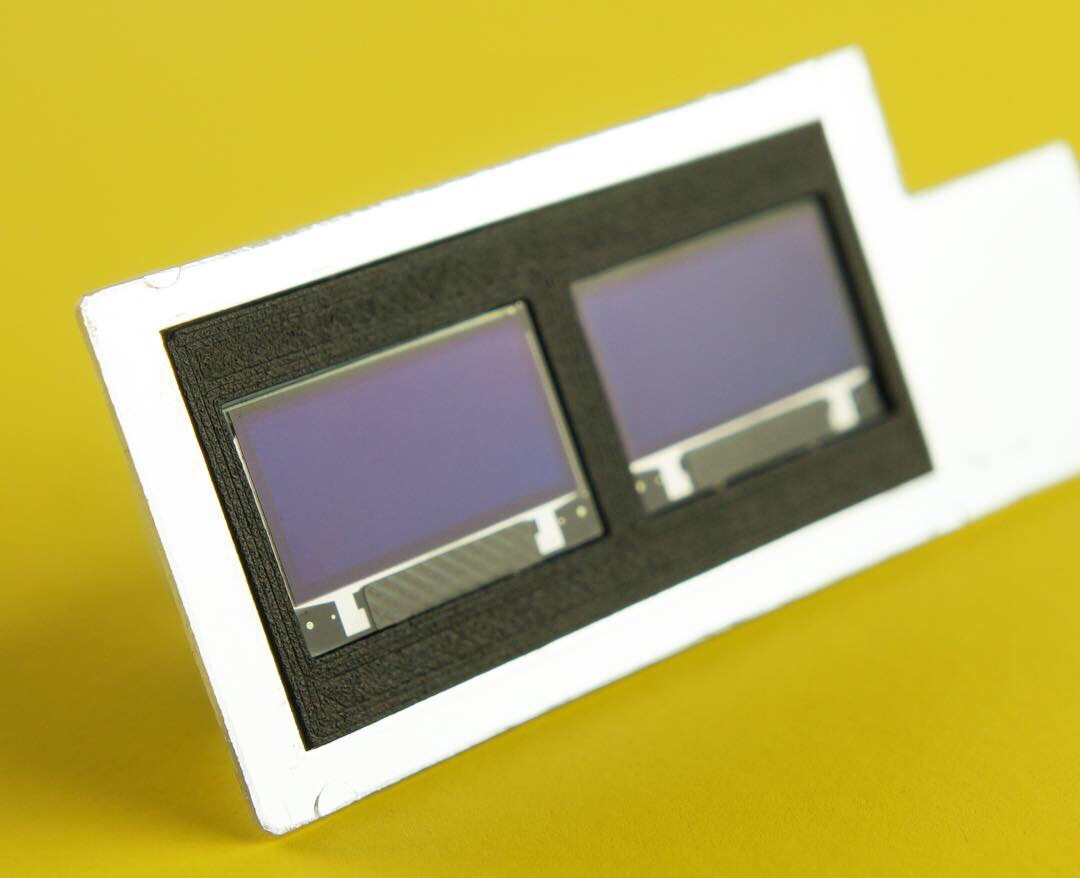
His latest creation takes an old-school “Monopak” electronic flash module and turns it into a desk clock that somehow also manages to look like a vintage television set. The OLED displays glowing behind the original flash diffuser create an awesome visual effect which really sells the whole look; as if the display is some hitherto undiscovered nixie variant.

On the technical side of things, there’s really not much to this particular build. Utilizing two extremely common SSD1306 OLED displays in a 3D printed holder along with an Arduino to drive them, the electronics are quite simple. There’s a rotary encoder on the side to set the time, though it would have been nice to see an RTC module added into the mix for better accuracy. Or perhaps even switch over to the ESP8266 so the clock could update itself from the Internet. But on this build we get the impression [Igor] was more interested in playing with the aesthetics of the final piece than fiddling with the internals, which is hard to argue with when it looks this cool.

Noticing the flash had a sort of classic TV set feel to it, [Igor] took the time to 3D print some detail pieces which really complete the look. The feet on the bottom not only hold the clock at a comfortable viewing angle, but perfectly echo the retro-futuristic look of 50s and 60s consumer electronics. He even went through the trouble of printing a little antenna to fit into the top hot shoe, complete with a metal ring salvaged from a key-chain.

Late last year we were impressed with the effort [Igor] put into creating a retro Raspberry Pi terminal from a legitimate piece of 1970’s laboratory equipment, and more recently his modern take on the lowly cassette player got plenty of debate going. We can’t wait to see what he comes up with next.

Wafer level chips are cheap and very tiny, but as [Kevin Darrah] shows, vulnerable to bright light without the protective plastic casings standard on other chip packages.

We covered a similar phenomenon when the Raspberry Pi 2 came out. A user was taking photos of his Pi to document a project. Whenever his camera flash went off, it would reset the board.

[Kevin] got a new Arduino 101 board into his lab. The board has a processor from Intel, an accelerometer, and Bluetooth Low Energy out of the box while staying within the same relative price bracket as the Atmel versions. He was admiring the board, when he noticed that one of the components glittered under the light. Curious, he pulled open the schematic for the board, and found that it was the chip that switched power between the barrel jack and the USB. Not only that, it was a wafer level package.

So, he got out his camera and a laser. Sure enough, both would cause the power to drop off for as long as the package was exposed to the strong light. The Raspberry Pi foundation later wrote about this phenomenon in more detail. They say it won’t affect normal use, but if you’re going to expose your device to high energy light, simply put it inside a case or cover the chip with tape, Sugru, or a non-conductive paint to shield it.


Filed under: Arduino Hacks

What’s cooler than learning about timers and interrupts on AVRs? Well, if you’re like [Matt], you can use that learning experience to build something useful – in this case, a timer for various camera flashes.

There are two ways to measure the speed of a flash. The first is the lag between when a button is pressed and when the flash goes off. As long as this is consistent, everything’s okay. The second type of speed is the pulse width. When looking at a xenon flash as time vs. brightness, they have a large spike at the beginning followed by a significant amount of decay. LED flashes are pretty much one cycle of a square wave.

To measure both types of flash speed, [Matt] used a $0.50 photodiode an a 3.5mm mack that ties into the flash remote. These bits are wired up to an Arduino, a little bit of fun work with timers and interrupts happens, and [Matt] learns how fast his flash is.


Filed under: Arduino Hacks, digital cameras hacks
Oct
02

Simple Photo Flash Trigger for Water Balloon Photography

arduino, arduino hacks, balloons, flash, photo, Photography, trigger, water Comments Off on Simple Photo Flash Trigger for Water Balloon Photography 

Water Balloon Photography

There have been countless projects to make custom photo flash trigger circuits. Usually the circuits react to sound, triggering the camera flash at the moment a certain sound is triggered. That type of trigger can be used to detect the popping of a balloon or shattering of glass. Other triggers detect motion, like a projectile crossing a laser beam for example. [Udo's] friend had a fun idea to take photos of water balloons popping. Unfortunately neither of those trigger methods would be well suited for this situation. That’s when [Udo] had to get creative.

[Udo] built a unique trigger circuit that uses the water inside the balloon as the trigger. The core component of the circuit is an Arduino. One of the Arduino’s analog pins is configured to enable the internal pull-up resistor. If nothing else is connected to the pin, the Arduino will read 5 volts there. The pin is connected to a needle on the end of a stick. There is a second needle on the same stick, just a short distance away from the first. When these needles pierce the balloon’s skin, the water inside allows for a brief moment of conductivity between the two pins. The voltage on the analog pin then drops slightly, and the Arduino can detect that the balloon has popped.

[Udo] already had a flash controller circuit. He was able to trigger it with the Arduino by simply trying the flash controller’s trigger pin to one of the Arduino’s pins. If the Arduino pulls the pin to ground, it closes the switch on the flash controller and the flash is triggered. Both circuits must share a common ground in order for this to work.

All of the code for [Udo's] project is freely available. With such spectacular photographs, it’s only a matter of time before we see more of these floating around.


Filed under: Arduino Hacks
Dec
27

Elinchrom EL-Skyport Triggered by Arduino

arduino hacks, camera, flash, nRF2402G, nRF24L01+, Photography Comments Off on Elinchrom EL-Skyport Triggered by Arduino 

Screenshot 2013-12-25 08.39.33

[Toby] has an Elinchrom EL-Skyport, which is a wireless flash trigger. He decided to see if he could trigger it using an Arduino, and came up with a nice proof of concept. This little device was not meant to be user serviceable, as can be seen in what [Toby] uncovered while taking it apart. But once he had it disassembled, he cataloged everything inside, and then he awesomely went to the trouble of drawing up a schematic. With that knowledge, he began reverse engineering the SPI protocol used, which almost deserves an article by itself.

It was a long road to get there, but in the end [Toby] built a prototype Arduino shield that houses an nRF24L01+ module. These are very cheap to pick up on eBay. He gives us the details on hooking up the module, though he had to go through extra hoops since he was using the Arduino Leonardo. Still, once you’re up and running, you can make use of one of the existing libraries specifically for this module.

Thanks to his effort, the rest of us have one more device to hack on. Thanks [Toby]!


Filed under: Arduino Hacks


  • Newsletter

    Sign up for the PlanetArduino Newsletter, which delivers the most popular articles via e-mail to your inbox every week. Just fill in the information below and submit.

  • Like Us on Facebook