Posts | Comments

Planet Arduino

Archive for the ‘NFC’ Category

flipper zero video game module

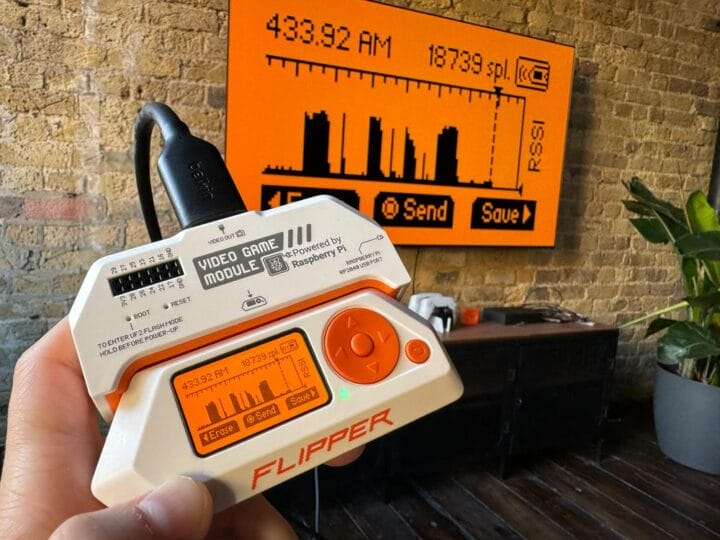
Flipper Zero hardware & wireless hacking tool can now be used as a proper game console thanks to a Raspberry Pi RP2040-powered video game module that mirrors the display of the device on a larger monitor or TV via DVI/HDMI video output, and also adds a 6-axis motion tracking sensor. The Flipper Zero has been in the news in recent days, notably with Canada’s government banning the device due to car theft (although it only seems feasible on older cars), and today the company has announced the launch of a video game module developed in collaboration with Raspberry Pi Ltd. Video game module specifications: MCU – Raspberry Pi RP2040 dual-core Arm Cortex-M0+ microcontroller clocked up to 133 MHz with 264 kB SRAM Video Output – DVI-D at 640х480 with 60 Hz refresh rate. It also supports HDMI. USB – USB Type-C port connected to the microcontroller. Acts as a USB device [...]

The post Flipper Zero gets a Raspberry Pi RP2040-powered video game module appeared first on CNX Software - Embedded Systems News.

When [gdarchen] wanted to read some NFC tags, he went through several iterations. First, he tried an Electron application, and then a client-server architecture. But his final iteration was to make a standalone reader with an Arduino and use WebUSB to connect to the application on the PC.

This sounds easy, but there were quite a few tricks required to make it work. He had to hack the board to get the NFC reader’s interrupt connected correctly because he was using a Leonardo board. But the biggest problem was enabling WebUSB support. There’s a library, but you have to change over your Arduino to use USB 2.1. It turns out that’s not hard, but there’s a caveat: Once you make this change you will need the WebUSB library in all your programs or Windows will refuse to recognize the Arduino and you won’t be able to easily reprogram it.

Once you fix those things, the rest is pretty easy. The PC side uses node.js. If you back up a level in the GitHub repository, you can see the earlier non-Arduino versions of the code, as well.

If you want to understand all the logic that went into the design, the author also included a slide show that discusses the three versions and their pros and cons. He did mention that he wanted a short-range solution so barcodes and QR codes were out. He also decided against RFID but didn’t really say why.

NFC business cards are a thing. You can also use them to catch some public transportation.

nfcphoneAdding an NFC unlocker to your car allows you to open your vehicle with your phone, or an NFC ring.

Read more on MAKE

The post Use Your Smartphone as Your Car Key with an NFC Lock appeared first on Make: DIY Projects and Ideas for Makers.

In the dark ages, you had to use a key to lock and unlock your car doors. Just about every car now has a remote control on the key that lets you unlock or lock with the push of a button. But many modern cars don’t even need that. They sense the key on your person and usually use a button to do the lock or unlock function. That button does nothing if the key isn’t nearby.

[Pierre Charlier] wanted that easy locking and unlocking, so he refitted his car with a Keyduino to allow entry with an NFC ring. What results is a very cool fistbump which convinces your car to unlock the door.

Keyduinio is [Pierre’s] NFC-enabled project, but you can also use a more conventional Arduino with an NFC and relay shield. The demo also works with a smartphone if you’re not one for wearing an NFC ring. Going this round, he even shows how to make it work with Bluetooth Low Energy (BLE).

In the video below, you can see how he removed the car’s internal lock switch and modified the wire harness to take the connection to the Arduino. He’s also included all the code. About the only tricky part is doing the actual wiring in your car and finding a suitable source of power. That varies from car to car, so it isn’t easy to give specific instructions.

Opening doors of one kind or another is a popular project theme. While [Pierre’s] project might open the door on a coupe, we’ve seen another project that works on a coop.


Filed under: Arduino Hacks, car hacks, wireless hacks

diyJukebox

DIY Jukebox is a project made by Mario Pucci to show how Arduino Uno, NFC Shield and Python can be used to build a real jukebox. NFC means Near Field Communication and the NFC shield can perceive objects attached to little chips called NFC tags containing specific messages. In this project, Marco programmed each chip to play a different music genre when the tag is inserted in the cardboard jukebox:

You can download the file of the cardboard Jukebox at this link and the sketches here.

The steps of the tutorial are in italian but you can use google translate if needed! Enjoy the sound of music :)

jukebox_paper1

Jun
04

New Project: Make a Custom NFC Unlocker for Your Computer

adafruit, arduino, computers, Computers & Mobile, Electronics, NFC, passwords Comments Off on New Project: Make a Custom NFC Unlocker for Your Computer 

Capture2Are incorrect passwords driving you insane? Do you tire of constantly having to type in your 20 character password? In this project we use an Adafruit NFC shield to detect an NFC tag and an Arduino Leonardo to unencrypt the NFC tag and type in your password. This project requires […]

Read more on MAKE

The post Make a Custom NFC Unlocker for Your Computer appeared first on Make:.

[Sigurd] manage to obtain an old vending machine from his dorm. The only problem was that the micocontroller on the main board was broken. He and his friend decided they could most likely get the machine back into working order, but they also knew they could probably give it a few upgrades.

This system uses two Arduino Pro Minis and an Electric Imp to cram in all of the new features. One Arduino is connected to the machine’s original main board. The Arduino interfaces with some of the shift registers, relays, and voltage regulators. This microcontroller also lights up the buttons on the machine as long as that particular beverage is not empty. It controls the seven segment LED display, as well as reading the coin validator.

The team had to reverse engineer the original coin validator in order to figure out how the machine detected and counted the coins. Once they figured out how to read the state of the coins, they also built a custom driver board to drive the solenoids.

A second Arduino is used to read NFC and RFID cards using a Mifare RC522 reader. The system uses its own credit system, so a user can be issued a card with a certain amount of pre-paid credit. It will then deduct credit appropriately once a beverage is vended. The two Arduinos communicate via Serial.

The team also wanted this machine to have the ability to communicate with the outside world. In this case, that meant sending cheeky tweets. They originally used a Raspberry Pi for this, but found that the SD card kept getting corrupted. They eventually switched to an Electric Imp, which worked well. The Arduino sends a status update to the Imp every minute. If the status changes, for example if a beverage was dispensed, then the Imp will send a tweet to let the world know. It will also send a tweet to the maintenance person if there is a jam or if a particular slot becomes empty.


Filed under: Arduino Hacks
Aug
10

NFC Ring Lock Box

arduino, arduino hacks, lock box, Nano, NFC, pn532, ring, servo Comments Off on NFC Ring Lock Box 

NFC Ring Lock Box

[Nairod785] wanted to build a lock box that would lock from the inside. He started with an inexpensive, plain wooden box. This kept the cost down but would also allow him to easily decorate the box later on using a wood burning tool.

To keep the box locked, he installed a simple latch on the inside. The latch is connected to a servo with string. When the servo rotates in one direction, it pulls the string and releases the latch. When the servo is rotated in the opposite direction, the latch closes and locks the box once again.

If you are going to have a locked box, then you are also going to need a key to open it. [Nairod785] used a ring with a built-in NFC tag, similar to the ring featured back in March. Inside of the box is a PN532 NFC module. The walls of the box were a little too thick for the reader to detect the ring, so [Nairod785] had to scratch the wall thickness down a bit. The NFC module is connected to an Arduino Nano. Communications are handled with I2C.

The NFC ring actually has two different NFC tags in it; one on each side. [Nairod785] had to program both of the tag ID’s into the Arduino to ensure that the ring would work no matter the orientation.

The system is powered by a small rechargeable 5V battery. [Nairod785] wired up a USB plug flush with the box wall so he can easily charge up the battery while the box is locked. It also allows him to reprogram the Arduino if he feels so inclined. There is also a power switch on the side to conserve energy.


Filed under: Arduino Hacks
May
14

Upgrade Your Garage Door with Arduino and RFID

access control, arduino, arduino hacks, garage door, garage door opener, NFC, reddit, rfid Comments Off on Upgrade Your Garage Door with Arduino and RFID 

RFID Garage Door Opener

[Jason] really wanted to build an RFID controlled garage door opener and decided to turn to Arduino to get the job done. For someone who’s never worked with an Arduino before, he really seemed to know what he was doing.

The Arduino acts as the brains of the operation while an off-the-shelf NFC/RFID reader module is used to read the RFID tags. To add new keys to the system, [Jason] simply swipes his “master” RFID key. An indicator LED lights up and a piezo speaker beeps, letting you know that the system is ready to read a new key. Once the new key is read, the address is stored on an EEPROM. From that point forward the new key is permitted to activate the system.

Whenever a valid key is swiped, the Arduino triggers a relay which can then be used to control just about anything. In this case, [Jason] plans to use it to control his garage door. The system also has a few manual controls. First is the reset button. If this button is held down for two seconds, all of the keys from the EEPROM are erased. This button would obviously only be available to people who are already inside the garage. There is also a DIP switch that allows the user to select how long the relay circuit should remain open. This is configurable in increments of 100ms.

For now the circuit is wired up on a couple of breadboards, but it might be a good idea to use something more permanent. [Jason] could always take it a step further and learn to etch his own PCB’s. Or he could even design a board in Eagle CAD and order a real printed board. Don’t miss the video description of the RFID system below.

[via Reddit]


Filed under: Arduino Hacks
Apr
02

Unlocking your Computer with a Leonardo and an NFC Shield

arduino hacks, Arduino Leonardo, NFC, radio hacks Comments Off on Unlocking your Computer with a Leonardo and an NFC Shield 

Manually typing your login password every time you need to login on your computer can get annoying, especially if it is long and complex. To tackle this problem [Lewis] assembled an NFC computer unlocker by using an Arduino Leonardo together with an NFC shield. As the latter doesn’t come with its headers soldered, a little bit of handy work was required.

A custom enclosure was printed in order to house the two boards together and discretely mount them under a desk for easy use. Luckily enough very few code was needed as [Lewis] used the Adafruit NFC library. The main program basically scans for nearby NFC cards, compares their (big-endianned) UIDs against a memory stored-one and enters a stored password upon match. We think it is a nice first project for the new generation of hobbyists out there. This is along the same lines as the project we saw in September.

(You’ll notice I made this post without mentioning the you-know-what project!)


Filed under: Arduino Hacks, radio hacks


  • Newsletter

    Sign up for the PlanetArduino Newsletter, which delivers the most popular articles via e-mail to your inbox every week. Just fill in the information below and submit.

  • Like Us on Facebook