Posts | Comments

Planet Arduino

Archive for the ‘Drones’ Category

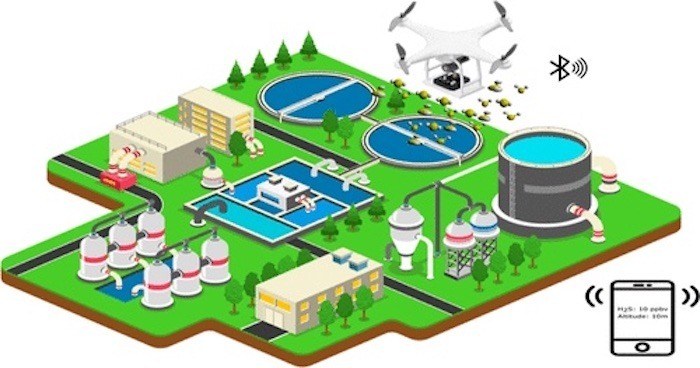
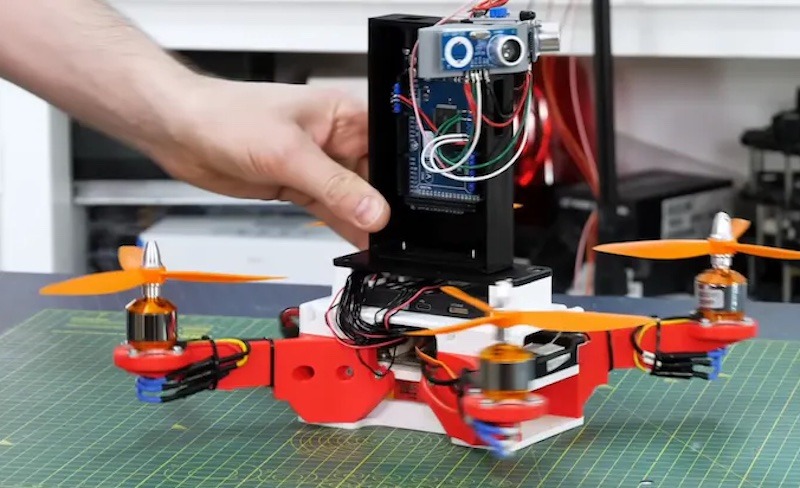
Air quality concerns encompass several different pollutants and irritants. Chlorofluorocarbons (CFCs) were, for example, a major concern in the 20th century due to the damage they cause to the ozone layer. But not all pollutants are easy to monitor. Hydrogen sulfide, which causes irritation of the eyes, nose, and throat at low levels and much more serious symptoms at high levels, can collect in pockets. To find them, researchers from Brazil have a developed a low-cost lab-on-a-drone.

The CDC reports that hydrogen sulfide exposure is a risk for those working in rayon textile manufacturing, petroleum and natural gas drilling and refining, wastewater treatment, and farms with manure storage pits. Because industry isn’t always keen on environmental protection, these researchers wanted a way to find pockets of high hydrogen sulfide concentration. To detect that gas efficiently at a variety of altitudes, they decided a drone-mounted approach was best.

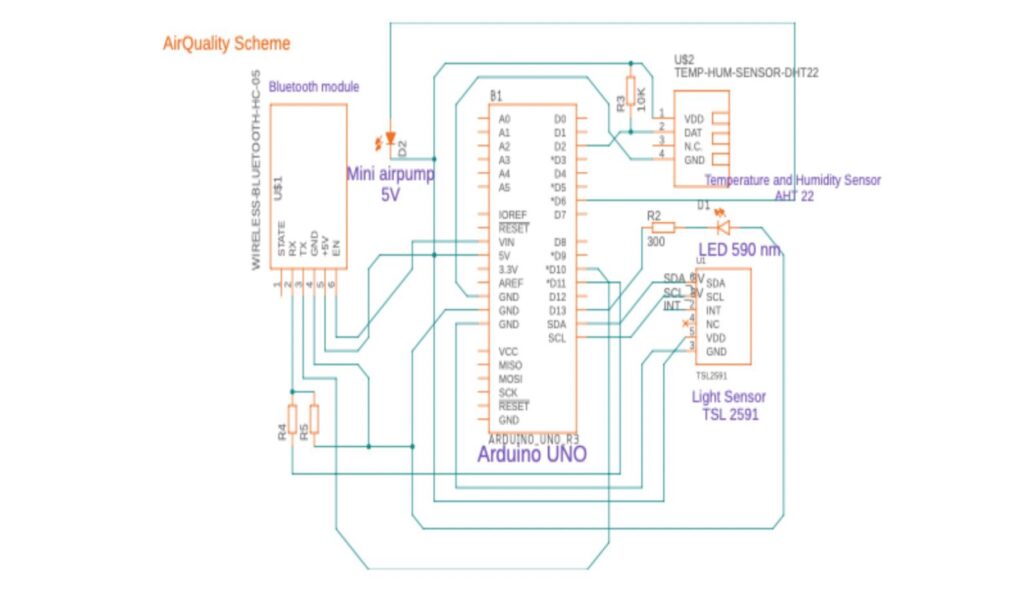
They achieved that by designing a sensor system light enough to be carried by off-the-shelf consumer drones. That payload consists of an Arduino UNO R3 board, the hydrogen sulfide sensor, an air pump for that sensor, and a DHT22 temperature and humidity sensor. It also has an HC-05 Bluetooth® module, so the researchers can monitor readings from anywhere within range.

The team found a significant increase in hydrogen sulfide levels as the drone got higher, indicating that existing sensors on the ground are insufficient for monitoring this kind of pollution. You can read more in their published paper here.

Images credit: Leal et al. Analytical Chemistry, 2023, DOI: 10.1021/acs.analchem.3c02719

The post Lab-on-a-drone detects and analyzes pollutants from the sky appeared first on Arduino Blog.

Drone shows have become a big trend over the past few years, with some shows containing thousands of individual drones. Those shows are wildly expensive, because the drones can easily cost a couple thousand dollars each. A big part of the reason for their high cost is their onboard positioning systems, which need to be accurate within a couple of centimeters — far better than standard GPS can achieve. In search of a more affordable option, James Bruton developed this experimental ultrasonic drone positioning system.

Like most positioning systems, this relies on triangulation through time of flight measurements. Triangulation lets you find the position, on a 2D plane, of Point A by measuring its distance to both Point B and Point C and knowing the distance between Point B and Point C ahead of time. This is a triangle and you know the length of every side (the distance between points), so you can calculate the position of Point A. Time of flight is the time it takes a signal to travel between two points. When you know the signal’s rate of travel (which is typically statistic or close enough), you can calculate distance by simply measuring the time it takes the signal to leave Point A and reach Point B (or vice-versa).

Bruton’s design takes advantage of those principles through simple, low-cost ultrasonic sensors. Normally, those measure the time it takes to emit a signal and receive the echo. But in this case, Bruton separated the two jobs so the system doesn’t require a reflective surface. One ultrasonic sensor on a central hub pulses a signal, and another ultrasonic sensor on the drone receives that. An infrared LED array helps to sync the two for precise timing. Arduino Mega 2560 boards on both sides (the hub side and the drone side) control the ultrasonic sensors.

With two hubs (Point B and Point C), the drone (Point A) can use the ultrasonic distance measurements to triangulate its own position in real time. This works in 2D, but a third hub would allow for 3D positioning. This worked well in initial testing, but was susceptible to interference from the drone motors and rotors. Bruton plans to try another idea soon, but this ultrasonic positioning system would work well for other types of vehicles operating within a relatively small area.

The post An experimental low-cost ultrasonic drone positioning system appeared first on Arduino Blog.

Drone racing is an increasingly popular hobby, especially as high-performance drones get more and more affordable. Racing drones can reach 200mph and a huge part of the skill set necessary for competition is the pilot’s ability to navigate through gates at high speed. Those gates mark check points on the course, a bit like the gates that slalom skiers go through. Drone racing gates can also track time, which is the case with this DIY micro FPV drone racing gate built by YouTuber ProfessorBoots.

This is an affordable gate meant for indoor micro FPV drone racing. It is big enough to accommodate some larger drones, but the pilot would have to have stellar finesse. For micro drones, it is perfect. The gate detects the presence of a passing drone and can time laps, recording each lap and allowing the pilot to see their best time. It also has a ring of LEDs for visibility. If desired, the user can program those LEDs to flash when a drone passes through.

The brain of the gate is a small and affordable Arduino Nano board. It detects passing drones using a pair of ultrasonic sensors. Many similar builds only use a single ultrasonic sensor, but ProfessorBoots added a second for reliable drone detection. The enclosure and ring are 3D-printable, with a strip of WS2812B individually addressable RGB LEDs running along the outer surface of the ring. A small four-digit, seven-segment display connects to the Arduino to display the time.

The post Make your own micro FPV drone racing gate appeared first on Arduino Blog.

Piloting a drone with something other than a set of virtual joysticks on a phone screen is exciting due to the endless possibilities. DJI’s Tello can do just this, as it has a simple Python API which allows for basic aspects to be controlled such as taking off, landing, and moving within a horizontal plane. Soham Chatterjee built a system that takes advantage of two sensors within the Arduino Nano 33 BLE Sense’s onboard suite, namely the APDS-9960 and LSM9DS1 IMU.

He started this endeavor by creating two simple programs that ran on the BLE Sense. The first initializes the APDS-9960 to detect gestures, which then sends strings like “detected DOWN gesture” via the USB port to a host machine. The second program checks if the IMU has gone over a certain threshold in a single direction and relays a corresponding string if it has. 

A Raspberry Pi runs one of two Python scripts that essentially read the incoming data from the Arduino and converts it into movements. For example, a gesture in the ‘DOWN’ direction lands the Tello drone, whereas tilting the board forwards will move the drone forward 50cm. As an added safety feature, the drone automatically lands after 60 seconds, although the Python script can be modified to prevent this behavior.

To read more about how Chatterjee constructed his drone system, you can view his first APDS-9960-based project here and the second IMU-controlled tutorial here.

The post Use the Nano 33 BLE Sense’s IMU and gesture sensor to control a DJI Tello drone appeared first on Arduino Blog.

Sensor deployment via unmanned aerial vehicles is an interesting concept. Up until now, you’ve had two options: use a drone that drops sensors onto the ground, or one with some kind of manipulator to stick them in particular place. However, researchers at Imperial College London have been studying a third approach, which shoots sensor pods from an aerial platform like darts.

The system utilizes a compressed spring, along with a shape-memory alloy (SMA) trigger to fling the sensor pods at a nearby surface, at up to a four-meter range. The actual sensor package used here is an Arduino Nano 33 BLE Sense, allowing for a variety of measurements without extra hardware  in hazardous environments or inaccessible locations.

Several methods of attachment were proposed, including magnets and chemical bonding, but the experiment’s research paper focuses on dart-like wood attachment, since this would require the most force.

More details on the project can be found on IEEE Spectrum and in the video below.

Researchers at the Skolkovo Institute of Science and Technology (Skoltech) in Moscow, Russia have come up with a novel way to interface with a drone via hand movements.

As shown in the video below, the device can be used to create long-exposure light art, though the possibilities for such an intuitive control system could extend to many other applications as well.

In this setup, a small Crazieflie 2.0 quadcopter is operated by a glove-like wearable featuring an Arduino Uno, along with an IMU and flex sensor for user input, and an XBee module for wireless communication. The controller connects to a base station running a machine learning algorithm that matches the user’s gestures to pre-defined letters or pattern, and directs the drone to light paint them. 

The team’s full research paper is available here.

If you fly drones for fun—or perhaps even for work—you know that piloting them can sometimes be a difficult tasks. Imagine, however, trying to control four drones simultaneously. While also “challenging,” researchers at the Skolkovo Institute of Science and Technology in Russia have come up with a new approach, dubbed for commanding such a swarm using only arm movements.

SwarmTouch takes the form of a wrist and finger-mounted device, with an array of eight cameras tracking its position. When the operator moves their arm, the drones react to the hand motion and the other flying robots in the group, as if there was a mechanical system linking each one together. 

Feedback is provided by an Arduino Uno connected to the control station via an XBee radio, which tells the operator whether the swarm is expanding or contracting using finger-mounted vibration motors. The setup is on display in the video below and its research paper can be found here.

We propose a novel interaction strategy for a human-swarm communication when a human operator guides a formation of quadrotors with impedance control and receives vibrotactile feedback. The presented approach takes into account the human hand velocity and changes the formation shape and dynamics accordingly using impedance interlinks simulated between quadrotors, which helps to achieve a life-like swarm behavior. Experimental results with Crazyflie 2.0 quadrotor platform validate the proposed control algorithm. The tactile patterns representing dynamics of the swarm (extension or contraction) are proposed. The user feels the state of the swarm at his fingertips and receives valuable information to improve the controllability of the complex life-like formation. The user study revealed the patterns with high recognition rates. Subjects stated that tactile sensation improves the ability to guide the drone formation and makes the human-swarm communication much more interactive. The proposed technology can potentially have a strong impact on the human- swarm interaction, providing a new level of intuitiveness and immersion into the swarm navigation.

In the Earth’s atmosphere, a drone can adjust its heading by varying the speed of the propellers, and thus the thrust output of each. If you wanted to land something on a lunar surface, or maneuver a spaceship, the lack of atmosphere means a different technique must be used.

While not going to space (yet), Tom Stanton decided to create a demonstrator for this technique, similar to how the manned Lunar Landing Research Vehicle (LLRV) operated in the 1960s and ’70s. Stanton’s device employs a central electric ducted fan (EDF) to hold the craft up, while three compressed air nozzles provide most of its directional control. 

In action, an RC flight controller’s signals are modified by an Arduino Nano to accommodate this unique control scheme, pulsing out bursts of air via three solenoid valves.

Check out the build and experimental process in the video below, culminating with untethered tests starting at around 17:30.

Multi-rotor drones are normally controlled using handheld devices, but what if you wanted to instead operate them with your whole body? Flight Chair, developed by researchers at Simon Fraser University in Canada, allows you to do just that, and is envisioned for use with emergency personnel observing a scene.

The chair is augmented with ultrasonic sensors to detect when a user leans forward, backward, left, and right, commanding the drone to do the same, while a gyroscopic sensor detects when the chair is swiveled to adjust its heading. 

Altitude adjustment is handled by a T-shaped foot panel, leaving one’s hands free to do other tasks. Sensor values are collected by an Arduino Mega, which passes this to a drone server over a USB connection.

In future, emergency services will increasingly use technology to assist emergency service dispatchers and call taker with information during an emergency situation. One example could be the use of drones for surveying an emergency situation and providing contextual knowledge to emergency service call takers and first responders. The challenge is that drones can be difficult for users to maneuver in order to see specific items. In this paper, we explore the idea of a drone being controlled by an emergency call taker using embodied interaction on a tangible chair. The interactive chair, called Flight Chair, allows call takers to perform hands-free control of a drone through body movements on the chair. These include tilting and turning of one’s body.

More details on the team’s prototype design be found in their research paper here

While much less common than quadcopters or airplanes, if you want a device that truly soars like a bird, you need an ornithopter. To help others make their own flying contraption, YouTuber Amperka Cyber Couch is outlining the build process in a video series starting with the one seen below.

Construction is also very well documented in his project write-up, and a clip of it in-flight can be found here. The bionic ‘bird’ uses a BLDC/ESC combination to turn a gearbox that flaps its wings, and an onboard Arduino Nano for control. 

Communication is via an MBee 868 wireless module, which links up to an Arduino Uno base station that provides its user interface.


  • Newsletter

    Sign up for the PlanetArduino Newsletter, which delivers the most popular articles via e-mail to your inbox every week. Just fill in the information below and submit.

  • Like Us on Facebook