Posts | Comments

Planet Arduino

Archive for the ‘joystick’ Category

When you hear the word “joystick,” you probably think of the standard dual-axis joysticks that we see on video game controllers. As the name implies, those move and provide signals for two axes (X and Y). But there is no reason that a joystick needs two axes and, in fact, that may not be desirable. To demonstrate the practicality of single-axis joysticks, Austin Allen built this simple controller suitable for several different applications.

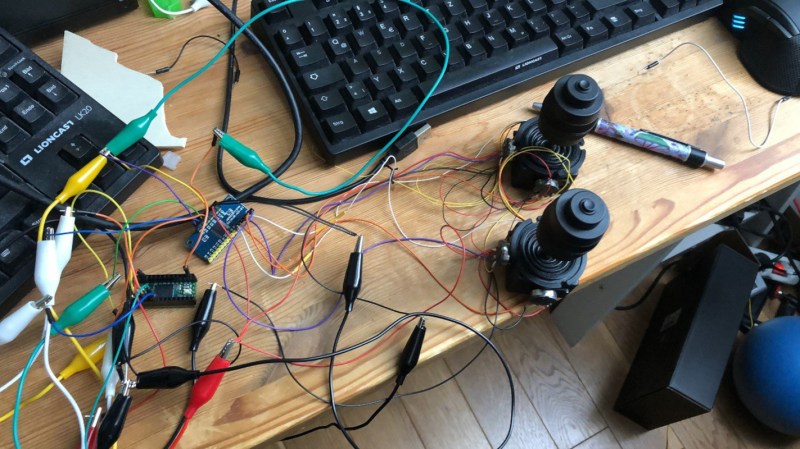
Allen’s device controls three different things with its three single-axis joysticks: an RGB LED, a servo motor, and a stepper motor. Each of those is an example of a single-axis at work. That axis maps to color (red and green) and brightness for the LED, horn position for the servo, and rotation direction/speed for the stepper motor. There are, of course, several other viable use cases for single-axis joysticks.

To showcase this, Allen’s unit provides signals to an Arduino Nano board, which then controls the LED and motors. It controls the LED and servo motor directly, but goes through a TMC2208 driver to handle the stepper motor. The signals from the joysticks are easy to read, because they’re just potentiometers. Each joystick accepts positive and negative power, then outputs a voltage between those two based on its position. With a standard analogRead() function, the Arduino can check the voltage and determine the joystick position.

You may not have any use for this specific controller, but it does do a good job of illustrating potential applications for single-axis joysticks and you should consider them for future projects.

The post Don’t ignore single-axis joysticks appeared first on Arduino Blog.

An input device combining a joystick with several knnobs and buttons

While most computer users make do with just a keyboard and mouse, power users often have multiple additional input devices. Gamers use joysticks or dedicated mice, CAD engineers have specialized gadgets for manipulating 3D objects, while graphic designers might want programmable macro buttons to automate various tasks. [Sascha Nitsch] didn’t fancy cluttering his desk with a whole bunch of input devices and therefore decided to combine as many functions as possible into the CIMDIT: a Completely Insane Multi Device Input Thingy.

The main components making up the CIMDIT are a 3-axis joystick module, which can double as a 3D CAD mouse, and a set of buttons, knobs and sliders to enable various functions. One rotary encoder is used to choose an operating mode, while four others can be used as programmable inputs. A small OLED display shows which mode is currently selected, but can also be used to display notifications from various programs.

An Arduino Pro Micro provides a USB interface to a PC and reads out the various input units. The entire design is modular, so it can be customized to any desired combination of analog and digital inputs. [Sascha] made a neat 3D printed enclosure to hold the 3-axis module along with 26 buttons, five rotary encoders and one analog slider. KiCAD files for the PCBs and the FreeCAD source for the enclosure are available under an open-source license on [Sascha]’s Git repo.

The same thing applies to the software driving the CIMDIT, though adding functionality to it might turn out to be tricky: [Sascha] had to perform some serious code optimization to fit everything into the Arduino’s 32 kB of program flash. The Git repo also includes a convenient tool to create key mappings to be programmed into the controller, saving you from having to compose a binary file by hand.

Love macro keypads? Check out these cool examples with gesture detection, an e-ink display or simply beautiful wooden keys.

A couple of joysticks wired up to a Teensy for prototyping.

Over the last two years, [benkster] has been perfecting their ideal flight controller. Like many people, they started out with a keyboard and mouse and eventually moved on to a joystick. While a HOTAS (hands on throttle-and-stick — e.g. a yoke controller with inputs right there on the sides) might have been the next logical step, those things cost too much. Naturally, the answer is to build one, ideally for less money. Hey, it could happen.

The design went from just an idea to a cardboard prototype, and then to a wooden enclosure and later, a 3D-printed case. Since [benkster] learned a great deal along the way, they want to give back to the community with a comprehensive joystick design/build guide so that others don’t have to start from zero, overwhelmed with information.

[benkster] wanted three joysticks, a bunch of big buttons, a throttle, a display to show component status (as in, is joystick #3 a joystick right now or a WASD keyboard?), and immersive details everywhere — you know, a million buttons and switches to give it that cockpit feel. [benkster] is using a Teensy 4 to control two 3-axis joysticks and one 2-axis stick. Since this adds up to too many axes for Windows/DirectX to read in, the 2-axis stick is used as a WASD keyboard.

This guide is a great place to start, especially for folks who may be newer to electronics. There are nice introductions to many types of components and tidbits that are relevant outside the world of joysticks.

You want immersive flight simulation away from the PC? Here’s a printable flexure-based ‘stick that snaps right on your Xbox controller and pushes the buttons.

Like many of us, [Emily’s Electric Oddities] has had a lot of time for projects over the past year or so, including one that had been kicking around since late 2018. It all started at the Hackaday Superconference, when [Emily] encountered the Adafruit Hallowing board in the swag bag. Since that time, [Emily] has wanted to display the example code eyeball movement on a CRT, but didn’t really know how to go about it. Spoiler alert: it works now.

See? It’s educational.

Eventually, [Emily] learned about the TV out library for Arduino and got everything working properly — the eyeball would move around with the joystick, blink when the button is pressed, and the pupil would respond visually to changes in ambient light. The only problem was that the animation moved at a lousy four frames per second. Well, until she got Hackaday’s own [Roger Cheng] involved.

[Roger] was able to streamline the code to align with [Emily]’s dreams, and then it was on to our favorite part of this build — the cabinet design. Since the TV out library is limited to black and white output without shades of gray, Emily took design cues from the late 70s/early 80s, particularly the yellow and wood of the classic PONG cabinet. We love it!

Is Your Pet Eye the worst video game ever, as [Emily] proclaims it to be? Not a chance, and we’re pretty sure that the title still rests with Desert Bus, anyway. Even though the game only lasts until the eye gets tired and goes to sleep, it’s way more fun than Your Pet Rock. Don’t miss the infomercial/explanation/demonstration video after the break. If one video is just not enough, learn more about [Emily’s] philosophy of building weird projects from the Supercon talk she presented. It’s also worth mentioning that this one fits right into the Reinvented Retro contest.

Why are eyeballs so compelling? We can’t say for sure, but boy, this eyeball web cam sure is disconcerting.

Thanks for the tip, [Jake_of_All_Trades]!

[Christofer Hiitti] found himself with the latest Microsoft Flight Simulator on his PC, but the joystick he ordered was still a few weeks out. So he grabbed an Arduino, potentiometers and a button and hacked together what a joke-yoke.

The genius part of this hack is the way [Christopher] used his desk drawer for pitch control. One side of a plastic hinge is attached to a potentiometer inside a drawer, while the other side is taped to the top of the desk. The second pot is taped to the front of the drawer for pitch control and the third pot is the throttle. It works remarkably well, as shown in the demo video below.

The linearity of the drawer mechanism probably isn’t great, but it was good enough for a temporary solution. The Arduino Leonardo he used is based on the ATmega32u4 which has a built-in USB, and with libraries like ArduinoJoystickLibrary the computer interface very simple. When [Christopher]’s real joystick finally arrived he augmented it with a button box built using the joke-yoke components.

We’ve seen There is no doubt that Microsoft Flight Simulator 2020 will spawn a lot of great controller and cockpit builds over the next few years. We’ve already covered a new joystick build, and a 3D printed frame to turn an Xbox controller into a joystick.

Does it seem like everyone you game against can do everything faster than you? Chances are good that they have some kind of dedicated game pad or macro pad with a bunch of custom shortcuts. If you can’t beat ’em, join ’em, but why buy one when you can build your own? [lordofthedum] did the smart thing when they built their own version of the Azeron game pad, which is an outrageously expensive but ergonomic and cool-looking macro pad that reminds us of the DataHand ergonomic keyboard.

Each finger hovers over a C-shaped group of three switches — one actuates by moving the finger forward, another by moving backward, and the third by pushing down like a regular button. The thumb gets a 4-way joystick. All of these inputs are wired up to an Arduino Pro Micro, which has sort of become the standard for DIY macro pads and keyboards. We think this looks fantastic, and really raises the bar for DIY macro pads.

Need a few more keys, but still want a thumb joystick? Check out the smooth and sweet Sherbet game pad.

We have seen quite a few DIY joystick designs that use Hall effect sensors, but [Akaki]’s controller designs (YouTube video, embedded below) really make the most of 3D printing to avoid the need for any other type of fabrication. He’s been busy using them to enhance his Microsoft Flight Simulator 2020 experience, and shares not just his joystick design, but makes it a three-pack with designs for throttle and pedals as well.

Hall effect sensors output a voltage that varies in proportion to the presence of a magnetic field, which is typically provided by a nearby magnet. By mounting sensors and magnets in a way that varies the distance between them depending on how a control is moved, position can be sensed and communicated to a host computer. In [akaki]’s case, that communication is done with an Arduino Pro Micro (with ATmega32U4) whose built-in USB support allows it to be configured and recognized as a USB input device. The rest is just tweaking the physical layouts and getting spring or elastic tension right. You can see it all work in the video below.

Hall effect sensors have featured in DIY joystick builds, but for something as delightful as it is different, don’t miss this fantastic high-speed magnetic imager based on them.

If you’d like to add a gear stick to your virtual race car, then Oli Norwell has just the project for you.

His USB device extends a joystick with a length of threaded rod through a custom-cut wooden plate, restricting movements to a 1-5/reverse/neutral layout. The shifter is held in different gear positions using magnets, in order keep it from automatically springing back to center.

An Arduino Leonardo reads the switch states, and passes along the shift positions as a simulated joystick in HID mode. Possible future improvements include extra buttons, mode selection switches, and even an LCD screen for feedback.

Check it out sim-driving in the video below!


  • Newsletter

    Sign up for the PlanetArduino Newsletter, which delivers the most popular articles via e-mail to your inbox every week. Just fill in the information below and submit.

  • Like Us on Facebook