Posts | Comments

Planet Arduino

Archive for the ‘nasa’ Category

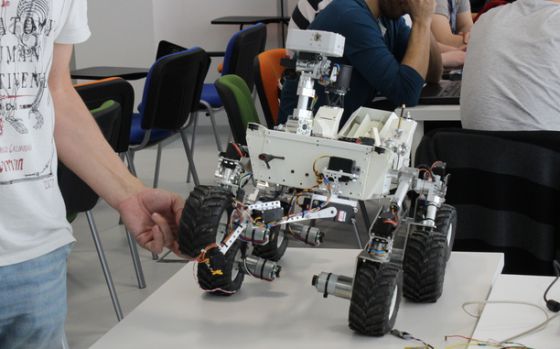
Merely looking at the latest Mars rover, Perseverance, will make almost any nerd giddy with excitement over the amount of cool tech that’s crammed into the vehicle before it gets shot into space. This feeling is what probably inspired Dejan of How to Mechatronics to create his own scaled-down version of the interplanetary vehicle, but not only would it look great, his DIY rover would also be able to drive and show what it’s “seeing” to the operator. 

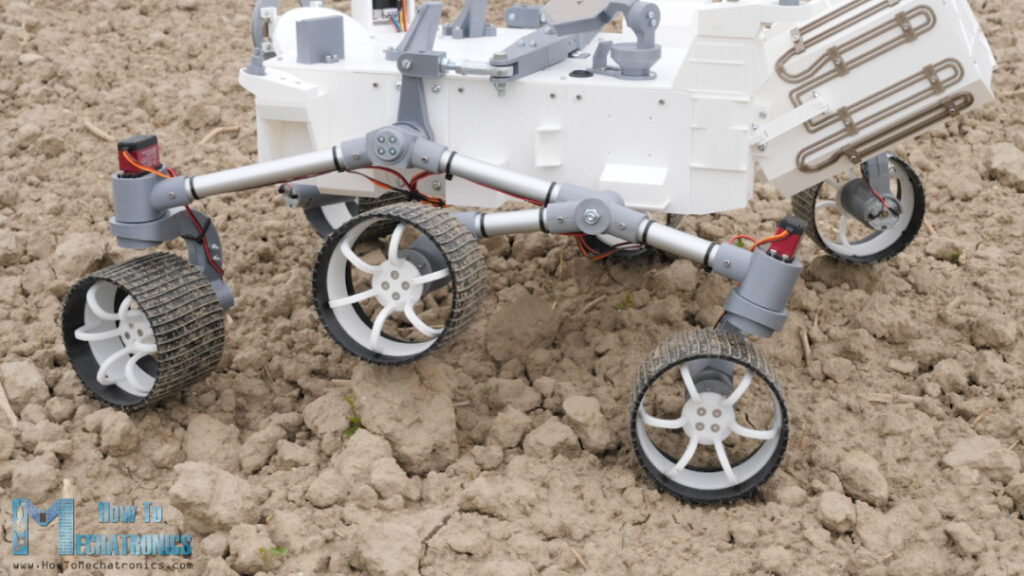
After designing a CAD model in Solidworks, Dejan got to work printing out the myriad of pieces required. The frame and structure of the rover is comprised of aluminum T-slot extrusions and tubes, while the rest is built from 3D-printed plastic. Each wheel was made to resemble the ones that are on the actual rover, and they are each driven by their own independent DC motor. Additionally, the four outer wheels are steered by separate servo modules. At the heart of the project is an Arduino Mega, which handles the DC motor drivers, servos, and the A4988 stepper driver that pans the camera horizontally. 

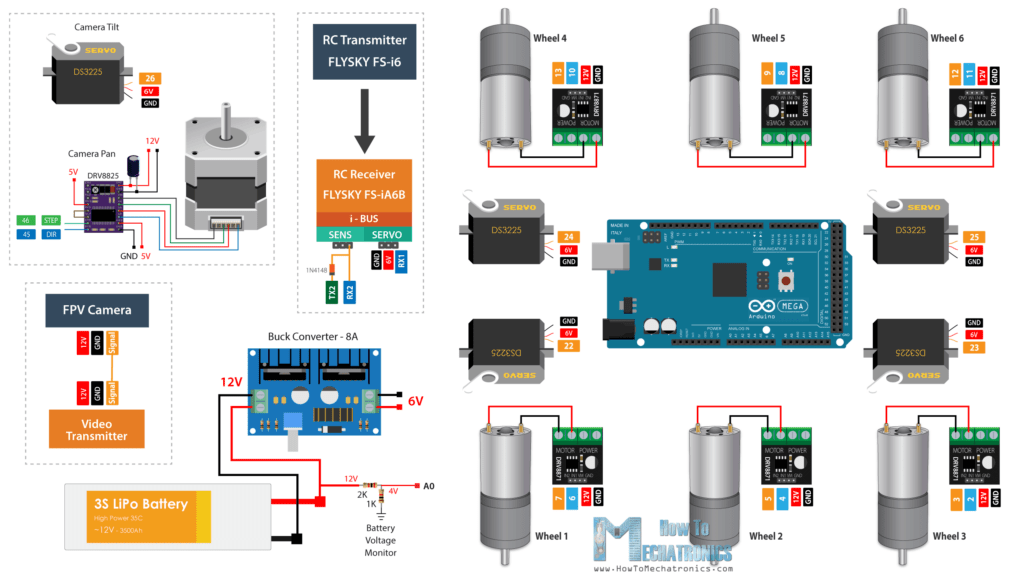
The rover’s driver has the ability to don a VR headset or just use their phone to view the output of its onboard FPV camera, which is pretty cool when trying to recreate what Perseverance does. More details about the project can be found here and seen in the video below where Dejan details how he built the scale rover and what all it can do.

The post DIY Perseverance rover replica looks and moves like NASA’s appeared first on Arduino Blog.

playA kid's homework table lifts up to reveal a NASA-inspired mission control center. Follow along for help in building your own.

Read more on MAKE

The post How to Build a Mission Control Desk appeared first on Make: DIY Projects, How-Tos, Electronics, Crafts and Ideas for Makers.

May
26

Four guys met at Arduino Day and now they are finalists at NASA Challenge

arduino, nasa, opensource, Robot, rover, zaragoza Comments Off on Four guys met at Arduino Day and now they are finalists at NASA Challenge 

Open Curiosity

Last March, during Arduino Day in Zaragoza, four guys met for the first time and  then decided to participate to the Nasa Challenge collaborating to the project made by Carlos Sicilia Til in the previews months:

OpenCuriosity is an open source, exomars rover (1:5 scale) with Arduino as main controller, based on the NASA Curiosity Rover. It contains a set of Arduino boards and sensors. The general public will be allowed to use these Arduinos and sensors for their own creative purposes while they are in space. All the people will be allowed to integrate their project in the robot, and the data gathered will be available on the internet in order to share this information with the general public for educational, science or other purposes. We want to provide affordable space exploration for everyone!

The robot designed by the Aragonese team is now among the finalists of the NASA contest!

Read the details of the story on El Pais.

DIY Satellite builders have been at it since 1961Setting the record straight on the history of Do-It-Yourself satellites.

Read more on MAKE

Feb
28

Ridiculously Accurate Mission Control Panel

arduino hacks, nasa, nasa control panel, Raspberry Pi Comments Off on Ridiculously Accurate Mission Control Panel 

space panel

We are absolutely blown away by the level of detail that went into this amazing mission control panel that [Jeff Highsmith] made for his son.

His kid just started school and needed a desk to do homework on. They had recently visited the Kennedy Space Center, and his son found a new interest in all things space – So [Jeff] took the opportunity to make the desk into this mind-boggling control panel. 

We saw a similar project recently, but this one seems to take it to the next level. The desk itself is hand-made from MDF sheet and with oak boards making up the structural members. He’s cut out over a dozen individual control panels, added switches, LEDs and potentiometers, and printed the labels on transparencies which give the whole thing a very professional and finished look. An iPad sits in the middle which plays a curated collection of space videos.

As far as we can tell, all the buttons actually do something. He’s using an Arduino with four I/O expanders (MCP23017) to take care of all the inputs and outputs, and a Raspberry Pi to add sound effects to the simulation.

Now all he needs is a spaceship to monitor — which apparently is in the works as well!

[Thanks Nick!]


Filed under: Arduino Hacks, Raspberry Pi


  • Newsletter

    Sign up for the PlanetArduino Newsletter, which delivers the most popular articles via e-mail to your inbox every week. Just fill in the information below and submit.

  • Like Us on Facebook