Posts | Comments

Planet Arduino

Archive for the ‘duemilanove’ Category

May
05

Playing with analog-to-digital converter on Arduino Due

ADC, arduino, arduino uno, ATmega328, ATSAM3X8E, duemilanove, microcontrollers Comments Off on Playing with analog-to-digital converter on Arduino Due 

adc_freerunning1-600x361

Piotr wrote a post on his blog about using some of advanced capabilities of ADC in Arduino Due:

Today I’m going to present some of more advanced capabilities of ADC built in ATSAM3X8E – the heart of Arduino Due.
I like the Arduino platform. It makes using complex microcontrollers much simpler and faster. Lets take for example the analog-to-digital converter. To configure it even on Atmega328 (Arduino Uno/Duemilanove) you must understand and set correct values in 4 registers. And it can be much more in complex device, like 14 in ATSAM3X8E (Arduino Due)!

Playing with analog-to-digital converter on Arduino Due – [Link]

mitosis

Cell biology professor [Mike] has created a way for blind students to decipher microscope slides using 3D prints and the magic of capacitive sensing. His write-up focuses on a slide showing the anaphase stage of mitosis in whitefish blastula, a popular choice for studying cell division. When a student touches a certain area of the print, the capacitive sensor triggers audio playback to tell them what they’re feeling.

[Mike] started by turning a 2D image of a cell into a 3D print. To do this, he made the image black and white, and then inverted the colors so that the 3D print’s topography will correspond correctly. The talking part is handled by an Arduino Duemilanove and a Spikenzie voice shield. The latter has a somewhat limited amount of space, but is more than adequate for the audio labels [Mike] made, which are all less than three seconds long.

A hard copy of the 2D file comes in handy for making sure the cap sensors are in the right places. To make those, [Mike] cut up some floor protector pads and covered the sticky side with copper tape. These are held on the 2D image with double-sided tape. The 3D print sits on top, separated by more furniture pads at the corners. He labeled this scientific sandwich model with a 3D printed Braille label that reads ‘anaphase’. [Mike] has made the referenced STL file along with a few others available at the National Institutes of Health’s 3D print exchange site.


Filed under: Arduino Hacks
Mar
05

Touchless rotary encoder from Indonesia

arduino, counter, diy, duemilanove Comments Off on Touchless rotary encoder from Indonesia 

Rotary Encoder


Mochamad shared with us his project about a touchless rotary encoder made with Arduino Duemilanove able to count rounds per second:


If you have problems with the language, check the blogpost in english!

Aug
30

How to make a pneumatic flight simulator

arduino, duemilanove, flight, pneumatic, simulator, tutorials, video Comments Off on How to make a pneumatic flight simulator 


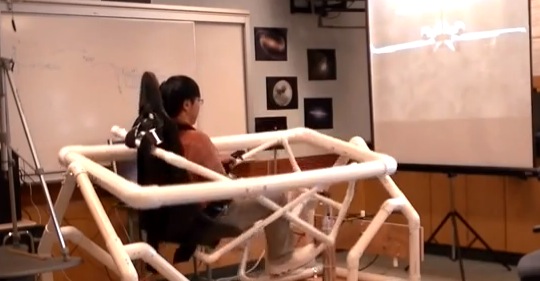
Arduino-Pneumatic Flight Simulator

Dominick Lee is a programmer, inventor who created the  “LifeBeam Flight Simulator“, a pneumatic-powered dual-axis motion flight simulator  using Arduino Duemilanove. After a few months of diligent work and the help of some generous collaborators he was able to mix physics, robotic and aviation into a motion platform that can make full rotations tilting at about 40 degrees.

The LifeBeam Flight Simulator is a full setup of equipment that runs simultaneously and collaboratively. The data is first sent from the Graphics or “Gaming PC”  through a custom software program that acquires game data. The game data is scaled and converted into specific coordinates for the roll and pitch (X and Y) axis. The program sends out the final signal which is received by an Arduino (Duemilanove). The Arduino has a complex program on it that combines the serial commands and parses certain values to calculate a voltage which is then converted into PWM and sent to a low-pass filter which smoothes the PWM into analog voltage. The analog voltage is connected to a Pneumatic Valve Amplifier which controls the pneumatic cylinders to make the platform move accordingly.

After watching the video below you can read the whole documentation on Instructables and make one yourself!


Jul
31

Standalone Arduino / ATMega chip on breadboard

arduino, ATmega, breadboard, duemilanove Comments Off on Standalone Arduino / ATMega chip on breadboard 

F8KVZ5SG51GEUYU.LARGE

domiflichi @ instructables.com writes:

If you’re like me, after I got my Arduino and performed a final programming on my first chip, I wanted to pull it off my Arduino Duemilanove and put it on my own circuit. This would also free up my Arduino for future projects.

The problem was that I’m such an electronics newbie that I didn’t know where to start. After reading through many web pages and forums, I was able to put together this Instructable. I wanted to have the information I learned all in one place, and easy to follow.

Standalone Arduino / ATMega chip on breadboard - [Link]

Jun
17

Vintage radio hacked into a docking station

arduino, duemilanove, Hacks, radio, tutorial Comments Off on Vintage radio hacked into a docking station 

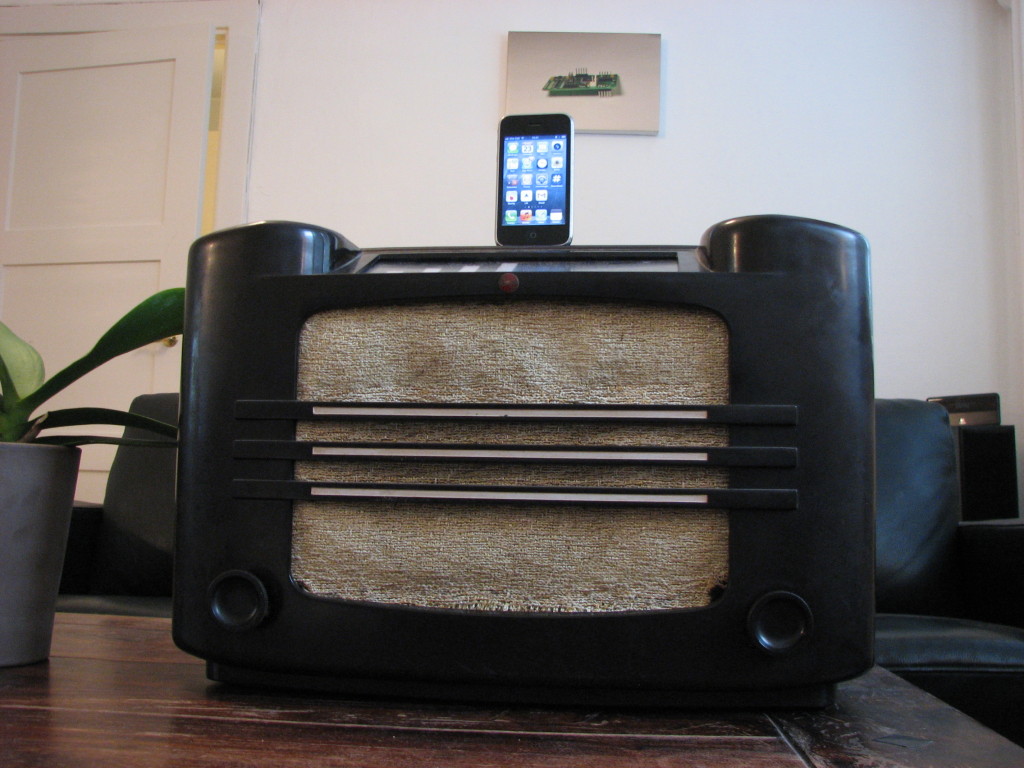
Vintage radio hacked into a docking station

Mr. Oyvind from Oslo sent us a cool  hack of a 75-years-old radio into an iPhone dock using an Arduino.

On his website you can read the complete tutorial or download the code and below you can have more details on the way he used the board:

the Arduino is used to read the state of the dual potentiometer that controls the volume and then translate this value into a certain number of LEDs being lit on the volume indicator.
I am using a Duemilanove. The code for the project is very simple and can be found here:http://www.build-electronic-circuits.com/wp-content/uploads/2013/05/radio_ino.zip
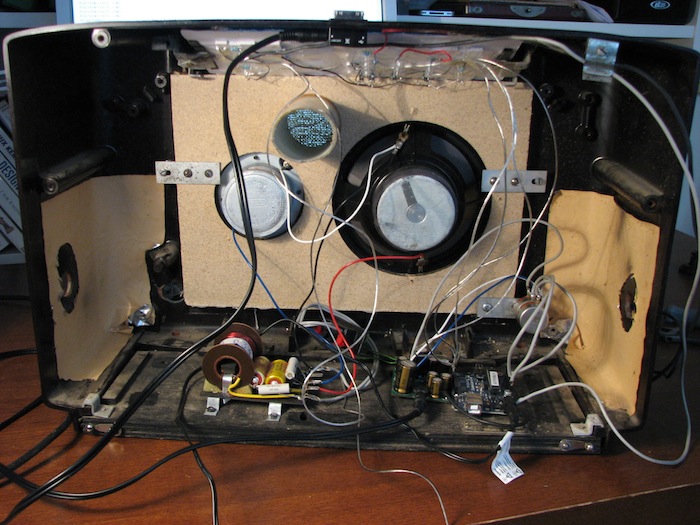
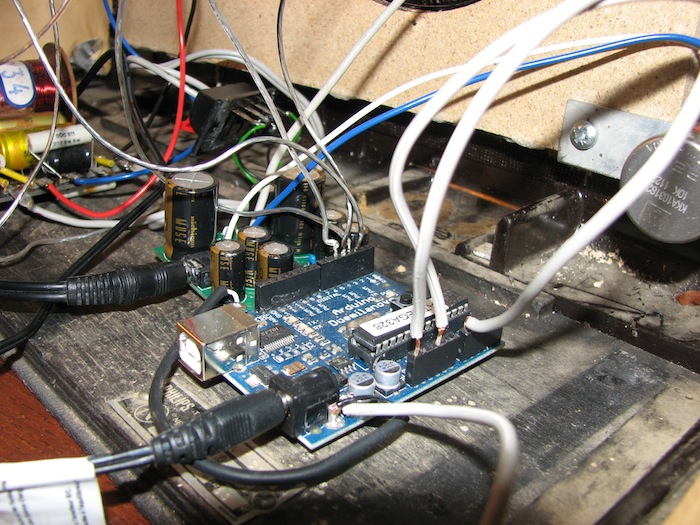
  •  An overview of the inside of the dock (very messy, I know ;) )
dock overview
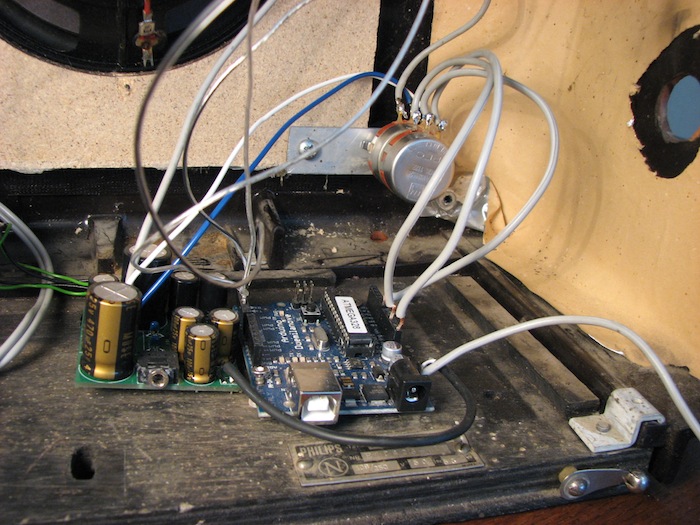
  •  I am using a dual potentiometer (2 pots in one). Here you can see one pot connected to the amplifier on the left to control the volume, and the other connected to the Arduino on the right to read the position of the pot.

dock pot amp arduino

  • Here you can see the 4 wires used to control the volume display connected to digital input 2, 3, 4 and 5 on the left side of the board. And you can see the potentiometer connected to 3.3V, analog input 0 and ground on the right side of the board.

dock connections

May
19

The Mood Lamp recognizes your facial expressions and turns them into light

arduino, duemilanove, Interaction Design, lamp, prototyping Comments Off on The Mood Lamp recognizes your facial expressions and turns them into light 

Mood Lamp

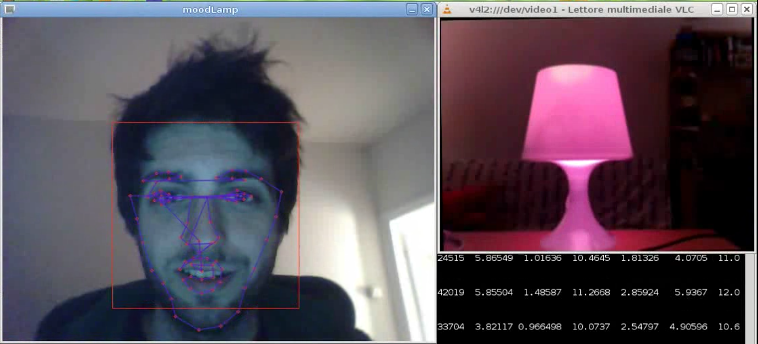
The Mood Lamp project by Vittorio Cuculo, is a system using interactions to communicate an emotional state to a physical object and receive back  a coherent response. In particular, through your facial expression you communicate your emotional state to an RGB color lamp . The lamp, at this point, will respond to the interaction by changing the color of the light emitted in accordance with the emotional state inferred.

The aim of the systems is to remove the mediation between human and machine typical of classic interfaces. Among the modes of natural interaction we usually have gestures, gaze tracking and facial expressions. The latter are particularly relevant because they play a fundamental role in nonverbal communication between human beings.

Regarding the man-machine interaction, the ability to recognize and synthesize facial expressions allows the machine to gain more communication skills, on the one hand by interpreting the emotions on the face of a subject, and on the other by translating their communicative intent through an output, such as movement, sound response or color change.

An IKEA lamp becomes a Natural Interaction system which senses human emotional states through facial expression. It uses OpenCV for image processing and analysis to identify emotional state through the movements of face’s fiducial points. The lamp, made with an Arduino Duemilanove, changes its color to represent the user’s current emotion.
In particular, it receives via serial communication, the values of pleasure, arousal and dominance, following the PAD emotional state model, as inferred from the facial expression and changes accordingly the color of the RGB LEDs.

Mood Lamp

Apr
23

Turning drawings into a music game

arduino, duemilanove, education, Kids, music Comments Off on Turning drawings into a music game 

musicink

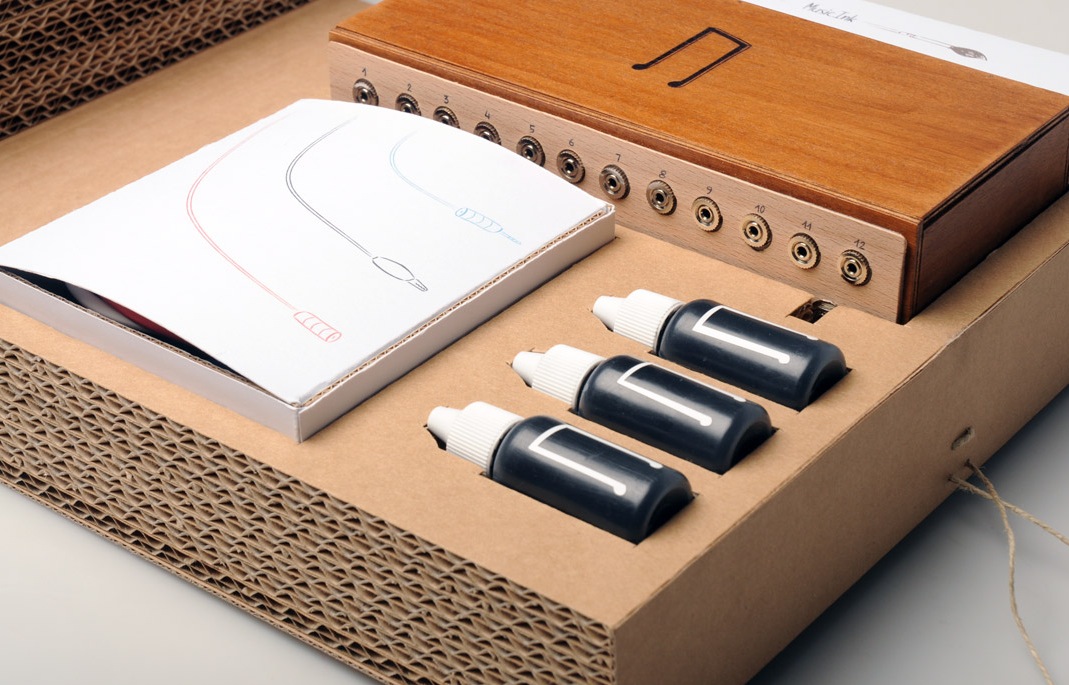
Gilda Negrini and Riccardo Vendramin, two young product designers from Italy, wrote us to share their last work, designed during a course called Autoproduzioni at Politecnico of  Milano. It’s called MusicInk, it runs on an Arduino Duemilanove board, and  gives an alternative method to teach music to children. That’s how they describe it:

MusicInk makes drawings turning into real music, this magical process is due to a mashup of various eterogenous technologies: Conductive Ink  by Bare Conductive, MPR121 controller, Arduino (Duemilanove board), LiPo shield (removed on a second time), Bluetooth shield by Seedstudio, Android platform, Pure Data for Android (libido), Pure Data patch.
Our project was developed with the help of our friend Manh Luong Bui and has been a very hard work.
We started our project studying the possibilities to create new and cheap musical instruments, then we discovered studies about conductive ink and we decided to create something different with these two technologies.

Here you can see their experience in testing MusicInk in a kindergarten in Milano with children between 4 and 5 years old:


Introduction

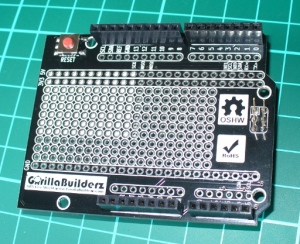
Some of you may be using an Arduino Leonardo board, taking advantage of the newer ATmega32U4 microcontroller for various reasons. And rightly so – there’s the extra analogue I/O, virtual USB and the microUSB socket so you can use your phone charger cable. However with the new microcontroller comes a few changes to the board pinouts – I2C and SPI have moved. So if you have a nice Ethernet shield or something using I2C – you’re basically out of luck… until now. The problem has been solved nicely by the team at GorillaBuilderz have created their LeoShield:

Use

You simply place it on the Leonardo, and then the older legacy shield on top. The LeoShield redirects the I2C pins back to A4 and A5, and also sends the SPI lines back to D11~D13. For example, our Ethernet shield:

The ICSP pins are also extended from the Leonardo to the LeoShield, for example:

however when inserting the LeoShield into your Leonardo, take care lining up all the pins before pushing the shield down. There is also the large prototyping area which has 5V , 3.3V and GND rails across the full width for convenience. The sticker on the rear of the shield is to insulate against any large items that may come in contact from the host board, however you can peel it off to realise the complete prototyping space.

Conclusion

It’s simple and it works – so if you need to use an older Arduino shield with a Leonardo the choice is simple – get yourself a Leoshield.

Disclaimer - The Leoshield was a review product received from GorillaBuilderz.

Thanks for reading tronixstuff.com. I’ve got some new tutorials coming up very soon, and a lot of existing posts are curently being updated – so follow things on twitterGoogle+, subscribe  for email updates or RSS using the links on the right-hand column. And join our friendly Google Group – dedicated to the projects and related items on this website. Sign up – it’s free, helpful to each other –  and we can all learn


Introduction

Some of you may be using an Arduino Leonardo board, taking advantage of the newer ATmega32U4 microcontroller for various reasons. And rightly so – there’s the extra analogue I/O, virtual USB and the microUSB socket so you can use your phone charger cable. However with the new microcontroller comes a few changes to the board pinouts – I2C and SPI have moved. So if you have a nice Ethernet shield or something using I2C – you’re basically out of luck… until now. The problem has been solved nicely by the team at GorillaBuilderz have created their LeoShield:

Use

You simply place it on the Leonardo, and then the older legacy shield on top. The LeoShield redirects the I2C pins back to A4 and A5, and also sends the SPI lines back to D11~D13. For example, our Ethernet shield:

The ICSP pins are also extended from the Leonardo to the LeoShield, for example:

however when inserting the LeoShield into your Leonardo, take care lining up all the pins before pushing the shield down. There is also the large prototyping area which has 5V , 3.3V and GND rails across the full width for convenience. The sticker on the rear of the shield is to insulate against any large items that may come in contact from the host board, however you can peel it off to realise the complete prototyping space.

Conclusion

It’s simple and it works – so if you need to use an older Arduino shield with a Leonardo the choice is simple – get yourself a Leoshield.

leoleoshieldsmall

Disclaimer - The Leoshield was a review product received from GorillaBuilderz.

Thanks for reading tronixstuff.com. I’ve got some new tutorials coming up very soon, and a lot of existing posts are curently being updated – so follow things on twitterGoogle+, subscribe  for email updates or RSS using the links on the right-hand column. And join our friendly Google Group – dedicated to the projects and related items on this website. Sign up – it’s free, helpful to each other –  and we can all learn

The post Review: GorillaBuilderz LeoShield appeared first on tronixstuff.


  • Newsletter

    Sign up for the PlanetArduino Newsletter, which delivers the most popular articles via e-mail to your inbox every week. Just fill in the information below and submit.

  • Like Us on Facebook