Posts | Comments

Planet Arduino

Archive for the ‘animatronic’ Category

There is no shame in taking advantage of a voice assistant device, like an Amazon Echo with Alexa. Those devices are useful and can add real convenience to your life. But they lack personality and any feeling of a soul—not just because of the stilted voices, but also because of the boring industrial designs intended for mass market appeal. To inject some life into his Amazon Echo, Workshop Nation turned it into a charming animatronic robot.

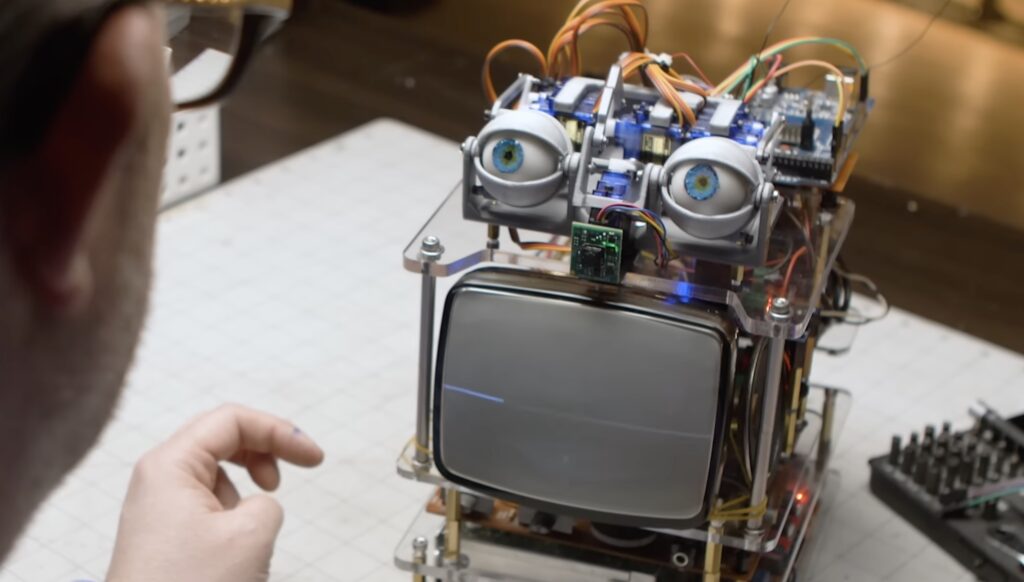
At its heart, this is still an Amazon Echo and it retains all of that functionality. But the Alexa brain now inhabits a body that looks like it was made by a wacky scientist from an ’80s movie featuring robot hijinks. It was cobbled together from salvaged parts, like an old CRT TV, as well as new components. It has 3D-printed animatronic eyes based on a design by Will Cogley and actuated by servo motors. Something akin to a voice waveform appears on the CRT whenever Alexa speaks, which works by using that signal voltage to drive one of the electron beam coils.

An Arduino Mega 2560 board controls the animatronics and also monitors a Useful Sensors Person Sensor. Its purpose is to direct the movement of the eyes to follow any people in the area. The Arduino also lets the users bypass the normal “Alexa” wake word so they can ask questions starting with whatever term they prefer. Those components (the bulk of which belong to the CRT) all attach to a frame made of laser-cut clear acrylic and threaded rods.

The result is a contraption that combines all of the convenience of a modern voice assistant with the aesthetic appeal of a science fair reject.

The post Amazon Echo becomes charming animatronic robot appeared first on Arduino Blog.

It isn’t uncommon to see a robot hand-controlled with a glove to mimic a user’s motion. [All Parts Combined] has a different method. Using a Leap Motion controller, he can record hand motions with no glove and then play them back to the robot hand at will. You can see the project in the video, below.

The project seems straightforward enough, but apparently, the Leap documentation isn’t the best. Since he worked it out, though, you might find the code useful.

An 8266 runs everything, although you could probably get by with less. The Leap provides more data than the hand has servos, so there was a bit of algorithm development.

We picked up a few tips about building flexible fingers using heated vinyl tubing. Never know when that’s going to come in handy — no pun intended. The cardboard construction isn’t going to be pretty, but a glove cover works well. You could probably 3D print something, too.

The Unity app will drive the hand live or can playback one of the five recorded routines. You can see how the record and playback work on the video.

This reminded us of another robot hand project, this one 3D printed. We’ve seen more traditional robot arms moving with a Leap before, too.

At this point, society has had over three decades to get used to the Blue Man Group. Maybe that’s why we’re less disturbed by [Graham Jessup]’s face-tracking Watchman than we should be. Either that, or it’s because it reminds us of Data from Star Trek: The Next Generation. Frankly, this is just way too cool to be dismissed out of hand as creepy.

The Watchman finds faces via video feed from a camera module positioned in his forehead as a third eye. The camera is connected to a Pi Zero that’s wearing a Google AIY vision bonnet. The Pi translates the face locations into servo positions and feeds them to an Arduino UNO located in the frontal lobe region to move the eyeballs and lids accordingly.

[Graham] had a bit of trouble with tracking accuracy at first, so he temporarily replaced the pupils with 5 mW lasers and calibrated them by tracking a printed stand-in of his head to avoid burning out his retinas.

This project builds on previous work by [Tjahzi] and the animatronic eye movements of [Will Cogley]. We can only imagine how awesome the Watchman would look with a pair of [Will]’s incredibly realistic eyeballs. Either way, we would totally trust the Watchman to defend our modest supply of toilet paper in the coming weeks. Check out a brief demo after the break, and a whole lot more clips on [Graham]’s site.

Via reddit

[Will] wanted to build some animatronic eyes that didn’t require high-precision 3D printing. He wound up with a forgiving design that uses an Arduino and six servo motors. You can see the video of the eyes moving around in the video below.

The bill of materials is pretty simple and features an Arduino, a driver board, and a joystick. The 3D printing parts are easy to print with no supports, and will work with PLA. Other than opening up holes there wasn’t much post-processing required, though he did sand the actual eyeballs which sounds painful.

The result is a nice tight package to hold six motors, and the response time of the eye motion is very impressive. This would be great as part of a prop or even a robot in place of the conventional googly eyes.

While the joystick is nice, we’d like to see an ultrasonic sensor connected so the eyes track you as you walk across the room. Maybe they could be mounted behind an old portrait for next Halloween. Then again, perhaps a skull would be even better. If you want a refresher about servos, start with a laser turret tutorial.

Hackers seem intent on making sure the world doesn’t forget that, for a brief shining moment, everyone thought Big Mouth Billy Bass was a pretty neat idea. Every so often we see a project that takes this classic piece of home decor and manages to shoehorn in some new features or capabilities, and with the rise of voice controlled home automation products from the likes of Amazon and Google, they’ve found a new ingredient du jour when preparing stuffed bass.

[Ben Eagan] has recently completed his entry into the Pantheon of animatronic fish projects, and while we’ll stop short of saying the world needed another Alexa-enabled fish on the wall, we’ve got to admit that he’s done a slick job of it. Rather than trying to convince Billy’s original electronics to play nice with others, he decided to just rip it all out and start from scratch. The end result is arguably one of the most capable Billy Bass updates we’ve come across, if you’re willing to consider flapping around on the wall an actual capability in the first place.

The build process is well detailed in the write-up, and [Ben] provides many pictures so the reader can easily follow along with the modification. The short version of the story is that he cuts out the original control board and wires the three motors up to an Arduino Motor Driver Shield, and when combined with the appropriate code, this gives him full control over Billy’s mouth and body movements. This saved him the trouble of figuring out how to interface with the original electronics, which is probably for the better since they looked rather crusty anyway.

From there, he just needed to give the fish something to get excited about. [Ben] decided to connect the 3.5 mm audio jack of an second generation Echo Dot to one of the analog pins of the Arduino, and wrote some code that can tell him if Amazon’s illuminated hockey puck is currently yammering on about something or not. He even added a LM386 audio amplifier module in there to help drive Billy’s original speaker, since that will now be the audio output of the Dot.

A decade ago we saw Billy reading out Tweets, and last year we presented a different take on adding an Alexa “brain” to everyone’s favorite battery powered fish. What will Billy be up to in 2029? We’re almost too scared to think about it.

If you are doing a senior design project in engineering school, it takes some guts to make a robotic duplicate of the school’s president. He or she might be flattered, or completely offended. Us? We laughed out loud. Check out the video below. Spoiler: the nose/moustache wiggle at the end kills us every time.

The project uses a variety of parts including a plastic mask, an Erector set, and the obligatory Arduino with an MP3 shield. There are many articulated parts including eyes, nose, mouth, and wiggly moustache. The face uses RC servos, although [gtoombs] says he’d use stepper motors next time for smoother motion.

The mouth synchronizes to the audio, although this is hard coded, so it would take some work to make the face speak arbitrary speech. Still, it would be possible with a little work.

Humanoid robots are often as much art as technology. Of course, if you build robots–no matter how inhuman they look–you may have to worry about rule 34.


Filed under: Arduino Hacks, robots hacks

Every now and then you see a project that makes you smile. It may not be something that will deliver world peace or feed the hungry, but when it opens in your browser in the morning you go to work a bit happier for the experience.

Just such a project is [Radomir Dopieralski’s] set of wearable mechatronic cat ears. A cosplay accessory that moves as you do. Very kawaii, but fun.

You may have seen the commercially available Necomimi brainwave activated mechatronic ears. [Radomir’s] version does not share their sophistication, instead he’s using an accelerometer to detect head movement coupled to an Arduino Pro Mini driving a pari of servos which manipulate the ears. He provides the source code, and has plans for a miniaturised version using an ATtiny85 on its own PCB.

Amusing cuteness aside, there are some considerations [Radomir] has had to observe that apply to any a head-mounted wearable computer. Not least the problem of putting the Pro Mini and its battery somewhere a little more unobtrusive and weatherproof than on top of his head. He also found that the micro-servos he was using did not have enough range of movement to fully bend the ears, something he is likely to address in a future version with bigger servos. He’s yet to address a particularly thorny problem: that a pair of servos mounted on your head can be rather noisy.

We’ve covered quite a few cosplay stories over the years. This is not even our first cat ear story. More than one example of a Pip Boy, a HAL 9000 costume, and a beautifully made Wheatley puppet have made these pages, to name a few. So scroll down and enjoy [Radomir’s] video demonstration of the ears in action.


Filed under: Arduino Hacks, wearable hacks
Oct
29

The making-of an animatronic baby alien

alien, animatronic, arduino, arduino uno, Featured, movie Comments Off on The making-of an animatronic baby alien 

alienpuppet

Eva Taylor works at EKT Workshop and built an animatronic rod puppet Alien as a masterwork research project for the National Institute of Dramatic Art (NIDA) in Sydney Australia. It was inspired by the “bambi burster” built for the film Alien 3, although her creature is somewhat different.

The animatronics are controlled via a Playstation 3 controller, using a servoshock module between the controller and an Arduino Uno board:

It contains and 8 way 2 stage tail mechanism and animatronic lips, jaw and tongue. The remaining parts are rod controlled. A myriad of techniques were deployed in its construction – the torso and limbs were hand-carved from Queensland Maple while the joints were custom made from recycled parts of RC cars and planes. The skeleton of the tail was custom made from acrylic and cut on a laser cutter. The head contains an underskull of fibreglass, dental acrylic teeth and silicone skin. The muscle groups are also made of deadened, encapsulated silicone.

She shared with us the video above showing the main phases of the making-of process, while the one below gives you an idea of how  the puppet looks like in a more dramatic piece:


  • Newsletter

    Sign up for the PlanetArduino Newsletter, which delivers the most popular articles via e-mail to your inbox every week. Just fill in the information below and submit.

  • Like Us on Facebook