Posts | Comments

Planet Arduino

Archive for the ‘plotter’ Category

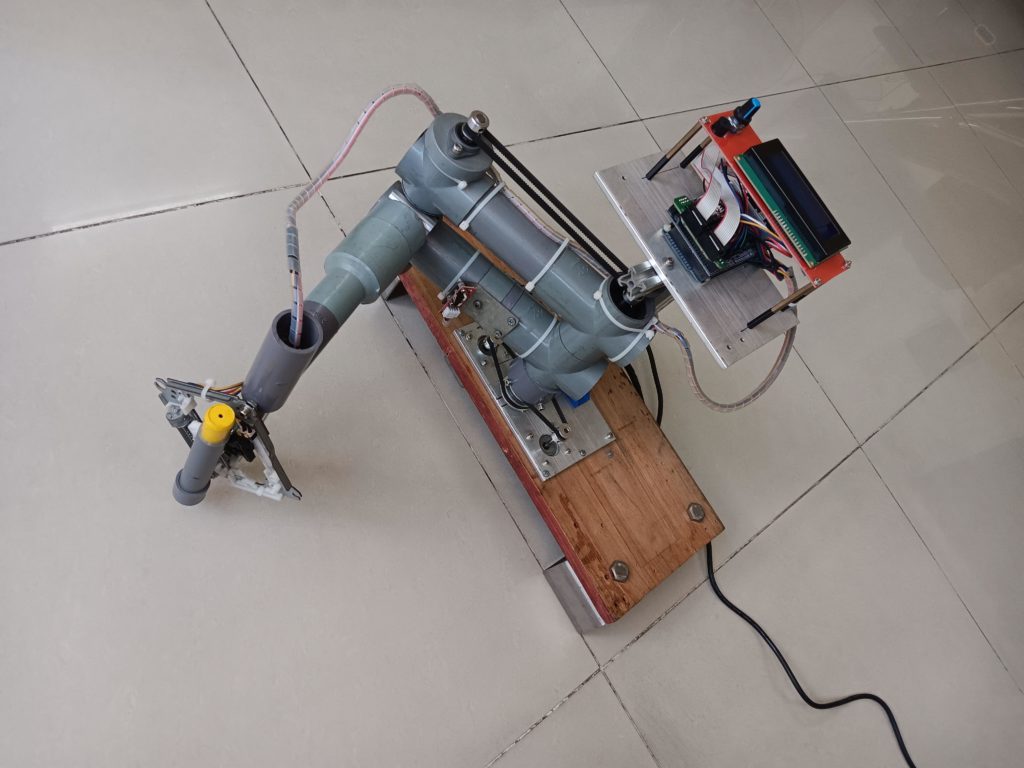
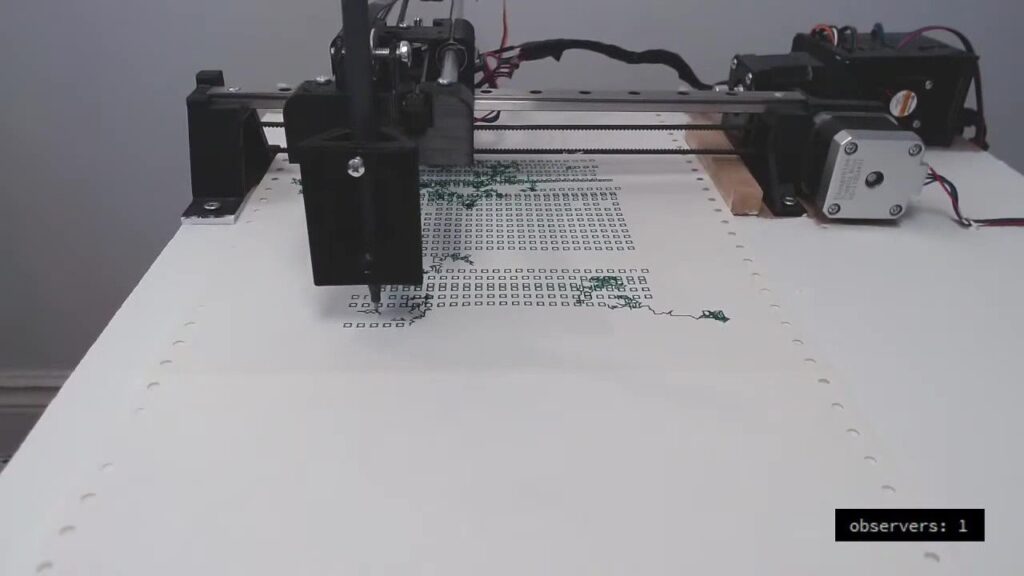
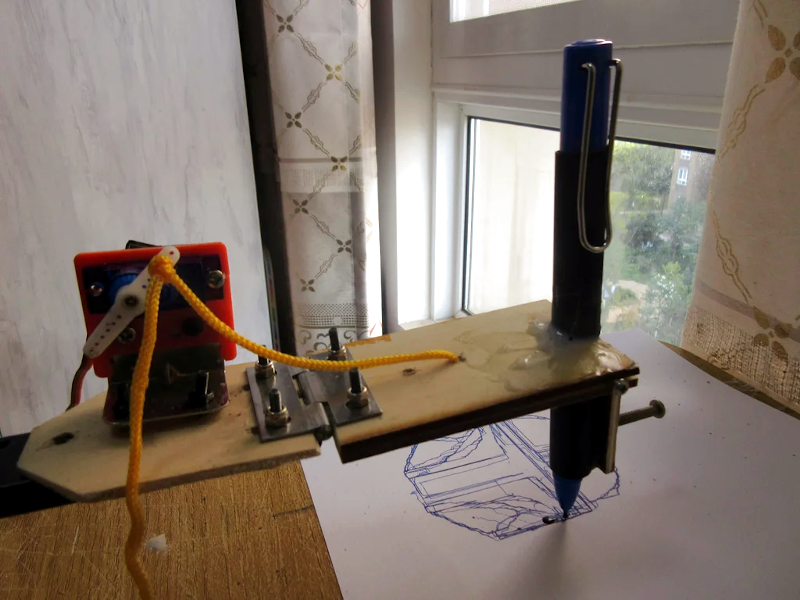
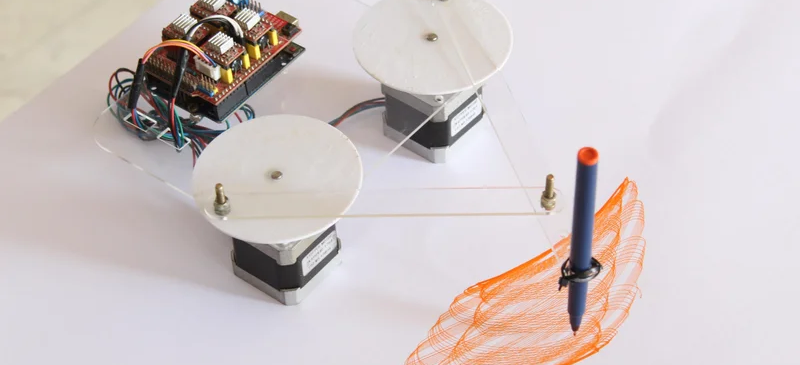
Robots come in all shapes and sizes, but one of the most popular styles for industrial applications is the SCARA (Selective Compliance Assembly Robot Arm). These have multiple degrees of freedom, each of which rotates around the vertical Z axis. But they’re otherwise constrained, which can have advantages for certain applications. For example, they tend to have relatively high payload capacities. If you’re on a budget but want to dip your toes in, tuenhidiy’s SCARA plotter is a great way to start.

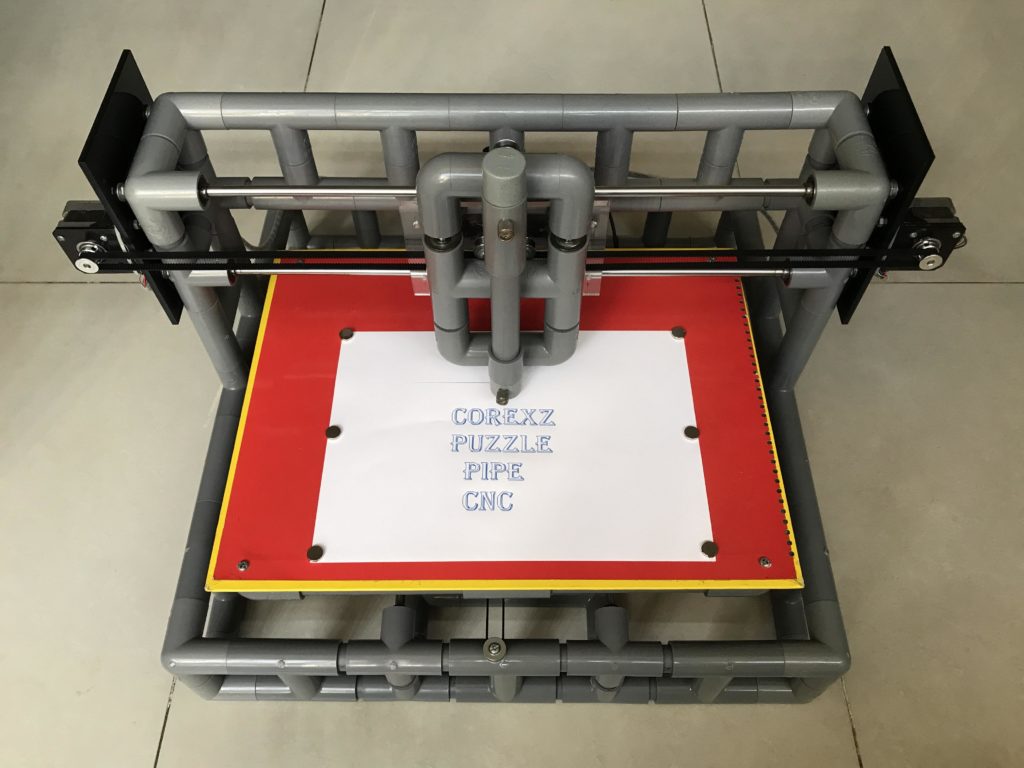
This is a follow-up to tuenhidiy’s previous SCARA design from a couple of years ago. The new version is more robust and includes a homing feature, which is important for repeatability. This is set up as a plotter and the firmware reflects that, but it would be possible to adapt the mechanical design for other purposes. 

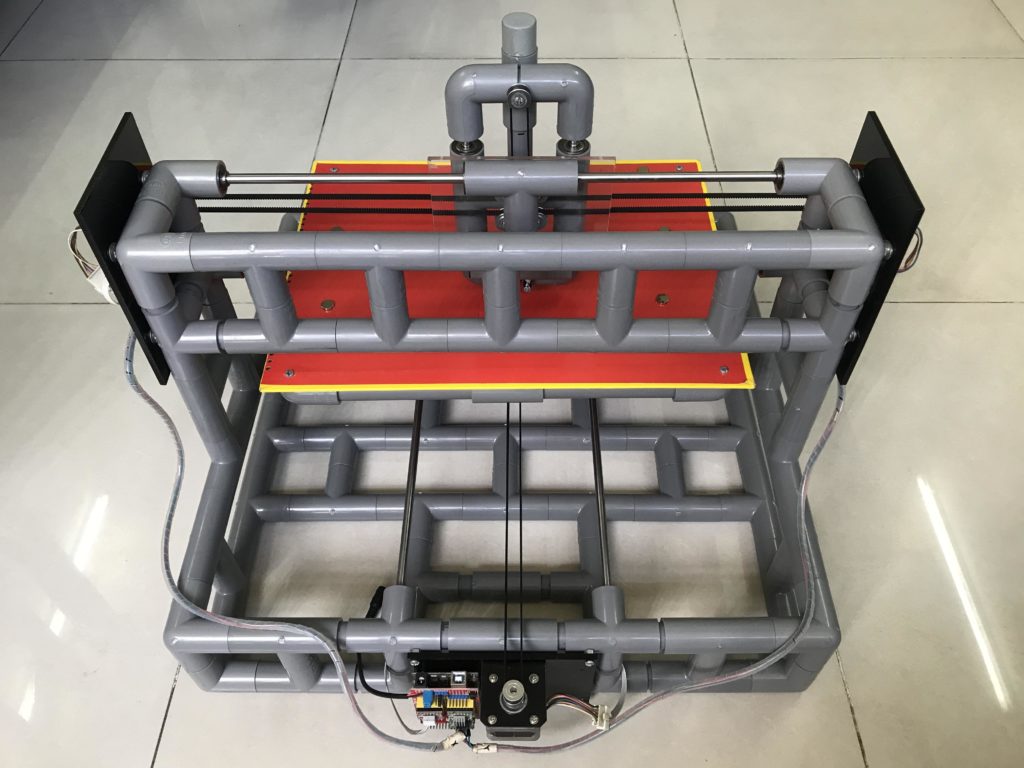
To keep costs down, most of the structure is PVC pipe. Stepper motors provide actuation via GT2 timing belts and pulleys. An Arduino Mega 2560 board controls those steppers through a RAMPS 1.4 board with A4988 stepper drivers. An interface module with a 2004 LCD, rotary encoder, buzzer, and button lets the user start jobs.

In this case, those jobs are G-code files containing the movement commands to reproduce the drawings. That works because the Arduino runs Marlin firmware (popular in the 3D printing community). The use of Marlin made homing easy and it accepts g-code that users can create with most of the standard software tools. 

The post Building your own affordable SCARA plotter with Arduino appeared first on Arduino Blog.

The whole purpose of machine automation is to eliminate human needs and errors. A CNC machine doesn’t get tired, doesn’t need breaks, and performs a task exactly the same way every time. But what if that weren’t true? What if machines experienced human emotions and let it affect their work like we do? That’s the idea behind Devlin Macpherson’s Nervous Drawing Machine.

By all outward appearances, this is just a standard two-axis pen plotter. Like many laser cutters and 3D printers, it has a stepper motors controlled by an Arduino board that follows g-code commands. A command might be something like “move the X axis 2mm to the right.” By chaining hundreds or thousands of those commands together, the machine can follow complex toolpaths that form letters, symbols, pictures, or anything else. Macpherson equipped the pen plotter with a continuously fed roll of paper so it can draw indefinitely.

Under normal conditions, the machine plots row after row of little squares. A video camera points at the plotter as it works and the video feed streams through a website. And this is where things get interesting. If someone visits the website and watches the stream, the pen plotter becomes nervous about being observed. It will then start to make mistakes, like drawing scribbles instead of squares. Once the visitor leaves the website and the machine is unobserved once again, it will return to drawing perfect rows of squares.

Macpherson built the Nervous Drawing Machine for his thesis project titled ICFWYWM (I Can’t Focus When You’re Watching Me). Like all good interactive art installations, it reflects the human condition.

The post This pen plotter gets nervous when observed appeared first on Arduino Blog.

Before CNC (computer numerical control) came along, automated machines utilized mechanisms like cams and tapers to act as guides. Those are physical components with precise contours meant to guide the tool, like an artist tracing lines with a pantograph. Such mechanisms are uncommon today, as CNC is far more versatile and much easier to implement. But Mr Innovative turned to those traditional techniques to build this cam-following plotter that can draw many shapes.

A “cam” is a rotating or pivoting component in a mechanism, which has an irregular profile to control the actuation of something. Internal combustion engines, for example, often contain rotating cams that to open and close the valves at the proper times. In this case, the plotter’s cam controls the movement of the pen in the X axis. Wider portions of the cam push the pen further right, while narrower portions of the cam allow the pen to move left. A rubber band pulls the pen arm cam follower tight against a cam. The paper moves at a constant rate in the Y axis, and its speed combined with the shape of the cam determine the resulting plot shape.

This machine will look familiar to those of you who have seen a Mr Innovative project in the past. It uses an Arduino Nano board paired with Mr Innovative’s own driver board design to control the two motors. One stepper motor controls the rotation of the cam and a second stepper motor controls the paper feed. The user can set the number of cam rotations using a Nextion touchscreen LCD panel. Mr Innovative 3D-printed the mechanical parts and mounted them to a small sheet of wood, with a standard linear rail and bearing restricting the movement of the pen arm to the X axis. It can’t draw any shape, but this machine is quite versatile and can produce quite a few interesting plots.

The post Nifty cam-following plotter can draw many shapes appeared first on Arduino Blog.

If you’ve ever wanted to build a large format plotter but didn’t have the floor space, maybe put it up against the wall and make it cute. That’s the idea behind Fumik, the wall-drawing robot. As you might expect, the little device is just a motion base with a pen. We hope there’s paper against the wall since not everyone wants computer-generated art on their drywall.

The maximum size is apparently 5 m wide by 3 m tall, plenty of room to express yourself. The controller is an Arduino Mega, and stepper motors with a CNC shield drive the whole assembly. Interestingly, the motor and electronics are all onboard the jellyfish itself, rather than the wall.

The device only holds one pen at a time, but you can draw with one color and then manually change the pen. The files on GitHub are good, but you’ll need to intuit some of the mechanics from the videos. However, since it uses off-the-shelf hardware, it should be pretty easy to figure it out. This looks like a cheap and cheerful wall plotter, and the results speak for themselves.

We have seen similar wall plotters. More than once, even.

Most plotters are planar, meaning they move in a single plane — though they often have the ability to move the tool up and down in the third axis. But if you convert one axis of the drawing plane into rotation, you get cylindrical plotting. That is how the rotary axis on a CNC machine works. If the tool moves in a third axis, you can even do conical plots. That’s exactly how CylinDraw makes it possible to plot directly onto cups and glasses.

CylinDraw is an open source “cup-specific” plotter and engraver. It is a 2.5 axis machine with a rotary axis, similar to the famous EggBot egg plotter. Except instead of drawing onto the elliptical (in cross section) surface of an egg, CylinDraw plots onto the straight or sloped surface of cups, bottles, and similar objects. By equipping a Dremel or other rotary tool, you can also engrave onto a surface instead of drawing. If you do draw, the software also lets you swap pens to get a full color palette.

An Arduino Nano board controls CylinDraw’s operation, including the stepper motors that rotate the cup and move the tool along the X axis. The frame and many of the parts, including the lathe-inspired chuck, are 3D-printed. But it is the software that really differentiates CylinDraw from similar plotters. With this software, you can automatically convert images into G-code toolpaths for the Arduino to follow for plotting.

CylinDraw is currently available as a DIY hardware kit on Etsy if you want to build one for yourself.

The post Plot designs onto cups with CylinDraw appeared first on Arduino Blog.

Although the widespread use of 3D printers has made things like linear bearings and leadscrews more common, you still can’t run down to your local big-box hardware store and get them. However, you can get drawer slides and any hobby shop can sell you some RC servos. That and an Arduino can make a simple and easy plotter. Just ask [JimRD]. You can also watch it do its thing in the video below.

Of course, servos aren’t usually what you use in a plotter. But the slides convert the rotation of the servo into linear motion. One servo for X and one for Y is all you need. Another microservo lifts the pen up and down using a hinge you could also get from a hardware store.

Is it pretty? No. Does it do amazing artwork? No, again. But it is the kind of thing you could probably throw together from things you happen to have hanging around, especially if you are about to trash an old desk or cabinet with slides in it.

This would make a great rainy day project. We are suckers for simple plotter projects even though you could just mate a pen to your 3D printer or CNC machine. Those won’t fit your whiteboard, though.

Instructables user tuenhidiy wanted to create a new kind of CNC plotter that was unlike nearly all of the others you’ve seen. Rather than use aluminum extrusions or wood, this machine is constructed from various pieces of PVC pipe all cut to exact lengths, hence its name, the “CoreXZ Puzzle Pipe Plotter.”

Electronics wise, the plotter runs on an Arduino Uno loaded with an instance of the ubiquitous GRBL firmware. Stacked on top was a CNC GRBL shield, which has three A4988 stepper motor drivers for delivering current to three NEMA17 motors. 

To assemble this PVC CNC machine, tuenhidiy started by building the lower frame from a plethora of T-joints and connectors along with several inserts for attaching the aluminum rods. The plate at the bottom of the machine glides across the Y axis via a pair of aluminum rods and a set of bearings whereas the perpendicularly placed X axis is stationary and moves in a similar manner using one stepper motor placed to the side. Across from this motor is another one, which manipulates the Z axis vertically. 

After adding a pen and connecting the motors to the shield, tuenhidiy opened the Universal Gcode Platform application and added a few different toolpaths for testing. As shown in the following video, the plotter does a great job at drawing both pictures and text accurately. For more details about this project, check out its tutorial on Instructables.

The post PVC pipe plotter prints pretty pictures appeared first on Arduino Blog.

The holidays always remind us of our favorite toys from when we were kids. Johnny Astro, an Erector set, and — of course — a Spirograph. [CraftDiaries] has an Arduino machine that isn’t quite a Spirograph, but it sure reminds us of one. The Arduino drives two stepper motors that connect to a pen that can create some interesting patterns.

The build uses a few parts that were laser cut, but they don’t look like they’d be hard to fabricate using conventional means or even 3D printing. The author even mentions you could make them out of cardboard or foamboard if you wanted to.

The electronics are straightforward with two stepper drivers. We couldn’t help but think that some of the old 3D printer motherboards we have laying around here could handle this very easily. However, in this project, the CPU is an ordinary UNO with a CNC shield to drive the motors.

Of course, the real trick is the software. Apparently, the different patterns come from the relationship between the delay between steps of the right motor and that of the left motor. There’s got to be some math behind that, but the patterns are certainly pretty.

If you prefer something that looks more like an actual Spirograph, grab a bag of Lego. Or try the Art-O-Matic.

Around these parts, we see plenty of plotter builds. They’re a great way to learn about CNC machines and you get to have fun making pictures along the way. [Ben Lucy] was undertaking just such a build of his own, but wanted to do something standalone that served a purpose. The result is the impressive Portable Portrait Painter.

What sets [Ben]’s project apart is how complete it is. Unlike other plotters that simply follow G-code instructions or process external images, the Portable Portrait Painter is a completely standalone machine. Fitted out with an OV7670 camera, hooked up to an Arduino, it’s capable of taking its own photos and then drawing them out as well.

Through some clever code from [Indrek Luuk], the Arduino Mega2560 is able to display a 20fps video preview on a color LCD screen. When the user presses a button, the current frame is captured and sent to the pen plotter. The plotting algorithm is particularly impressive, with images first processed with histogram compensation to maximise contrast. The pen is then drawn across the page line by line, and pressed into the page by varying amounts depending on the color value of each pixel. The darker the pixel, the thicker the stroke made by the pen. This more analog approach produces a much more detailed image than more basic plotters which either leave a mark or don’t.

The portraits produced by the plotter are impressive, and we like the edge-of-page artifacts, which add a little style to the final results. The Portrait Painter would make a great conversation piece at any Maker Faire or hackerspace night.

It’s a project that reminds us of some of the painting robots we’ve seen over the years. Video after the break.

Vertical pen plotters, which work by suspending a drawing device between two variable lengths of cable, can be a lot of fun. When his kids stopped using a 780x1200mm blackboard, ‘tuenhidiy’ had the perfect surface on which to create his own!

The project uses a pair of NEMA 17 motors to dictate the lengths of timing belt that suspend the drawing instrument, with counterweights help keep it in position. An Arduino Mega running Makelangelo firmware controls the device, using a RAMPS 1.4 board and two A4988 stepper drivers.

It’s a nice clean build, which looks fairly straightforward to reproduce. Results, as seen in the videos below, are quite impressive!


  • Newsletter

    Sign up for the PlanetArduino Newsletter, which delivers the most popular articles via e-mail to your inbox every week. Just fill in the information below and submit.

  • Like Us on Facebook