Posts | Comments

Planet Arduino

Archive for the ‘RTC’ Category

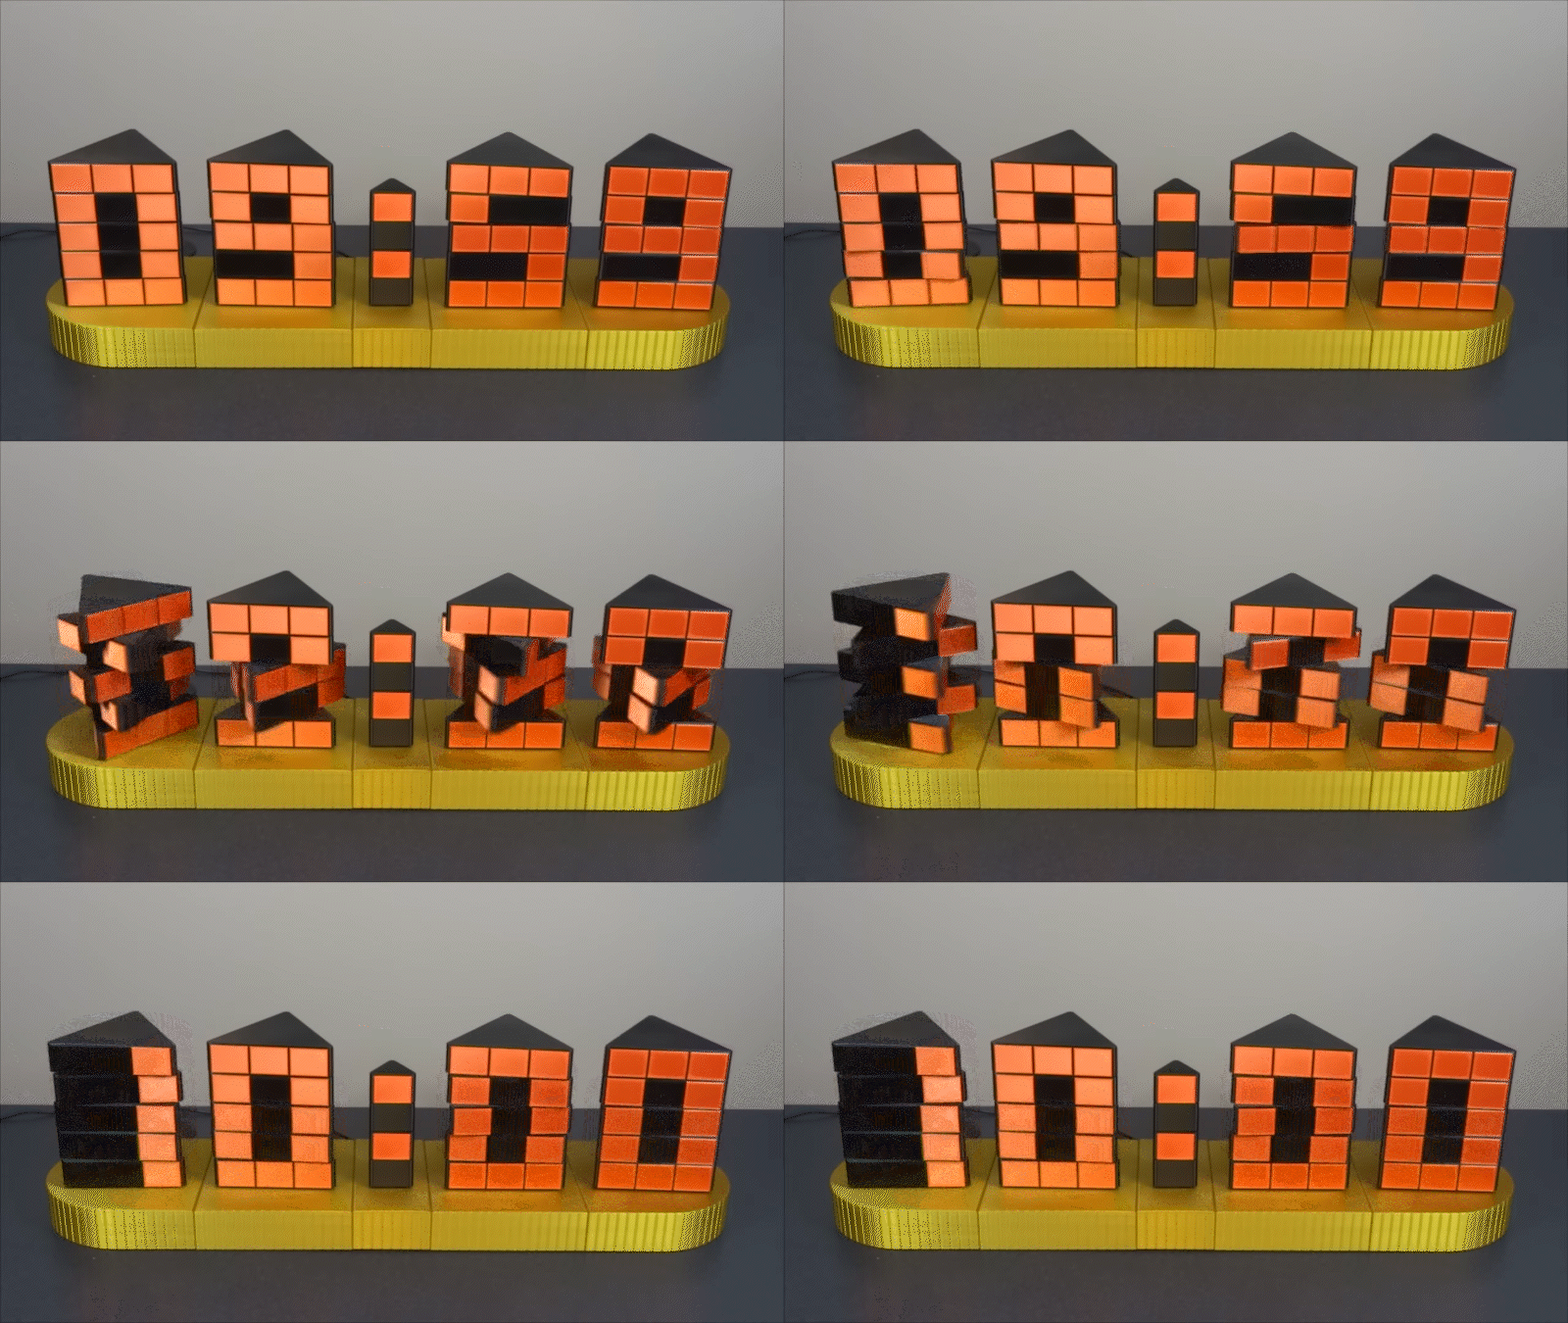
An orange 3D printed four digit clock with rotating segments

[Hans Andersson] has been creating marvelous twisting timepieces for over a decade, and we’re pleased to be able to share his latest mechanical clock contraption with our readers, the Time Twister 5.

In contrast to his previous LEGO-based clocks, version five of the Time Twister uses 3D printed segments, undoubtedly providing greater flexibility in terms of aesthetics and function. Each digit is a mechanical display, five layers vertical and three segments horizontal, with a total of three unique faces. Each layer of each display can be individually rotated by a servo, and this arrangement allows for displaying any number between zero and nine. The whole show is controlled by an Arduino MEGA and a DS3231 real-time clock.

Watching these upended prisms rotate into legible fifteen-segment digits is enjoyable enough already, but the mechanical sound created by this timepiece in motion is arguably even more satisfying. Check out the video below to see (and hear) for yourself. If you want to build one yourself, all the details are here.

We last covered [Hans Andersson] and his very first Time Twister clock way back in November 2011. Since then we’ve come across many impressive mechanical clocks, like this seven-segment work of art. We’re constantly impressed by the outstanding craftsmanship of these mechanical clocks, and it’s inspiring to see one of our OG horologists back in the saddle once more.

Pomodoro timer helps you focus on tasks without burning out.

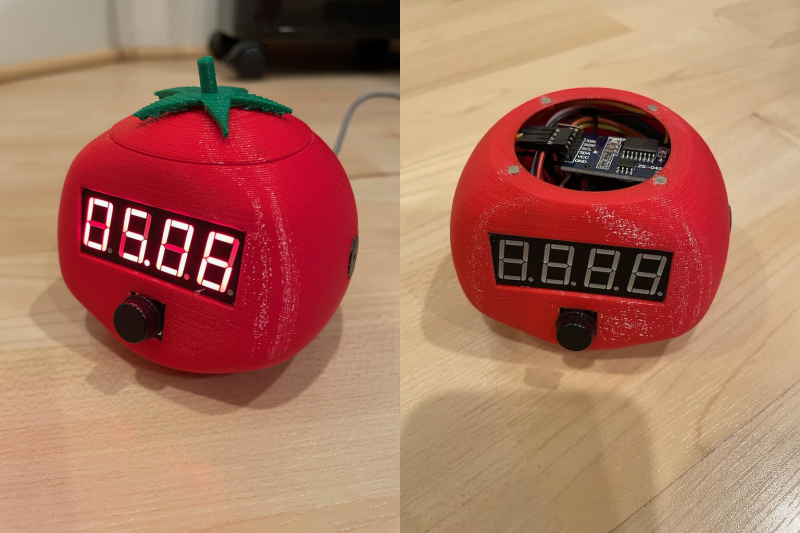
Student and hacker [prusteen] recently fell in love with the Pomodoro method of time management. That’s where you concentrate on your task for 25 minutes, then take a five-minute break, and repeat this four times with a longer break at the end. Initially, [prusteen] was keeping track on their phone, but hated having to change the timer value between Pomodoros and break times. In order to keep the flow mode engaged, [prusteen] came up with this darling little study buddy that does it all with the push of a button.

By default, this tomato shows the current time, which we think is a handy and often-overlooked feature of Pomodoro timer builds. Press that momentary switch on the front, and it starts counting upward to 25 minutes. Then it beeps in stereo through a pair of buzzers when the time is up, and automatically starts a five-minute break timer. Press it again and the display goes back to clock mode, although judging by the code, doing this will cancel the timer.

Inside the juicy enclosure is an Arduino Nano, an RTC, and a 7-segment display. We love the attention to detail here, from the little green leaves on top to the anatomically-correct dimple on the underside. And we always like to see lids that snap on with magnets. So satisfying. Check out the brief demo after the break, which unfortunately does not include any lid-snapping action.

Do you need more interaction with your Pomodoro timer? Build yourself a pomo-dachi instead.

If you want strangers to give you well wishes on your birthday out in the real world, you have call attention to the occasion by wearing a pointy hat or a button that says ‘today is my birthday, gimme presents’. But on your reddit cakeday, aka the day you joined, you’re automatically singled out with the addition of a slice of 8-bit cake next to your username. The great thing about your cakeday is that you’re almost guaranteed to get some karma for once, especially if you make something cakeday related like [ScottyD]’s cakeday countdown clock. But plenty of people forget what their cakeday is and miss out on the fun.

This countdown clock works like you might expect — every day that isn’t your cakeday, a message scrolls by with the number of days remaining until your next one. When the big day comes, the message becomes TODAY IS YOUR CAKE DAY. Both messages are bookended by cute little pixelated cake slices that we would apply liberally to the day-of message if we made one of these.

This simple but fun project shouldn’t put too big of a dent in your parts box, since it’s essentially an Arduino, a real-time clock module, and a 32×8 LED matrix to display the text. We love the uni-body design of the enclosure because it creates a shelf for the Arduino and gives easy access for gluing in the display from the rear. If for some reason you don’t reddit, then make one anyway and use it to count down to your IRL birthday or something. We’ve got the build video cut and plated for you to consume after the break.

We would understand if 2020 is supplying you with enough existential crises, but if not, consider building a clock that counts down the rest of your life expectancy.

Via r/duino

Good clocks are generally those that keep time well. But we think the mark of a great clock is one that can lure the observer into watching time pass. It doesn’t really matter how technical a timepiece is — watching sand shimmy through an hourglass has its merits, too. But just when we were sure that there was nothing new to be done in the realm of 7-segment clocks, [thediylife] said ‘hold my beer’ and produced this beauty.

A total of 28 servos are used to independently control four displays’ worth of 3D-printed segments. The servos pivot each segment back and forth 90° between two points: upward and flat-faced to display the time when called upon, and then down on its side to rest while its not needed.

Circuit-wise, the clock’s not all that complicated, though it certainly looks like a time-consuming build. The servos are controlled by an Arduino through a pair of 16-channel servo drivers, divided up by HH and MM segments. The Arduino fetches the time from a DS1302 RTC module and splits the result up into four-digit time. Code-wise, each digit gets its own array, which stores the active and inactive positions for each servo. Demo and full explanation of the build and code are waiting after the break.

When it comes to 7-segment displays, we say the more the merrier. Here’s a clock that uses pretty much all of them.

After covering a few of his builds at this point, we think it’s abundantly clear that [Igor Afanasyev] has a keen eye for turning random pieces of antiquated hardware into something that’s equal parts functional and gorgeous. He retains the aspects of the original which give it that unmistakable vintage look, while very slickly integrating modern components and features. His work is getting awfully close to becoming some kind of new art form, but we’re certainly not complaining.

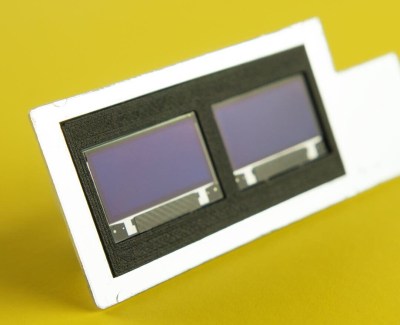
His latest creation takes an old-school “Monopak” electronic flash module and turns it into a desk clock that somehow also manages to look like a vintage television set. The OLED displays glowing behind the original flash diffuser create an awesome visual effect which really sells the whole look; as if the display is some hitherto undiscovered nixie variant.

On the technical side of things, there’s really not much to this particular build. Utilizing two extremely common SSD1306 OLED displays in a 3D printed holder along with an Arduino to drive them, the electronics are quite simple. There’s a rotary encoder on the side to set the time, though it would have been nice to see an RTC module added into the mix for better accuracy. Or perhaps even switch over to the ESP8266 so the clock could update itself from the Internet. But on this build we get the impression [Igor] was more interested in playing with the aesthetics of the final piece than fiddling with the internals, which is hard to argue with when it looks this cool.

Noticing the flash had a sort of classic TV set feel to it, [Igor] took the time to 3D print some detail pieces which really complete the look. The feet on the bottom not only hold the clock at a comfortable viewing angle, but perfectly echo the retro-futuristic look of 50s and 60s consumer electronics. He even went through the trouble of printing a little antenna to fit into the top hot shoe, complete with a metal ring salvaged from a key-chain.

Late last year we were impressed with the effort [Igor] put into creating a retro Raspberry Pi terminal from a legitimate piece of 1970’s laboratory equipment, and more recently his modern take on the lowly cassette player got plenty of debate going. We can’t wait to see what he comes up with next.

Sometimes you have an idea, and despite it not being the “right” time of year you put a creepy skull whose eyes tell the time and whose jaw clacks on the hour into a nice wooden box for your wife as a Christmas present. At least, if you’re reddit user [flyingalbatross1], you do!

The eyes are rotated using 360 degree servos, which makes rotating the eyes based on the time pretty easy. The servos are connected to rods that are epoxied to the spheres used as eyes. Some water slide iris decals are put on the eyes offset from center in order to point in the direction of the minutes/hours. An arduino with a real time clock module keeps track of the time and powers the servos.

Check out the video after the break:

The jaw opens and closes on the hours – springs are screwed to the inside of the jaw to the outside of the skull behind the bones that surround the eyes; they’re hidden when the skull is in its box. A third servo is used as a winch to pull the jaw open from the inside of the bottom of the chin. When it releases, the springs close the mouth and the clack of the teeth replaces an hourly chime.

A bit late (or early) for Halloween, but it’s a really fun project. [Flyingalbatross1] has made the arduino code available, as well as showing plenty of images of how the parts are put together. Take a look at this this atomic clock-in-a-skull, or you make your own talking skull for Halloween!

via Reddit

We’re certainly no strangers to unique timepieces around these parts. For whatever reason, hackers are obsessed with finding new and interesting ways of displaying the time. Not that we’re complaining, of course. We’re just as excited to see the things as they are to build them. With the assumption that you’re just as enamored with these oddball chronometers as we are, we present to you this fantastic digital tachometer clock created by [mrbigbusiness].

The multi-function digital gauge itself is an aftermarket unit which [mrbigbusiness] says you can get online for as little as $20 from some sites. All he needed to do was figure out how to get his Arduino to talk to it, and come up with some interesting way to hold it at an appropriate viewing angle. The mass of wires coming out of the back of the gauge might look intimidating, but thanks to his well documented code it shouldn’t be too hard to follow in his footsteps if you were so inclined.

Hours are represented by the analog portion of the gauge, and the minutes shown digitally were the speed would normally be displayed. This allows for a very cool blending of the classic look of an analog clock with the accuracy of digital. He’s even got it set up so the fuel indicator will fill up as the current minute progresses. The code also explains how to use things like the gear and high beam indicators, so there’s a lot of room for customization and interesting data visualizations. For instance, it would be easy to scrap the whole clock idea and use this gauge as a system monitor with some modifications to the code [mrbigbusiness] has provided.

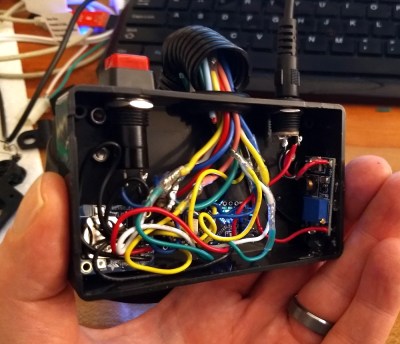
The gauge is mounted to a small project box with some 3D printed brackets and bits of metal rod, complete with a small section of flexible loom to cover up all the wires. Overall it looks very slick and futuristic without abandoning its obvious automotive roots. Inside the base [mrbigbusiness] has an Arduino Nano, a DS1307 RTC connected via I2C, a voltage regulator, and a push button to set the time. It’s a perfectly reasonable layout, though we wonder if it couldn’t be simplified by using an ESP8266 and pulling the time down with NTP.

We’ve seen gauges turned into a timepiece before, but we have to admit that this is probably the most practical realization we’ve seen of the idea yet. Of course if you want to outfit the garage with something a bit more authentic, you can always repurpose a Porsche brake rotor.

We’re big fans of the impractical around here at Hackaday. Sure there’s a certain appeal to coming up with the most efficient method to accomplish your goal, the method that does exactly what it needs to do without any superfluous elements. But it’s just not as much fun. If at least one person doesn’t ask “But why?”, then you probably left something on the table, design wise.

So when we saw this delightfully complex clock designed by [Tucker Shannon], we instantly fell in love. Powered by an Arduino, the clock uses an articulated arm with a UV LED to write out the current time on a piece of glow-in-the-dark material. The time doesn’t stay up for long depending on the lighting in the room, but at least it only takes a second or two to write out once you press the button.

Things are pretty straightforward inside the 3D printed case. There’s an Arduino coupled with an RTC module to keep the time, which is connected to the two standard hobby servos mounted in the front panel. A UV LED and simple push button round out the rest of the Bill of Materials. The source code is provided, so you won’t have to figure out the kinematics involved in getting the two servos to play nicely together if you want to try this one at home.

We’ve seen many clocks powered by Arduinos over the years, occasionally they even have hands. But few can boast their own robotic arm.

How many times have you wished for a pocket-sized multimeter? How about a mini microcontroller-based testing rig? Have you ever dared to dream of a device that does both?

Multiduino turns an Arduino Nano into a Swiss Army knife of portable hacking. It can function as an analog multimeter to measure resistance, voltage drop, and continuity. It can also produce PWM signals, read from sensors, do basic calculator functions, and display the health of its rechargeable battery pack.

Stick a 10kΩ pot in the left-side header and you can play a space shooter game, or make line drawings by twisting the knob like an Etch-A-Sketch. Be sure to check out the detailed walk-through after the break, and a bonus video that shows off Multiduino’s newest functions including temperature sensing, a monophonic music player for sweet chiptunes, and a virtual keyboard for scrolling text on the OLED screen. [Danko] has a few of these for sale in his eBay store. They come assembled, and he ships worldwide. The code for every existing function is available on his site.

More of a maximalist? Then check out this Micro-ATX Arduino.

Thanks for the tip, [Rahul].

Retro tech is almost always ripe for the hacking — be it nostalgia, an educational teardown, or acknowledging and preserving the shoulders upon which we stand. Coming across an old West-German built flip clock, YouTuber [Aaron Christophel] retrofitted the device while retaining its original mechanical components!

No modern electronics are complete without LEDs of some kind, so he has included a strip in the base of the clock face for visibility and cool factor. He doesn’t speak to the state of the clock beforehand, but he was able to keep the moving bits of the clock working for its second shot at life.

Controlling the clock is an Arduino Mini Pro and a simple DS1307 RTC board housed within the clock itself. Originally, it had a conspicuous external box that housed the electronics and power supply that has now been rendered obsolete — or ready for re-purposing another day! Code for the Arduino is an efficient few lines using a pair of libraries. All it needs to do is flip the polarity of the electromagnet motor every minute to update the time.

We like an elegant hack once in a while and sometimes retro tech lends itself to exactly that.


  • Newsletter

    Sign up for the PlanetArduino Newsletter, which delivers the most popular articles via e-mail to your inbox every week. Just fill in the information below and submit.

  • Like Us on Facebook