If you’ve got a smart home, or you just want to know how soaked your garden is getting in the winter, you might want to measure rainfall. There are a bunch of ways to go about it, and this capacitive rainmeter solution from [Magnus Thome] might just be the perfect solution you’re looking for.
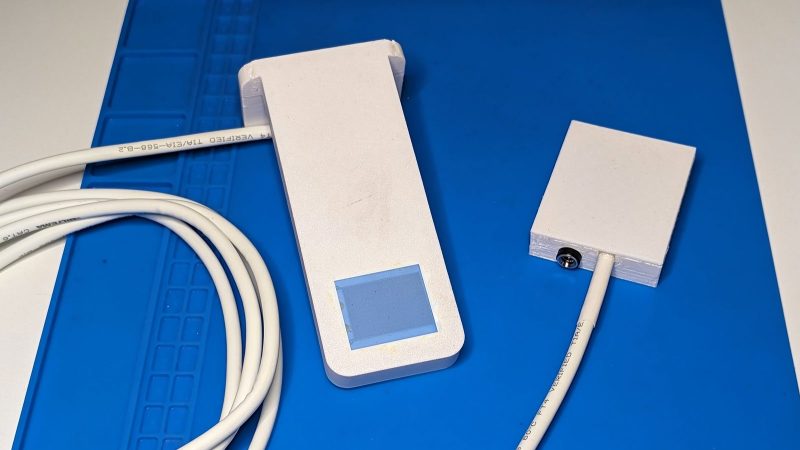
Like many who came before, [Magnus] had experimented with traditional resistive-based sensors using copper traces to measure water levels. As the soil moisture measuring set learned as well, corrosion tends to promise a pretty short life for these designs. Capacitive sensors, on the other hand, can be isolated from the water itself, and thus sense the levels without being subject to such degradation.
[Magnus] pairs the off-the-shelf capacitive sensor with an ESP32 charged with reading it and reporting back to Home Assistant. It’s also outfitted with a heater to keep it at a constant temperature to avoid it freezing over during those cold and snowy Swedish winters.
It’s a tidy way to integrate a quality commercial sensor with a DIY smart home setup. If you’ve been whipping up your own neat sensor networks for your smart home, don’t hesitate to let us know. Video after the break.
While it can be straightforward to distill water to high purity, this is rarely the best method for producing water for useful purposes. Even drinking water typically needs certain minerals in it, plants may need a certain pH, and wastewater systems have a whole host of other qualities that need to be measured. Measuring water quality is a surprisingly complex endeavor as a result and often involves a wide array of sensors, much like this water quality meter from [RowlesGroupResearch].
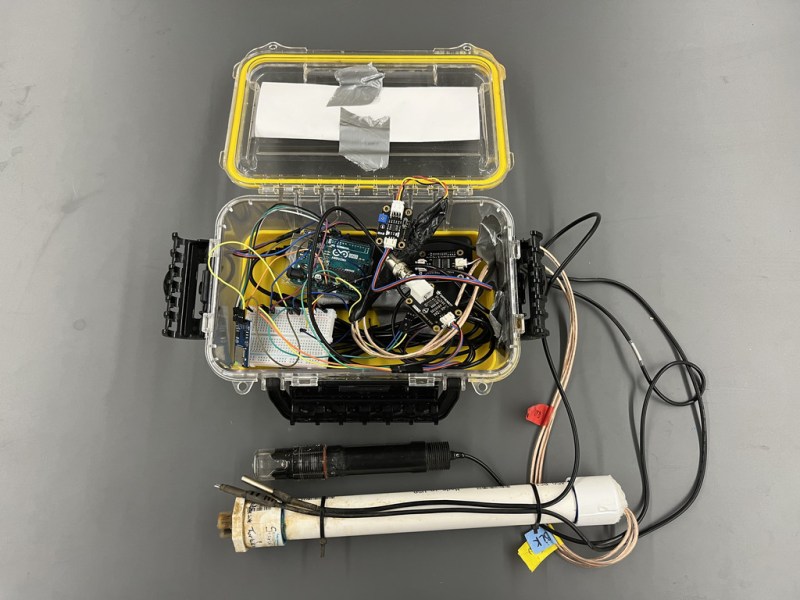
The water quality meters that they are putting to use are typically set up in remote locations, without power, and are targeting natural bodies of water and also wastewater treatment plants. Temperature and pH are simple enough to measure and grasp, but this device also includes sensors for total dissolved solids (TDS) and turbidity which are both methods for measuring various amounts and types of particles suspended in the water. The build is based around an Arduino so that it is easy for others to replicate, and is housed in a waterproof box with a large battery, and includes data logging to an SD card in order to make it easy to deploy in remote, outdoor settings and to gather the data at a later time.
The build log for this device also goes into detail about all of the steps needed to set this up from scratch, as well as a comprehensive bill of materials. This could be useful in plenty of professional settings such as community wastewater treatment facilities but also in situations where it’s believed that industrial activity may be impacting a natural body of water. For a water quality meter more focused on drinking water, though, we’d recommend this build that is trained on its own neural network.
Controlling your computer with a wave of the hand seems like something from science fiction, and for good reason. From Minority Report to Iron Man, we’ve seen plenty of famous actors controlling their high-tech computer systems by wildly gesticulating in the air. Meanwhile, we’re all stuck using keyboards and mice like a bunch of chumps.
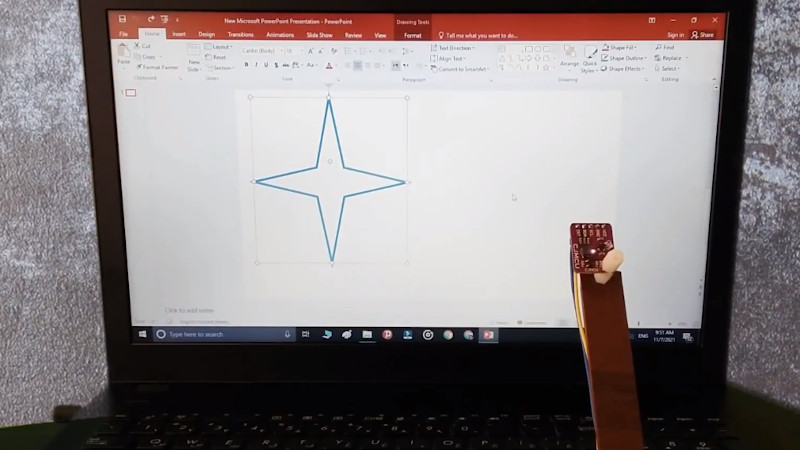
But it doesn’t have to be that way. As [Norbert Zare] demonstrates in his latest project, you can actually achieve some fairly impressive gesture control on your computer using a $10 USD PAJ7620U2 sensor. Well not just the sensor, of course. You need some way to convert the output from the I2C-enabled sensor into something your computer will understand, which is where the microcontroller comes in.
Looking through the provided source code, you can see just how easy it is to talk to the PAJ7620U2. With nothing more exotic than a switch case statement, [Norbert] is able to pick up on the gesture flags coming from the sensor. From there, it’s just a matter of using the Arduino Keyboard library to fire off the appropriate keycodes. If you’re looking to recreate this we’d go with a microcontroller that supports native USB, but technically this could be done on pretty much any Arduino. In fact, in this case he’s actually using the ATtiny85-based Digispark.
This actually isn’t the first time we’ve seen somebody use a similar sensor to pull off low-cost gesture control, but so far, none of these projects have really taken off. It seems like it works well enough in the video after the break, but looks can be deceiving. Have any Hackaday readers actually tried to use one of these modules for their day-to-day futuristic computing?
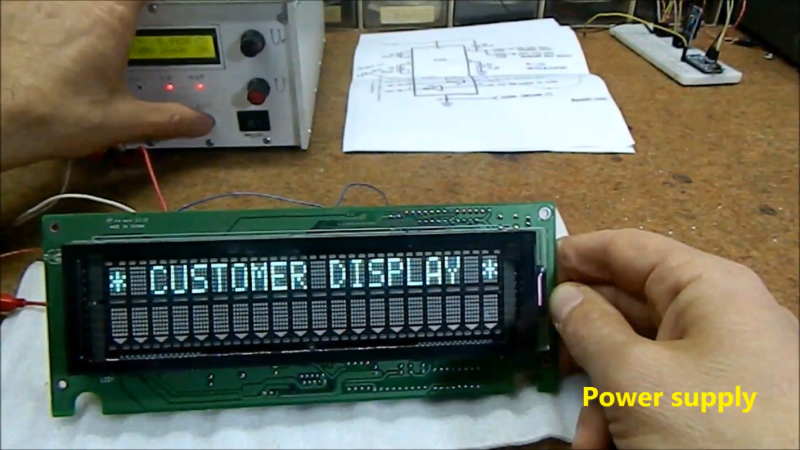
For those of us old enough to remember the VCR (and the difficulty of programming one), the ubiquitous vacuum fluorescent display, or VFD, is burned into our memories, mostly because of their brightness and contrast when compared to the superficially-similar LCD. These displays are incredibly common even apart from VCRs, though, and it’s easy to find them for next to no cost, but figuring out how to drive one if you just pulled it out of a 30-year-old VCR is going to take some effort. In this build, [mircemk] shows us how he drives unknown VFD displays using an Arduino in order to build his own weather forecasting station.
For this demonstration [mircemk] decided to turn a VFD into a weather forecasting station. First of all, though, he had to get the VFD up and running. For this unit, which came from a point-of-sale (POS) terminal, simply connecting power to the device turned on a demo mode for the display which let him know some information about it. From there, and with the knowledge that most POS terminals use RS232 to communicate, he was able to zero in on the Rx and Tx pins on the on-board microcontroller and interface them with an Arduino. From there it’s a short step to being able to output whatever he wanted to this display.
For this project, [mircemk] wanted the display to output information about weather, but rather than simply pull data from some weather API he is actually using a sensor suite connected to the Arduino to measure things like barometric pressure in order to make a 12-hour forecast. The design is inspired by old Zambretti weather forecasters which used analog wheels to input local weather data. It’s an interesting build not only for the VFD implementation but also for attempting to forecast the weather directly with just a tiny sensor set instead of downloading a forecast to display. To do any better with your own forecasts, you’d likely need your own weather station.
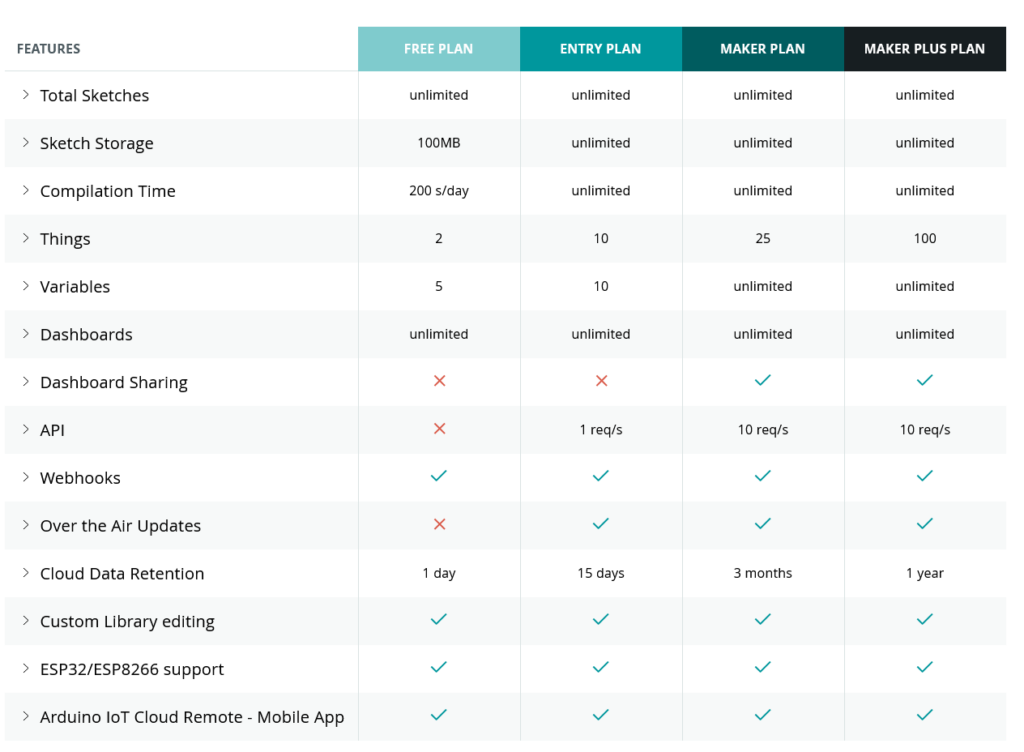
Historical data can be essential to making your electronics and Arduino project work how you want them to. Data retention is one of the features that changes depending on which level of Arduino Cloud account you have. Here’s everything you need to know, so you can choose exactly the right Arduino Cloud plan.
Hang on though. Aren’t we here to talk about data retention?
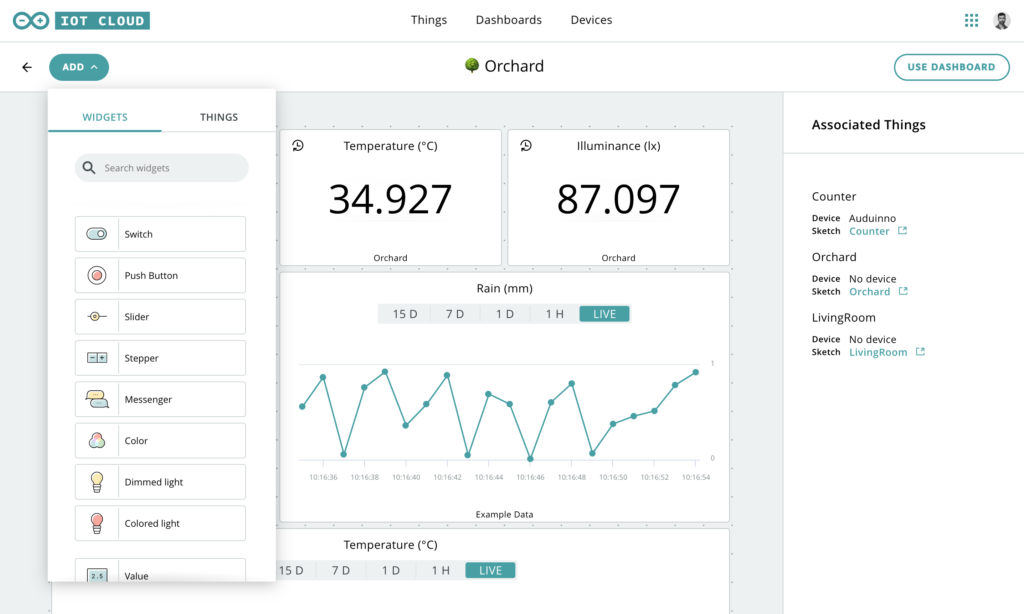
Indeed we are. When we say “variables”, this is the term used to describe the data you send to your Arduino Cloud. It sounds a bit technical, but consider the word. “Variable” actually makes more sense than “data”, which is kinda woolly.
Variables are information that changes or, you guessed it, varies. Temperature, for example. If you have a temperature sensor sending data to the Cloud, it’s a variable. Because the value of the data (the temperature) is always changing/varying.
So in your sketch it’s known as a variable. The different data retention options in the Arduino Cloud plans tell you how long the Cloud will store a record of those variables for you.
Historical Data Options
Each Arduino Cloud plan offers a different length of time for how long you retain sensor data, depending on your needs.
If you’re running a home automation to turn the lights on when it drops dark, your system is working with (pretty much) real-time data. So 24 hours of sensor information is perfectly adequate. It’s not like you’ll be turning a lamp on or off based on yesterday’s ambient light levels.
A weather station might work a bit differently though. If you’re measuring the temperature or rainfall or daylight hours, you may want to build a comparison to see how the weather is changing. In this case, an Arduino Cloud Entry plan would give you 15 days of data, allowing you to monitor and record recent changes in your weather station’s variables.
Historical data for an IoT greenhouse, or maybe an aquarium or terrarium, would be much more important. Maybe it’s even an industrial project that’s monitoring equipment for predictive maintenance needs. In these cases, being able to look back at your variables over previous weeks and months could be essential. In that case, you’d go Maker or Maker Plus, so you can build dashboards with detailed histories of your measurements.
It’s very possible that you don’t even know how much historical data will be useful to your project at first. You start on the free tier, decide that it’d be useful to have legacy information, and go up through the Entry plan and eventually settle on Maker. The project leads the way, until it’s delivering everything you need.
Putting Historical Data to Use in Arduino Cloud
Arduino Cloud is really clever when it comes to the data generated by sensors and used as variables. For example, you can specify how often new data is sent to your Arduino Cloud.
Let’s say you’re monitoring Wi-Fi signal strength at the bottom of the garden, where a project (weather station, let’s say) is installed. If this is a solar and/or battery powered device, power consumption becomes essential. By changing the data sampling interval from updating a variable on Arduino Cloud every second to updating once a minute, you can extend battery life by a huge amount. The device is only operating a fraction of the time it was before, and the information is just as useful.
Combined with 15 days or three months of historical data, you can build a detailed picture of Wi-Fi performance that lets you keep everything running perfectly. Or, if you need to find out when and why your signal has been dropping, the story is right there in your Arduino Cloud dashboard.
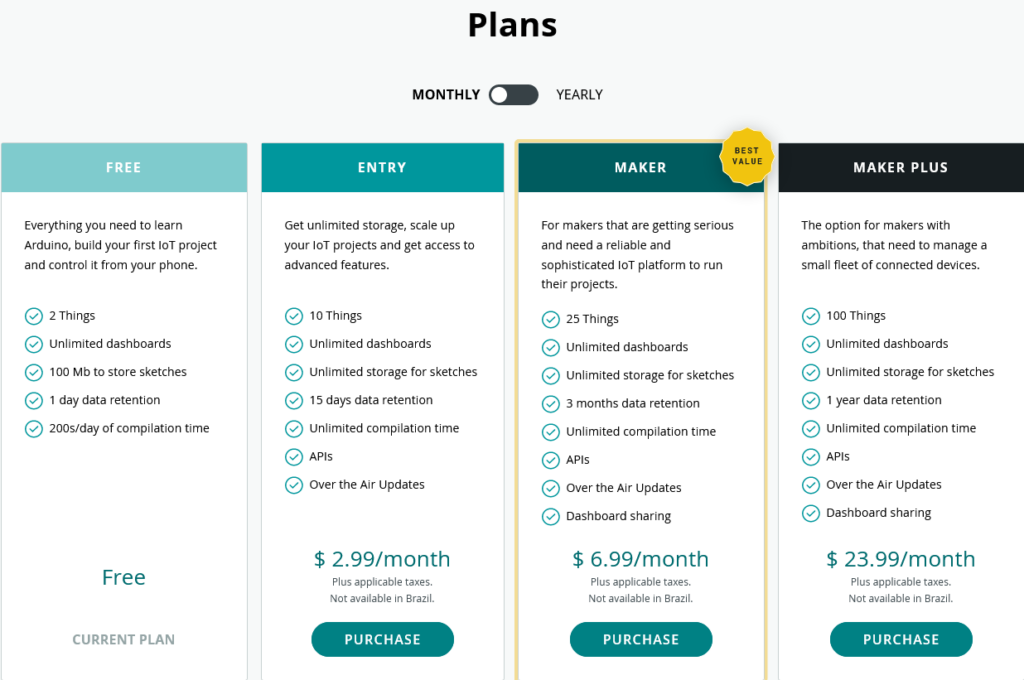
Choosing the Right Arduino Cloud Plan
So for all these reasons, you can see why different amounts of data retention are available in the Arduino Cloud plans. It’s not that all projects benefit from as much retention as possible. As we discussed, even some complex, elaborate projects barely need any. Others, which might be simple signal strength monitoring or rainfall measurement, need to know what was happening months ago.
You have the choice, because the different Arduino Cloud plans offer different historical data options for different needs. If in doubt for what your project needs to work as intended, start on the free plan and work up from there.
He starts the build off by modifying an arc lighter, the fancy kind one might use to light a fire on a windy day, so that it can be controlled by a micro-controller. The arc is moved to the needle end of the syringe with a careful application of wires and hot glue. When the syringe is filled with a bit of alcohol and the original plunger is pressed back in a small spark will send it flying back out in a very satisfying fashion.
Of course it wouldn’t be a proper hack without an Arduino added on for no reason other than the joy of doing so. [MKJZZ] adds an ultrasonic sensor into the mix which, when triggered appropriately by an invading object fires the arc lighter using a reed relay.
He demonstrates the build by eliminating an intruding coke can on his work bench. You can see it in the video after the break. All in all a very fun hack.
When [millerman4487] bought a TCS230-based color sensor, he was expecting a bit more documentation. Since he didn’t get it, he did a little research and some experimentation and wrote it up to help the rest of us.
The TCS3200 uses an 8×8 array of photodiodes. The 64 diodes come in four groups of 16. One group has a blue filter, one has green and the other has a red filter. The final set of diodes has no filter at all. You can select which group of diodes is active at any given time.
Sixteen photodiodes have blue filters, 16 photodiodes have green filters, 16 photodiodes have red filters, and 16 photodiodes are clear with no filters. The four types (colors) of photodiodes are interdigitated to minimize the effect of non-uniformity of incident irradiance. All photodiodes of the same color are connected in parallel. Pins S2 and S3 are used to select which group of photodiodes (red, green, blue, clear) are active.
The output of the array is a frequency that corresponds to the light intensity measured by one bank of photodiodes. You’ll need to make several pulse input measurements to compute the color and [millernam4487] provides code for it. You may, however, need to calibrate the device before you get good results.
Building a real-life version of the Star Trek tricorder has been the goal of engineers and hackers alike since the first time Dr McCoy complained about being asked to work outside of his job description. But while modern technology has delivered gadgets remarkably similar in function, we’ve still got a long way to go before we replicate 24th century Starfleet design aesthetic. Luckily there’s a whole world of dedicated hackers out there who are willing to take on the challenge.
[Taste The Code] is one such hacker. He wanted to build himself a practical gadget that looked like it would be at home on Picard’s Enterprise, so he gathered up the components to build a hand-held heart rate monitor and went in search for a suitable enclosure. The electronics were simple enough to put together thanks to the high availability and modularity we enjoy in a post-Arduino world, but as you might expect it’s somewhat more difficult to put it into a package that looks suitably sci-fi while remaining functional.
Internally his heart rate monitor is using an Arduino Pro Mini, a small OLED screen, and a turn-key pulse sensor which was originally conceived as a Kickstarter in 2011 by “World Famous Electronics”. Wiring is very simple: the display is connected to the Arduino via I2C, and the pulse sensor hooks up to a free analog pin. Everything is powered by 3 AA batteries delivering 4.5 V, so he didn’t even need a voltage regulator or the extra components required for a rechargeable battery pack.
Once everything was confirmed working on a breadboard, [Taste The Code] started the process of converting a handheld gyroscopic toy into the new home of his heart rate monitor. He kept the battery compartment in the bottom, but everything else was stripped out to make room. One hole was made on the pistol grip case so that a finger tip could rest on the pulse sensor, and another made on the side for the OLED screen. This lets the user hold the device in a natural way while getting a reading. He mentions the sensor can be a bid fiddly, but overall it gives accurate enough readings for his purposes.
Designed collaboratively by [Tore Knudsen], [Simone Okholm Hansen] and [Victor Permild], Pour Reception seeks to challenge what constitutes an interface, and how elements of play can create a new experience for a relatively everyday object.
Lacking buttons or knobs of any kind, Pour Reception appears an inert acrylic box with two glasses resting on top. A detachable instruction card cues the need for water, and pouring some into the glasses wakes the radio.
Inside, two aluminium plates — acting as capacitive touch sensors — are connected to an Arduino using the Tact library from NANDSudio. Wekinator — a machine learning tool — enabled [Knudsen] to program various actions to control the radio. Pouring water between the glasses changes stations, rotating and tweaking the glass’ positions adjusts audio quality, and placing a finger in the glass mutes it temporarily.
It’s a great concept for a more engaging piece of tech, if perhaps a little unnerving to be pouring water around household electronics. Best take preventative measures before applying this idea elsewhere.
Gardening is a rewarding endeavour, and easily automated for the maker with a green thumb. With simplicity at its focus, Hackaday.io user [MEGA DAS] has whipped up a automated planter to provide the things plants crave: water, air, and light.
[MEGA DAS] is using a TE215 moisture sensor to keep an eye on how thirsty the plant may be, a DHT11 temperature and humidity sensor to check the airflow around the plant, and a BH1750FVI light sensor for its obvious purpose. To deliver on these needs, a 12V DC water pump and a small reservoir will keep things right as rain, a pair of 12V DC fans mimic a gentle breeze, and a row of white LEDs supplement natural light when required.
The custom board is an Arduino Nano platform, with an ESP01 to enable WiFi capacity and a Bluetooth module to monitor the plant’s status while at home or away. Voltage regulators, MOSFETs, resistors, capacitors, fuses — can’t be too careful — screw header connectors, and a few other assorted parts round out the circuit. The planter is made of laser cut pieces with plenty of space to mount the various components and hide away the rest. You can check out [MEGA DAS]’ tutorial video after the break!
[MEGA DAS] has made his Arduino code and phone app available to download for anyone else wanting to build their own. Once assembled, he can ensure his plant is well taken care of wherever he is with a few taps on his phone. Not too shabby for a seven day build.
Planet Arduino is, or at the moment is wishing to become, an aggregation of public weblogs from around the world written by people who develop, play, think on Arduino platform and his son. The opinions expressed in those weblogs and hence this aggregation are those of the original authors. Entries on this page are owned by their authors. We do not edit, endorse or vouch for the contents of individual posts. For more information about Arduino please visit www.arduino.cc
You are currently browsing the archives for the Sensor category.