Posts | Comments

Planet Arduino

Archive for the ‘toy’ Category

We hate to break it to [Rob Cai], but he’s built a VGA drawing toy, not an Etch-a-Sketch. How do we know? Simple, Etch-a-Sketch is a registered trademark. Regardless, his project shows how an Arduino can drive a VGA monitor using the VGAx library. Sure, you can only do four colors with a 120×60 resolution, but on the other hand, it requires almost no hardware other than the Arduino (you do need four resistors).

The hardware includes two pots and with the right firmware, it can also play pong, if you don’t want to give bent your artistic side. You can see videos of both the art toy and the pong game, below.

Because the device started as a pong game, [Rob’s] version has two boxes, each with a pot and a button. Of course, if you were really building it just for the drawing toy, you’d probably put it all in a box. Maybe even a red box. If we were building it, we’d be tempted to put a tilt sensor or an accelerometer in the box so you could shake it to erase the picture. Just saying.

If you want 640×480 resolution from an Arduino, it can be done, but it takes more hardware. If you were trying to get a kid interested in Arduino, you could do worse than start with two projects with video that are fun, use a handful of easy-to-source parts, and shares hardware. Then again, if you are in the “go big or go home” camp, we’d redirect to this pong game, instead.


Filed under: Arduino Hacks

[Markus Gritsch] and his son had a fun Sunday putting together a little toy airboat from a kit. They fired it up and it occurred to [Markus] that it was pretty lame. It went forward and sometimes sideward when a stray current influenced its trajectory, but it had no will of its own.

The boat was extracted from water before it could wander off and find itself lost forever. [Markus] did a mental inventory of his hacker bench and decided this was a quickly rectified design shortcoming. He applied a cheap knock-off arduino, equally cheap nRF24L01+ chip of dubious parentage, and their equivalent hobby servo to the problem.

Some quick coding later, assisted by prior work from other RC enthusiasts, the little boat was significantly upgraded. Now the boat could be brought back to shore using any R/C controller that supported the, “Bayang,” protocol. He wouldn’t have to face the future in which he’d have to explain to his son that the boat, like treacherous helium balloons, was just gone. Video after the break.


Filed under: Arduino Hacks, toy hacks

[Apachexmd] wanted to do something fun for his three-year-old son’s birthday party. Knowing how cool race cars are, he opted to build his own Hot Wheels drag race timer. He didn’t take the easy way out either. He put both his electronics and 3D printing skills to the test with this project.

The system has two main components. First, there’s the starting gate. The cars all have to leave the gate at the same time for a fair race, so [Apachexmd] needed a way to make this electronically controlled. His solution was to use a servo connected to a hinge. The hinge has four machine screws, one for each car. When the servo is rotated in one direction, the hinge pushes the screws out through holes in the track. This keeps the cars from moving on the downward slope. When the start button is pressed, the screws are pulled back and the cars are free to let gravity take over.

The second component is the finish line. Underneath the track are four laser diodes. These shine upwards through holes drilled into the track. Four phototransistors are mounted up above. These act as sensors to detect when the laser beam is broken by a car. It works similarly to a laser trip wire alarm system. The sensors are aimed downwards and covered in black tape to block out extra light noise.

Also above the track are eight 7-segment displays; two for each car. The system is able to keep track of the order in which the cars cross the finish line. When the race ends, it displays which place each car came in above the corresponding track. The system also keeps track of the winning car’s time in seconds and displays this on the display as well.

The system runs on an Arduino and is built almost exclusively out of custom designed 3D printed components. Since all of the components are designed to fit perfectly, the end result is a very slick race timer. Maybe next [Apachexmd] can add in a radar gun to clock top speed. Check out the video below to see it in action.


Filed under: Arduino Hacks, toy hacks
May
29

The Lightgame Project: A Multiplayer Arduino Game

arduino, arduino hacks, children, game, i2c, Kids, reflex, reflex game, student, TFT, TFT LCD, toy Comments Off on The Lightgame Project: A Multiplayer Arduino Game 

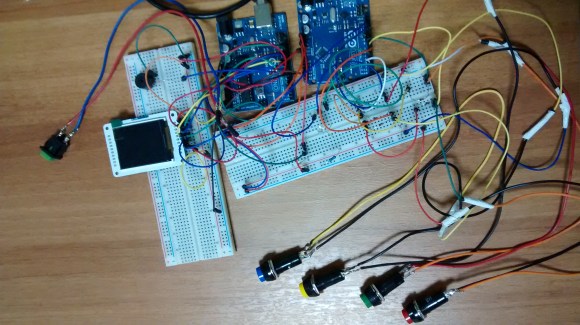
lightgame_3Summer is upon us. The Lightgame Project is a multiplayer reaction time based game built around the Arduino. It’s a perfect rainy day project for those restless kids (and adults!). Designed by two undergraduate students [Efstathios] and [Thodoris] for a semester long project, all the hard work has already been done for you.

There are tons of reasons we love games that you can build yourself. For one, it’s an amazing way to get children interested in hobby electronics, making, and hacking. Especially when they can play the game with (and show off to) their friends. Another reason is that it is a perfect way to share your project with friends and family, showcasing what you have been learning. The game is based on your reaction time and whether or not you press your button when another players color is shown. The project is built around two Arduinos connected via I2C. The master handles the mechanics of the game, while the slave handles the TFT LCD and playing music through a buzzer.

I2C is a great communication protocol to be familiar with and this is a great project to give it a try. [Efstathios] and [Thodoris] did a great job writing up their post, plus they included all the code and schematics needed to build your own. It would be great to see more university professors foster open source hardware and software with their students. A special thanks goes out to [Dr. Dasygenis] for submitting his student’s work to us!


Filed under: Arduino Hacks


  • Newsletter

    Sign up for the PlanetArduino Newsletter, which delivers the most popular articles via e-mail to your inbox every week. Just fill in the information below and submit.

  • Like Us on Facebook