Posts | Comments

Planet Arduino

Archive for the ‘voice recognition’ Category

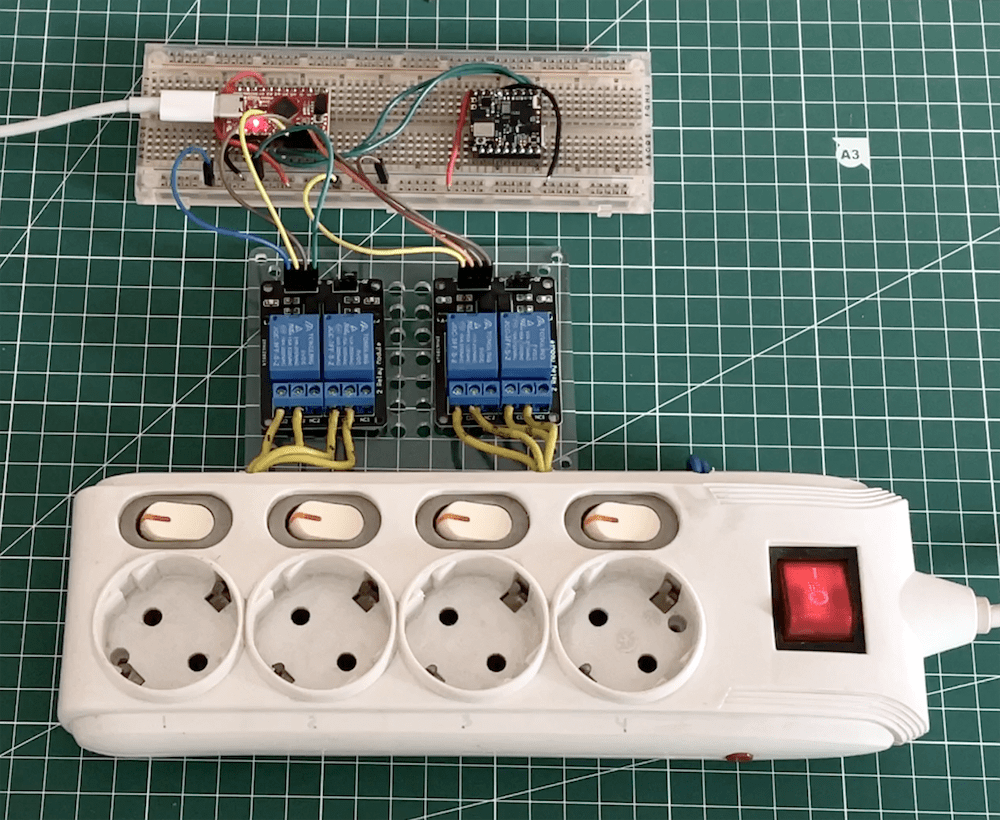
As Jallson Suryo discusses in his project, adding voice controls to our appliances typically involves an internet connection and a smart assistant device such as Amazon Alexa or Google Assistant. This means extra latency, security concerns, and increased expenses due to the additional hardware and bandwidth requirements. This is why he created a prototype based on an Arduino Nicla Voice that can provide power for up to four outlets using just a voice command.

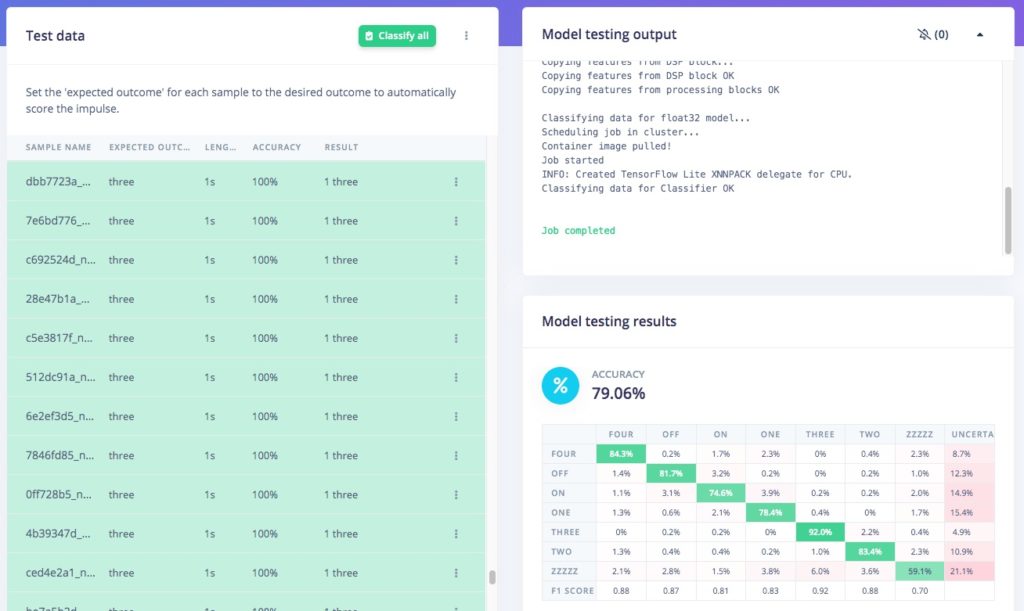
Suryo gathered a dataset by repeating the words “one,” “two,” “three,” “four,” “on,” and “off” into his phone and then uploaded the recordings to an Edge Impulse project. From here, he split the files into individual words before rebalancing his dataset to ensure each label was equally represented. The classifier model was trained for keyword spotting and used Syntiant NDP120-optimal settings for voice to yield an accuracy of around 80%.

Apart from the Nicla Voice, Suryo incorporated a Pro Micro board to handle switching the bank of relays on or off. When the Nicla Voice detects the relay number, such as “one” or “three”, it then waits until the follow-up “on” or “off” keyword is detected. With both the number and state now known, it sends an I2C transmission to the accompanying Pro Micro which decodes the command and switches the correct relay.

To see more about this voice-controlled power strip, be sure to check out Suryo’s Edge Impulse tutorial.

The post Controlling a power strip with a keyword spotting model and the Nicla Voice appeared first on Arduino Blog.

For well over one hundred years, people have been constructing machines that dispense fortunes to those who ask at the insertion of a coin and the push of a button. In modern days, this has taken the form of mobile apps that can be far more expansive, albeit with a lack of physical interaction. Seeing an opportunity to use an embedded speech recognition model in this kind of application, the Electronic Cats team built the aptly named Fortune Cat just in time for some Halloween fun.

This small device, based on the Arduino Nano 33 BLE Sense, takes advantage of the onboard microphone to listen for words being spoken at the small cube. Performing the language processing is Cyberon’s Arduino Speech Recognition Engine, which was configured to listen for the wake phrase “Fortune Cat” and then later respond to “tell me my future” as its command phrase. After generating the model online, it was incorporated into the code via the DSpotter software development kit that lets the program check if either the wake or action phrase has been said and then act accordingly.

In this case, asking Fortune Cat for your future will present one of 20 random phrases that get displayed on the OLED mounted to the top of the 3D-printed enclosure. To read more about how the Electronic Cats crew created and configured Fortune Cat, you can check out their write-up here on Hackster.io or watch their video below!

The post Fortune Cat uses embedded speech recognition to predict your future appeared first on Arduino Blog.

Speech commands are all the rage on everything from digital assistants to cars. Adding it to your own projects is a lot of work, right? Maybe not. [Electronoobs] shows a speech board that lets you easily integrate 255 voice commands via serial communications with a host computer. You can see the review in the video below.

He had actually used a similar board before, but that version was a few years ago, and the new module has, of course, many new features. As of version 3.1, the board can handle 255 commands in a more flexible way than the older versions.

Although the board can handle 255 commands, it only listens for 7 of those at one time, which is an odd limitation. However, the older board had even stricter limits where you could only listen to one of three groups and each group had 5 commands. With the new board, you can pick any 7 of the 255 commands to be active at once. You can then replace some of the 7 with other commands based on context. For example, you might listen for a main menu command and, based on that selection, listen for a different set of second-level commands.s

The interface is either serial or I2C. We couldn’t help but think that if you could listen to 12 or 15 commands at once, you could have a set for listening to numbers which might be handy. Maybe version 4?

You train the commands using a microphone with an interactive wizard-like setup. The eventual target for this is a robot, but for now [Electronoobs] is just lighting up LEDs on command. But it looks very easy to use for whatever purpose as long as you can work out the limit of 7 commands.

It is harder to do, but you can make an Arduino process speech by itself. Even easier, with a bigger processor.

Film history is full of cute robots, but for our money, none are more charming than WALL-E. His vocabulary may be limited, but that doesn’t stop him from showing the full range of emotions through body language. Like Baby Yoda, WALL-E was an instant fan-favorite and a plethora of toys were made in his honor. If you can get your hands on one, Kevr102 has an Instructables tutorial that will walk you through how to bring that toy to life with the help of an Arduino.

To complete this project exactly as Kevr102 describes, you will need a specific 7″ tall plastic WALL-E toy. That toy has motors for the tracks, arm movement, and head movement. Starting with that will save you the trouble of mechanical design and 3D printing work. But you will replace all of the motors to make them easier to control. In total, you will need two 360 degree servo motors, three heavy duty servo motors, and two micro servo motors.

You will control those motors with an Arduino Nano through a servo shield. The exciting part of the build, which enables your WALL-E robot to respond to voice commands, works thanks to an EasyVR3 voice recognition module. That module also lets you play sounds, so WALL-E can emit his signature sound effects and modulated voice. Kevr102 explains how you can setup custom voice commands and sound effects, so you can tailor them to suit your tastes.

The post Build your own adorable, talking WALL-E robot appeared first on Arduino Blog.

May
19

[Justin]’s friend [Steve] injured his spine a while ago, and after asking what would make [Steve]’s life simpler, the answer was easy. [Steve] missed reading books. Sure, e-readers exist, but you still need to turn the page. Now [Steve] can do that with his voice thanks to some microcontrollers, Bluetooth modules, and a voice recognition module.

A voice-activated page turner wasn’t the first attempt at giving [Steve] the ability to turn a page on a Kindle. The first prototype was a big blue button that sent a keyboard code for ‘right arrow’ over Bluetooth, turning a book one page at a time. This worked well until multiple pages turned, and with no back button it was a major nuisance.

After playing with the voice recognition in an Amazon Echo, [Steve] and [Justin] wondered if the same voice recognition technology could be applied to page turns on a Kindle. With a voice recognition Arduino shield from SparkFun it was easy to detect a ‘page down’ command. A Bluetooth module sends HID commands to a Kindle, allowing [Steve] to read a book with only his voice.

[Justin] put all the design files for this build up on Github.


Filed under: Arduino Hacks, misc hacks
Muy  buenas a todos de nuevo, Tras mucho tiempo sin poder publicar un video tutorial, hoy os quiero presentar un tuyo sobre EasyVr. Éste es un tutorial que hacía mucho tiempo que quería hacer. Que es EasyVR? Pues bien, es una placa que nos va permitir control nuestro arduino mediante nuestra voz. La cual cosa, […]


  • Newsletter

    Sign up for the PlanetArduino Newsletter, which delivers the most popular articles via e-mail to your inbox every week. Just fill in the information below and submit.

  • Like Us on Facebook