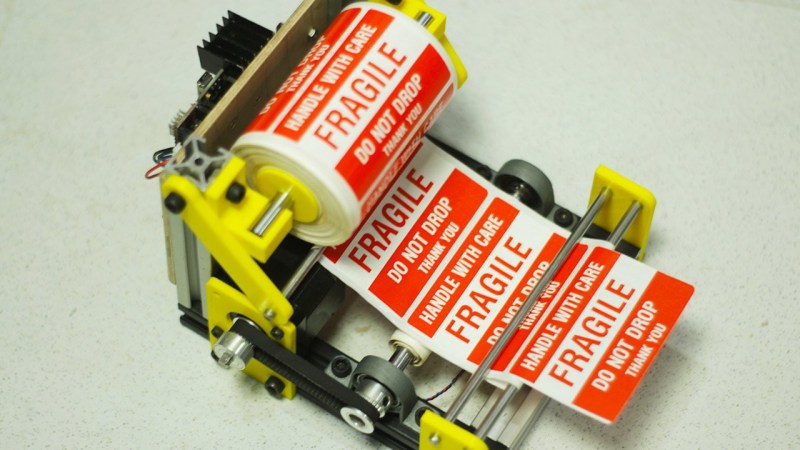
What’s the worst part about packaging up a whole lot of the same basic thing? It might just be applying the various warning stickers to the outside of the shipping box. Luckily, [Mr Innovative] has built an open-source automatic sticker dispenser that does the peeling for you, while advancing the roll one at a time quite satisfyingly.
This tidy build is made primarily of 20×20 extruded aluminium and stainless steel smooth rod. All the yellow bits are 3D printed. The brains of this operation is an Arduino Nano, with an A4988 stepper motor driver controlling a NEMA17.
Our favorite part of this build is the IR sensor pair arranged below the ready sticker. It detects when a sticker is removed, then the stepper advances the roll by one sticker height. The waste is collected on a spool underneath.
Between the video and the instructions, [Mr Innovative] has made it quite simple to build one for yourself. Definitely check this one out after the break.
It’s 2021. Everyone and their mother is filming themselves doing stuff, and a lot of it is super cool content. But since most of us have to also work the video capture devices ourselves, it can be difficult to make compelling footage with a single, stationary overhead view, especially when there are a lot of steps involved. A slider rig is a good start, but the ability to move the camera in three dimensions programmatically is really where it’s at.
[KronBjorn]’s excellent automated overhead camera assistant runs on an Arduino Mega and is operated by typing commands in the serial monitor. It can pan ±20° from straight down and moves in three axes on NEMA-17 stepper motors. It moves really smoothly, which you can see in the videos after the break. The plastic-minimal design is interesting and reminds us a bit of an ophthalmoscope — that’s that main rig at the eye doctor. There’s only one thing that would make this better, and that’s a dedicated macro pad.
If you want to build your own, you’re in luck — there’s quite a lot of detail to this project, including a complete BOM, all the STLs, code, and even assembly videos of the 3D-printed parts and the electronics. Slide past the break to check out a couple of brief demo videos.
If you have any kind of business, chances are it involves stickers at some point in the process. More accurately it involves you peeling the backs off of sticker after sticker, slowly wasting time and working your way toward a repetitive stress injury. Why do that to yourself when you could have a machine do it for you?
That’s exactly the thinking behind [Mr Innovative]’s automatic label dispensing machine. All he has to do is load up the roll of labels, dial in the length of each label, and away the machine goes, advancing and dispensing and taking up the empty paper all at once. In fact, that’s how it works: the take-up reel is on the shaft of a NEMA-17 stepper motor, which gets its instructions from an Arduino Nano and an A4988 motor driver. Our favorite part is the IR sensor located underneath the sticker that’s ready to take — the machine doesn’t feed another until it senses that you’ve taken the previous sticker. We stuck the demo and build video after the break.
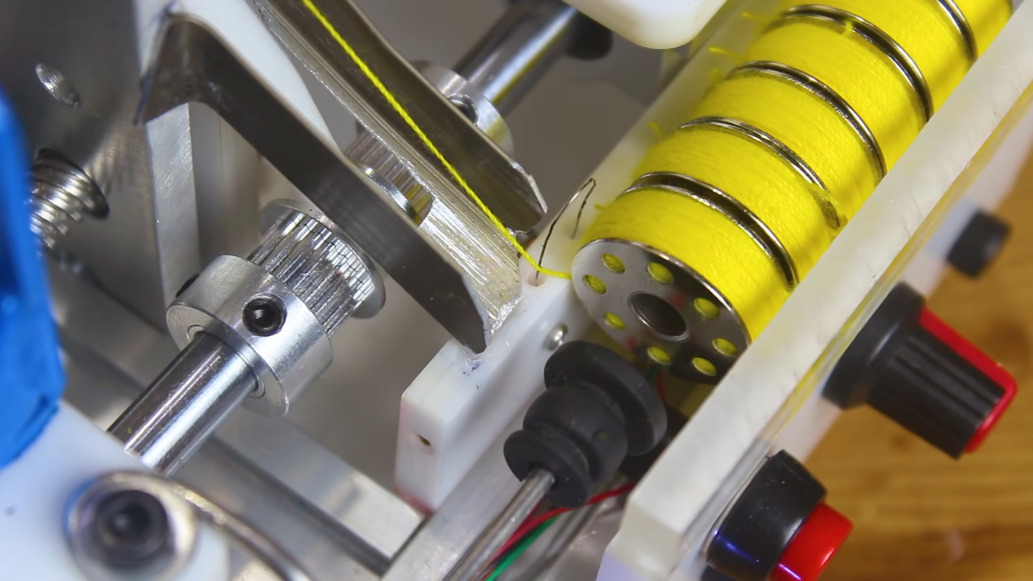
Our other favorite thing about this build is that [Mr Innovative] seems to have used the same PCB as his freaky fast bobbin winder.
One of the worst things about sewing is finding out that your bobbin — that’s the smaller spool that works together with the needle and the larger spool to make a complete stitch — ran out of thread several stitches ago. If you’re lucky, the machine has a viewing window on the bobbin so you can easily tell when it’s getting dangerously close to running out, but many machines (ours included) must be taken halfway apart and the bobbin removed before it can be checked.
Having spare bobbins ready to go is definitely the answer. We would venture to guess that most (if not all) machines have a built-in bobbin winder, but using them involves de-threading the machine and setting it up to wind bobbins instead of sew. If you have a whole lot of sewing to do and can afford it, an automatic bobbin winder is a godsend. If you’re [Mr. Innovative], you build one yourself out of acrylic, aluminium, and Arduinos.
Here’s how it works: load up the clever little acrylic slide with up to twelve empty bobbins, then dial in the speed percentage and press the start button. The bobbins load one at a time onto a drill chuck that’s on the output shaft of a beefy 775 DC motor. The motor spins ridiculously fast, loading up the bobbin in a few seconds. Then the bobbin falls down a ramp and into a rack, and the thread is severed by a piece of nichrome wire.
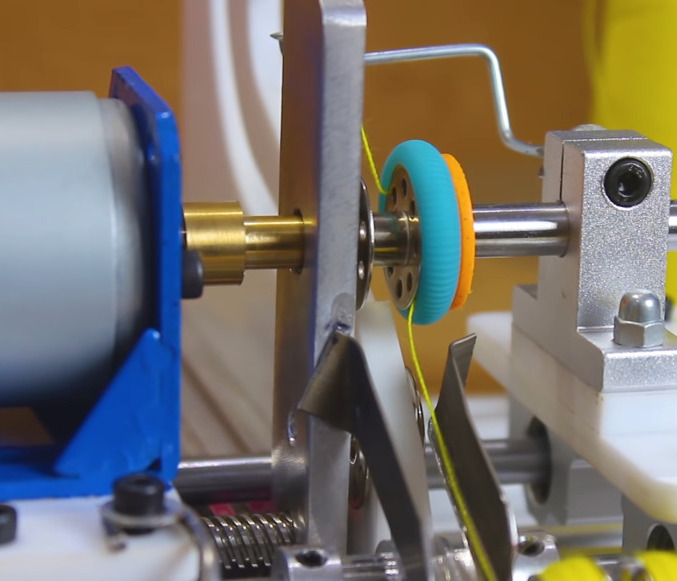
An important part of winding bobbins is making sure the thread stays in place at the start of the wind. We love the way [Mr. Innovative] handled this part of the problem — a little foam doughnut around a bearing holds the thread in place just long enough to get the winding started. The schematic, BOM, and CAD files are available if you’d like to make one of these amazing machines for yourself. In the meantime, check out the demo/build video after the break.
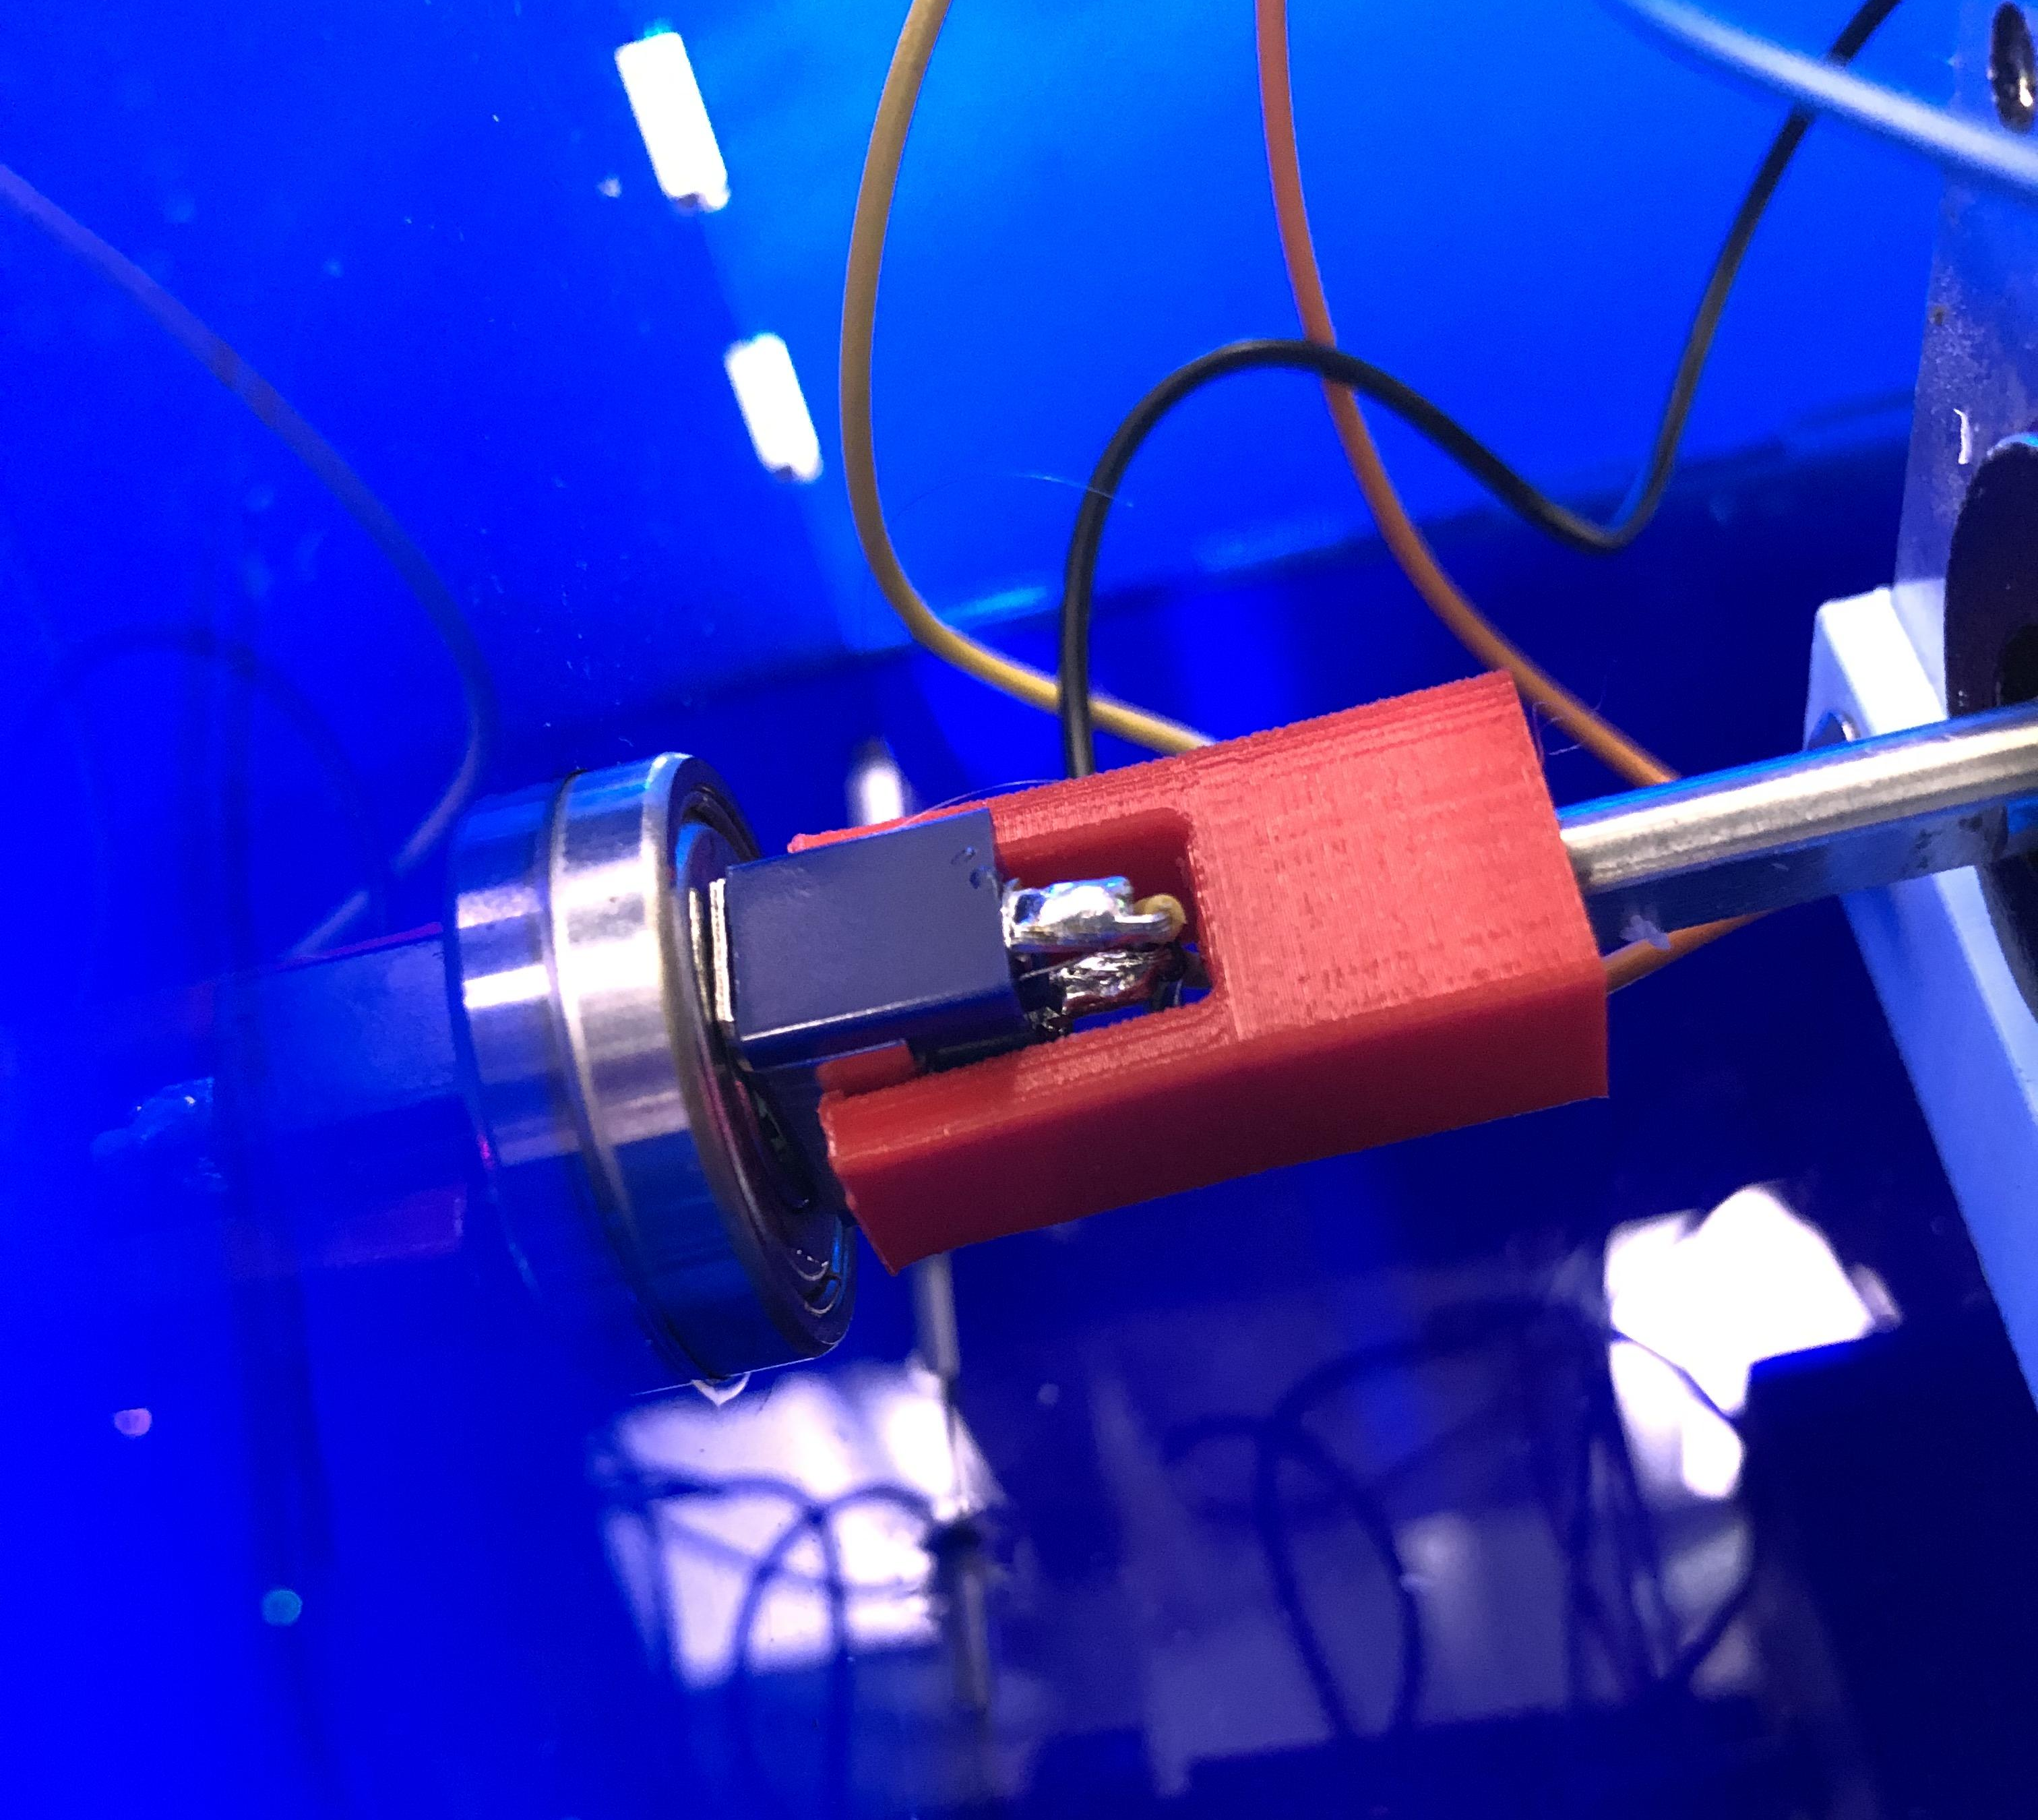
Traditionally, the useless machine is a simple one that invites passersby to switch it on. When they do, the machine somehow, some way, turns itself off; usually with a finger or finger-like object that comes out from the box in what feels like an annoyed fashion. Honestly, that’s probably part of what drives people to turn them on over and over again.
What’s really happening is that an Arduino is getting a signal from the toggle switch, and is then rotating it on a ball bearing with a stepper motor driven through an H-bridge.
It shouldn’t be too hard to make one of these yourself, given that [Bart] has provided the schematic and STLs. If we weren’t living in such touchy times, we might suggest building one of these into your Halloween candy distribution scheme somehow. Sell the switch as one that turns on a candy dispenser, and then actually dispense it after three or five tries.
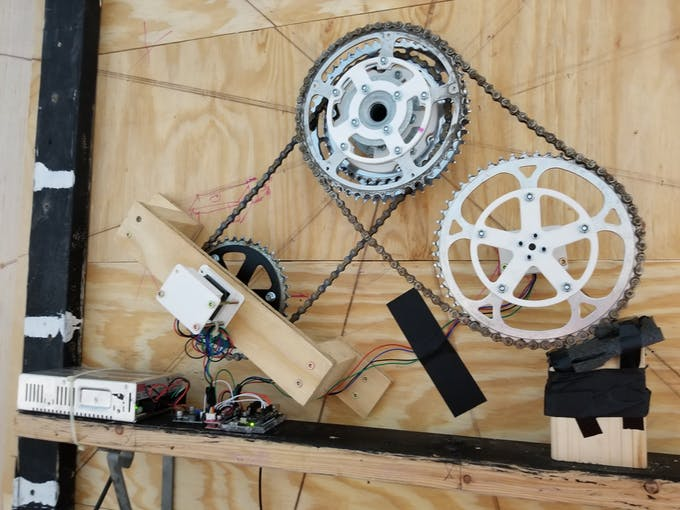
When [tnjyoung] was asked to build a huge lighted clock for a high school theater’s production of Cinderella with only two weeks before opening night, he probably wished for a fairy godmother of his own to show up and do it for him. But he and his team pulled it off, and it looks amazing. That medallion in the middle? It was laid out painstakingly by hand, using electrical tape.
This thing is 12 feet wide and weighs more than 500 pounds. Even so, it isn’t a permanent set piece, so it has to move up and down throughout the show on airplane cables. Now for the minutiae: there’s an Arduino Uno with built-in Wi-Fi that receives UDP commands from a phone to raise and lower the clock at the appropriate times. The ‘duino is also controlling two stepper motors, one for the hour hand and one for the minute hand.
Time is almost a minor character in the story of Cinderella, since she has to get back by midnight. Because of this, [tnjyoung] programmed a dozen or so time cues that move the steppers at various speeds to achieve different effects, like time flying by as she dances the night away with the Prince. Hour you still just sitting there? Sweep past the break to watch the build process fly by in a matter of minutes.
Part of [Gelstronic]’s house has a glass roof. While he enjoys the natural light and warmth, he doesn’t like getting up on a ladder to clean it every time a bird makes a deposit or the rainwater stains build up. He’s tried to make a cleaning robot in the past, but the 25% slope of the roof complicates things a bit. Now, with the addition of stepper motors and grippy tank treads, [Gelstronic] can tell this version of GRawler exactly how far to go, or to stay in one place to clean a spot that’s extra dirty.
GRawler is designed to clean on its way up the roof, and squeegee on the way back down. It’s driven by an Arduino Pro Micro and built from lightweight aluminium and many parts printed in PLA. GRawler also uses commonly-available things, which is always a bonus: the brush is the kind used to clean behind appliances, and the squeegee blade is from a truck-sized wiper. [Gelstronic] can control GRawler’s motors, the brush’s spin, and raise/lower the wiper blade over Bluetooth using an app called Joystick BT Commander. Squeak past the break to see it in action.
As far as we can tell, [Gelstronic] will still have to break out the ladder to place GRawler and move him between panels. Maybe the next version could be tethered, like Scrobby the solar panel-cleaning robot.
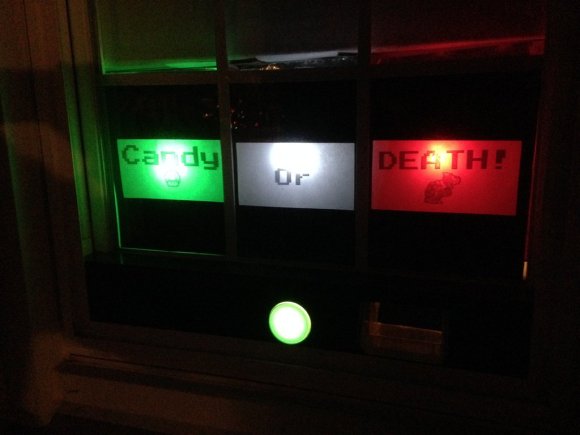
Will you be handing out candy on Halloween? Maybe you have a party to attend or kids to take around the neighborhood and can’t be home to answer the bell. You don’t want to be The Dark House With No Candy, ’cause that’s a good way to get TP’d. We’re not exactly sure what [Ben]‘s catalyst was aside from trying to avoid tempting would-be thieves with an unattended bowl on the porch. Whatever the reason, we’re happy to present Candy or Death, his gamified candy (or death)-dispensing machine.
Okay, so it only dispenses candy for now. [Ben] hasn’t quite worked the kinks out of his death ray. He designed it to sit behind a porch-facing window so it can’t be messed with. All trick-or-treaters can do is push the button and take the candy. It’s built around a cereal dispenser that’s modified to be cranked by a piece of round rod driven with a NEMA-17 stepper motor and an Arduino Uno with a motor shield. The candy slides down a length of aluminium rain gutter into a plastic stacking bin, and the whole thing is built into a nice wood frame.
A few adjustments were necessary to keep it from jamming. The dispenser’s hopper uses rubber blades to govern the flow, and he ended up removing a few and trimming the others. [Ben] has an album up of all his build pics and put his code on the gits. Stick around to see videos of the machine from the front and rear.
Planet Arduino is, or at the moment is wishing to become, an aggregation of public weblogs from around the world written by people who develop, play, think on Arduino platform and his son. The opinions expressed in those weblogs and hence this aggregation are those of the original authors. Entries on this page are owned by their authors. We do not edit, endorse or vouch for the contents of individual posts. For more information about Arduino please visit www.arduino.cc
You are currently browsing the archives for the NEMA-17 category.

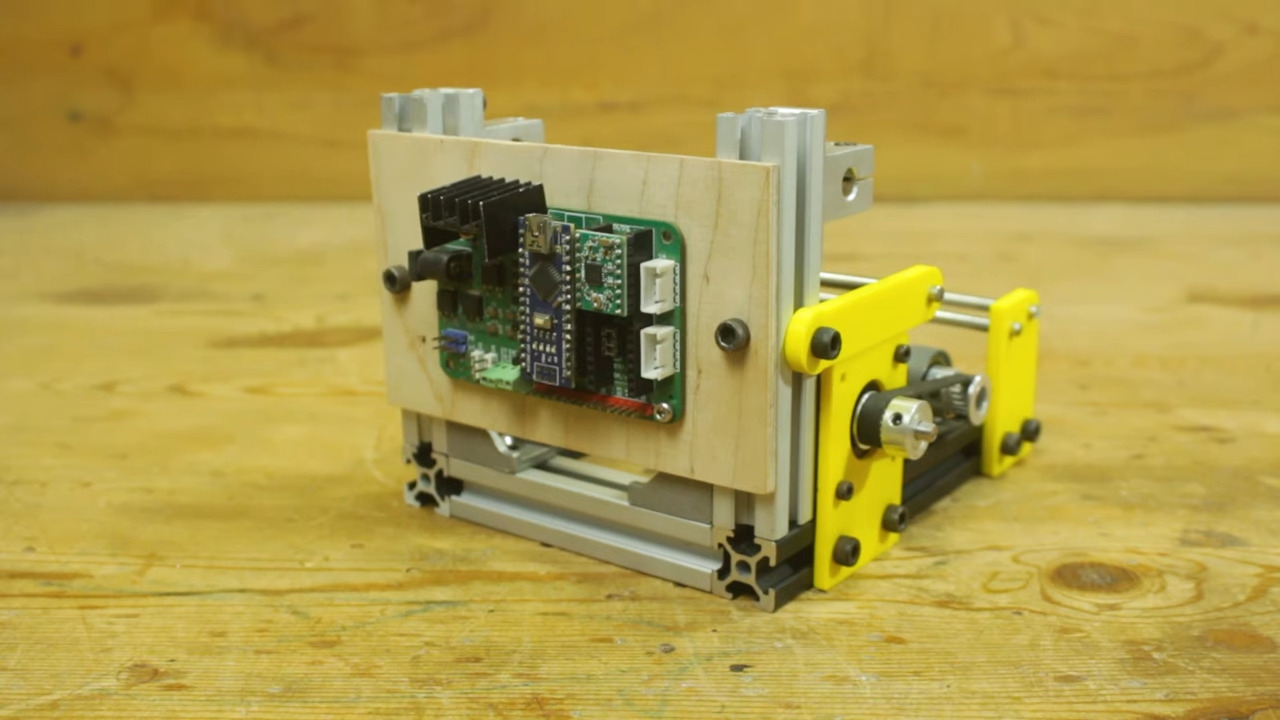 This tidy build is made primarily of 20×20 extruded aluminium and stainless steel smooth rod. All the yellow bits are 3D printed. The brains of this operation is an Arduino Nano, with an A4988 stepper motor driver controlling a NEMA17.
 Will you be handing out candy on Halloween? Maybe you have a party to attend or kids to take around the neighborhood and can’t be home to answer the bell. You don’t want to be The Dark House With No Candy, ’cause that’s a good way to get TP’d. We’re not exactly sure what [Ben]‘s catalyst was aside from trying to avoid tempting would-be thieves with an unattended bowl on the porch. Whatever the reason, we’re happy to present

