What’s smaller than a Feather but larger than a Trinket? It’s an Adafruit ItsyBitsy ESP32, a powerful processor PCB with a plethora of pins! It features the ESP32 Pico module, an FCC-certified module that contains an ESP32 chip with dual-core 240MHz Tensilica processor, WiFi, and Bluetooth classic + BLE, configured with 8 MB of Flash memory, and 2 MB of PSRAM.
The Adafruit ItsyBitsy ESP32 guide has everything you need to get started with using this board. There’s pages for overview, pinouts, low power use, CircuitPython with Web Workflow, Arduino, factory reset and resources for download.
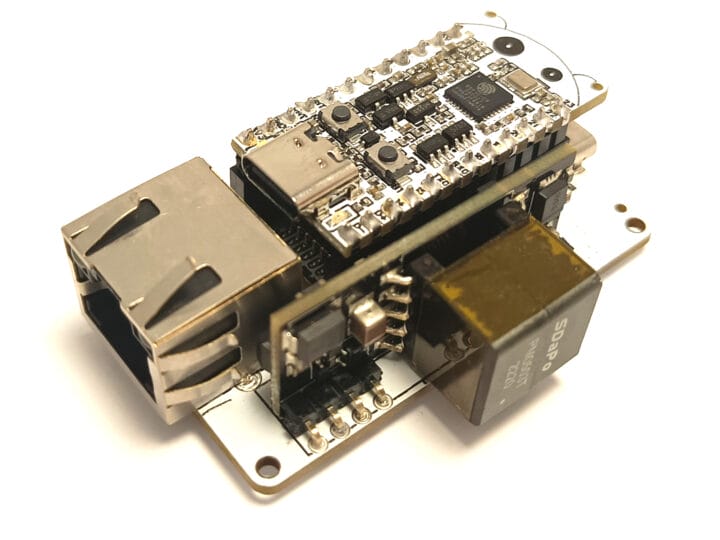
We’ve already covered a range of ESP32-C6 boards, but none supporting Ethernet and PoE so far, and the ESP32-C6-Bug board brings that to the table thanks to the Esp32-Bug-Eth shield with a W5500 Ethernet chip, an RJ45 jack and a PoE power module. Like other ESP32-C6 devices, the little board supports Wi-Fi 6, Bluetooth LE 5, as well as Thread and Zigbee through its 802.15.4 radio, but it also integrates some other interesting features such as castellated holes for easy soldering on a carrier board and support for LiPo batteries with built-in battery charging and protection circuits. ESP32-C6-Bug board specifications: SoC – ESP32-C6FH4 MCU cores 32-bit RISC-V core @ 160 MHz 32-bit RISC-V core @ 20 MHz low-power coprocessor can run tasks even when the main system is in deep sleep state Memory – 512 KB SRAM Storage – 4 MB Flash Wireless – WiFi 6, Bluetooth LE 5, and [...]
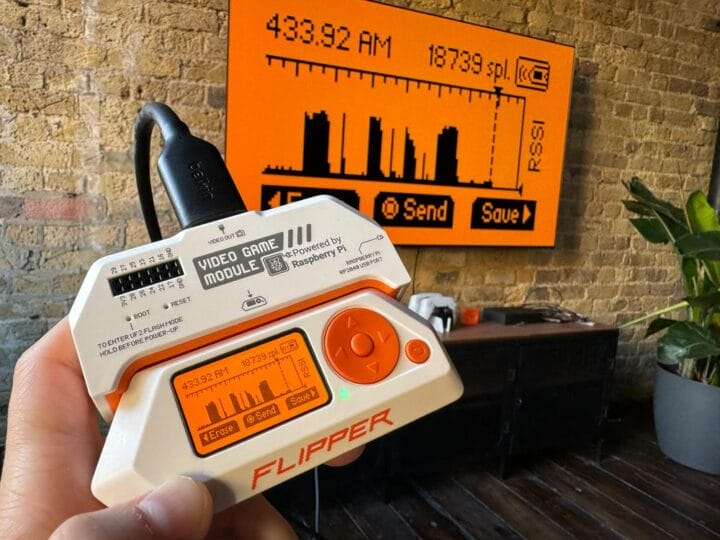
Flipper Zero hardware & wireless hacking tool can now be used as a proper game console thanks to a Raspberry Pi RP2040-powered video game module that mirrors the display of the device on a larger monitor or TV via DVI/HDMI video output, and also adds a 6-axis motion tracking sensor. The Flipper Zero has been in the news in recent days, notably with Canada’s government banning the device due to car theft (although it only seems feasible on older cars), and today the company has announced the launch of a video game module developed in collaboration with Raspberry Pi Ltd. Video game module specifications: MCU – Raspberry Pi RP2040 dual-core Arm Cortex-M0+ microcontroller clocked up to 133 MHz with 264 kB SRAM Video Output – DVI-D at 640х480 with 60 Hz refresh rate. It also supports HDMI. USB – USB Type-C port connected to the microcontroller. Acts as a USB device [...]
Historically, there have been a few cases of useful wireless power transmission over great distances, like a team at MIT that was able to light up a 60 W bulb at several meters, and of course Nikola Tesla had grand dreams of drawing energy from the atmosphere. But for most of us wireless power is limited to small, short-range devices like cellphone chargers. While it’s not a lot of work to plug in a phone when it needs a charge, even this small task can be automated.
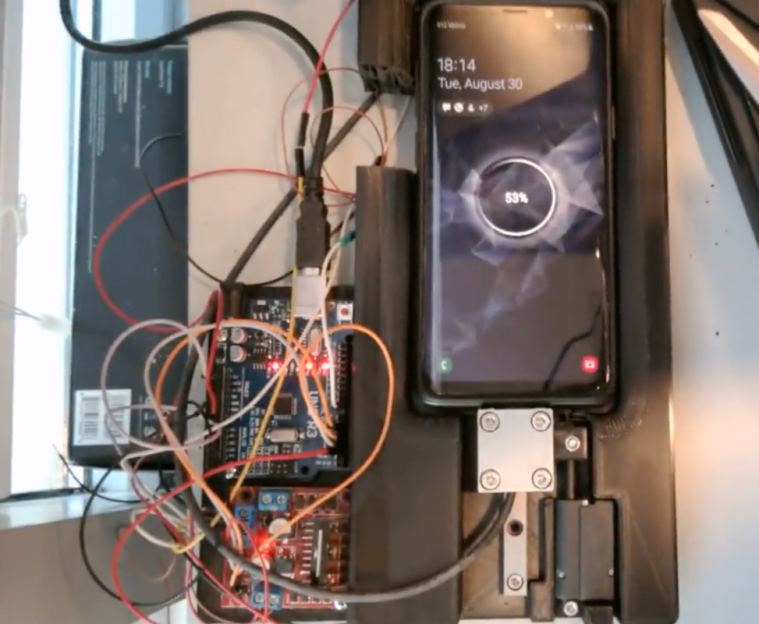
This build begins with a 3D printed cradle for the smartphone to sit in. When the device detects that the phone has been placed in the cradle, it uses a linear actuator to drive a custom-built charging cable into the phone’s USB port. Similarly, when the phone is lifted from the cradle the cable is automatically removed. It appears that there is some play in the phone’s position that lets the charger be plugged in smoothly, and the project’s creator [Larpushka] points out that the linear actuator is not particularly strong so we don’t imagine the risk of damage is very high.
While wireless charging still may have the edge when it comes to keeping debris out of the port, we still really enjoy a project like this that seems to be done for its own sake. There are some improvements that [Larpushka] plans to make, but for now we’re delighted by this build. For anyone looking to add true wireless charging to any phone that doesn’t have it, though, it’s not too difficult to accomplish either.
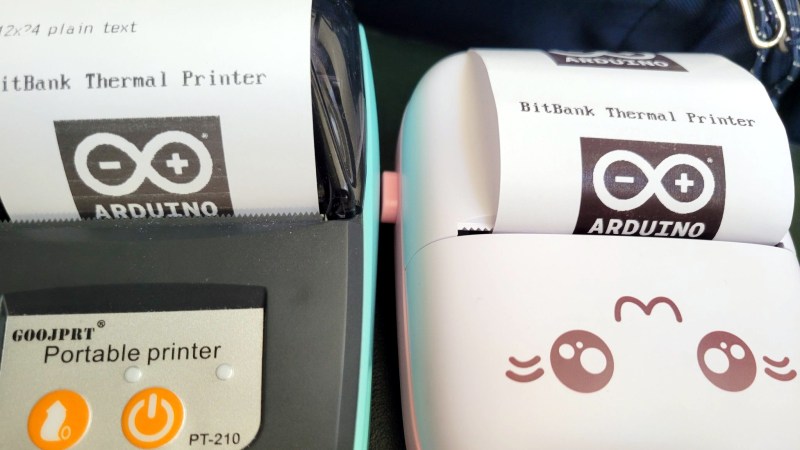
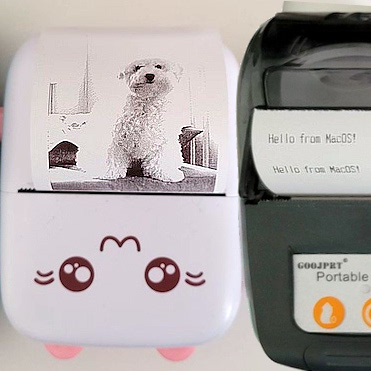
[Larry Bank]’s Arduino library to print text and graphics on BLE (Bluetooth Low Energy) thermal printers has some excellent features, and makes sending wireless print jobs to a number of common models about as easy as can be. These printers are small, inexpensive, and wireless. That’s a great mix that makes them attractive for projects that would benefit from printing out a hardcopy.
It’s not limited to simple default text, either. Fancier output can be done using Adafruit_GFX library-style fonts and options, which sends the formatted text as graphics. You can read all about what the library can do in this succinct list of concise functions.
But [Larry] hasn’t stopped there. While experimenting with microcontrollers and BLE thermal printers, he also wanted to explore talking to these printers from his Mac using BLE directly. Print2BLE is a MacOS application that allows dragging image files into the application’s window, and if the preview looks good, the print button makes it come out of the printer as a 1-bpp dithered image.
Small thermal printers make for neat projects, like this retrofitted Polaroid camera, and now that these little printers are both wireless and economical, things can only get easier with the help of a library like this. Of course, if that’s all starting to look a little too easy, one can always put the thermal back in thermal printing by using plasma, instead.
We have very big plans for Arduino Cloud this year, which took a major leap forward with the recent name change. But that’s not all we’re working on. We’ve already got some exciting new features to bring to you, including a watchdog timer that keeps your hardware ticking.
WiFi Module Firmware Update
First of all, we’re updating the WiFi module firmware on Arduino Cloud-compatible boards. It’ll be moving to a newer version (1.4.4), as well as the library used to connect devices to Arduino Cloud.
These measures will significantly reduce memory footprint on SAMD. The primary benefit of which is allowing for larger user sketches than was previously possible.
Just follow the process below to update your boards to the latest WiFi firmware.
How to Update Your Firmware
The WiFi module firmware is updated automatically when uploading a new sketch from Web Editor or Arduino Cloud interface. So you don’t need to take any action to do this.
If you want to manually apply a firmware update, go to “Devices” and select your device. Look for “NINA firmware” in device properties. If the device firmware is older than 1.4.4, an update button will be available. Please remember that if you update firmware this way, you’ll have to re-upload your sketch when it’s complete.
Watchdog Function
This release of the Arduino Cloud IoT library also adds watchdog functionality. It’s intended for all ATSAMD21G18-based cloud-connected boards such as MKR boards and Nano 33 IoT.
The watchdog is essentially an electronic timer, counting down from a preset value. When it hits zero, the watchdog triggers a reset of the microcontroller. The timer is periodically reset to its starting value at the beginning of the loop()function, which means the software is running smoothly.
Should something on your Arduino board crash, the starting value doesn’t get reset and the watchdog eventually restarts it. This will save you a lot of time as it helps to automatically recover from temporary hardware faults or unrecoverable software errors whenever you have an unattended or remote device. Watchdog enabled by default, but can easily be disabled, should you wish to.
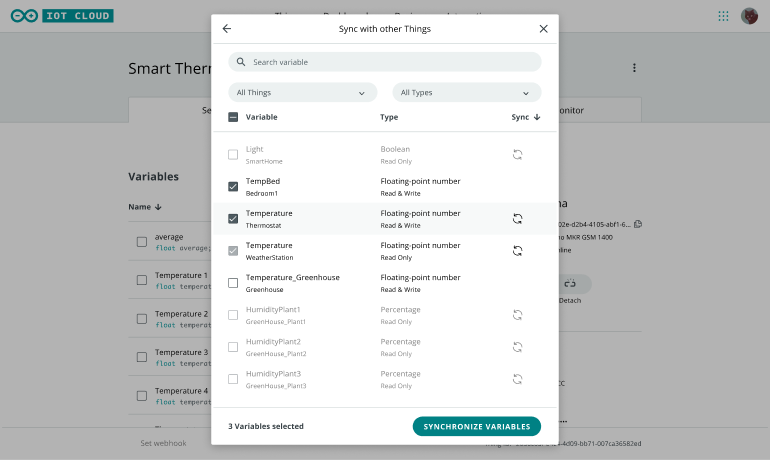
There’s a brand new device-to-device communication feature available now in the Arduino IoT Cloud. It’s something we’ve been working on for a long time. So we’re excited to see how it’ll add a whole new connected dimension to your Arduino projects.
What is “Device-to-Device”? Communication?
Internally we’ve been looking at this feature as “device-to-device” communication. It will allow your Arduino devices to send wireless messages to each other, without writing a single line of code or spending time with radio modules and network protocols.
Using this feature you can link variables of the same data type between two or more cloud-enabled devices. For example, one button could set three smart bulbs to the same color. Or you could turn on a heater when temperature sensors in your room or outside in your weather station drop below a certain level. Being able to sync variables gives you an intelligent way to control multiple devices very easily.
Whether you use an Oplà IoT Kit, a MKR WiFi 1010, a Nano 33 IoT or an (upcoming!) Nano RP2040 Connect, you can configure everything from the web interface. After configuration, any changes you make to variables on one device will be reflected promptly on the other(s). This creates a seamless, powerful and secure two-way communication with almost no effort on your part, and no code required. The Arduino IoT Cloud handles authentication, security, network disruptions and any other tricky parts.
What Does This Mean For Your Projects and Devices?
It means there are lots of options with thing-to-thing communication (also known as variable synchronization):
Collect sensor readings from remote devices.
Actuate devices remotely. For instance, pressing a button on one Arduino turns on an LED or motor on another.
Create a distributed algorithm where multiple devices collaborate with each other.
Are you thinking about home automation? Interactive installations? Monitoring and controlling machines from a wireless panel? This powerful new feature makes all those things easy to achieve for makers of all abilities.
Combined with IoT Cloud’s dashboards this delivers a powerful new way to build incredible automations with minimal (if any) changes. Furthermore, it gives you smartphone control of your connected boards via the existing Arduino IoT Remote iOS and Android apps.
If you want to be one of the first to try it out, grab an Arduino IoT Cloud subscription. After that, just make sure you’re signed up to the Arduino newsletter to hear about other new features.
dropController has the kind of documentation we wish would spontaneously generate itself whenever we build something. [Martyn Currey] built a robust rig for water droplet photography, and we don’t want to dismiss the hardware, but the most impressive part might be the website. It might not be very fancy, but it’s thorough and logically organized. You can find parts lists, assembly manuals, tutorials, sketches, and schematics. If only all the projects that came our way were so well detailed.
Water droplet photography is pretty cool, although freehanding it will make your patience fall faster than 9.81 m/s². The concept is that a solenoid valve will flicker open to release a drop of water, wait for a certain number of microseconds, and then trigger your DSLR via a wired remote cable. The tricky part comes from controlling as many as six valves and three flashes. We don’t have enough fingers and toes to press all those buttons.
The bill of materials contains many commonly available parts like an Arduino Nano, an LM2596 voltage regulator, some MOSFETS, an HC-06 Bluetooth module, plus standard audio connectors to hook everything up. Nothing should break the bank, but if money is not an issue, [Martyn] sells kits and complete units.
If you ride a bike, you probably share the road with a lot of cars. Unfortunately, they don’t always share the road very well with you. [Mech Tools] took a helmet, a few Arduinos, and some wireless transceivers and made headgear that shows when you stop and also shows turn signals. We were a little surprised, though, that the bike in question looks like a motorcycle. In most countries, motorcycle helmets meet strict safety standards and modifying them is probably not a good idea. However, it wasn’t exactly clear how the extra gear attached to the helmet, so it is hard to say if the project is very practical or not.
In particular, it looks as though the first version had the electronics just stuck to the outside of the helmet. The final one had things mounted internally and almost certainly had cuts or holes made for the lights. We aren’t sure which of those would be more likely to be a problem in the case of an accident.
However, as a concept, we liked the idea. It made us wonder if you could do the same thing to something a little less critical like a motorcycle jacket. After all, we’ve seen a lot of wearable gear lately.
[Dave Akerman]’s interest in high-altitude projects means he is no stranger to long-range wireless communications, for which LoRa is amazingly useful. LoRa is a method of transmitting at relatively low data rates with low power over long distances.
Despite LoRa’s long range, sometimes the transmissions of a device (like a balloon’s landed payload) cannot be received directly because it is too far away, or hidden behind buildings and geography. In these cases a useful solution is [Dave]’s self-contained LoRa repeater. The repeater hardware is simple, and [Dave] says that if one has the parts on hand, it can be built in about an hour.
The device simply re-transmits any telemetry packets it receives, and all that takes is an Arduino Mini Pro and a small LoRa module. A tiny DC-DC converter, battery, and battery charger rounds out the bill of materials to create a small and self-contained unit that can be raised up on a mast, flown on a kite, or carried by a drone.
Planet Arduino is, or at the moment is wishing to become, an aggregation of public weblogs from around the world written by people who develop, play, think on Arduino platform and his son. The opinions expressed in those weblogs and hence this aggregation are those of the original authors. Entries on this page are owned by their authors. We do not edit, endorse or vouch for the contents of individual posts. For more information about Arduino please visit www.arduino.cc
You are currently browsing the archives for the wireless category.


 [Dave Akerman]’s interest in high-altitude projects means he is no stranger to long-range wireless communications, for which LoRa is amazingly useful. LoRa is a method of transmitting at relatively low data rates with low power over long distances.
