Posts | Comments

Planet Arduino

Archive for the ‘anemometer’ Category

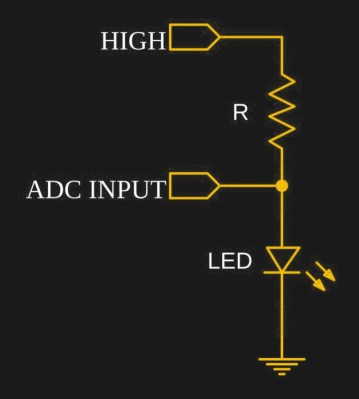
We’d seen it done with buttons, switches, gestures, capacitive touch, and IR remote, but never like this. [electron_plumber] made an LED that can be blown out like a candle, and amazingly it requires no added sensors. The project uses an Arduino to demonstrate turning a tiny LED on and off in response to being blown on, and the only components are the LED and a resistor.
[electron_plumber] used an 0402 LED and thin wires to maximize the temperature responses.
How is this done? [electron_plumber] uses an interesting property of diodes (which are the “D” in LED) to use the LED itself as a temperature sensor. A diode’s voltage drop depends on two things: the current that is being driven through the diode, and the temperature. If the current is held constant, then the forward voltage drop changes reliably in response to temperature. Turning the LED on warms it up and blowing on it cools it off, causing measurable changes in the voltage drop across the device. The change isn’t much — only a handful of millivolts — but the effect is consistent and can be measured. This is a principle [Elliot Williams] recently covered in depth: using diodes as temperature sensors.

It’s a clever demo with a two important details to make it work. The first is the LED itself; [electron_plumber] uses a tiny 0402 LED that is mounted on two wires in order to maximize the temperature change caused by blowing on it. The second is the method for detecting changes of only a few millivolts more reliably. By oversampling the Arduino’s ADC, an effectively higher resolution is obtained without adding any hardware or altering the voltage reference. Instead of reading the ADC once, the code reads the ADC 256 times and sums the readings. By working with the larger number, cumulative changes that would not register reliably on a single read can be captured and acted upon. More details are available from [electron_plumber]’s GitHub repository for LEDs as Sensors.

Embedded below is a video that is as wonderful as it is brief. It demonstrates the project in action, takes a “show, don’t tell” approach, and is no longer than it needs to be.

In the past we have seen LEDs that can be blown out like candles in different ways; one used a microphone to detect blowing while another used a thermistor to detect the temperature change from blowing. [electron_plumber]’s project is notable not only for using no added parts, but also for being documented in a way that just about anyone can get up and running, and that’s something we always like to see.

If the term “3D printed weather station” makes you think of a printed enclosure for off-the-shelf sensors, don’t feel bad. We thought the same thing when we first read the message [Rob Ward] sent in about his latest project. Surely he couldn’t mean that he actually printed all the principal parts of a serious weather station setup, such as the wind vane, anemometer, or rain gauge?

Except, on closer inspection, that’s exactly what he did. Every part of the weather station is designed in OpenSCAD, printed out, and infused with various vitamins to turn them into functional pieces of hardware. Interestingly enough, most of the magic is done with simple reed switches and magnets.

For example, the wind vane uses eight reed switches and an embedded magnet to communicate the current wind direction to the Arduino Uno which handles the user interface. Wind speed, on the other hand, it done with a single reed switch as it just needs to count rotations to calculate speed.

[Rob] did “cheat” by using an off-the-shelf barometric pressure sensor, but we’ll give him a pass for that one. Unless somebody wants to hit the tip line with a design for a printable barometer, we’ll consider this the high water mark in printable weather stations.

This isn’t the first time we’ve seen a DIY anemometer or rain gauge, of varying degrees of complexity. But the clean look of the final version, completely open nature of the OpenSCAD source, and the low part count make this an extremely compelling option for anyone looking to up their home forecasting game.

Dec
30

Arduino Ultrasonic Anemometer

anemometer, arduino, Test/Measurements, ultrasonic Comments Off on Arduino Ultrasonic Anemometer 

20140930_223552

by lfaessler @ soldernerd.com:

My aim is to build an ultrasonic anemometer based on a Arduino Uno board. Now what’s an anemometer? That’s just a fancy name for a wind meter. I want to be able to measure both wind speed and wind direction with high accuracy. Most wind meters are of the cup or vane variety. They turn wind into mechanical motion and then measure that motion to calculate wind speed and possibly direction. An ultrasonic anemometer on the other hand sends and receives ultrasonic pulses and measures the time-of-flight. From the time-of-flight (or the time difference, depending on your approach) you can then calculate the wind speed in a given direction. Add a second pair of senders and receivers at a 90-degree angle and you get both wind speed and direction.

Arduino Ultrasonic Anemometer - [Link]


  • Newsletter

    Sign up for the PlanetArduino Newsletter, which delivers the most popular articles via e-mail to your inbox every week. Just fill in the information below and submit.

  • Like Us on Facebook