Posts | Comments

Planet Arduino

Archive for the ‘dial’ Category

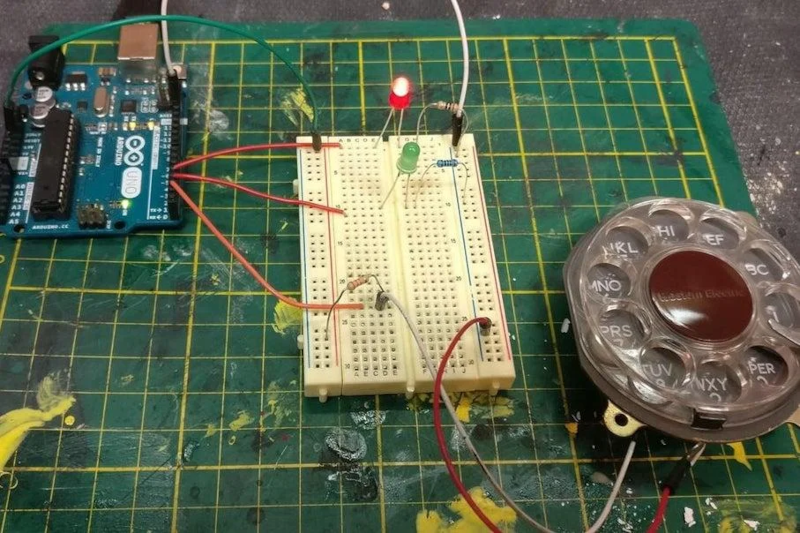
A lot of phrases surrounding phones don’t make sense anymore. With a modern cellphone, you don’t really “hang up” and there’s certainly no “dial” to be had. However, with [jakeofalltrades’] project, you can read an old-fashioned phone dial using an Arduino.

The idea behind a phone dial is actually pretty simple. When you pull the dial back to the stop using one of the numbered holes and release it, it causes a switch to open and close the same number of times as the hole you selected. That is, if you pull back the 5 hole, you should get 5 switch closures. The duration of each switch event and the time between switch events is a function of the speed the dial moves because of its internal spring. The zero hole actually produces ten pulses.

There are standards for how precise the timing has to be, but — honestly — it’s pretty loose since these were not made to be read by precise microcontroller timers. In the United States, for example, the dial was supposed to produce between 9.5 and 10.5 pulses per second, but the equipment on the other end would tolerate anything from 8 to 11.

Even if you don’t want a rotary dial in your next project, the code has some good examples of using ATmega328 timers that you might find useful in another context. However, a dial would add a nice retro touch to any numeric input you might happen to need.

If you need project inspiration, how about a volume control? Or, why not a numeric keypad?

[Max] had a rotary dial from an old telephone and — unsurprisingly — had nothing in particular to do with it. The simple answer? Use an Arduino Leonardo to turn it into a USB keyboard device.

Of course, the Leonardo can easily impersonate a USB keyboard, so that’s the easy part of the project. Interfacing to the dial requires an understanding of how the phone system works.

While today, TouchTone phones are most common, they were quite uncommon for many years. Early phones required you to have an operator connect your circuit to another person’s circuit. Unfortunately for the operators, the system was inherently unscalable and also cost prohibitive.

There were a variety of schemes tried and — supposedly — an undertaker who was angry that the operator was connecting his customers to her husband’s competing mortuary invented the dial telephone.

The details are pretty simple. A typical dial has two contacts. There’s a normally open contact that closes when you spin the dial to any position. It says closed until the spring returns the dial to the home position.

The other contact is normally closed and makes or breaks the phone line. Each time the dial rewinds past a position, the contact opens briefly. Of course, this is a mechanical system, so the software has to debounce the inputs, but that’s easy enough.

If you don’t have access to a dial, you could always print one. Sort of.

[Patrick] was looking for an easier way to control music and movies on his computer from across the room. There is a huge amount of remote control products that could be purchased to do this, but as a hacker [Patrick] wanted to make something himself. He calls his creation, “Dial” and it’s a simple but elegant solution to the problem.

Dial looks like a small cylindrical container that sits on a flat surface. It’s actually split into a top and bottom cylinder. The bottom acts as a base and stays stationary while the top acts as a dial and a push button. The case was designed in SOLIDWORKS and printed on a 3D printer.

The Dial runs on an Arduino Pro mini with a Bluetooth module. The original prototype used Bluetooth 2.0 and required a recharge after about a day. The latest version uses the Bluetooth low energy spec and can reportedly last several weeks on a single charge. Once the LiPo battery dies, it can be recharged easily once plugged into a USB port.

The mechanical component of the dial is actually an off-the-shelf rotary encoder. The encoder included a built-in push button to make things easier. The firmware is able to detect rotation in either direction, a button press, a double press, and a press-and-hold. This gives five different possible functions.

[Patrick] wrote two pieces of software to handle interaction with the Dial. The first is a C program to deal with the Bluetooth communication. The second is actually a set of Apple scripts to actually handle interaction between the Dial and the various media programs on his computer. This allows the user to more easily write their own scripts for whatever software they want. While this may have read like a product review, the Dial is actually open source!


Filed under: Arduino Hacks, peripherals hacks


  • Newsletter

    Sign up for the PlanetArduino Newsletter, which delivers the most popular articles via e-mail to your inbox every week. Just fill in the information below and submit.

  • Like Us on Facebook