Posts | Comments

Planet Arduino

Archive for the ‘compass’ Category

Of all the tools humanity has developed for navigation over our history, the humble compass is arguably the most important. A compass is cheap to produce, reliable, and incredibly useful for every kind of navigation. But standard mechanical compasses aren’t perfect; they can stick, are easy for people to misread, and don’t always indicate exact angles well. This simple digital compass built by Mirko Pavleski solves those problems.

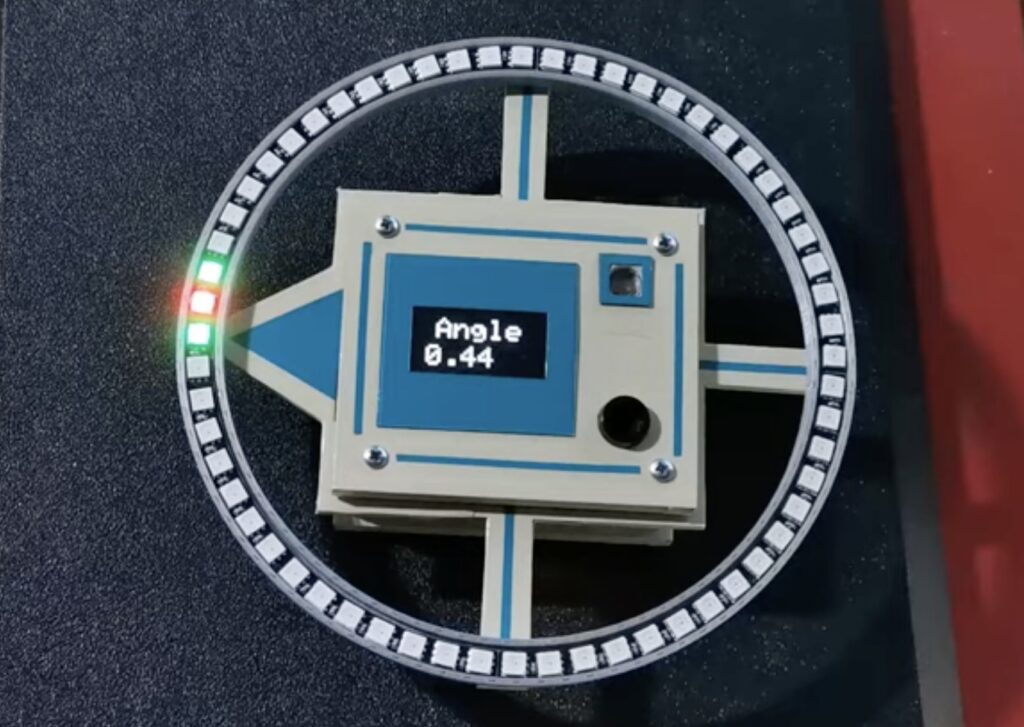
There are, of course, many digital compasses on the market that will work just as well as this device. But this could still be a fun weekend project. It is a digital compass that aids navigation in two ways. First, it indicates magnetic north using an outer ring of LEDs. But there are only 60 LEDs, so that can be off by as much as three degrees in either direction. For that reason, this device also contains an OLED display that shows the exact angle (down to two decimal places) relative to magnetic north.

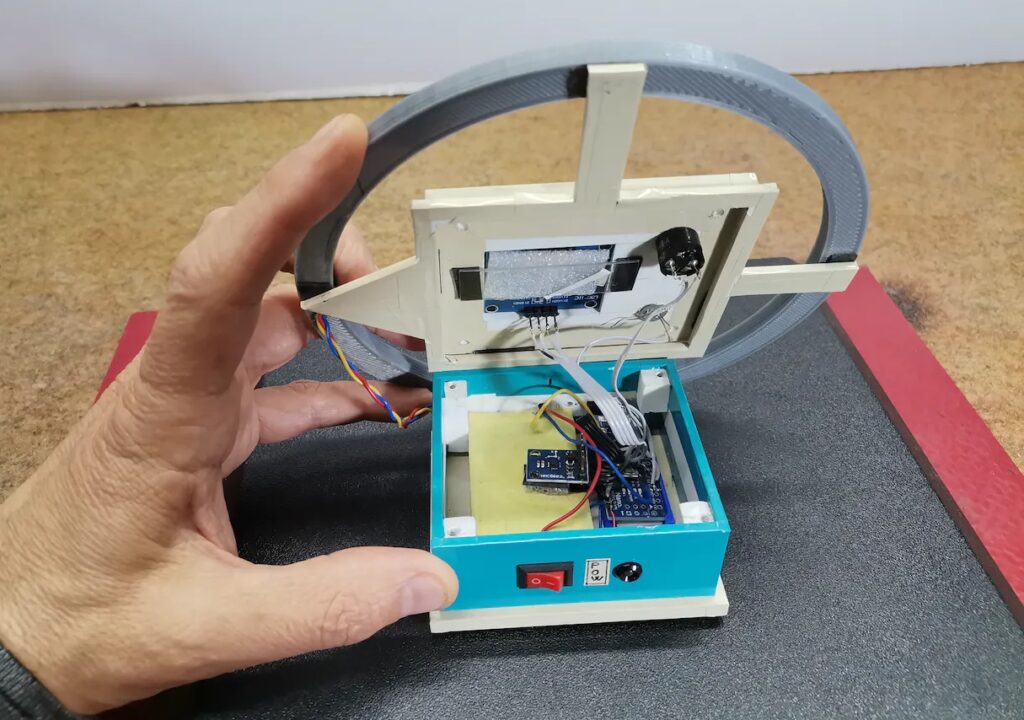
This is a very simple device to build and it only requires four components: an Arduino Nano board, an HMC5883L compass module, a ring with 60 WS2812B individually addressable RGB LEDs, and an OLED screen. If you want to use it on the go, a standard 9V battery will provide portable power. Those components fit into a basic 3D-printable case that protects the electronics and puts everything in the correct orientation.

The post This electronic compass guides you using LEDs and OLED display appeared first on Arduino Blog.

Consider an analog or even digital compass. While you can reasonably expect either to point towards magnetic north when held flat, when you add tilt and/or roll to the equation, things get a bit wonky. That is unless you’re maker “lingib,” who was able to construct a magical compass using an Arduino Uno and an MPU-9250 IMU unit, with an accelerometer/gyro in the same package.

As seen in the video below, when the compass unit is set at an angle, the heading output varies significantly—as much as 100 degrees according to the project write-up. When stabilization is turned on, however, the gyro/accelerometer is used to compensate for magnetometer heading variations—reducing output errors to just a few degrees.

This Instructable explains how to make a tilt compensated compass using an Arduino Uno R3, an LCD display, and an IvenSense MPU-9250 multi-chip-module that contains an MPU-6050 accelerometer / gyro and an AK8963 magnetometer within the same package.

The LCD simultaneously displays the heading, (P)itch, and (R)oll.

The heading accuracy is within 2 degrees depending on how well the compass has been calibrated.

Without tilt compensation the compass headings vary significantly … sometimes by as much as 100 degrees.

When stabilised, the tilted compass headings only vary by one or two degrees … the improvement is amazing.

The tilt stabilization may be disabled by placing a jumper wire between Arduino pins A0 and GND.

Feel like taking a long walk, but can’t be bothered with carrying your drinks? Have no fear, this  “Follow Me” Cooler Bot is here!

Really just a mobile platform with a cooler on top, the robot connects to smartphone via Bluetooth, following it using GPS. Making the platform involves a little woodworking skill, and an aluminium hub with a 3D-printed hub adapter connects the motors to a pair 6″ rubber wheels with a swivel caster mounted at the rear. A pocket in the platform’s base houses the electronics.

The Arduino Uno — via an L298n motor driver — controls two 12V DC, brushed and geared motors mounted with 3D printed brackets, while a Parallax PAM-7Q GPS Module in conjunction with an HMC 5883L compass help the robot keep its bearing. A duo of batteries power the motors and the electronics separately to prevent  any malfunctions.

Controlling the platform is done on an Android smartphone using Blynk. Ease of use and the ability to set basic commands to be sent to the robot over a desired connection type made it ideal for this helpful little ‘bot.

There isn’t anything more complicated going on — like obstacle avoidance or sophisticated pathfinding — so you kinda need a clear line between you and the cooler. Still, beverage storage is a great feature to add to you tag-along robot companion. It seems to work just fine.


Filed under: Arduino Hacks, gps hacks, robots hacks

A conventional compass points north (well, to magnetic north, anyway). [Videoschmideo]  wanted to make a compass that pointed somewhere specific. In particular, the compass — a wedding gift — was to point to a park where the newlywed couple got engaged. Like waking up in a fresh new Minecraft world, this is their spawn point and now they can always find their way back from the wilderness.

The device uses an Arduino, a GPS module, a compass, and a servo motor. Being a wedding gift, it also needs to meet certain aesthetic sensibilities. The device is in an attractive wooden box and uses stylish brass gears. The gears allow the servo motor to turn more than 360 degrees (and the software limits the rotation to 360 degrees). You can see a video of the device in operation, below.

The compass module may be hard to find, but you should be able to modify it to work with more readily available boards. Since you may not be able to find the exact gears used, your build will probably be a little different anyway.

The brass and wood are decidedly steampunk looking. It reminded us of this GPS project. If you have too much street cred to buy an off-the-shelf GPS, you could always roll your own.


Filed under: Arduino Hacks, gps hacks

1cover-1024x768

Coffee, good food, bar? Sometimes it’s hard to explore a new city and choose among hundreds options without spoiling it! A team of students at CIID (Grishma Rao, Justine Syen, Adriana Chiaia, Jivitesh Ranglani) created Pilgrim, a MKR1000-based device providing a tangible interface for discovery without a digital screen. Acting like a smart compass, Pilgrim points people in the direction of a desired location, sourcing data directly from the Yelp API and leading to an eventual unexpected discovery:


The experience begins with the selection of a category using a dial below the compass, that clicks to send out data. The proximity to the destination is then indicated by lights along the rim of the compass, that light up one by one as the person gets closer to the location.

Once a category selection is received via clicking the dial, the code queries the Yelp API to return the coordinates of the best matched result to Pilgrim. The magnetic needle would then turn an angle relative to the user’s current position, replacing magnetic north with coordinates of the destination.

Pilgrim is programmed with a Genuino MKR 1000 which enables the compass to be connected to internet and also has a higher amount of memory. Moreover, Pilgrim uses a magnetometer + accelerometer for the directions, a stepper motor with an H-bridge, and a rotary encoder for the dial.

3-2-1024x768

Giant wristwatches are so hot right now. This is a good thing, because it means they’re available at many price points. Aim just low enough on the scale and you can have a pre-constructed chassis for building your own smartwatch. That’s exactly what [benhur] did, combining a GY-87 10-DOF module, an I²C OLED display, and an Arduino Pro Mini.

The watch uses one button to cycle through its different modes. Date and time are up first, naturally. The next screen shows the current temperature, altitude, and barometric pressure. Compass mode is after that, and then a readout showing your step count and kilocalories burned.

In previous iterations, the watch communicated over Bluetooth to Windows Phone, but it drew too much power. With each new hardware rev, [benhur] made significant strides in battery life, going from one hour to fourteen to a full twenty-fours.

Take the full tour of [benhur]’s smartwatch after the break. He’s open to ideas for the next generation, so share your insight with him in the comments. We’d like to see some kind of feedback system that tells us when we’ve been pounding away at the Model M for too long. 

[via Embedded Lab]


Filed under: Arduino Hacks, wearable hacks
Jun
18

Neopixel Ring Compass Takes Things in a New Direction

arduino hacks, arduino pro mini, compass, neopixel Comments Off on Neopixel Ring Compass Takes Things in a New Direction 

A couple of years ago, [philo mech] came across [David Ratliff]’s NeoPixel compass project. Ever since then, he’s wanted to make his own. To his delight, [philo mech] was able to find time to do just that.

An Arduino Pro Mini drives an LSM303DLHC compass/accelerometer breakout board and a 12-LED NeoPixel ring. The heading is indicated with a red ‘Pixel between two yellow ones.  In the video after the break, [philo mech] gives several demonstrations of the ring’s red indicator in relation to a standard compass arrow.

This colorful compass currently boasts two very useful modes: one to track the whereabouts of North, and the other for determining the user’s current heading. Mk. II  will compensate for tilt and will employ a 16-Pixel ring to display finer degrees of directional change. Want to make your own? The code is pasted in the video’s comments.

Thanks for the tip, [Chris].


Filed under: Arduino Hacks
May
28

RFduino Compass

arduino, bluetooth, compass, LSM303, RFduino Comments Off on RFduino Compass 

FNFGA6TIA57G4LE.LARGE

by RFduino @ instructables.com

The RFduino compass is a fully functional stand-alone compass which also transmits the current heading via Bluetooth low energy technology to phones, tablets, personal computers or any other equipped device. The RFduino compass is known as a Bluetooth Smart device.

RFduino Compass – [Link]

Mar
19

Arduino Digital Magnetic Compass – HMC5883L

arduino, ATmega328P, compass, HMC5883L Comments Off on Arduino Digital Magnetic Compass – HMC5883L 

FTDERE0I7CCFR2H.MEDIUM

by mi.vasilakis @ instructables.com:

Today I will show you how to make your own arduino compass by using the MHC5883L 3-axis digital compass board.

I prefer to build my own arduino based circuit by using the ATmega328p uno possessor, but this is optional for you. Buttons are used for turn on or off display leds and to change display mode of compass.

Arduino Digital Magnetic Compass – HMC5883L - [Link]

Jan
27

TinyCompass

arduino, ATmega328, compass Comments Off on TinyCompass 

FLA4E8II5BS9NUA.MEDIUM

by TinyCircuits @ instructables.com:

In this Instructable, we will be building a compass using the TinyShield Compass as well as the Circle Edge Led shield.

After getting your boards and battery, the Arduino IDE will be the first thing to download if you have not done so already. When the IDE has been loaded go to tools, board, and select Arduino Pro or Pro Mini (3.3V, 8MHz) w/ ATmega328.

TinyCompass - [Link]


  • Newsletter

    Sign up for the PlanetArduino Newsletter, which delivers the most popular articles via e-mail to your inbox every week. Just fill in the information below and submit.

  • Like Us on Facebook