What’s this? Another fabulous creation from [Niklas Roy] and [Kati Hyyppä] that combines art and electronics with our zeitgeist and a lot of recycled bits and bobs? You got it. Their workshop in eastern Berlin used to be a retail shop and has a large display window as a result. This seems perfect for a pair of artists in a pandemic, because they can communicate with the community through the things they display in the window. Most recently, it was this interactive cyborg baby we are choosing to call Cybaby.
You might recognize Cybaby as one of the very hackable Robosapien robots, but with a baby doll head. (It also has a single red eye that really pulls its look together.) In the window, Cybaby comes alive and toddles around against a backdrop that grew and evolved over several weeks this spring and summer. Passersby were able to join the network and control Cybaby from outside with their smartphone to make it walk around, press various buttons that change its environment, and trigger a few sensors here and there. Robosapien has been around for about 20 years, so there is already Arduino code out there that essentially simulates its R/C signals. [Niklas] and [Kati] used a NodeMCU (ESP12-E) to send pulses to the IR input of the robot.
Back on the zany zeitgeist front, there’s a hair salon, a convenience store, and a nightclub for dancing that requires a successful trip through the testing center first (naturally). Oh, and there’s a lab next door to the nightclub that can’t be accessed by Cybaby no matter what it tries or how it cries. Check it out after the break.
Unless you’ve held on to an old tube TV, did the hack that lets you use a light gun with an LCD via Wiimote receiver and a couple of microcontrollers, or live close to one of those adult arcades, you might be really jonesing to play Duck Hunt by now. It’s time to renew that hunting license, because [Danko] has recreated the game for NodeMCU boards, and it’s open season.
Instead of ducks, you get to shoot cute little Twitter-esque birds of varying sizes and point values, and a tiny cab-over truck if you wish. There’s a 60-second free-for-all, and then time is up and your score is displayed. As a special bonus, there’s no smug dog to laugh at you if don’t hit anything. Be sure to check out the demo and build video after the break.
This pocket console lives on a nicely-wired breadboard for now while [Danko] works on a custom PCB. He’s also planning to add support for Arduboy games in the future, and maybe a joystick instead of a D-pad of buttons.
[Mirko Pavleski] has put together a little weather station for himself that combines Internet-sourced forecasts with physical sensor data to give him a complete view of his local conditions. There’s no shortage of weather applications for our smartphones and computers that will show us the current local conditions and the forecast for the next couple of days. It’s so easy to pull weather data from the various APIs out there that you even see the functionality “baked in” to different gadgets these days. Of course, you can dig through every weather API in the world and not find the temperature and humidity inside your office; for that, you need your own sensors.
[Mirko] took a somewhat unconventional approach by essentially building two totally separate weather devices and packing them into one enclosure, which gives the final device a rather unique look thanks to the contrasting display technologies used.
Local conditions are detected by an Arduino Nano connected to a BMP180 sensor and displayed on a Nokia 5110 LCD. The screen shows not only real-time temperature and barometric pressure, but the change in pressure over the last several hours. The three-day forecast, on the other hand, is provided by a NodeMCU ESP8266 development board connected to the increasingly ubiquitous 0.96 inch OLED.
One of the tasks I dread is configuring a web server to send email correctly via Gmail. The simplest way of sending emails is SMTP, and there are a number of scripts out there that provide a simple method to send mail that way with a minimum of configuration. There’s even PHP mail(), although it’s less than reliable.
Out of the box, Gmail requires OAUTH2 for authentication and to share user data, which has the major advantage of not requiring that you store your username and password in the application that requires access to your account. While they have an ‘allow less secure apps’ option that allows SMTP access for legacy products like Microsoft Outlook, it just doesn’t seem like the right way forward. Google documents how to interact with their API with OAUTH2, so why not just use that instead of putting my username and password in plaintext in a bunch of prototypes and test scripts?
Those are the thoughts that run through my head every time this comes up for a project, and each time I’ve somehow forgotten the steps to do it, also forgotten to write it down, and end up wasting quite a bit of time due to my own foolishness. As penance, I’ve decided to document the process and share it with all of you, and then also make it work on an ESP8266 board running the Arduino development environment.
Before we continue, now would be a good time for a non-technical refresher on how OAUTH works. The main differences between OAUTH and OAUTH2 are that the latter requires HTTPS, and the access tokens that allow an application to use specific services in a user account have an expiry.
To use Gmail with OAUTH2, we will need to start with five things: An application registered in the Google APIs, its client ID and client secret, a computer running LAMP (a by-the-hour VPS works just fine here), and a domain name that points to it.
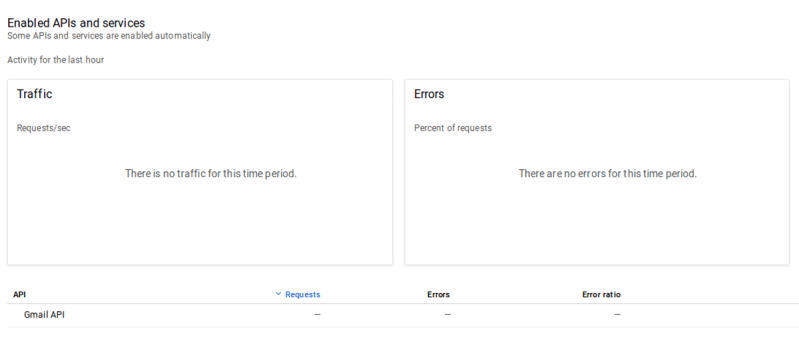
Registering an application with Google API is easy. Go to the Google API console, log in, create a new project, and enter it. Enable the Gmail API; it should be suggested on the front page.
With the project created and the Gmail API enabled, the dashboard should look something like this
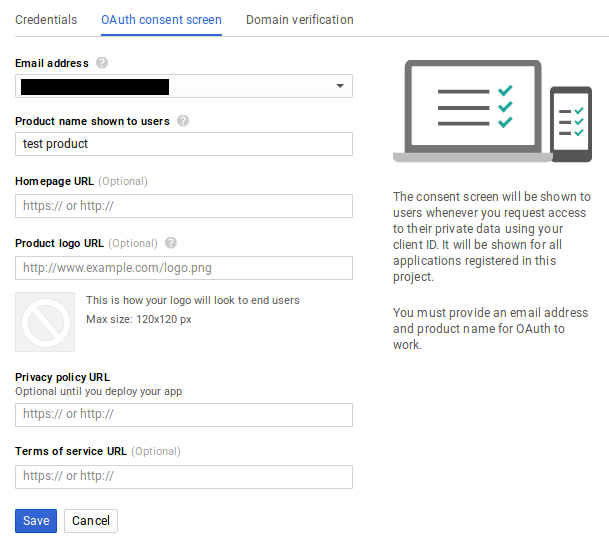
Then click on ‘credentials’ on the sidebar, create credentials, and finally ‘create OAUTH Client ID’. Before you can continue, you need to create a consent screen. The only entry you really need to fill out at this time is ‘Product Name Shown to Users’.
After saving that form, select ‘Web Application’ as your application type. Note the field called ‘Authorized redirect URIs’, we’ll return to it later. It’s important that it be correctly set for us to be able to receive a refresh token later on in this process.
For now, just press ‘Create’. A pop-up will display containing your Client ID and Client secret. You’ll need them soon, so best to copy/paste them into a local file on your computer for now.
Next, we will use those two pieces of data to request an access token and refresh token. We may as well accomplish two things at the same time here by installing the popular PHP email sender called PHPMailer on our web server. It includes a tool to request an OAUTH2 access/refresh token as well as being easily capable of sending a quick test email. To install it, we’ll use the Composer PHP dependency management tool:
$sudo apt-get install composer
Then we should navigate to our web-accessible directory, in my case /var/www/html, and install a few PHP scripts. Note that this should not be done as root, so create another user if needed and give them access to the directory:
Now enter the directory vendor/phpmailer/phpmailer. There will be a script called get_oauth_token.php. Move this script up three directories into the directory you just ran the ‘composer’ commands from. The location of this script as seen from the web needs to be entered into the ‘Authorized redirect URIs’ field of the Google API that we saw earlier. In this case it would have been https://mydomain.com/get_oauth_token.php. Public IP addresses will not work, this is why a domain name pointed to your web server is a requirement.
Now, open get_oauth_token.php in a text editor and paste in your Client ID and Client Secret where needed. Don’t try to run the script locally, it will fail. Open up a web browser on any computer, and navigate to the URL you entered as the ‘Authorized redirect URI’. Then select Google from the list of email services – at this point if it worked you will be asked to log in and then authorize the unverified application, under ‘Advanced’ under the warning prompt, at which point you will finally receive a refresh token. If you only want an access token for some reason you’ll have to edit the script to echo it back.
If that didn’t work, there are two common reasons: a wrong redirect URI or the script cannot find its dependencies. In the former case, the error message from Google will tell you the script URL as it sees it, and you can use that information to update the redirect URI in the Google API Console to fix the issue. For the latter, check your apache error log, probably located in /var/log/apache2/error.log, to see what dependency is not being found. You might see something like this:
PHP Warning: require(vendor/autoload.php): failed to open stream: No such file or directory in /var/www/html/mydomain/get_oauth_token.php on line 59, referer: http://mydomain.com/get_oauth_token.php
If you have received your refresh token, congratulations: the painful part is over. You can just go to the PHPMailer Github page and fill out their OAUTH2 example (gmail_xoauth.phps), and it ought to just work. If all you needed to do is send mail from a project on your VPS, you’re more or less ready to move on to more interesting parts of your project:
$email = 'someone@gmail.com';
$clientId = 'RANDOMCHARS-----duv1n2.apps.googleusercontent.com';
$clientSecret = 'RANDOMCHARS-----lGyjPcRtvP';
//Obtained by configuring and running get_oauth_token.php
//after setting up an app in Google Developer Console.
$refreshToken = 'RANDOMCHARS-----DWxgOvPT003r-yFUV49TQYag7_Aod7y0';
Remember to clean up any unnecessary scripts that contain your refresh token and other sensitive data before continuing.
ESP8266: We Don’t Need No Stinking Servers
Now what if we wanted to use these tokens to send email directly from project on a Raspberry Pi without needing a server in the middle? It turns out that once we have the client ID, client secret, and refresh token, we no longer require the server and domain name we’ve been using so far, and a mail-sending application, e.g. PHPMailer, can be installed on a computer anywhere with Internet access as long as it is configured with those values.
Things get a little more complicated when we try to do this on an ESP8266. OAUTH2 requires that we use SSL, and access tokens regularly expire and need to be refreshed. Thankfully, [jalmeroth] generously wrote a proof-of-concept and published it on GitHub. If provided with an access token, it can access your Gmail account and use it to send an email. It can also directly update/get data from Google Sheets, but I didn’t test this. However, if the access token was expired, it couldn’t detect that, although it did include working code to actually request a new token, but not parse it out and use it.
In an attempt to add to the functionality of that proof of concept, I forked the project and made a few changes. First, I changed to order of operations in the code to make it check if the current access token was valid before doing anything else. Second, Google API was responding ‘400 Bad Request’ if the access token was invalid, and everything but ‘200 OK’ responses were being filtered out by the code. Finally, I wrote a couple of JSON parsers that check the reason for the ‘400 Bad Request’ and extract and use the access token returned by Google API when a new one is requested.
It works, but it’s hardly reliable – not surprising considering I’ve never really used the Arduino platform before. Notably, the SHA1 fingerprint for Google API fails often. Checking from my local machine, the SHA1 fingerprint varies between two signatures there too. It would be fairly easy to check for either of them, or just keep trying, but I’d rather understand what’s going on first. (Is it just a CDN or something else?) Or perhaps I should rewrite the whole application in Lua where I’m more competent.
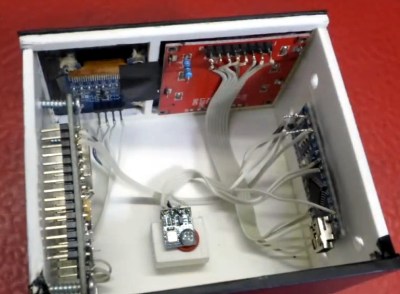
A fun little application built on the above was to place a button on my office that sends an email to my phone. I don’t want people to contact me at that email address frivolously, but do want to know immediately if someone is waiting outside my office. The big red button is for normal requests, but urgent requests require lockpicking. If it’s urgent it better also be interesting.
Finally, did you know that Hackaday provides an API for accessing hackaday.io? It uses the simpler OAUTH (not OAUTH2) authentication, so should be more straightforward than the above to implement on the ESP8266. Have any of you used it?
A little board that adds WiFi to any project for a few hundreds of pennies has been all the rage for at least half a year. I am referring to the ESP8266 and this product is a marrige of one of those WiFi modules with the support hardware required to get it running. This week I’m reviewing the HUZZAH ESP8266 Breakout by Adafruit Industries.
If you saw the article [cnlohr] woite for us about direct programming this board you will know that a good chunk of that post covered what you need to do just to get the module into programming mode. This required adding a regulated 3.3V source, and a way to pull one of the pins to ground when resetting the power rail. Not only does the HUZZAH take care of that for you, it turns the non-breadboard friendly module into a DIP form factor while breaking out way more pins than the most common module offers. All of this and the price tag is just $9.95. Join me after the break for the complete run-down.
The Hardware
This board is about 1.5 inches by 1 inch… like two postage stamps side-by-side. It hosts the FCC and CE approved module which we first heard about in December. These modules need a 3.3v supply and there is a regultor on board which can supply up to 500mA (the module can consume as much as 250mA) and can be fed by a battery, USB power, or any other 5V supply. As I mentioned earlier you need to pull a pin low during reset to put the module in programming mode. There are two switches on the board that facilitate this, hold the user button down and press reset and you’re ready to flash.
On a breadboard you’ll have two rows not covered by the board on one side, and one row on the other. The board doesn’t have a USB-to-UART bridge but we’re fine with that. On one end of the board you’ll find the common pinout for a USB-to-serial programming cable. Above you can see the programming cable Adafruit sent me with these samples. To the right I tried out my 5V Sparkfun FTDI board and as advertised, the HUZZAH can be programmed with either 3.3v or 5V logic levels.
The one thing I noticed is that the two buttons are a bit tricky to get at with the programmers connected, especially the FTDI board. For the second module I may supply my own right-angle header to get around that. Of course doing so would cover part of the breadboard so this is probably six of one, half dozen of the other.
I love it that they supply the pin headers but don’t solder them. Sometimes I prefer pin sockets or unpopulated pads, and this makes it easy for me to make that choice like the right-angle one I mentioned above. It’s something small but I also appreciate that the pinheaders in the package were not the minimum number necessary for this board — there were a few extra pins. You need to break them off and sometimes they can break one pin over from where you expected. If it were the minimum number you would either start over or solder a single pin at the end of the row (not ideal). If you screw up snapping these you could conceivably use a set of three pins and the rest as one unit to fix your mistake. Maybe I’m weird but it’s the small things in life!
Programming Options: NodeMCU and Lua
The board ships with this firmware on it. I was up and running with the Lua interpreter within three minutes of the package arriving at my door. Seriously, it took me longer to figure out if the USB-to-serial was green or white for TX/RX than it did to connect to my local WiFi Access point. Adafuit’s ‘Hello World’ walkthrough gets you going if you haven’t given this a try before.
Programming Options: Arduino IDE
Adafruit has a Board Manager for Arduino IDE. Perhaps this is common knowledge but I don’t often work with this IDE and it’s the first time I’ve run into it. What can I say, it kicks ass!
I hate setting up tool chains for new chips. With this you add a web address and port number, restart the IDE, and use the board manager to add support for this board. Sweet!
That turns this into an Arduino compatible board which solves something that has long bothered me. I’ve seen a ton of really simple Arduino projects that use the ESP8266 externally. Last month’s porting of the Arduino framework for these chips, coupled with this ready-to-go hardware does away with that nonsense. Seriously, the vast majority of those projects need little to no computing power and will work like a dream when directly programmed onto this chip.
To prove my point, I knocked out this quick binary counter that uses five LEDs as outputs. I’m not leveraging any of the WiFi features on this, but the compiled binary is 174,358 bytes and the Arduino IDE reports this board has a max capacity of 524,288 bytes. It five I/O used for LEDs there are still four more digital pins, the two UART pins, and an ADC input.
Programming Options: esptool
Arduino will overwrite NodeMCU but that’s easy to reflash. I followed [cnlohr’s] direct programming guide to write the binary using esptool. Both this method and the Arduino method are directly programming the EEPROM on the module. This is exactly the same method you’d use if you wanted to develop natively using the Espressif or the Open Source SDKs. Here’s the commands I used to reflash the NodeMCU firmware:
“Buy as many of these as [Phil] will make for us.” That’s what I’ve asked [Julian], the Hackaday Store manager to do. You should be able to get the Hackaday black version of this in a few weeks. Adafruit is currently sold out but I’m sure they’re racing to remedy this.
These are amazing little boards. The price of $9.95 is crazy considering what you get for it. I’m talking about the entire ecosystem which gives you multiple flavors of programming environments. Adafruit has done a lot to contribute to the code and knowledge base here, but a mammoth portion of this is community developed and I think coming in low on the price is one more way Adafruit has chosen to be a good guy in this ecosystem. The board has a ton of I/O for what it is, and if that’s not enough just, implement I2C, SPI, or UART to couple a beefy uC to the connectivity this one brings to the party. I see zero downside on this board. It’s as close to perfect as you can get.
Planet Arduino is, or at the moment is wishing to become, an aggregation of public weblogs from around the world written by people who develop, play, think on Arduino platform and his son. The opinions expressed in those weblogs and hence this aggregation are those of the original authors. Entries on this page are owned by their authors. We do not edit, endorse or vouch for the contents of individual posts. For more information about Arduino please visit www.arduino.cc
You are currently browsing the archives for the NodeMCU category.


 This board is about 1.5 inches by 1 inch… like two postage stamps side-by-side. It hosts the FCC and CE approved module which
 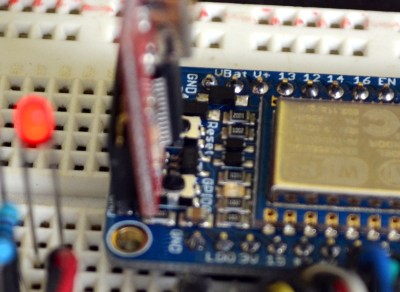 To the right I tried out my 5V Sparkfun FTDI board and as advertised, the HUZZAH can be programmed with either 3.3v or 5V logic levels.
 Adafruit has a Board Manager for Arduino IDE. Perhaps this is common knowledge but I don’t often work with this IDE and it’s the first time I’ve run into it. What can I say, it kicks ass!
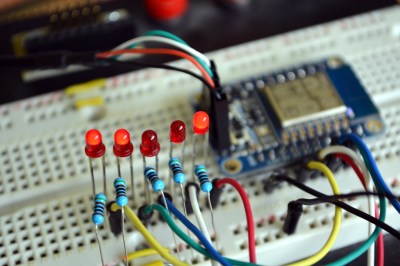 To prove my point, I knocked out this quick binary counter that uses five LEDs as outputs. I’m not leveraging any of the WiFi features on this, but the compiled binary is 174,358 bytes and the Arduino IDE reports this board has a max capacity of 524,288 bytes. It five I/O used for LEDs there are still four more digital pins, the two UART pins, and an ADC input.

