Posts | Comments

Planet Arduino

Archive for the ‘control’ Category

While almost everyone has a heater of some sort in their home, it’s fairly unlikely that the heat provided by a central heating system such as a furnace is distributed in an efficient way. There’s little reason to heat bedrooms during the day, or a kitchen during the night, but heating systems tend to heat whole living space regardless of the time of day or the amount of use. You can solve this problem, like most problems, with an Arduino.

[Karl]’s build uses a series of radiator valves to control when each room gets heat from a boiler. The valves, with a temperature monitor at each valve, are tied into a central Arduino Mega using alarm wiring. By knowing the time of day and the desired temperature in each room, the Arduino can control when heat is applied to each room and when it is shut off, presumably making the entire system much more efficient. It also has control over the circulating pump and some of the other boiler equipment.

Presumably this type of system could be adapted to a system which uses a furnace and an air handler as well, although it is not quite as straightforward to close vents off using a central unit like this as it is to work with a boiler like [Karl] has. With careful design, though, it could be done. Besides replacing thermostats, we can’t say we’ve ever seen this done before.

Thanks to [SMS] for the tip!

There are few scenes in life more moving than the moment the solder paste melts as the component slides smoothly into place. We’re willing to bet the only reason you don’t have a reflow oven is the cost. Why wouldn’t you want one? Fortunately, the vastly cheaper DIY route has become a whole lot easier since the birth of the Reflowduino – an open source controller for reflow ovens.

This Hackaday Prize entry by [Timothy Woo] provides a super quick way to create your own reflow setup, using any cheap means of heating you have lying around. [Tim] uses a toaster oven he paid $21 for, but anything with a suitable thermal mass will do. The hardware of the Reflowduino is all open source and has been very well documented – both on the main hackaday.io page and over on the project’s GitHub.

The board itself is built around the ATMega32u4 and sports an integrated MAX31855 thermocouple interface (for the all-important PID control), LiPo battery charging, a buzzer for alerting you when input is needed, and Bluetooth. Why Bluetooth? An Android app has been developed for easy control of the Reflowduino, and will even graph the temperature profile.

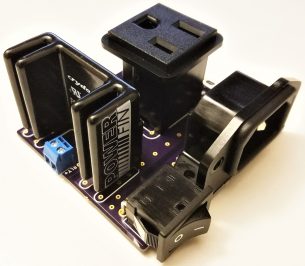
When it comes to controlling the toaster oven/miscellaneous heat source, a “sidekick” board is available, with a solid state relay hooked up to a mains plug. This makes it a breeze to setup any mains appliance for Arduino control.

We actually covered the Reflowduino last year, but since then [Tim] has also created the Reflowduino32 – a backpack for the DOIT ESP32 dev board. There’s also an Indiegogo campaign now, and some new software as well.

If a toaster oven still doesn’t feel hacky enough for you, we’ve got reflowing with hair straighteners, and even car headlights.

Gesture-enabled controls mean you get to live out your fantasy of wielding force powers. It does, however, take a bit of hacking to make that possible. Directly from the team at [circuito.io] comes a hand gesture controller for Jedi mind-trick manipulation of your devices!

The star of the show here is the APDS-9960 RGB and gesture sensor, with an Arduino Pro Mini 328 doing the thinking and an IR transmitter LED putting that to good use. The Arduino Sketch is a chimera of two code examples for IR LEDs and the gesture sensor — courtesy of the always estimable Ken Shirriff, and SparkFun respectively.

Of course, you can have the output trigger different devices, but since this particular build is meant to control a TV the team had to use a separate Arduino and IR receiver to discover the codes for the commands they wanted  to use. Once they were added to the Sketch, moving your hand above the sensor in X, Y or Z-axes executes the command. Voila! — Jedi powers.

Power issues meant the team needed to implement a ‘deep sleep’ mode that sees the Arduino dosing until a gesture is detected, preserving the 3.7V LiPo 1000mAh battery life. A cool optional add-on they threw in is a tilt switch which also puts the Arduino in sleep mode when the box is in any orientation but up!

How often is it that you can hack your way to having sci-fi powers? More often than you might think.

Ever on the lookout for creative applications for tech, [Andres Leon] built a solar powered battery system to keep his Christmas lights shining. It worked, but — pushing for innovation — it is now capable of so much more.

The shorthand of this system is two, 100 amp-hour, deep-cycle AGM batteries charged by four, 100 W solar panels mounted on an adjustable angle wood frame. Once back at the drawing board, however, [Leon] wanted to be able track real-time statistics of power collected, stored and discharged, and the ability to control it remotely. So, he introduced a Raspberry Pi running Raspbian Jessie Lite that publishes all the collected data to Home Assistant to be accessed and enable control of the system from the convenience of his smartphone. A pair of Arduino Deuemilanoves reporting to the Pi control a solid state relay powering a 12 V, 800 W DC-to-AC inverter and monitor a linear current sensor — although the latter still needs some tinkering. A in-depth video tour of the system follows after the break!

All the electronics are housed in a climate-controlled box which kicks on when the Pi’s CPU heats up — this is in a Florida backyard, folks — and powered off the battery system, with a handful of 40amp breakers between the components keep things safe. [Leon] has helpfully provided links to all the resources he used, as well as his code on GitHub.

We love homebrew solar power systems, but if only there was some way to take them on the road with us.


Filed under: Arduino Hacks, Raspberry Pi, solar hacks
Aquesta pàgina ens explica com podem controlar la velocitat dels nostres motors fent ús de la funció analogWrite.S'utilitzen les sortides 10 i 11 de l'arduino UNO (pins PWM), connectades als pins enable del xip L293D dels dos motors del nostre robot.


Si voleu el muntatge en el simulador proteus (molt bona explicació) no us perdeu el vídeo:


If you’ve ever tried to tune a PID system, you have probably encountered equal parts overwhelming math and black magic folk wisdom. Or maybe you just let the autotune take over. If you really want to get some good intuition for motion control algorithms, PID included, nothing beats a little hands-on experimentation.

To get you started, [Clovis] wrote in with his budget propeller-based PID demo platform (Portuguese, translated shockingly well here).

The basic setup is a potentiometer glued to a barbecue skewer with a mini-quadcopter motor and rotor on the end of it. A microcontroller reads the voltage and PWMs the propeller through a MOSFET. The goal is to have the pendulum hover stably in midair, controlled by whatever algorithms you can dream up on the controller. [Clovis]’ video demonstrates on-off and PID control of the fan. Adding a few more potentiometers (one for P, I, and D?) would make hands-on tweaking even more interactive.

In all, it’s a system that will only set you back a few bucks, but can teach you more than you’d learn in a month in college. Chances are good that you’re not going to have exactly the same brand of sardine can on hand that he did, but some improvisation is called for here.

If you don’t know why you’d like to master open-loop control algorithms, here’s one of the best advertisements that we’ve seen in a long time. But you don’t have to start out with hand-wound hundred-dollar motors, or precisely machined bits. As [Clovis] demonstrates, you can make do with a busted quadcopter and whatever you find in your kitchen.


Filed under: Arduino Hacks

If you’ve built yourself a home theater PC, one of your highest priorities is probably coming up with a convenient control solution. The easiest way to do this is to simply use something like a wireless keyboard and mouse. But, that’s not very conducive to an enjoyable home theater experience, and it feels pretty clunky. However, if you’ve got the right components lying around, [Sebastian Goscik] has instructions and an Arduino sketch that will let you control your HTPC with any IR remote control.

There are a number of ways you could control your HTPC, and we’ve featured more than one build specifically for controlling XBMC over the years. Unfortunately, most of those methods require that you spend your hard earned money (which is better spent on popcorn). [Sebastian’s] setup can be replicated with things you probably have on hand: an Arduino, an IR remote, and a scavenged IR receiver. The IR receiver can be found in many devices, like old stereos or TVs that themselves were controlled via an IR remote.

It starts with an Arduino Sketch that lets you can see on the serial monitor what code is being generated by the button presses on your remote. These are then scripted to perform any task or function you like when those buttons are pushed. The most obvious use here is simple directional control for selecting your movies, but much more complex tasks are possible. Maybe someone can program a T9 script to type using the number buttons on most remotes?


Filed under: Arduino Hacks, home entertainment hacks
Jan
27

[AlxDroidDev] built himself a nice remote control box for CHDK-enabled cameras. If you haven’t heard of CHDK, it’s a pretty cool software modification for some Canon cameras. CHDK adds many new features to inexpensive cameras. In this case, [AlxDroidDev] is using a feature that allows the camera shutter to be activated via USB. CHDK can be run from the SD card, so no permanent modifications need to be made to the camera.

[AlxDroidDev’s] device runs off of an ATMega328p with Arduino. It operates from a 9V battery. The circuit contains an infrared receiver and also a Bluetooth module. This allows [AlxDroidDev] to control his camera using either method. The device interfaces to the camera using a standard USB connector and cable. It contains three LEDs, red, green, and blue. Each one indicates the status of a different function.

The Arduino uses Ken Shirrif’s IR Remote library to handle the infrared remote control functions. SoftwareSerial is used to connect to the Bluetooth module. The Arduino code has built-in functionality for both Canon and Nikon infrared remote controls. To control the camera via Bluetooth, [AlxDroidDev] built a custom Android application. The app can not only control the camera’s shutter, but it can also control the level of zoom.


Filed under: Arduino Hacks
Oct
06

Brewmonitor: The Arduino-powered, cloud-based homebrewing controller

arduino, control, DS18B20, homebrewing, mysql, PHP Comments Off on Brewmonitor: The Arduino-powered, cloud-based homebrewing controller 

IMG_20141002_155652-600x449

The Arduino and Cloud-based homebrewing controller by Martin Kennedy of TheBedroomLaboratory:

It’s just a basic site, based on this Scotch.io tutorial, which is currently plotting the temperature in my sitting room. It’s got a PHP backend (Laravel framework with RESTful API), MySQL database and an AngularJS frontend with (n3-chart/d3 for the graph). In the house, I’ve whacked together a quick breadboard circuit which comprises of an Arduino clone, a DS18B20 Temperature Sensor (with resistor for the i2c connection) and an ESP8266 module. Every minute, this wireless sensor POSTs the temperature to our REST API. This value is saved in the database and will appear in the graph whenever the page is opened. To hook it up to a fermenter, the sensor would just be placed in a thermowell in the fermenter bucket so we can see the beer temperature over time.

[via]

Brewmonitor: The Arduino-powered, cloud-based homebrewing controller - [Link]


  • Newsletter

    Sign up for the PlanetArduino Newsletter, which delivers the most popular articles via e-mail to your inbox every week. Just fill in the information below and submit.

  • Like Us on Facebook