Posts | Comments

Planet Arduino

Archive for the ‘JTAG’ Category

CERBERUS 2100 8-bit computer board

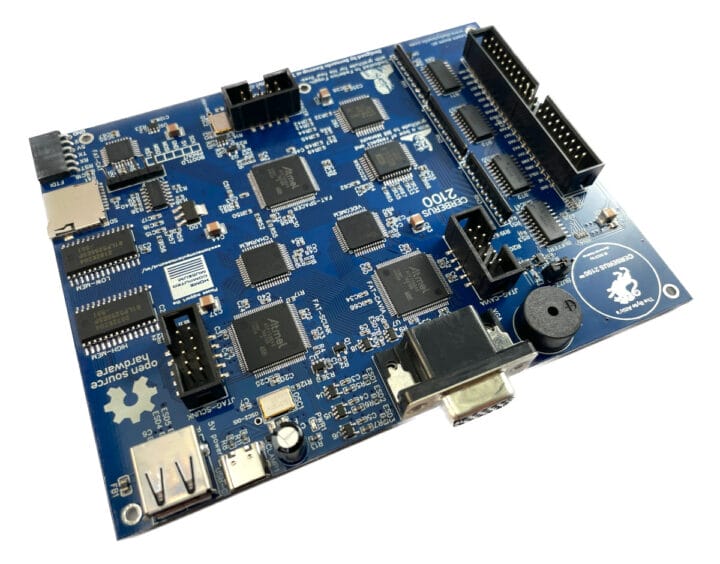
Olimex has just announced the launch of the CERBERUS 2100 open-source hardware, educational, multi-processor 8-bit computer with both Z80 and 6502 CPUs, as well as a Microchip AVR processor serving as an I/O controller. The CERBERUS 2100 features several CPLD and is fully programmable from the lowest level (individual gates and flip-flops) up to BASIC interpreters running on the Z80 and 6502 CPUs. Olimex did not design this themselves as the hardware design is from Bernardo Kastrup (aka TheByteAttic), while BASIC interpreters were written by Alexander Sharikhin (6502) and Dean Belfield (Z80). CERBERUS 2100 specifications: Processors Zilog Z80 8-bit microprocessor at 4 or 8 MHz (user selectable) Western Design Center W65C02S 8-bit microprocessor at 4 or 8 MHz (user selectable) “FAT-CAT” (Custom ATmega328pb) Microchip 8-bit AVR ATMega328PB microcontroller at 16 MHz CPLDs (ATF1508AS-7AX100) FAT-SCUNK (Scan CoUNter and clocK) and FAT-CAVIA (ChAracter Video Adapter) for video circuit connected to a 25.175 [...]

The post CERBERUS 2100 is a BASIC-programmable educational board with Z80 and 6502 8-bit CPUs appeared first on CNX Software - Embedded Systems News.

IMG_5821-red

Marcelo Jimenez developed a library to use an Arduino as a JTAG programmer. Basically a Python script uploads a XSVF file to an Arduino which interprets it and performs the necessary JTAG manipulation in order to do the programming.

The project is pretty simple because it just uses  a few resistors and some wires and the library is included in the Arduino library manager or you can check it  on Github.

He also wrote an article to explain some JTAG, SVF and XSVF basics:

 I have recently felt the need to incorporate a JTAG port in a project to program a hardware that contained a CPLD. The idea was to both program it and perform some integrity tests on the board. I imagined something using pogo pins, to make it easier and quicker to test everything. I would also write the necessary test routines and generate some kind of report.

With this objective in mind, I have decided to design an Arduino shield to do the job. The testing routines were not really a big deal. And I was sure I would find some JTAG library for Arduino ready to be used. That was not the case.

There were some projects using Arduino to control a JTAG TAP (Test Access Port), but they were all incomplete. And I had no idea what was really JTAG. So I had to study a little bit to make things work for me.

In the end, the challenge proved enlightening. There were some caveats, both from hardware and from software. I’ll try to address them in this article.

Continue reading on his blog.

jtagLibrary


  • Newsletter

    Sign up for the PlanetArduino Newsletter, which delivers the most popular articles via e-mail to your inbox every week. Just fill in the information below and submit.

  • Like Us on Facebook