Microduino-Joypad is … an 8-bit game console + open source + UPin27 + AVR,STM32,MSP430,51 compatible + smart controller == Awesome! by Microduino Studio:
Microduino studio launched the first kickstarter in September 2013, introducing the brand new Arduino-compatible development board—Microduino. We achieved success with the unique Upin27 interface, compact size, rich expansion boards as well as many applications. Over the past year, Microduino community has been growing rapidly. Now we have nearly 10,000 players worldwide.
At the 25th anniversary of the Gameboy console, we are now releasing Joypad – 8-bit multi-functional game console to show our respects to Gameboy–the most classic game console in the history.
With this elegantly designed little Joypad, we are hoping to bring you the greatest joy from your childhood memory. The best thing is it’s completely open source and you can even create and develop your own game to inspire your imagination. Moreover, it’s not only a game console, it’s also a remote controller for other devices, such as Quadcopter, robot and cell phone, etc.
Microduino-Joypad: an open source 8-bit game console & more! - [Link]
In the same manner as their MSP430 development board, Texas Instruments also have another LaunchPad board with their powerful Stellaris LM4F120H5QR microcontroller. It’s an incredibly powerful and well-featured MCU – which offers an 80 MHz, 32-bit ARM Cortex-M4 CPU with floating point, 256 Kbytes of 100,000 write-erase cycle FLASH and many peripherals such as 1MSPS ADCs, eight UARTs, four SPIs, four I2Cs, USB & up to 27 timers, some configurable up to 64-bits.
That’s a bucket of power, memory and I/O for not much money – you can get the LaunchPad board for around $15. This LaunchPad has the in-circuit debugger, two user buttons, an RGB LED and connectors for I/O and shield-like booster packs:
and the other side:
However the good news as far as we’re concerned is that you can now use it with the Energia Arduino-compatible IDE that we examined previously. Before rushing out to order your own Stellaris board, install Energia and examine the available functions and libraries to make sure you can run what you need. And if so, you’re set for some cheap Arduino power.
Installation
Installation is simple, just get your download from here. If you’re running Windows 7 – get the USB drivers from here. When you plug your LaunchPad into the USB for the first time, wait until after Windows attempts to install the drivers, then install drivers manually after download via Device manager … three times (JTAG, virtual serial port and DFU device). Use the debug USB socket (and set the switch to debug) when installing and uploading code. If you get the following warning from Windows, just click “Install this driver software anyway”:
Once the drivers are installed, plug in your LaunchPad, wait a moment – then run Energia. You can then select your board type and serial port just like the Arduino IDE. Then go ahead and upload the “blink” example…
Awesome – check out all that free memory space. In the same manner as the MSP430, there are some hardware<>sketch differences you need to be aware of. For example, how to refer to the I/O pins in Energia? A map has been provided for front:
… and back:
As you can imagine, the Stellaris MCUs are different to an AVR, so a lot of hardware-specific code doesn’t port over from the world of Arduino. One of the first things to remember is that the Stellaris is a 3.3V device. Code may or may not be interchangeable, so a little research will be needed to match up the I/O pins and rewrite the sketch accordingly. For example, instead of digital pins numbers, you use PX_Y - see the map above. So let’s say you want to run through the RGB LED… consider the following sketch:
int wait = 500;
void setup()
{
 // initialize the digital pin as an output.
 pinMode(PF_1, OUTPUT); // red
 pinMode(PF_3, OUTPUT); // green
 pinMode(PF_2, OUTPUT); // blue
}
Which simply blinks the red, green and blue LED elements in series. Using digital inputs is in the same vein, and again the buttons are wired so when pressed they go LOW. An example of this in the following sketch:
void setup()
{
// initialize the digital pins
pinMode(PF_1, OUTPUT); // red
pinMode(PF_3, OUTPUT); // green
pinMode(PF_2, OUTPUT); // blue
pinMode(PF_4, INPUT_PULLUP); // left - note _PULLUP
pinMode(PF_0, INPUT_PULLUP); // right - note _PULLUP
}
void loop()
{
if (digitalRead(PF_4)==LOW) { blinkslow(); }
if (digitalRead(PF_0)==LOW) { blinkfast(); }
}
And for the non-believers:
Where to from here?
Sometimes you can be platform agnostic, and just pick something that does what you want with the minimum of time and budget. Or to put it another way, if you need a fast CPU and plenty of space but couldn’t be bothered don’t have time to work with Keil, Code Composer Studio, IAR etc – the Energia/Stellaris combination could solve your problem. There’s a growing Energia/Stellaris forum, and libraries can be found here. At the time of writing we found an I2C library as well.
However to take full advantage of the board, consider going back to the TI tools and move forward with them. You can go further with the tutorials and CCS etc from Texas Instruments own pages.
In the meanwhile have fun and keep checking into tronixstuff.com. Why not follow things on twitter, Google+, subscribe for email updates or RSS using the links on the right-hand column? And join our friendly Google Group – dedicated to the projects and related items on this website. Sign up – it’s free, helpful to each other – and we can all learn something.
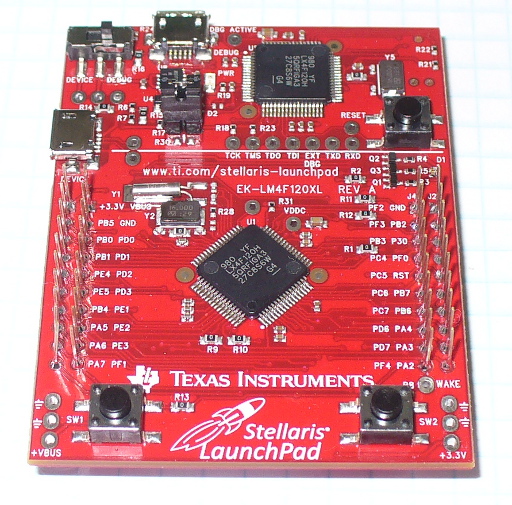
In the same manner as their MSP430 development board, Texas Instruments also have another LaunchPad board with their powerful Stellaris LM4F120H5QR microcontroller. It’s an incredibly powerful and well-featured MCU – which offers an 80 MHz, 32-bit ARM Cortex-M4 CPU with floating point, 256 Kbytes of 100,000 write-erase cycle FLASH and many peripherals such as 1MSPS ADCs, eight UARTs, four SPIs, four I2Cs, USB & up to 27 timers, some configurable up to 64-bits.
That’s a bucket of power, memory and I/O for not much money – you can get the LaunchPad board for around $15. This LaunchPad has the in-circuit debugger, two user buttons, an RGB LED and connectors for I/O and shield-like booster packs:
and the other side:
However the good news as far as we’re concerned is that you can now use it with the Energia Arduino-compatible IDE that we examined previously. Before rushing out to order your own Stellaris board, install Energia and examine the available functions and libraries to make sure you can run what you need. And if so, you’re set for some cheap Arduino power.
Installation
Installation is simple, just get your download from here. If you’re running Windows 7 – get the USB drivers from here. When you plug your LaunchPad into the USB for the first time, wait until after Windows attempts to install the drivers, then install drivers manually after download via Device manager … three times (JTAG, virtual serial port and DFU device). Use the debug USB socket (and set the switch to debug) when installing and uploading code. If you get the following warning from Windows, just click “Install this driver software anyway”:
Once the drivers are installed, plug in your LaunchPad, wait a moment – then run Energia. You can then select your board type and serial port just like the Arduino IDE. Then go ahead and upload the “blink” example…
Awesome – check out all that free memory space. In the same manner as the MSP430, there are some hardware<>sketch differences you need to be aware of. For example, how to refer to the I/O pins in Energia? A map has been provided for front:
… and back:
As you can imagine, the Stellaris MCUs are different to an AVR, so a lot of hardware-specific code doesn’t port over from the world of Arduino. One of the first things to remember is that the Stellaris is a 3.3V device. Code may or may not be interchangeable, so a little research will be needed to match up the I/O pins and rewrite the sketch accordingly. For example, instead of digital pins numbers, you use PX_Y - see the map above. So let’s say you want to run through the RGB LED… consider the following sketch:
int wait = 500;
void setup()
{
// initialize the digital pin as an output.
pinMode(PF_1, OUTPUT); // red
pinMode(PF_3, OUTPUT); // green
pinMode(PF_2, OUTPUT); // blue
}
void loop()
{
 digitalWrite(PF_1, HIGH);
 delay(wait);
 digitalWrite(PF_1, LOW);
 digitalWrite(PF_3, HIGH);
 delay(wait);
 digitalWrite(PF_3, LOW);
 digitalWrite(PF_2, HIGH);
 delay(wait);
 digitalWrite(PF_2, LOW);
}
Which simply blinks the red, green and blue LED elements in series. Using digital inputs is in the same vein, and again the buttons are wired so when pressed they go LOW. An example of this in the following sketch:
void setup()
{
 // initialize the digital pins
 pinMode(PF_1, OUTPUT); // red
 pinMode(PF_3, OUTPUT); // green
 pinMode(PF_2, OUTPUT); // blue

 pinMode(PF_4, INPUT_PULLUP); // left - note _PULLUP
 pinMode(PF_0, INPUT_PULLUP); // right - note _PULLUP
}
void blinkfast()
{
 for (int i=0; i<10; i++)
 {
 digitalWrite(PF_1, HIGH);
 delay(250);
 digitalWrite(PF_1, LOW);
 digitalWrite(PF_3, HIGH);
 delay(250);
 digitalWrite(PF_3, LOW);
 digitalWrite(PF_2, HIGH);
 delay(250);
 digitalWrite(PF_2, LOW);
 }
}
void blinkslow()
{
 for (int i=0; i<5; i++)
 {
 digitalWrite(PF_1, HIGH);
 delay(1000);
 digitalWrite(PF_1, LOW);
 digitalWrite(PF_3, HIGH);
 delay(1000);
 digitalWrite(PF_3, LOW);
 digitalWrite(PF_2, HIGH);
 delay(1000);
 digitalWrite(PF_2, LOW);
 }
}
void loop()
{
 if (digitalRead(PF_4)==LOW) { blinkslow(); }
 if (digitalRead(PF_0)==LOW) { blinkfast(); }
}
And for the non-believers:
Where to from here?
Sometimes you can be platform agnostic, and just pick something that does what you want with the minimum of time and budget. Or to put it another way, if you need a fast CPU and plenty of space but couldn’t be bothered don’t have time to work with Keil, Code Composer Studio, IAR etc – the Energia/Stellaris combination could solve your problem. There’s a growing Energia/Stellaris forum, and libraries can be found here. At the time of writing we found an I2C library as well.
However to take full advantage of the board, consider going back to the TI tools and move forward with them. You can go further with the tutorials and CCS etc from Texas Instruments own pages.
In the meanwhile have fun and keep checking into tronixstuff.com. Why not follow things on twitter, Google+, subscribe for email updates or RSS using the links on the right-hand column? And join our friendly Google Group – dedicated to the projects and related items on this website. Sign up – it’s free, helpful to each other – and we can all learn something.
Over the last year or so Texas Instruments have been literally pushing their MSP430 development platform hard by offering an inexpensive development kit – their LaunchPad. For around ten dollars (not everyone could get it for $4.30) it includes a development board with flash emulation tool and USB interface, two of their microcontrollers, crystal, USB cable and some headers. It was (is?) a bargain and tens of thousands of LaunchPads were sold. Happy days.
However after the courier arrived and the parcel was opened, getting started with the LaunchPad was an issue for some people. Not everyone has been exposed to complex IDEs or university-level subjects on this topic. And to get started you needed to use a version of Code Composer Studio or IAR Embedded Workbench IDEs, which scared a few people off. So those LaunchPads went in the cupboard and gathered dust.
Well now it’s time to pull them out, as there’s a new way to program the MSP430 using a fork of the Arduino IDE – Energia. Put simply, it’s the Arduino IDE modified to compile and upload code to the LaunchPad, which makes this platform suddenly much more approachable.
Getting Started
You’ll need to download and install the appropriate USB drivers, then the IDE itself from here. To install the IDE you just download and extract it to your preferred location, in the same manner as the Arduino IDE. Then plug your LaunchPad into the USB. Finally, load the IDE. Everything is familiar to the Arduino user, except the only surprise is the colour (red as a nod to TI perhaps…):
Looking good so far. All the menu options are familiar, the files have the .ino extension, and the preferences dialogue box is how we expect it. Don’t forget to select the correct port using the Tools > Serial port… menu. You will also need to select the type of MSP430 in your LaunchPad. At the time of writing there is support for three types listed below (and the first two are included with the LaunchPad v1.5):
MSP430G2553 - <=16 MHz, 16KB flash, 512b SRAM, 24 GPIO, two 16-bit timers, UART, SPI, I2C, 8 ADC channels at 10-bit, etc. Cost around Au$3.80 each**
MSP430G2452 - <=16 MHz, 8KB flash, 256b SRAM, 16 GPIO, one 16-bit timer, UART, I2C, 8 ADC channels, etc. Cost around Au$2.48 each**
MSP430G2231 - <=16 MHz, 2KB flash, 128b SRAM, 10 GPIO, one 16-bit timer, SPI, I2C, 8 ADC channels, etc. Cost around Au$3.36 each**
** One-off ex-GST pricing from element14 Australia. In some markets it would be cheaper to buy another LaunchPad. TI must really be keen to get these in use.
There are some hardware<>sketch differences you need to be aware of. For example, how to refer to the I/O pins in Energia? A map has been provided for each MSP430 at the Energia wiki, for example the G2553:
As you can imagine, MSP430s are different to an AVR, so a lot of hardware-specific code doesn’t port over from the world of Arduino. One of the first things to remember is that MSP430s are 3.3V devices. Code may or may not be interchangeable, so a little research will be needed to match up the I/O pins and rewrite the sketch accordingly. You can refer to pins using the hardware designator on the LaunchPad (e.g. P1_6) or the physical pin number. For example – consider the following sketch:
void setup() {
 // initialize the digital pins as an output.
 pinMode(P1_0, OUTPUT); // LED 1
 pinMode(P1_6, OUTPUT); // LED 2
}
You could have used 2 (for physical pin 2) instead of P1_0 and 14 (physical pin … 14!) instead of P1_6. It’s up to you. Another quick example is this one – when the button is pressed, the LEDs blink a few times:
const int redLED = P1_0;
const int greenLED = P1_6;
const int button = P1_3; // button S2 (on the left)
Due to the wiring of the LaunchPad, when you press the button, P1_3 is pulled LOW. For the non-believers, here it is in action:
So where to from here? There are many examples in the Energia IDE example menu, including some examples for the Energia libraries. At the time of writing there is: Servo, LiquidCrystal, IRremote, SPI, wire, MSPflash and Stepper. And as the Energia project moves forward more may become available. For help and discussion, head over to the 4-3-Oh forum and of course the Energia website. And of course there’s the TI MSP430 website.
Conclusion
Well that was interesting to say the least. If you have a project which needs to be low-cost, fits within the specifications of the MSP430, has a library, you’re not hung up on brand preference, and you just want to get it done – this is a viable option. Hopefully after time some of you will want to work at a deeper level, and explore the full IDEs and MSP430 hardware available from TI. But for the price, don’t take my word for it – try it yourself.
In the meanwhile have fun and keep checking into tronixstuff.com. Why not follow things on twitter, Google+, subscribe for email updates or RSS using the links on the right-hand column? And join our friendly Google Group – dedicated to the projects and related items on this website. Sign up – it’s free, helpful to each other – and we can all learn something.
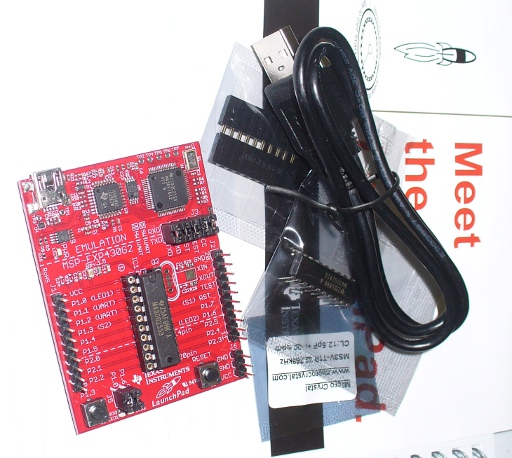
Over the last year or so Texas Instruments have been literally pushing their MSP430 development platform hard by offering an inexpensive development kit – their LaunchPad. For around ten dollars (not everyone could get it for $4.30) it includes a development board with flash emulation tool and USB interface, two of their microcontrollers, crystal, USB cable and some headers. It was (is?) a bargain and tens of thousands of LaunchPads were sold. Happy days.
However after the courier arrived and the parcel was opened, getting started with the LaunchPad was an issue for some people. Not everyone has been exposed to complex IDEs or university-level subjects on this topic. And to get started you needed to use a version of Code Composer Studio or IAR Embedded Workbench IDEs, which scared a few people off. So those LaunchPads went in the cupboard and gathered dust.
Well now it’s time to pull them out, as there’s a new way to program the MSP430 using a fork of the Arduino IDE – Energia. Put simply, it’s the Arduino IDE modified to compile and upload code to the LaunchPad, which makes this platform suddenly much more approachable.
Getting Started
You’ll need to download and install the appropriate USB drivers, then the IDE itself from here. To install the IDE you just download and extract it to your preferred location, in the same manner as the Arduino IDE. Then plug your LaunchPad into the USB. Finally, load the IDE. Everything is familiar to the Arduino user, except the only surprise is the colour (red as a nod to TI perhaps…):
Looking good so far. All the menu options are familiar, the files have the .ino extension, and the preferences dialogue box is how we expect it. Don’t forget to select the correct port using the Tools > Serial port… menu. You will also need to select the type of MSP430 in your LaunchPad. At the time of writing there is support for three types listed below (and the first two are included with the LaunchPad v1.5):
MSP430G2553 - <=16 MHz, 16KB flash, 512b SRAM, 24 GPIO, two 16-bit timers, UART, SPI, I2C, 8 ADC channels at 10-bit, etc. Cost around Au$3.80 each**
MSP430G2452 - <=16 MHz, 8KB flash, 256b SRAM, 16 GPIO, one 16-bit timer, UART, I2C, 8 ADC channels, etc. Cost around Au$2.48 each**
MSP430G2231 - <=16 MHz, 2KB flash, 128b SRAM, 10 GPIO, one 16-bit timer, SPI, I2C, 8 ADC channels, etc. Cost around Au$3.36 each**
** One-off ex-GST pricing from element14 Australia. In some markets it would be cheaper to buy another LaunchPad. TI must really be keen to get these in use.
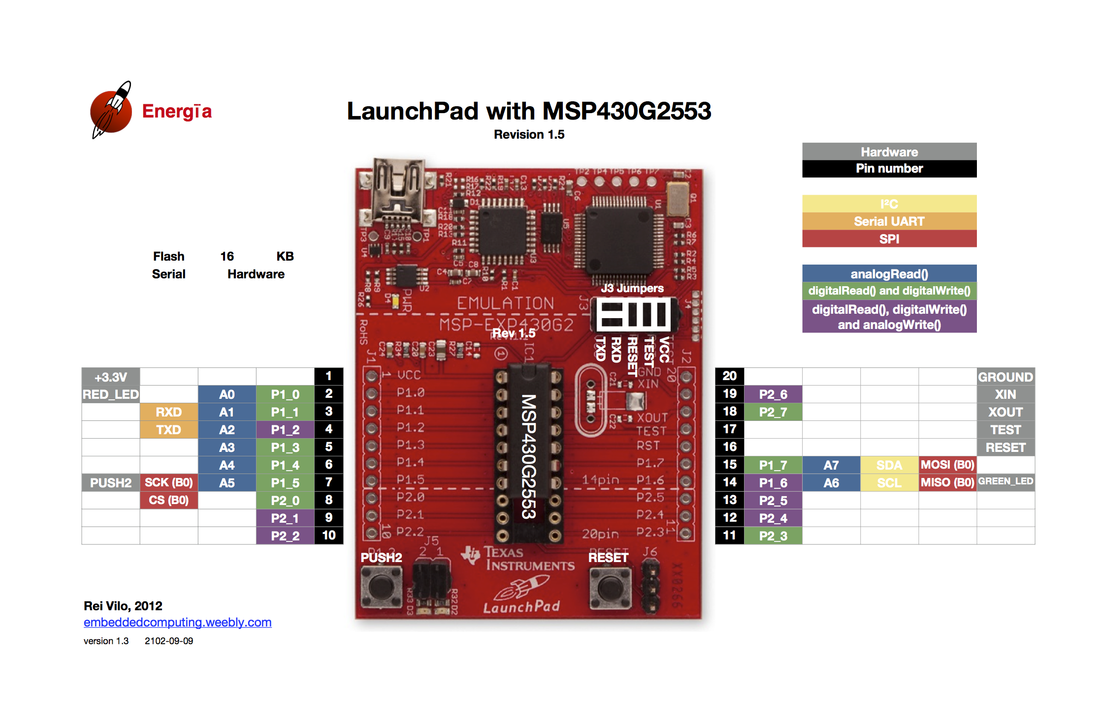
There are some hardware<>sketch differences you need to be aware of. For example, how to refer to the I/O pins in Energia? A map has been provided for each MSP430 at the Energia wiki, for example the G2553:
As you can imagine, MSP430s are different to an AVR, so a lot of hardware-specific code doesn’t port over from the world of Arduino. One of the first things to remember is that MSP430s are 3.3V devices. Code may or may not be interchangeable, so a little research will be needed to match up the I/O pins and rewrite the sketch accordingly. You can refer to pins using the hardware designator on the LaunchPad (e.g. P1_6) or the physical pin number. For example – consider the following sketch:
void setup()
{
// initialize the digital pins as an output.
pinMode(P1_0, OUTPUT); // LED 1
pinMode(P1_6, OUTPUT); // LED 2
}
void loop() {
 digitalWrite(P1_6, HIGH);
 digitalWrite(P1_0, HIGH);
 delay(100);
 digitalWrite(P1_6, LOW);
 digitalWrite(P1_0, LOW);
 delay(100);
}
You could have used 2 (for physical pin 2) instead of P1_0 and 14 (physical pin … 14!) instead of P1_6. It’s up to you. Another quick example is this one – when the button is pressed, the LEDs blink a few times:
const int redLED = P1_0;
const int greenLED = P1_6;
const int button = P1_3; // button S2 (on the left)
int a = 0;
void setup()
{
 pinMode(redLED, OUTPUT);
 pinMode(greenLED, OUTPUT);
 pinMode(button, INPUT_PULLUP); // note _PULLUP
 digitalWrite(redLED, LOW);
 digitalWrite(greenLED, LOW);
}
void loop()
{
 if (digitalRead(button)==LOW)
 {
 for (a=0; a<10; a++)
 {
 digitalWrite(redLED, HIGH);
 digitalWrite(greenLED, LOW);
 delay(200);
 digitalWrite(redLED, LOW);
 digitalWrite(greenLED, HIGH);
 delay(200);
 }
 digitalWrite(redLED, LOW);
 digitalWrite(greenLED, LOW);
 }
}
Due to the wiring of the LaunchPad, when you press the button, P1_3 is pulled LOW. For the non-believers, here it is in action:
So where to from here? There are many examples in the Energia IDE example menu, including some examples for the Energia libraries. At the time of writing there is: Servo, LiquidCrystal, IRremote, SPI, wire, MSPflash and Stepper. And as the Energia project moves forward more may become available. For help and discussion, head over to the 4-3-Oh forum and of course the Energia website. And of course there’s the TI MSP430 website.
Conclusion
Well that was interesting to say the least. If you have a project which needs to be low-cost, fits within the specifications of the MSP430, has a library, you’re not hung up on brand preference, and you just want to get it done – this is a viable option. Hopefully after time some of you will want to work at a deeper level, and explore the full IDEs and MSP430 hardware available from TI. But for the price, don’t take my word for it – try it yourself.
In the meanwhile have fun and keep checking into tronixstuff.com. Why not follow things on twitter, Google+, subscribe for email updates or RSS using the links on the right-hand column? And join our friendly Google Group – dedicated to the projects and related items on this website. Sign up – it’s free, helpful to each other – and we can all learn something.
During July there was another competition which was quite fun, so from August and onwards we shall do it again. The winner ‘S.R.’ won the minor prize so the major prize jackpots into this month. Running these competitions are a way of saying thank you to my readers, and to generate some interaction. So …
All you have to do for a chance to win is the following:
Read the blog posts and articles in August, as there will be six questions you will need to answer placed randomly amongst the posts. To keep track, subscribe using one of the methods on the right hand side of this page
When you have answers for allsix questions, email them to competition@tronixstuff.com
If you follow me on twitter (@tronixstuff) and retweet one post in August, you will receive two entries, so put your twitter address in your email.
On September the 1st, all the email addresses will be placed in a random draw and one selected. If the entry drawn has all six questions correct, they will win the major prize!
If the first entry drawn does not have six correct answers, they will win the minor prize, and the major prize will carry over until September, to be combined with the new major prize.
The prizes!
Major prize
The major prize for August consists of the following:
One assembled, used JYE Tech Digital Storage Oscilloscope – from the kit review;
One new pair of 315 MHz wireless data modules, as used in Getting Started with Arduino – Chapter Eleven;
And something different, the new Texas Instruments MSP430 Launchpad kit, including evaluation board, two MCUs and the USB cable.
Minor prize
The minor prize for August is John’s Fun with LEDs! pack, consisting of:
ten each of red, green, yellow and orange 5mm LEDs;
Planet Arduino is, or at the moment is wishing to become, an aggregation of public weblogs from around the world written by people who develop, play, think on Arduino platform and his son. The opinions expressed in those weblogs and hence this aggregation are those of the original authors. Entries on this page are owned by their authors. We do not edit, endorse or vouch for the contents of individual posts. For more information about Arduino please visit www.arduino.cc
You are currently browsing the archives for the MSP430 category.