Posts | Comments

Planet Arduino

Archive for the ‘halloween’ Category

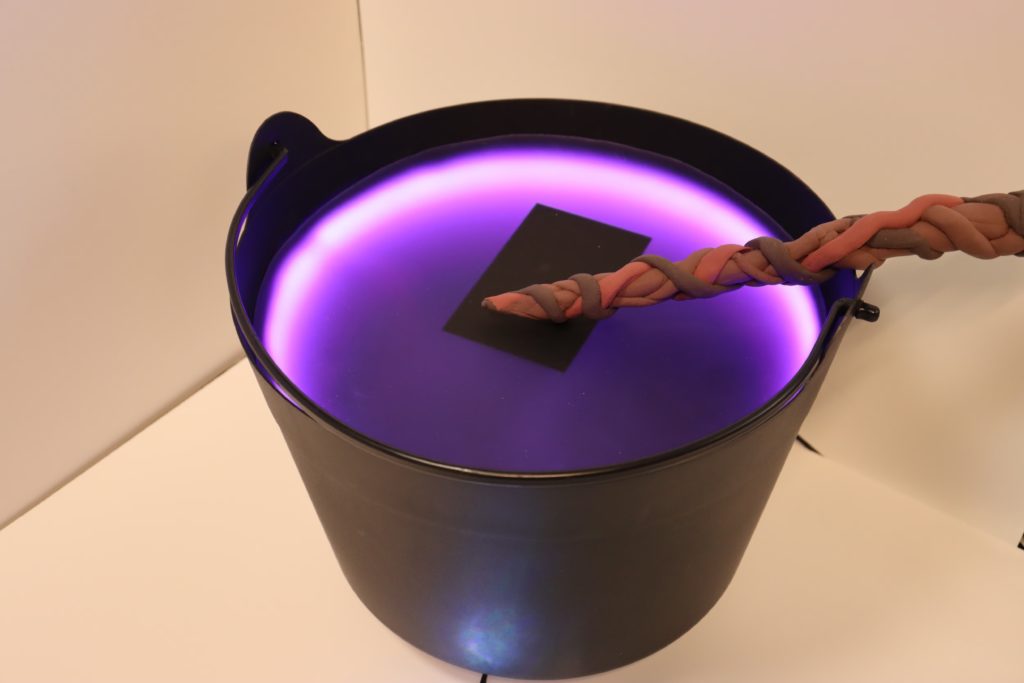
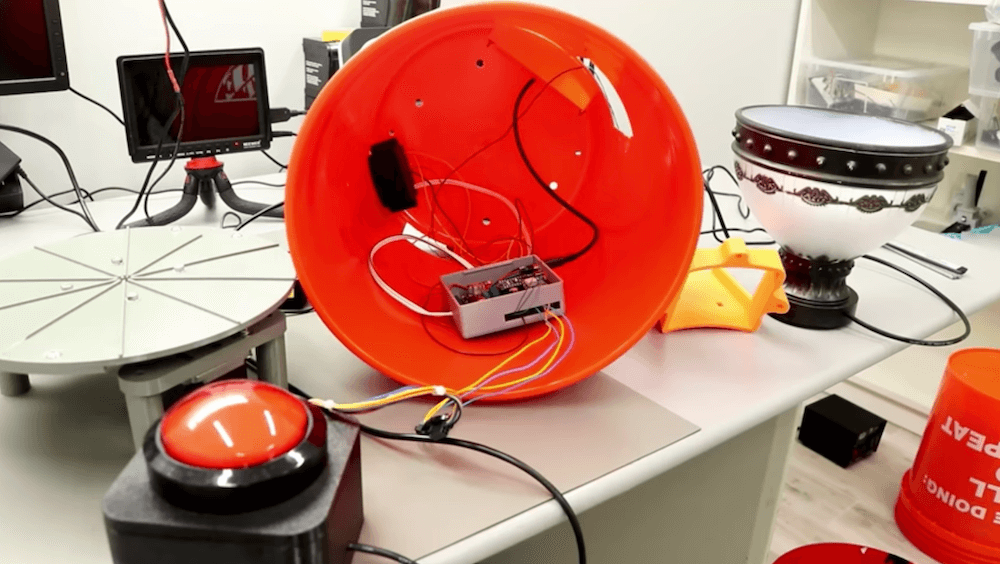
The large, bubbling cauldron is a classic mainstay in our Halloween decorations as it evokes imagery of devious witches and their mysterious concoctions. Fed up with this being a mere display piece, element14 Presents’ Katie Dumont created her own interactive enchanted cauldron that allows visitors to brew their own digital potions from an array of distinct ingredients using a whimsical “wand” and NFC-tagged bottles.

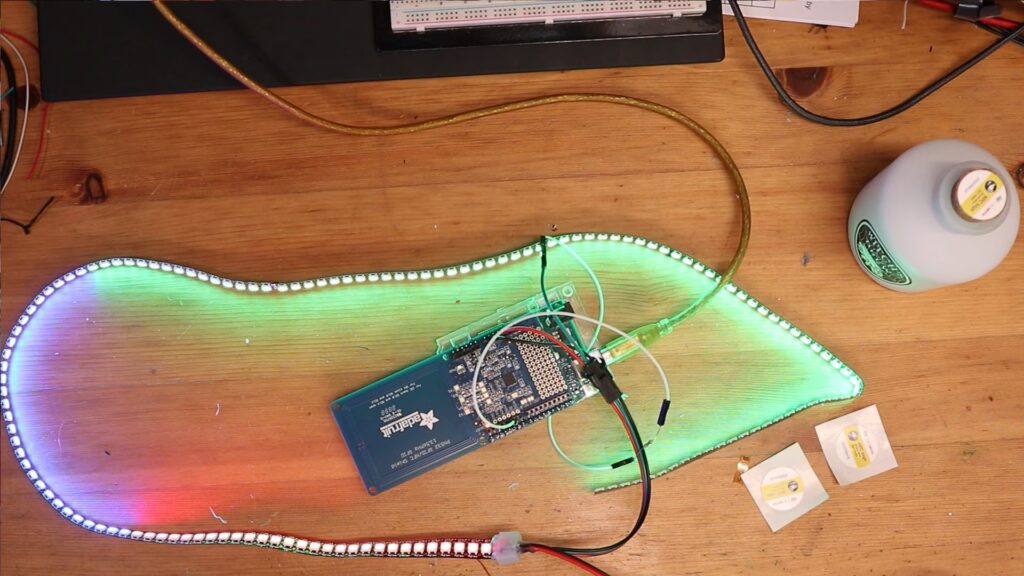
To test her idea of mixing ingredients, Dumont began by connecting an Adafruit NFC reader to an Arduino UNO Rev3 along with a strip of RGB LEDs. The code she wrote checks which NFC tag is present every second, and depending on the color, will either add another color or increase/decrease the overall brightness. After the special wand tag has been detected, each pixel along the strip is mixed into a shared, uniform color across all of them.

Upon the heels of this successful experiment, Dumont included another layer of interactivity in the form of a small game where players are presented with a certain color and must try to use the potion bottles to replicate it as close as possible with only red, green, and blue inputs. After selecting a sequence of three colors, tapping the wand will display the result and either flash red or white to indicate failure or success, respectively.

To see more about how Dumont created her enchanted cauldron, you can read the build log here and watch her demo video below!

The post Brew virtual potions by mixing ingredients in this interactive cauldron appeared first on Arduino Blog.

We’re only a few short weeks away from Halloween and that means we’re starting to see the creative projects that makers come up with to celebrate the holiday. Movement, lights, and sound effects are the name of the game when it comes to Halloween decor and the Treat Trough of Terror is the perfect example.

Gord Payne’s Treat Trough of Terror is a fun and unique way to doll out candy to the kids on Halloween while practicing social distancing. Payne can stand on his front stoop and when a trick-or-treater comes along, he can drop candy down the chute to their eager little hands. To turn that into a fun experience, the chute passes through a decorative jack o’ lantern. As the candy slides down the chute, the whole thing lights up and places spooky sound effects.

The chute itself is just PVC pipe cut in half lengthwise and resting on a patio chair. The lights are WS2812B LEDs driven by an Arduino Nano board. The Arduino also controls the sound effects played by a small MP3 player module, with audio output going to a pair of powered speakers. An ultrasonic sensor detects the candy as it slides past on the chute, which tells the Arduino to activate the light and sound effects.

If you want to hand out candy while maintaining at least six feet of distance, this is the perfect project to work on over the next few weeks.

The post The Treat Trough of Terror spits out Halloween candy appeared first on Arduino Blog.

With its bright color scheme and generally upbeat tone, the recently released Barbie movie evokes many of the same feelings as the toy brand. In keeping with this idea, Jaimie and Jay of the Wicked Makers YouTube channel decided to take it in the opposite direction by transforming a Barbie dollhouse into a haunted mansion for Halloween — complete with all of the requisite eerie effects and lighting.

The duo started by disassembling the interior and repainting the structural components, outside walls, and several other movable objects such as the door and various props. Once this had been completed, the next step involved finding LED filament, many small, discrete LEDs, and a miniature fog machine for creating an additional spookiness factor. The individual LEDs were placed into SLA printed skull lighting fixtures, custom-made clay candles, and inside of the previously pink chandelier where they could then be controlled by an Arduino UNO R4 WiFi

Beyond these effects, a strand of LED filament was laid into the upper floor to produce a glowing ring for summoning spirits. While a pair of iPads and a phone were placed behind acrylic windows on the second floor and on the ceiling in order to play high quality videos of ghosts and a portal opening up above the summoning ring. 

To see more about how Jaimie and Jay’s Barbie dreamhouse conversion using an UNO R4, watch their video below!

The post Turning a Barbie dreamhouse into a screamhouse with the Arduino UNO R4 appeared first on Arduino Blog.

A two picture montage of a boy wearing a sonic the hedgehog costume with LEDs in them. The left picture is at night with the boy wearing sunglasses and a face mask with the sonic costume head piece lit up. The right picture is during the day with the boy wearing a face mask, holding a plastic pu mpkin bucket for candy and wearing a lit up sonic the hedgehog costume in the front yard of a house.

[Wentworthm] couldn’t say no to his son’s plea for a Sonic the Hedgehog costume for Halloween but also couldn’t resist sprucing it up with LEDs either. The end result is a surprisingly cool light up Sonic the Hedgehog costume.

a picture of a breadboard with an Arduino Nano on it, with wires going out to 3d printed tear dropped shapes that have LED strips in them, with some LED strips on.

After some experimentation, [Wentworthm] ordered two costumes and ended up mixing and matching the head piece of one with the body suit of the other. For the head, [Wentworthm] created six 3D printed “quills” that had slots for the WS2812B LED strips to slide into and diffuse out the sides, with each quill sliding into the folds of the Sonic head “spikes”. Sewn strips of cloth were used to house the LED strips that were placed down the sides of the costume. An additional 3D printed switch housing was created to allow for a more robust interface to the two push buttons to activate the LEDs. An Arduino Nano, soldered to a protoboard, was used to drive the LED strips with a USB battery pack powering the whole project.

[Wentworthm] goes into more detail about the trials and errors, so the post is definitely worth checking out for more detail on the build. Halloween is always a great source of cool costumes and we’ve featured some great ones before, like a light up crosswalk costume to making a giant Gameboy colour costume.

Video after the break!

This year for Halloween, Quint BUILDs wanted to make something special for his daughter’s costume. Quint’s idea was to design and fabricate a pair of mechatronic dragon wings that can mount to a user’s back and move in three different modes by utilizing a set of pneumatic air cylinders. 

The prototype began as a single air cylinder connected to a relay that was, in turn, controlled by a single Arduino Micro and button. This way, Quint could finely tune the timings and pressures required for the device. After 3D printing a simple controller, machining a few aluminum plates, and welding it all together into a second prototype, it was time to experiment with programming more complex movements. 

Three pneumatic cylinders were used to create a couple axes of motion. First, the larger base cylinder moves a central piston vertically, thus extending and retracting them outwards. Each wing can flap independently through the use of two smaller pistons and linkages. Finally, pressurized air is provided by a compressed CO2 canister. These actuators are each controlled by a dedicated relay module that’s connected to an Arduino Uno.

Whenever one of the three buttons on the controller are pressed, a subroutine for the specified movement is executed. This could include fluttering the wings a couple of times, extending them outwards, and even performing a more complicated flapping motion. 

To see how this project was built in more detail, you can check out Quint’s write-up here on Instructables.

The post Scale up your dragon costume with wings that extend, flap and retract appeared first on Arduino Blog.

YouTuber Brankly is going to be giving out candy in style this Halloween. Or, more accurately, his automated pumpkin system is going to take care of the task for him.

His large fake jack-o’-lantern sits atop a hilariously smaller skeleton body, and hides inside a servo-driven turntable dispensing mechanism. As it rotates, treats are pushed out of a tongue-like slide mechanism, where it’s detected by two infrared sensors. This detection stops (and reverses) the dispensing plate, while the bowl in front illuminates.

Sounds and lighting are recycled from the modified bowl and pumpkin assembly, and LEDs under control of an Arduino Nano are added to a large button box that starts the cycle. Another Nano runs the rest of the setup, along with a stepper driver board and voltage regulator on a custom PCB.

More build specifics can be found on GitHub.

While trick-or-treating may or may not be in effect this Halloween, if you’re planning to participate, a mask could be a good idea. To help add some “expression” to your COVID-19 facial covering, BuildXYZ has come up with the Pixel Mask — capable of showing fangs and other graphics on an 128×64 OLED screen to match any costume.

But that’s not all. The device is equipped with an Arduino Nano and microphone that senses sound levels and then animates a mouth on the front display to mimic a wearer’s mouth movements. There’s even a button to activate a special “Trick or Treat” message.

The build can be equipped with N95 filter material, and is powered by a portable USB pack. Print files are available on Thingiverse and code is on GitHub if you’d like to construct your own.

If you’d like your jack-o’-lantern to stand out, a pair of animatronic eyes should do the trick. While there are numerous ways that you can go about this, few (if any) look as good as the set made by Will Cogley in the first video below.

The incredibly realistic 3D-printed eyeballs are installed into the hollowed out pumpkin using skewers as supports, and glance in all directions, along with orange eyelids that open and close for an even more human(ish) appearance. 

The second clip delves deeper into the eyeballs themselves, which come in several forms. Control is via a Wii Nunchuk-esque joystick interface, with the help of an Arduino.

October 31st is almost here and we’re all super excited, because this is the perfect time for some DIY fun! Nothing to wear? Not a problem! Need a spook-tacular decoration? We’ve got just the thing.

To help get you into the spirit, we’ve selected a handful of Halloween-themed projects from the Arduino Project Hub that will surely catch the attention of trick-or-treaters (or send them screaming into the night.)  

Talking Triceratops Skull

Make your Echo Dot a bit more interesting than a hockey puck using an Arduino Uno, a Motor Shield, a 3.5mm TRS splitter, and an amplified speaker.

Animatronic Halloween Prop

This Arduino Mega-based robot can be operated remotely from your smartphone or move about autonomously, complete with creepy lights and a terrifying soundtrack.

LED Eye Mask

Stand out as you walk through the neighborhood by customizing a store-bought mask with an eye made of LEDs and a mouth that flashes red. 

Dropping Spider

Here’s a quick, last-minute scare prank for your porch. Drop a fake spider on anyone that tries to ring your doorbell via an Arduino Uno, an HC-SR04 ultrasonic sensor, and a servo. 

Ultimate Dry Ice Machine

Add some special effects to your party with a 3D-printed, Arduino Nano-powered fog machine that’s controllable over Bluetooth. 

Have a project of your own? Be sure to share it with us! 

The idea of a mechanized walking suit to carry you around seems like a great idea, but having a practical leg assembly for it is still a futuristic concept. As seen here however, if you’re still a kid, you might be able to get your dad to carry you around in a custom suit fashioned after a MechWarrior vehicle.

The suit is beautifully designed by creator Gridlock Cosplay, and features an Arduino-powered control system. This allows the little pilot to command the mech’s human “engine” via a joystick and system of lights. The suit also features exterior and interior lights, a pilot cooling fan, spinning “radar” assembly, retractable pilot cage, and of course a cell phone holder in the padded engine compartment.


  • Newsletter

    Sign up for the PlanetArduino Newsletter, which delivers the most popular articles via e-mail to your inbox every week. Just fill in the information below and submit.

  • Like Us on Facebook