For an easy plotter design that you can build with only simple hand tools, be sure to check out this tiny project from Mr Innovative. The machine features a pair of stepper and lead screw assemblies to maneuver a pen in an X/Y plane, along with a clever string and servo setup to handle retraction.
An Arduino Nano and two L293D ICs mounted to a custom PCB are used to control the device, though a breadboard could certainly substitute for the PCB in a pinch. Drawings are translated into the proper format via Inkscape and Processing.
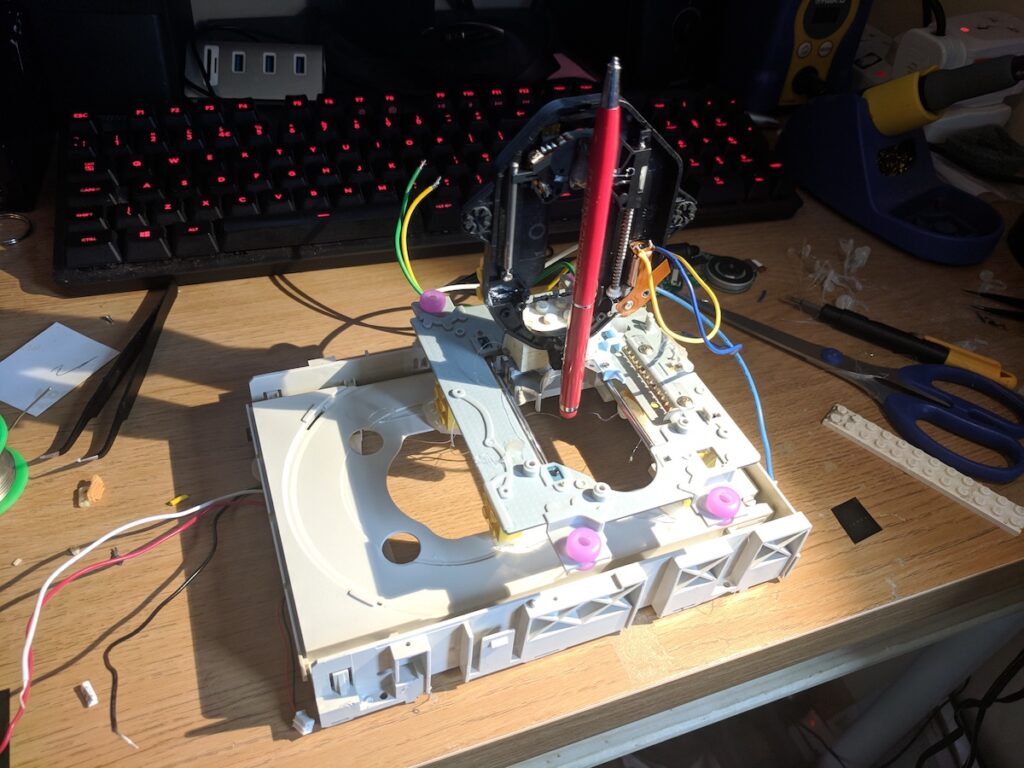
There is something fascinating about watching an autonomous machine. An automatic car wash, a soda vending machine that picks up the product behind a window, a plotter, or a robot like a CNC or 3D printer are all interesting to watch. Although [EngineerDog] bills Mug-O-Matic as a tiny CNC, we think it is more of a plotter for coffee mugs. It’s still fun to watch though, as you can see in the video below.
The design has about 60 printed parts and uses a Sharpie at the business end. It accepts gcode and can even emblazon your favorite mug with our own Jolly Wrencher, so you know we like it.
Of course, a Sharpie mark won’t stay on a mug forever, but the write up says you can bake the mug to make the markings permanent. At first, the project used a cheap Arduino Nano breakout board. However, that was set up to drive the servos with the Arduino’s power supply, so instead of board surgery there is now a custom PCB.
The resulting drawings are a little shaky, we aren’t sure if that’s from the way the device mounts on top of the mug or just the lever arm of the carriage the pen rides in. However, for a fun project it does a great job.
We couldn’t help but think about eggbots and the spherebot when we saw this. We also wondered if this could draw on glass that would later be etched with hydrofluoric acid or Armour Etch.
We know, we know. Getting PCBs professionally fabricated anymore is so cheap and easy that making them in-house is increasingly becoming something of a lost art. Like developing your own film. Or even using a camera that has film, for that matter. But when you’re in Brazil and it takes months for shipments to arrive like [Robson Couto] is, sometimes you’re better off sticking with the old ways.
The primary hardware issues [Robson] ran into were in the Z axis, as some poor component selections made the stock configuration wobble a bit too much. He replaced some flimsy standoffs as well as swapping in some bushings he salvaged from dead inkjet printers, and the movement got a lot tighter.
Despite the fact that the version of Grbl flashed onto the engraver’s cloned Arduino Uno supports Z leveling, it’s not actually enabled out of the box. [Robson] just needed to add some extra wiring to use the spindle’s bit as a probe on the copper clad board. He also went ahead and updated to the latest version of Grbl, as the one which ships with the machine is fairly old.
Even if you don’t have access to fancy tools like a 3D printer or CNC router, that doesn’t mean you can’t make something interesting. James, using only a “hot glue gun, some scissors, and a screwdriver,” was able to construct a rudimentary drawing robot that marks paper with a sharpie.
2 CD drives were creatively modified to form X, Y, and Z axes, letting him lower his writing instrument and draw. An Arduino Uno along with an Adafruit Motor Shield forms the controls for the device, and the structure is built out of LEGO bricks.
As of now it’s described as more of an “Etch A Sketch type thing,” but it looks like a great starting point for more advanced drawbots in the future! Code for the build is available on GitHub.
In a project, repetitive tasks that break the flow of development work are incredibly tiresome and even simple automation can make a world of difference. [Simon Merrett] ran into exactly this while testing different stepper motors in a strain-wave gear project. The system that drives the motor accepts G-Code, but he got fed up with the overhead needed just to make a stepper rotate for a bit on demand. His solution? A grbl man-in-the-middle jog pendant that consists of not much more than a rotary encoder and an Arduino Nano. The unit dutifully passes through any commands received from a host controller, but if the encoder knob is turned it sends custom G-Code allowing [Simon] to dial in a bit acceleration-controlled motor rotation on demand. A brief demo video is below, which gives an idea of how much easier it is to focus on the nuts-and-bolts end of hardware when some simple motor movement is just a knob twist away.
[Simon]’s jog pendant moves a single motor which is exactly what he needs to ease development of his 3D printed strain-wave gear using a timing belt, but it could be programmed with any G-Code at all. Speaking of DIY jog pendants for CNC machines, don’t forget this wireless one made from an Atari 2600 joystick that jogs a plasma cutter in X and Y, and zeroes it with a push of the button.
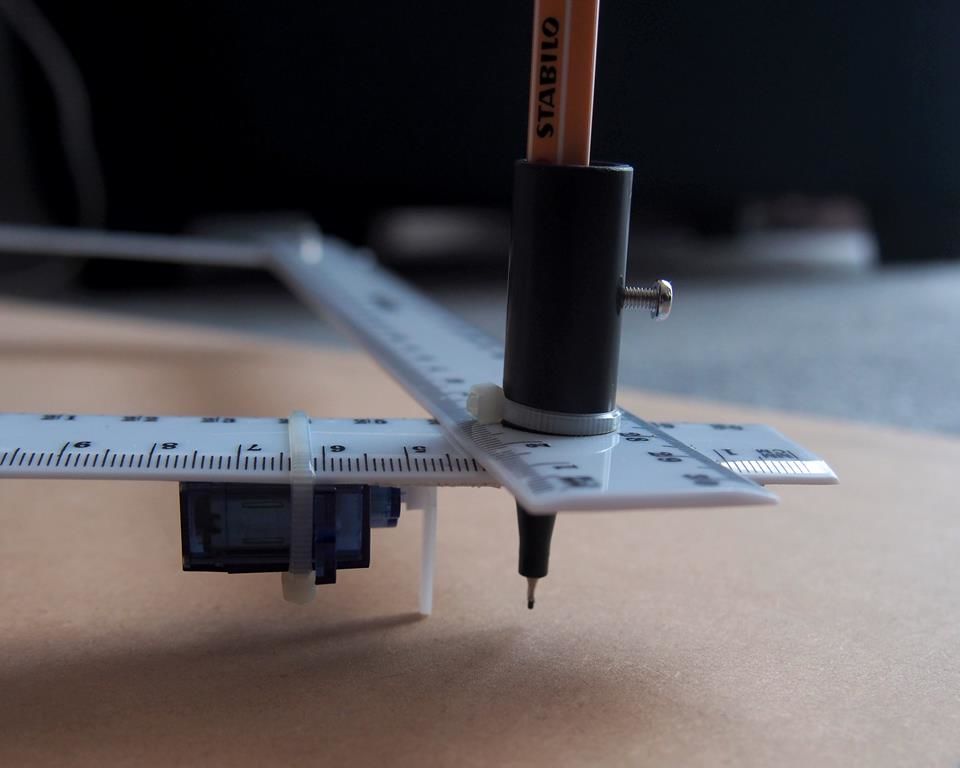
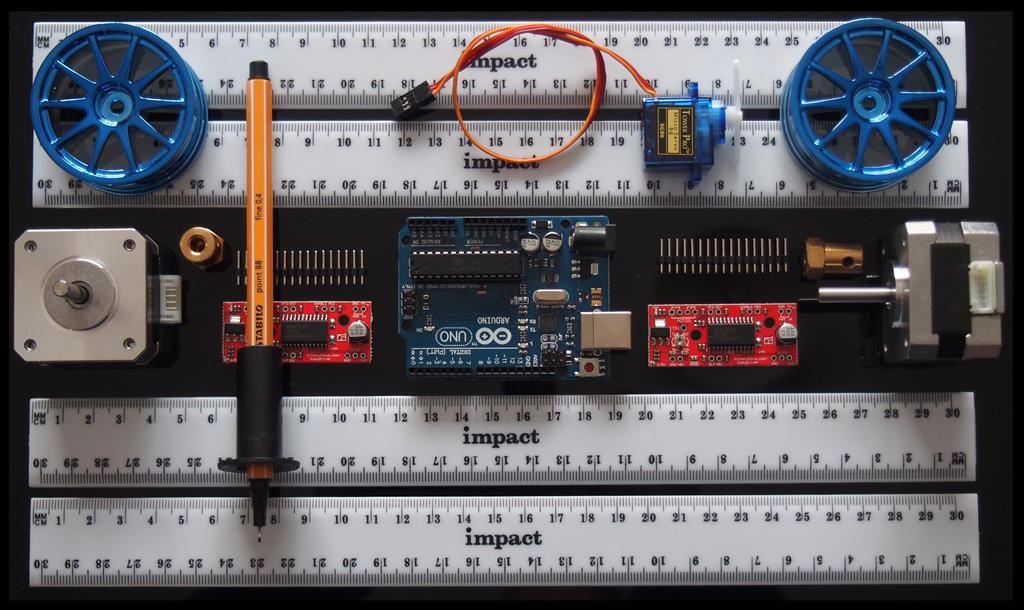
When you see a plastic ruler, you wouldn’t normally assume it was destined to become part of a CNC plotter. Maker “lingib,” however, realized their potential to be combined to form plotter arms, in this case actuated by two stepper motors.
The resulting build can expand and contract the resulting shape, allowing a pen at the end point of the two sets of rulers to move back and forth across a piece of paper. Necessary spaces in the plot are provided by a micro servo that can lift the pen/ruler off of the writing surface.
The device is powered by an Arduino Uno, which controls the two NEMA 17 stepper motors via a pair of EasyDriver Modules. You can find more details about how to create one of these, including code and how the geometry behind it works, on its Instructables page.
“Measure twice, cut once” is great advice in every aspect of fabrication, but perhaps nowhere is it more important than when building a CNC machine. When precision is the name of the game, you need measuring tools that will give you repeatable results and preferably won’t cost a fortune. That’s the idea behind this Arduino-based measuring jig for fabricating parts for a CNC build.
When it comes to building on the cheap, nobody holds a candle to [HomoFaciens]. We’ve seen his garbage can CNC build and encoders from e-waste and tin cans, all of which gave surprisingly good results despite incorporating such compliant materials as particle board and scraps of plumber’s strapping. Looking to build a more robust machine, he finds himself in need of parts of consistent and accurate lengths, so he built this jig. A sled of particle board and a fence of angle aluminum position the square tube stock, and a roller with a paper encoder wheel bears on the tube under spring pressure. By counting pulses from the optical sensors, he’s able to precisely position the tube in the jig for cutting and drilling operations. See it in action in the video after the break.
If you’ve been following [HomoFaciens], you’ll no doubt see where he’s been going — build a low-end tool, use that to build a better one, and so on. We’re excited to see him moving into more robust materials, but we’ll miss the cardboard and paperclip builds.
A zen garden should be a source of relaxation and escape from the everyday. The whole point should be to escape from–among other things–your electronics. Unless you are [MakrToolbox]. Then you’ll make a beautiful zen garden end table that allows you to make patterns in the sand using a ball bearing and an Arduino. You can see a video below.
Technically, the device is almost an upside down 3D printer with no Z axis. The mechanism moves a magnet which controls the steel ball and draws patterns in the sand. However, the really impressive parts of this project are the woodworking for the end table and the impressive documentation, should you want to reproduce this project yourself.
We couldn’t help but think of this as a really nice grown-up Etch-a-Sketch. [MakrToolbox] originally used a 3D printer control board to get everything moving but later decided to take a different approach. From the user’s point of view, a joystick drives the ball. We can’t comment on if it has the same soothing effect, or not.
You’d think that a CNC zen garden was a novel idea, but time has demonstrated that it isn’t. Not even close. Seriously. However, it may be the most aesthetic one we’ve seen.
This little DIY 64×64 graphical printer by [Egor] is part pen plotter in design, somewhat dot matrix-ish in operation, and cleverly designed to use unmodified 9G servos. The project page is all in Russian (translation to English here) but has plenty of photos that make the operation and design clear. Although nearly the entire thing is made from laser-cut wood, [Egor] says that a laser cutter is optional equipment. The first version was entirely cut with hand tools.
Small DIY CNC machines driven over a serial line commonly use Arduinos and CD-ROM drive guts (like this Foam Cutter or this Laser Paper Cutter) but this build uses its own custom rack-and-pinion system, and has some great little added details like the spring-loaded clip to hold paper onto the print pad.
The frame and parts (including all gears) are laser-cut from 4 mm plywood and the unit is driven by three small servos. A simple Java program processes images and an Arduino UNO handles the low-level control. A video of everything in action is embedded below.
Planet Arduino is, or at the moment is wishing to become, an aggregation of public weblogs from around the world written by people who develop, play, think on Arduino platform and his son. The opinions expressed in those weblogs and hence this aggregation are those of the original authors. Entries on this page are owned by their authors. We do not edit, endorse or vouch for the contents of individual posts. For more information about Arduino please visit www.arduino.cc
You are currently browsing the archives for the CNC category.


 In a project, repetitive tasks that break the flow of development work are incredibly tiresome and even simple automation can make a world of difference. [Simon Merrett] ran into exactly this while testing different stepper motors in a strain-wave gear project. The system that drives the motor accepts G-Code, but he got fed up with the overhead needed just to make a stepper rotate for a bit on demand. His solution? A