Posts | Comments

Planet Arduino

Archive for the ‘3d’ Category

Researchers across several universities have developed a controller that provides tangible interaction for 3D augmented reality data spaces.

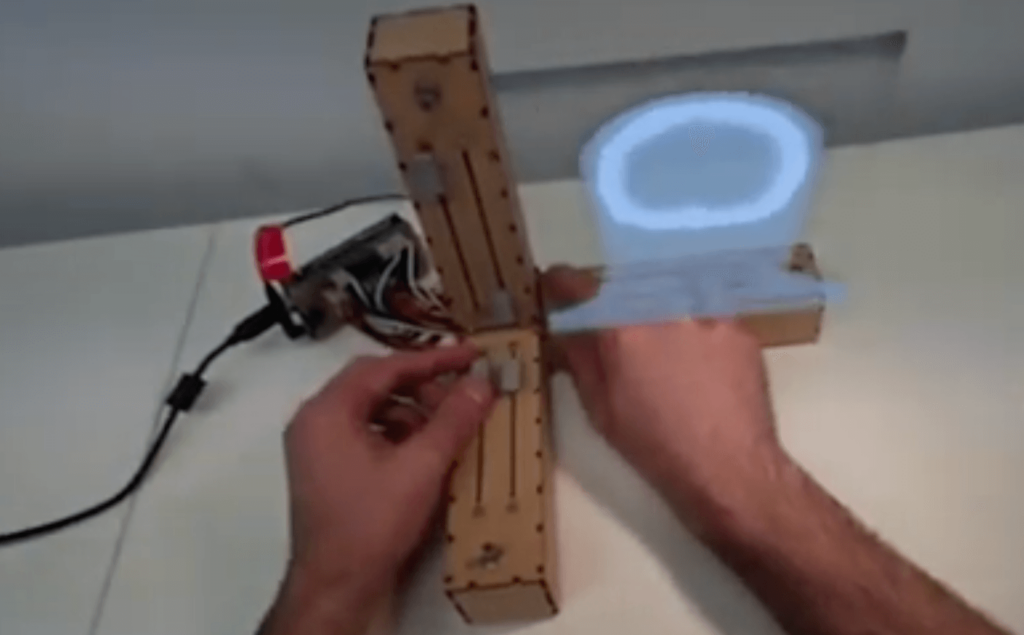
The device is comprised of three orthogonal arms, embodying X, Y, and Z axes which extend from a central point. These form an interactive space for 3D objects, with linear potentiometers and a rotary button on each axis as a user interface.

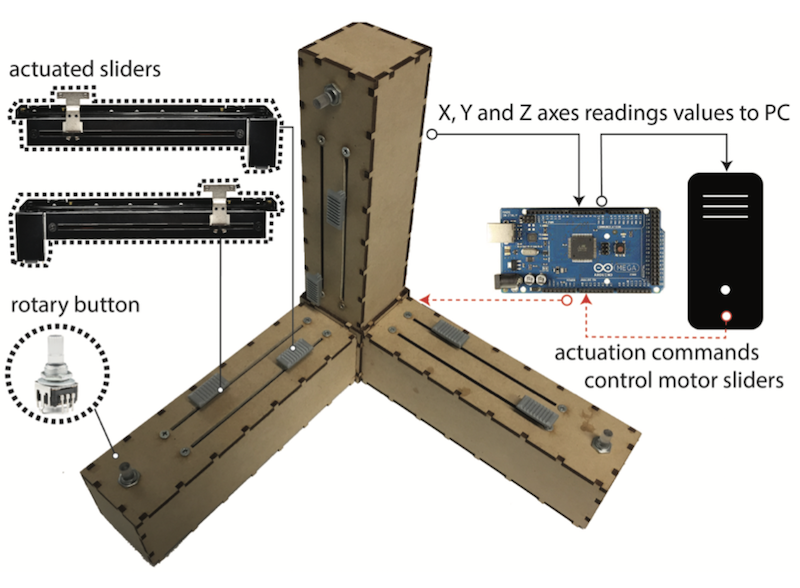
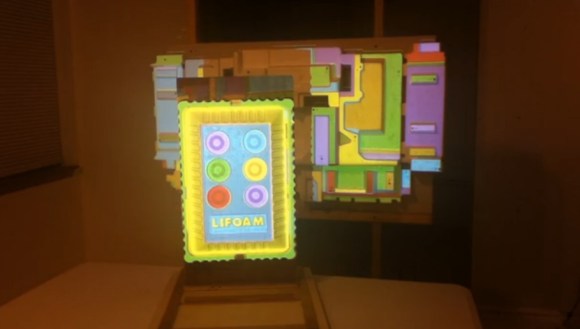
At the heart of it all is an Arduino Mega, which takes in data from the sliders to section a model. This enables users to peer inside of a representation with an AR headset, “slicing off” anything that gets in the way by defining a maximum and minimum view plane. The sliders are each motorized to allow them to move together and to provide force feedback.

Possible applications include medical imaging and CAD modeling, among many others. More details on the Embodied Axes project can be found in the researchers’ paper here.

Unless you live in a special, unique place like Hawaii or Costa Rica it’s unlikely you’ll be able to surf every day. It’s not easy to plan surf sessions or even surf trips to most locations because the weather conditions will need to be just right. Not only the wave height (swell) but also the wind speed and direction, tide, water and air temperature, and even amount and type of marine life present can all impact your surf session. You’ll want something which can easily tell you right away if conditions are good.

This project from [luke] is called the Surf Window shows the surf conditions at the local beach with just one glance. Made out of various pieces of wood, each part represents one of the weather conditions at the beach. A rotating seagull gives the wind direction, for example, and the wave height is represented by 3D, moving waves. All of the parts are connected with various motors and linkages to an Arduino Mega +WiFi R3 which grabs all of its information from Magicseaweed, a surf forecasting site.

The Surf Window can show the current conditions at virtually any surfable beach in the world, so if you really want to know how Jaws, Mavericks, or even Reef Road is breaking right now, you could use this to give you a more nuanced look. Don’t forget to take the correct board for the conditions!

The first time I saw 3D modeling and 3D printing used practically was at a hack day event. We printed simple plastic struts to hold a couple of spring-loaded wires apart. Nothing revolutionary as far as parts go but it was the moment I realized the value of a printer.

Since then, I have used OpenSCAD because that is what I saw the first time but the intuitiveness of other programs led me to develop the OpenVectorKB which allowed the ubiquitous vectors in OpenSCAD to be changed at will while keeping the parametric qualities of the program, and even leveraging them.

All three values in a vector, X, Y, and Z, are modified by twisting encoder knobs. The device acts as a keyboard to

  1. select the relevant value
  2. replace it with an updated value
  3. refresh the display
  4. move the cursor back to the starting point

There is no software to install and it runs off a Teensy-LC so reprogramming it for other programs is possible in any program where rotary encoders may be useful. Additional modes include a mouse, arrow keys, Audacity editing controls, and VLC time searching.

Here’s an article in favor of OpenSCAD and here’s one against it. This article does a good job of explaining OpenSCAD.

[Editor’s note: This is a Hackaday writer’s hack, hence the “I” in place of the usual “we”. We all love custom peripherals though, and a good number of us love OpenSCAD, so you could probably read it either way, but we don’t want to take credit for [Brian]’s work.]


Filed under: 3d Printer hacks, Arduino Hacks

Small OLED displays are inexpensive these days–cheap enough that pairing them with an 8-bit micro is economically feasible. But what can you do with a tiny display and not-entirely-powerful processor? If you are [ttsiodras] you can do a real time 3D rendering. You can see the results in the video below. Not bad for an 8-bit, 8 MHz processor.

The code is a “points-only” renderer. The design drives the OLED over the SPI pins and also outputs frame per second information via the serial port.

As you might expect, 3D output takes a good bit of math, and the chip in question isn’t very good at handling real numbers. [Ttsiodras] handles this using an old technique: fixed point arithmetic. The idea is simple. Normally, we think of a 16-bit word as holding unsigned values of 0 – 65535. However, if you choose, you can also use it to represent numbers from 0-50.999, for example. Mentally, you scale everything by 1,000 and then reverse the operation when you want to output. Addition and subtraction are straightforward, but multiplication and division require some extra work.

If you want to read more about fixed point math, you are in the right place. We’ve also covered a great external tutorial, too. But if you think this is the first time we’ve covered a 3D graphics engine for the ATmega parts, you’re wrong.


Filed under: Arduino Hacks

What’s the best way to image a room? A picture? Hah — don’t be so old-fashioned! You want a LIDAR rig to scan the space and reconstruct it as a 3D point map in your computer.

Hot on the heels of [Saulius Lukse]’s scanning thermometer, he’s replaced the thermal camera on their pan/tilt setup with a time-of-flight (TOF) camera — a Garmin LIDAR — capable of 500 samples per second and end up scanning their room in a mere fifteen minutes. Position data is combined with the ranging information to produce a point cloud using Python. Open that file in a 3D manipulation program and you’ll be treated to a sight like this:

That’s an image generated of a 4.7 million point cloud. It’s not perfect, but it’ll certainly do.

[Lukse] laments that the camera requires ideal lighting conditions that make it unsuitable to for a lot of outdoor imaging and is similarly limited to shorter ranges. It also necessitates hauling a laptop around so he’s considering making it an all-in-one package down the road.

Want to more about how LIDAR works? Check out this teardown video of a police speed enforcement LIDAR ‘gun.’ Or have a look at this (faster) completely DIY laser scanner.


Filed under: Arduino Hacks, laser hacks

[Helios Labs] recently published version two of their 3D printed fish feeder. The system is designed to feed their fish twice a day. The design consists of nine separate STL files and can be mounted to a planter hanging above a fish tank in an aquaponics system. It probably wouldn’t take much to modify the design to work with a regular fish tank, though.

The system is very simple. The unit is primarily a box, or hopper, that holds the fish food. Towards the bottom is a 3D printed auger. The auger is super glued to the gear of a servo. The 9g servo is small and comes with internal limiters that only allow it to rotate about 180 degrees. The servo must be opened up and the limiters must be removed in order to enable a full 360 degree rotation. The servo is controlled by an Arduino, which can be mounted directly to the 3D printed case. The auger is designed in such a way as to prevent the fish food from accidentally entering the electronics compartment.

You might think that this project would use a real-time clock chip, or possibly interface with a computer to keep the time. Instead, the code simply feeds the fish one time as soon as it’s plugged in. Then it uses the “delay” function in order to wait a set period of time before feeding the fish a second time. In the example code this is set to 28,800,000 milliseconds, or eight hours. After feeding the fish a second time, the delay function is called again in order to wait until the original starting time.


Filed under: 3d Printer hacks, Arduino Hacks
Nov
23

PieceMaker Factory: A Glimpse Into The Future of Toys?

3d, 3D printing, arduino, devinck, Electronics, Kids & Family, Makers, Toys Comments Off on PieceMaker Factory: A Glimpse Into The Future of Toys? 

MeganLate Friday night I saw what may be the future of toys, or at least something completely unique at my local Toys'R'Us.

Read more on MAKE

Sep
29

Arduino Leaks a Peek of Their Upcoming 3D Printer

3d, 3D Printer, arduino Comments Off on Arduino Leaks a Peek of Their Upcoming 3D Printer 

sharebot_arduino_materia03

by Mike Senese @ makezine.com:

Arduino, known for creating an easy-to-use microcontroller revolution, is about to launch its own 3D printer.

The Arduino Materia 101 made its global debut earlier today on the official Arduino twitter account with a photo of a boxy white and teal FDM printer and a note that Arduino co-founder Massimo Banzi is showing the printer live on Italian TV. It also states that the printer will be presented next weekend at Maker Faire Rome.

In the image, the printer appears to have an LCD screen, a control knob, and a switch on the front plate. A filament spool holder with a matching color scheme sits attached to the right side. The mechanical bits are obscured, so details about its extruder or print bed size aren’t clear, but we’ll be looking forward to learning more shortly.

Arduino Leaks a Peek of Their Upcoming 3D Printer - [Link]

Jun
18

Arduino Controlled CNC / 3D Printer

3d, arduino, CNC, instructable, motor, printer Comments Off on Arduino Controlled CNC / 3D Printer 

FI881D5HQDLZ0Z5.MEDIUM

aldricnegrier @ instructables.com writes:

The objective of this instructable is to guide your way throw the entire making process of building a BuildersBot machine. An Arduino controlled CNC Router that can also perform 3D printing.

The instructions will cover all areas such as, mechanics, electronics and software.

Arduino Controlled CNC / 3D Printer - [Link]

Aug
22

TightLight: A 3D projection mapping assistant

3d, 3d graphics, 3d modeling, arduino hacks, photocell, projection, projectors, video hacks Comments Off on TightLight: A 3D projection mapping assistant 

tightLight

Anyone can grab a projector, plug it in, and fire a movie at the wall. If, however, you want to add some depth to your work–both metaphorical and physical–you’d better start projection mapping. Intricate surfaces like these slabs of styrofoam are excellent candidates for a stunning display, but not without introducing additional complexity to your setup. [Grady] hopes to alleviate some tedium with the TightLight (Warning: “music”).

The video shows the entire mapping process of which the Arduino plays a specific role toward the end. Before tackling any projector calibration, [Grady] needs an accurate 3D model of the projection surface, and boy does it look complicated. Good thing he has a NextEngine 3D laser scanner, which you’ll see lighting the surface red as it cruises along.

Enter the TightLight: essentially 20 CdS photocells hooked up to a Duemilanove, each of which is placed at a previously-marked point on the 3D surface. A quick calibration scan scrolls light from the projector across the X then Y axis, hitting each sensor to determine its exact position. [Grady] then merges the photocell location data with the earlier 3D model using the TouchDesigner platform, and bam: everything lines up and plays nice.


Filed under: Arduino Hacks, video hacks


  • Newsletter

    Sign up for the PlanetArduino Newsletter, which delivers the most popular articles via e-mail to your inbox every week. Just fill in the information below and submit.

  • Like Us on Facebook