Posts | Comments

Planet Arduino

Archive for the ‘Microcontroller’ Category

Watching video on computers used various methodologies in correlation with the power of computer microprocessors. Animated GIF led to MJPEG video, then came MPEG-1 video, best known for video CD (VCD) recording. When processors became more powerful, MPEG-2 was developed and used for DVDs etc. Later, MPEG-4 was possible with yet faster processors.

The same progression is happening with small devices built using microcontrollers. Animated GIFs have been available for the last year. MJPEG has been demonstrated.

Now 陳亮手痕定律 (@moononournation on X/Twitter) has been coding an MPEG-1 player in Arduino for the LilyGo T-Keyboard Blackberry lookalike. Video quality is pretty good for the low resolutions involved.

See X/Twitter for posts and the code on GitHub.

Arduino has a library for quickly and easily setting up a simple web server on an ESP8622-based board, and [Tomaž] found that power consumption on an ESP-01 can be reduced a considerable amount by simply inserting a 1 ms delay in the right place. The reason this works isn’t because of some strange bug or oddball feature — it’s really just a side effect of how the hardware operates under the hood.

[Tomaž] uses the “hello world” example from ESP8266WebServer to explain. In it, the main loop essentially consists of calling server.handleClient() forever. That process checks for incoming HTTP connections, handles them, sends responses, exits — and then does it all over again. A simple web server like this one spends most of its time waiting.

A far more efficient way to handle things would be to launch server.handleClient() only when an incoming network connection calls for it, and put the hardware to sleep whenever that is not happening. However, that level of control just isn’t possible in the context of the Arduino’s ESP8266WebServer library.

So what’s to be done? The next best thing turns out to be a simple delay(1) statement right after each server.handleClient() call in the main loop.

Why does this work? Adding delay(1) actually causes the CPU to spend the vast majority of its time in that one millisecond loop. And counting microseconds turns out to be a far less demanding task, power-wise, than checking for incoming network requests about a hundred thousand times per second. In [Tomaž]’s tests, that one millisecond delay reduced idle power consumption at 3.3 V from roughly 230 mW to around 70 mW — about 60% — while only delaying the web server’s response times by 6-8 milliseconds.

For simple web server applications, this is is for sure a good trick to keep in mind. There are also much more advanced techniques for saving power on ESP8266-based boards; from boards that barely sip a single microamp while sleeping, to coin-cell powered boards that go so far as to modify the TCP/IP stack to help squeeze every bit of power savings possible.

The trick to a fun escape room is layers. For [doktorinjh]’s Spacecase, you start with an enigmatic aluminum briefcase and a NASA drawstring backpack. A gamemaster reads the intro speech to set the mood, and you’re ready to start your escape from the planet. The first layer is the backpack with puzzles you need to solve to get into the briefcase. In there, you discover a hidden compartment and enough sci-fi references to put goofy smiles on our faces. We love to see tools reused as they are in one early puzzle, you use a UV LED to reveal a hidden message, but that light also illuminates puzzle clues later.

All the tech in Spacecase makes it a wonder of mixed media. The physical layer has laser engraved wood featuring the font from the 1975 NASA logo, buttons, knobs, LEDs, toggle switches, and a servo. Beneath the visible faceplate is an RGB sensor, audio player, speaker, and at the center is an Arduino MEGA. We’d love to get our hands on Spacecase for a game, and we’re inspired to pull out all the stops and build games with our personal touches. Maybe something with a mousetrap.

This isn’t the first escape room hardware we’ve seen and [doktorinjh] similarly made a bomb diffusing game.

For most of us, getting weather information is as trivial as unlocking a smartphone or turning on a computer and pointing an app or browser at one’s weather site of choice. This is all well and good, but it lacks a certain panache that old weather stations had with their analog dials and stained wood cases. The weather station that [BuildComics] created marries both this antique aesthetic with modern weather data availability, and then dials it up a notch for this enormous analog weather station build.

The weather station uses 16 discrete dials, each modified with a different label for the specific type of data displayed. Some of them needed new glass, and others also needed coils to be modified to be driven with a lower current than they were designed as well, since each would be driven by one of two Arduinos in this project. Each are tied to a microcontroller output via a potentiometer which controls the needle’s position for the wildly different designs of meter. The microcontrollers themselves get weather information via the internet, which allows for about as up-to-date information about the weather as one could gather first-hand.

The amount of customization of these old meters is impressive, and what’s even more impressive is the project’s final weight. [BuildComics] reports that it took two people just to lift it onto the wall mount, which is not surprising given the amount of iron in some of these old analog meters. And, although not as common in the real world anymore, these old antique meters have plenty of repurposed uses beyond weather stations as well.

Raspberry Pi enters the microcontroller world with its first custom-chip board, and they're bringing in a number of other companies to use it too.

Read more on MAKE

The post Raspberry Pi Announces $4 “Pico” Microcontroller with Custom Chip, Collaborations with Arduino, Adafruit, and Others appeared first on Make: DIY Projects and Ideas for Makers.

It’s a little known secret that when the Hackaday writers gather in their secret underground bunker to work on our plans for world domination, we often take breaks to play our version of the corporate “Buzzword Bingo”, where paradigms are leveraged and meetings circle back to loop in offline stakeholders, or something like that. Our version, however, is “Comment Line Bingo”, and right in the middle of the card is the seemingly most common comment of all: “You should have used a 555,” or variations thereof.

So it was with vicious glee that we came across the Trollduino V1.0 by the deliciously named [Mild Lee Interested]. It’s the hardware answer to the common complaint, which we’ll grant is often justified. The beautiful part of this is that Trollduino occupies the same footprint as an Arduino Uno and is even pin-compatible with the microcontroller board, or at least sort of. The familiar line of components and connectors sprout from the left edge of the board, and headers for shields line the top and bottom edges too. “Sketches” are implemented in hardware, with jumpers and resistors and capacitors of various values plugged in to achieve all the marvelous configurations the indispensable timer chip can be used for. And extra points for the deliberately provocative use of Comic Sans in the silkscreen.

Hats off to [Lee] for a thoroughly satisfying troll, and a nice look at what the 555 chip can really do. If you want a more serious look at the 555, check out this 555 modeled on a breadboard, or dive into the story of the chip’s development.

[Zoltán] sends in his very interesting implementation of a NumPy-like library for micropython called ulab.

He had a project in MicroPython that needed a very fast FFT on a micro controller, and was looking at all of the options when it occurred to him that a more structured approach like the one we all know and love in CPython would be possible on a micro controller too. He thus ended up with a python library that could do the FFT 50 times faster than the the pure Python implementation while providing all the readability and ease of use benefits that NumPy and Python together provide.

As cool as this is, what’s even cooler is that [Zoltan] wrote excellent documentation on the use of the library. Not only can this documentation be used for his library, but it provides many excellent examples of how to use MicroPython itself.

We really recommend that fans of Python and NumPy give this one a look over!

Even on the go, there is no substitute for a physical keyboard with buttons that move and click. Sure, you could solder a bunch of tactile switches to some perfboard, but how about going all out and making something robust as [Anthony DiGirolamo] did for his Teensy Thumboard. Everything is insertion-mount so it is an approachable project for anyone who knows the dangerous end of a soldering iron, and that also makes it easy to hack on.

Each pin of the Teensy has an adjacent empty hole tied to it for easy access, and the serial data pins are exposed at the top of the board. All the holes use standard 0.1″ (2.54mm) spacing. The I/O points used by the keyboard are labeled, and the rest of them can use the space under the controller where proto-board style holes add some extra space for an IMU or whatever sensors suit your slant.

Most impressive is the shell, which is freely available on Thingiverse, where you can also find a bill of materials with links to everything you will need in case you don’t have drawers full of those tactile switches.

If this looks familiar, you have probably seen the PocketCHIP, and it is no secret that this project is an homage to that versatile pocket computer. We appreciate this kind of love for PocketCHIP, especially since they are now a limited commodity.

Machine learning is starting to come online in all kinds of arenas lately, and the trend is likely to continue for the forseeable future. What was once only available for operators of supercomputers has found use among anyone with a reasonably powerful desktop computer. The downsizing isn’t stopping there, though, as Microsoft is pushing development of machine learning for embedded systems now.

The Embedded Learning Library (ELL) is a set of tools for allowing Arduinos, Raspberry Pis, and the like to take advantage of machine learning algorithms despite their small size and reduced capability. Microsoft intended this library to be useful for anyone, and has examples available for things like computer vision, audio keyword recognition, and a small handful of other implementations. The library should be expandable to any application where machine learning would be beneficial for a small embedded system, though, so it’s not limited to these example applications.

There is one small speed bump to running a machine learning algorithm on your Raspberry Pi, though. The high processor load tends to cause small SoCs to overheat. But adding a heatsink and fan is something we’ve certainly seen before. Don’t let your lack of a supercomputer keep you from exploring machine learning if you see a benefit to it, and if you need more power than just one Raspberry Pi you can always build a cluster to get your task done just a little bit faster, too.

Thanks to [Baldpower] for the tip!

We’ve all been there. When debugging a microcontroller project, we just want to put in a print statement to figure out what’s going on with the microcontroller in real time. However, advanced embedded programmers know that printf statements are verboten: they’re just too SLOW. While not fixing this plight entirely, [Atakan Sarioglu] has come up with a clever way to create readable debug messages with minimal runtime overhead.

[Atakan Sarioglu]’s innovation, called BigBug (Github), is a dynamically-generated codebook. The codebook translates abbreviated messages sent over serial (UART here) to longer-form human-readable messages. To generate the codebook, BigBug automatically parses your comments to create a lookup between an abbreviation and the long-form message. When you are running your program on the microcontroller, BigBug will translate the short codes to long messages in real-time as you send log/debug data over serial.

For example (not restricted to Arduino-only), if you write Serial.println("HW") //@BB[HW] Hello World!, BigBug will translate the received characters HW\n to Hello World!. In this simple example, the abbreviation uses 3 characters while the fully readable message uses 13 characters, for a savings of ~75% with no loss of clarity. More advanced usage lets you log data: Serial.println("DT 1 1") //@BB[DT] Today's Date is: {0}/{1} becomes Today's Date is 1/1. You can also use enumerated variables (last example could showToday's Date is Jan. 1 with the same print command).

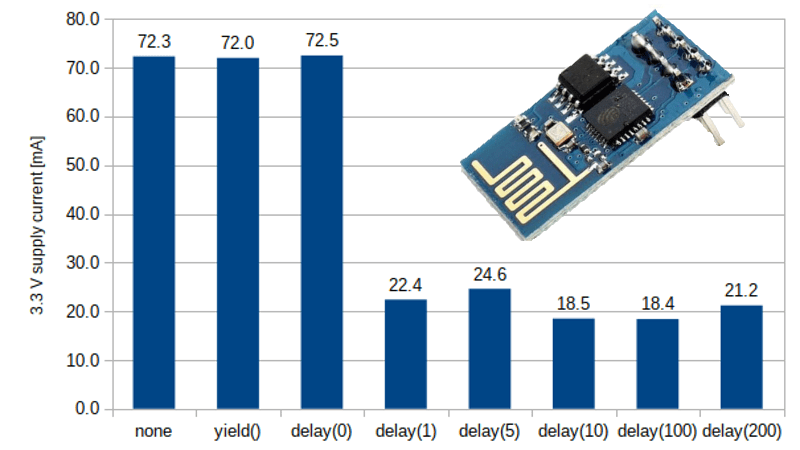
In terms of real-world benefit, using a 115200 baud connection (with 8N1 encoding) this is 115200 bits per second /(8+1) bits per byte = 12800 bytes/sec = 1 byte every 80 microseconds. Sending 13 bytes of Hello World!\n (in a naive, blocking UART implementation) takes ~1 ms of CPU time. With the shortcode HW\n, it would take ~0.25 ms to send essentially the same message (then decoded by BigBug). Note that because this just operates on serial data, BigBug is language independent

If you’ve been constrained by serial throughput for debugging, this looks like a well-polished tool to solve your problems. If you are just using an Arduino and throughput is no issue, then try this tool to debug Arduino programs. Or you could always double-down and use a microcontroller to debug another microcontroller.


  • Newsletter

    Sign up for the PlanetArduino Newsletter, which delivers the most popular articles via e-mail to your inbox every week. Just fill in the information below and submit.

  • Like Us on Facebook