Posts | Comments

Planet Arduino

Archive for the ‘pov’ Category

Believe it or not, the Mickey Mouse clip used for this demonstration is actually in the public domain.

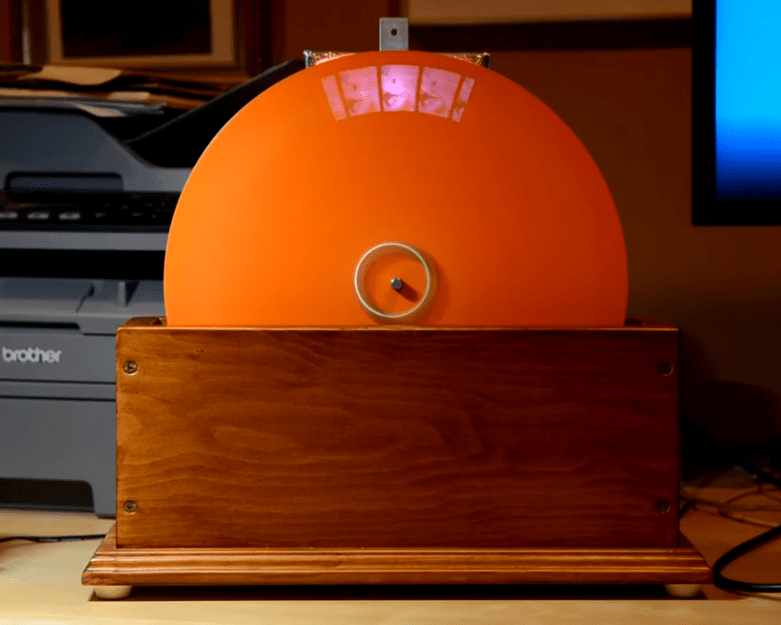
The earliest televisions used a spinning disk technology called the Nipkow disk, which is exactly what [Science ‘n’ Stuff] recreated with their Arduino-based mechanical color television (video link, also embedded below.) The device reads video and audio from an SD card, and displays the video using a precisely-timed RGB LED visible through a perforated spinning disk. The persistence of vision effect results in a video that is small, relative to the size of the disk, but perfectly watchable. A twist is that the video is in color!

A Nipkow disk is a fairly simple and electromechanical device that relies on timing; something a modern microcontroller and RGB LED is perfectly capable of delivering. In this device, the holes in the disk create 32 vertical scanlines with 96 “pixels” making up each of those lines. Spinning disk technology was always limited to being monochromatic, but in this implementation, each “pixel” is given its own unique color by adjusting the RGB LED accordingly.

The first video shows off the device and demonstrates it working; note that it may look like there are multiple little screens, but the center one can be thought of as the “true” display with the others essentially being artifacts due to light leakage. If you’re interested in the nuts and bolts of exactly how a Nipkow disk works, then the second video is what you’ll be more interested in, because it goes through all the details of exactly how everything functions.

Another neat thing about Nipkow disks is that image acquisition is really not much more complex than image display.

[via Arduino Blog]


Just as we are driven today to watch gifs that get better with every loop, people 100+ years ago entertained themselves with various persistence of vision toys that used the power of optical illusions to make still images come to life. [jollifactory] recently recreated one of the first POV devices — the phenakistoscope — into a toy for our times.

The original phenakistoscopes were simple, but the effect they achieved was utterly amazing. Essentially a picture disk with a handle, the user would hold the handle with one hand and spin the disk with the other while looking in a mirror through slits in the disk. Unlike the phenakistoscopes of yore that could only be viewed by one person at a time, this one allows for group watching.

Here’s how it works: an Arduino Nano spins a BLDC motor from an old CD-ROM drive, and two strips of strobing LEDs provide the shutter effect needed to make the pictures look like a moving image.The motor speed is both variable and reversible so the animations can run in both directions.

To make the disks themselves, [jollifactory] printed some original phenakistiscopic artwork and adhered each one to a CD that conveniently snaps onto the motor spindle. Not all of the artwork looks good with a big hole in the middle, so [jollifactory] created a reusable base disk with an anti-slip mat on top to spin those.

If you just want to watch the thing in action, check out the first video below that is all demonstration. There be strobing lights ahead, so consider yourself warned. The second and third videos show [jollifactory] soldering up the custom PCB and building the acrylic stand.

There are plenty of modern ways to build old-fashioned POV toys, from all-digital to all-printable.

The human body does plenty of cool tricks, but one of the easiest to take advantage of is persistence of vision (POV). Our eyes continue to see light for a fraction of a second after the light goes off, and we can leverage this into fun blinkenlight toys like POV staffs. Sure, you can buy POV staffs and other devices, but they’re pretty expensive and you won’t learn anything that way. Building something yourself is often the more expensive route, but that’s not the case with [shurik179]’s excellent open-source POV staff.

There’s a lot to like about this project, starting with the detailed instructions. It’s based on the ItsyBitsyM4 Express and Adafruit’s Dotstar LED strips. You could use the Bluetooth version, but it’s already quite easy to load images to the staff because it shows up as a USB mass storage device. We like that [shurik179] added an IMU and coded the staff so that the images look consistent no matter how fast the staff is spinning. In the future, [shurik179] might make a Bluetooth version that’s collapsible. That sounds like quite the feat, and we can’t wait to see it in action.

As cool as it is to wave a POV staff around, there’s no real practical application. What’s more practical than a clock?

This thing right here might be the coolest desk toy since Newton’s Cradle. It’s [Stephen Co]’s latest installment in a line of mesmerizing, zodiac-themed art lamps that started with the water-dancing Aquarius.  All at once, it demonstrates standing waves, persistence of vision, and the stroboscopic effect. And the best part? You can stick your finger in it.

This intriguing lamp is designed to illustrate Pisces, that mythological pair of fish bound by string that represent Aphrodite and her son Eros’ escape from the clutches of Typhon. Here’s what is happening: two 5V DC motors, one running in reverse, are rotating a string at high speeds. The strobing LEDs turn the string into an array of optical illusions depending on the strobing rate, which is controlled with a potentiometer. A second pot sweeps through eleven preset patterns that vary the colors and visual effect. And of course, poking the string will cause interesting interruptions.

The stroboscopic effect hinges on the choice of LED. Those old standby 2812s don’t have a high enough max refresh rate, so [Stephen] sprung for APA102Cs, aka DotStars. Everything is controlled with an Arduino Nano clone. [Stephen] has an active Kickstarter campaign going for Pisces, and one of the rewards is the code and STL files. On the IO page for Pisces, [Stephen] walks us through the cost vs. consumer pricing breakdown.

We love all kinds of lamps around here, from the super-useful to the super-animated.

Hackaday readers have certainly seen more than a few persistence of vision (POV) displays at this point, which usually take the form of a spinning LED array which needs to run up to a certain speed before the message becomes visible. The idea is that the LEDs rapidly blink out a part of the overall image, and when they get spinning fast enough your brain stitches the image together into something legible. It’s a fairly simple effect to pull off, but can look pretty neat if well executed.

But [Andy Doswell] has recently taken an interesting alternate approach to this common technique. Rather than an array of LEDs that spin or rock back and forth in front of the viewer, his version of the display doesn’t move at all. Instead it has the viewer do the work, truly making it the “Chad” of POV displays. As the viewer moves in front of the array, either on foot or in a vehicle, they’ll receive the appropriate Yuletide greeting.

In a blog post, [Andy] gives some high level details on the build. Made up of an Arduino, eight LEDs, and the appropriate current limiting resistors on a scrap piece of perfboard; the display is stuck on his window frame so anyone passing by the house can see it.

On the software side, the code is really an exercise in minimalism. The majority of the file is the static values for the LED states stored in an array, and the code simply loops through the array using PORTD to set the states of all eight digital pins at once. The simplicity of the code is another advantage of having the meatbag human viewer figure out the appropriate movement speed on their own.

This isn’t the only POV display we’ve seen with an interesting “hook” recently, proving there’s still room for innovation with the technology. A POV display that fits into a pen is certainly a solid piece of engineering, and there’s little debate the Dr Strange-style spellcaster is one of the coolest things anyone has ever seen. And don’t forget Dog-POV which estimates speed of travel by persisting different images.

[Thanks to Ian for the tip.]

When [Im-pro] wants a display, he wants it to spin.  So he built a persistence of vision (POV) display capable of showing a 12-bit color image of 131 x 131 pixels at 16 frames per second. You can see a video about the project below, but don’t worry, you can view it on your normal monitor.

The project starts with a Java-based screen capture on a PC. Data goes to the display wirelessly to an ESP8266. However, the actual display drive is done by an FPGA that drives the motor, reads a hall effect index sensor, and lights the LEDs.

Perhaps the most interesting part of the project is the FPGA-based mapping of the rectangular coordinates of the incoming video to the polar coordinates required by the display. There are 4 arms of LEDs or “wings” and a 3D printed structure that is all included in the post.

The FPGA is a Cmod S6 which is a breakout board for a Xilinx Spartan 6 with more than enough horsepower to handle the workload. There are also custom PCBs involved, so when you think about it, it is a fairly wide-ranging project. Java software, ESP8266 software, FPGA configurations, a 3D-printed design, and PCB layouts. If you want something simple to tackle that has a bit of everything in it, this might be your next project.

Most of the POV displays we see don’t have this kind of color-depth and resolution. We’ve seen displays built around fans. Our favorite, though, is the dog speedometer.

We’ve covered plenty of persistence of vision (POV) displays before, but this one from [Vadim] is rather fun: it’s built on top of a PC fan. He’s participating in a robot building competition soon and wanted to have a POV display. So, why not kill two birds with one stone and build the display onto a fan that could also be used for ventilation?

The display is a stand-alone module that includes a battery, Neopixels, Arduino and an NRF240L01 radio that receives the images to be displayed. That might seem like overkill, but putting the whole thing on a platform that rotates does get around the common issue of powering and sending signals to a rotating display: there is no need for slip connections.

[Vadim] goes into a good level of detail on how he built the display, including the problems he had diagnosing a faulty LED chip, and why it is important to test at each stage as it is easier to debug when the display isn’t whizzing around at high speed.

It’s a bit of a rough build that uses more protoboard than might be necessary, but we’re keeping our fingers crossed that it doesn’t fly off during the competition.

[Johan Beyers] built an elegantly simple Dog Speedometer project that uses a POV display to display a running dog’s speed without the benefit of an accelerometer. Using an Arduino (looks like it might be a D-love) and a line of 5 LEDs, [Johan] built a dirt-simple POV — 39 lines of code — that times out the flashes so that an immobile viewer sees the dog’s speed. How do you know your pup’s loping speed? That’s the beauty of this project.

Instead of putting all of the LEDs in a line, they are arranged in a V-shape. Because of this spatial offset, the patterns flashed out only “look right” at the right speed. Each number is flashed at a different speed, so you just look for the least distorted numeral.

[Johan]’s code does only what it needs to get the job done. The character data are stored in arrays that are played back directly to the pins of PORTD — avoiding most of the usual Arduino-style complexity with pin definitions and other foolery.

POV displays can be leveraged to add pizzazz to any project — this CD-ROM POV clock and this wind-powered POV weather station come to mind.


Filed under: Arduino Hacks

bonus_1.slr_PRThis isn't your typical schoolroom globe... Create a Persistence-of-Vision LED Globe to display a map, a skull, or message.

Read more on MAKE

The post Build a Persistence-of-Vision LED Globe appeared first on Make: DIY Projects and Ideas for Makers.

For those who haven’t addicted themselves to Super Hexagon yet, it’s pretty… addicting, to say the least. Normally this 80’s arcade-style game would run in a browser but some of the people at Club de Jaqueo in Buenos Aires decided to cram all of that into an Arduino. They didn’t stop there, though, and thought that it would work best with a POV display.

To navigate the intricate maze of blending a POV display with a fast-paced game like this, the group turned to the trusty Arduino Micro. After some frustration in the original idea, they realized that the game is perfectly suited for a POV display since it’s almost circular. The POV shouldn’t take up too much of the processing power of the Arduino, so most of the clock cycles can be used for playing the game. They couldn’t keep the original name anymore due to the lack of hexagon shape (and presumably copyrights and other legal hurdles), but the style of the original is well-preserved.

The group demonstrated their setup this past weekend, and the results are impressive judging by the video below. They’ve also released their source code and schematics as well, in case you have an old fan (or maybe even a bicycle?) lying around that is just begging to be turned into a mini-arcade game.


Filed under: Arduino Hacks


  • Newsletter

    Sign up for the PlanetArduino Newsletter, which delivers the most popular articles via e-mail to your inbox every week. Just fill in the information below and submit.

  • Like Us on Facebook