Posts | Comments

Planet Arduino

Archive for the ‘uno’ Category

We recently covered Vaclav Krejci’s stick shift project, in which he designed a board that surrounds the shift lever and uses Hall effect sensors to detect its position. It then displayed the current gear on a small OLED screen. The idea was that the user could mount that screen wherever they wanted on the dashboard or center console. But now Krejci is back with a more satisfying solution: an LED display built into the shifter knob itself.

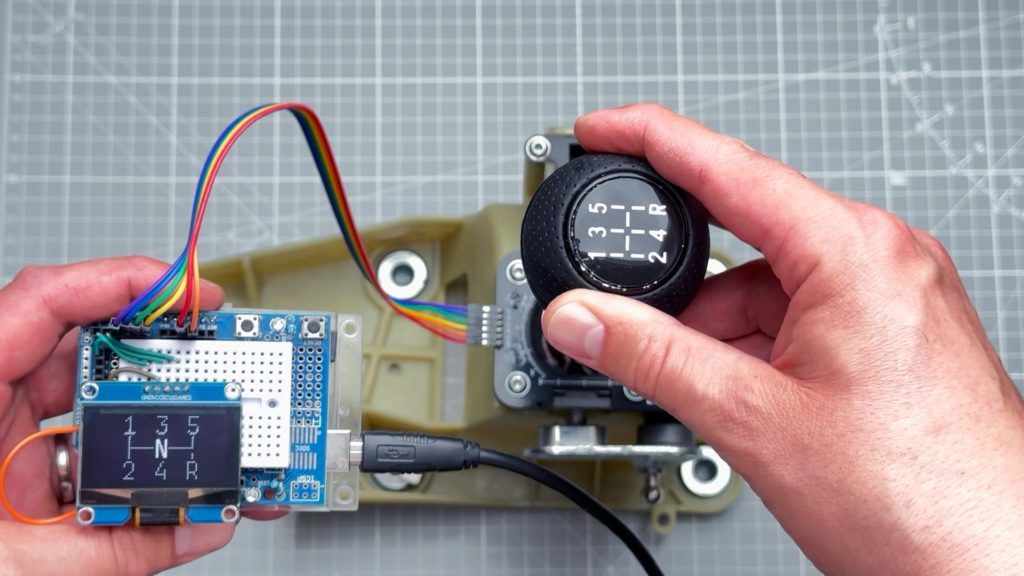
The rest of the hardware, aside from the display, is the same. A custom PCB surrounds the shift lever and contains the Hall effect sensors. Jumper cables connect those to a shield on an Arduino UNO Rev3, which looks at the signals from the sensors and calculates the approximate position of a permanent magnet attached to the shift lever. That position tells the Arduino the current gear.

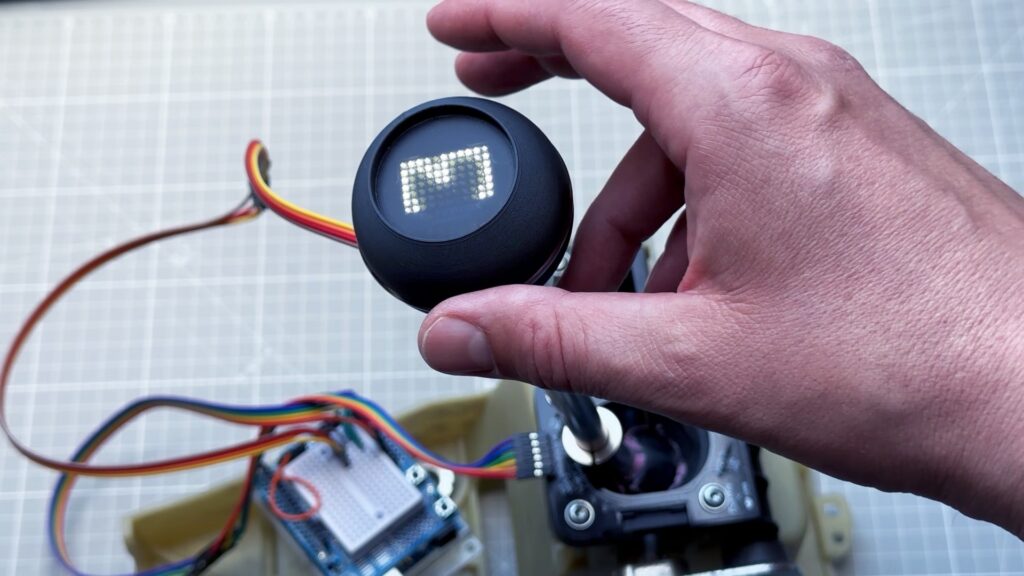
The difference is in how it displays the gear to the user. Before, it was a loose OLED screen. Now, it is a bright Pimoroni 7×11 LED matrix display integrated into the shifter knob. The knob is an inexpensive aftermarket model that Krejci modified for this project. He removed the top half of the knob and replaced it with a 3D-printed version with a cavity where the LED matrix can sit. A sheet of tinted translucent plastic helps to diffuse the light and hide everything else.

This looks absolutely fantastic and would be really cool to see in a car.

The post DIY shifter knob gets a beautiful integrated LED gear indicator appeared first on Arduino Blog.

The high cost of EV (electric vehicle) chargers may lead you to believe that they’re complex systems. But with the exception of Tesla’s Supercharger, that isn’t true. They’re actually quite simple — basically just glorified switches. All of the nitty gritty charging details are the responsibility of the car’s onboard circuitry. With that in mind, EV owners may want to follow Pedro Neves’ guide on building an affordable Arduino-based EV charging station.

Because the car deals with all of the particulars of charging, the only purpose of the “charger” is to provide a connection to the electrical grid. “Charger” isn’t even the right word, as this is more accurately EVSE (electric vehicle supply equipment). For safety reasons, the car and the EVSE communicate with each other. The car can tell the EVSE when it is safe to provide power and the EVSE will then connect a switch between the charging plug and the electrical grid. It really isn’t any more complex than a $15 smart outlet and most of the cost of an EVSE is the heavy-gauge wiring. 

Here, Neves proves that with a DIY EVSE designed around an Arduino UNO Rev3 board. It has a custom shield with relays for switching power and to power the Arduino itself with mains voltage. A few LEDs act as status indicators. EVSE protocols are standardized, so Neves was able to program the Arduino to communicate with any connected car. Once the Arduino receives permission from the car, it switches the relays to provide mains voltage. A heavy-duty 3D-printed enclosure contains those components, with a breaker switch and weatherproofing.

The post Creating a low-cost EV charging station with Arduino appeared first on Arduino Blog.

Arcade machines are a dying breed and that’s a shame, because their purpose-built approach to gaming is so wholesome. There is something intrinsically satisfying about a device that does one thing and does it well. If you want to bring that beauty into your own home, Migi has a great Instructables tutorial that will walk you through building your own arcade cabinet with custom Arduino-based controls.

Migi’s cabinet design is inspired by Capcom’s Mini Cute line, which was a series of small arcade machines popular in Japanese cafes. But while it is smaller than standard arcade cabinets, it is still big enough to feel substantial. An old laptop runs MAME or whatever other emulation software the user desires. Because a CRT (cathode-ray tube) display is a must for an arcade cabinet, Migi used a 14” Sony PVM (Professional Video Monitor). Those tend to be pretty pricey these days, so anyone replicating this build may want to entertain other CRT options.

Arcade games need rock-solid controls, so Migi designed this to utilize Sanwa buttons and sticks. The cabinet has controls for two players, with an Arduino UNO Rev3 dedicated to each set of controls. Migi set it up that way to make the software setup easier, as each Arduino will appear as its own gamepad in the emulation software. 

Migi constructed the cabinet itself using a combination of MDF and acrylic. A big laser cutter made that fabrication a snap, but less well-equipped hobbyists may have to utilize alternative tools like handheld routers. With a coat of paint and some printed graphics, it looks fantastic. And the Sanwa controls should hold up to decades of heavy use. 

The post Build an adorable arcade cabinet with custom controls appeared first on Arduino Blog.

Science Buddies had a problem: their tiny little pug loves eating their cat’s poop. Because the pug is smaller than the cat, they couldn’t simply put the litter box behind a tiny cat door. So they came up with a more sophisticated solution: a motorized door triggered by a magnetic collar.

Riley the pug’s responses to poop access prevention are awfully pugnacious, but she is also pretty skittish. Science Buddies surmised that a cardboard door would be enough to stop her. But that would also stop Trouble the cat, so the door needed to remain open for Trouble and only close when Riley tried to enter the area with the litter box. After experimenting with a few different solutions, Science Buddies landed on servo-actuated cardboard doors that close in the presence of a strong magnetic field.

That magnetic field comes from a permanent magnet dangling from Riley’s collar. An Arduino UNO Rev3 board detects that magnet using several Reed switches arranged along the bottom edge of the door frame. When the magnet causes the Reed switches to close, the Arduino knows that Riley is trying to get to the cat poop. In then closes two cardboard doors using small hobby servo motors.

It took some tinkering to position the Reed switches in a way that they’d trigger consistently, but Science Buddies found a reliable setup in the end. Now whenever Riley attempts to get to the litter box, the cardboard doors slam in her adorable pug snoot and she abandons her quest.

The post This DIY pet door helps keep a dog out of the cat’s litter box appeared first on Arduino Blog.

You’ll find dartboards in just about every dive bar in the world, like cheaper and pokier alternatives to pool. But that doesn’t mean that darts is a casual game to everyone. It takes a lot of skill to play on a competitive level and many of us struggle to perform well. Niklas Bommersbach decided that years of practice was too much of a commitment, so he built this robot that can dominate dart games.

This robot can, essentially, throw a dart perfectly every time to hit the desired target on the board. If you’re unfamiliar with the game, you might think that a bullseye is always best. But that isn’t true — especially for certain rulesets. To play strategically, Bommersbach needed his robot to nail the desired space on the board on-demand. 

His first step was to make throws repeatable and predictable. His robot has a balanced arm that spins up to a precise rotational speed. At the set angle, it releases the dart. By monitoring many throws with computer vision, Bommersbach was able to dial in the speed and angle variables until the result became very predictable. An Arduino UNO Rev3 board controls the arm speed and calculates the release. But Bommersbach struggled to get the timing of the release exactly right, as the Arduino was running its code sequentially and so there was a small variance — just enough to throw off the throw.

His solution was to add a second Arduino, which has the sole responsibility of releasing the dart using a stepper-actuated mechanism. That allowed for very precise timing and repeatable throws. The timing influences the dart’s vertical position on the board, while a linear motion system controls its horizontal position.

In test matches, Bommersbach’s robot was able to trounce human opponents with ease.

The post This robot dominates dart games appeared first on Arduino Blog.

Go to any arcade and the air hockey table will probably be one of the most popular games they have. Everyone loves air hockey, but a lot of people don’t want to go to an arcade just to play. If you fall into that category, then you can follow LloydB’s Instructables guide to make your own scorekeeping air hockey table.

The key to air hockey is right there in the name: air. All of those little holes in the table’s surface allow air flow. That creates an air cushion for the puck and paddles to float on, reducing friction and enabling knuckle-shattering gameplay. For that to work, the table needs something pushing at least as much air as escapes through the holes. This table isn’t very big, so it doesn’t need a high volume of air. Three 12V PC fans are enough. They push air into a chamber beneath the hole-filled top board. Power for the fans comes from a battery holder with 8 AA batteries.

Those batteries also power the Arduino UNO Rev3 that handles the scorekeeping, which is the other important part of air hockey. Each goal chute has a laser break-beam sensor to detect when the puck comes shooting in. The Arduino then updates the scores shown on a 16×2 LCD screen. The Arduino will also emit a tone through a buzzer. That increases in pitch with each point, so players get audible cues as the game progresses. 

The post This small scorekeeping air hockey game brings the arcade classic to your tabletop appeared first on Arduino Blog.

We all know how annoying a ceiling fan can be when it isn’t balanced well and that annoyance perfectly demonstrates the necessity of a good, sturdy bearing. A ceiling fan’s bearing needs to allow for smooth rotational motion with as little friction as possible, while completely constraining movement in every other axis. Those properties make a ceiling base a surprisingly good starting point for a SCARA, as demonstrated in tuenhidiy’s recent Instructables write-up.

In their tutorial, tuenhidiy refers to this as a “Spaceship Scara Arm.” It isn’t exactly clear why they chose the “spaceship” terminology, but it is similar to a conventional SCARA (Selective Compliance Assembly Robot Arm) — just one with only two degrees of freedom (DOF).

The entire point of a SCARA is that it is fully constrained, except for rotation around the Z axis at each joint. After their ceiling fan broke, tuenhidiy noticed that the fan’s base with its beefy bearing would be perfect for this application. They took that, added a couple of stepper motors and belts, some aluminum extrusion, and a couple more bearings to create this simple SCARA.

An Arduino UNO Rev3 board controls those motors through a CNC Shield V3. Grbl firmware makes it easy to control the positions of the motors using just about any software a user could possibly want. Some simple calculations regarding the arm’s geometry and gear ratios should let appropriate software determine exactly where it is in space. For a demonstration, tuenhidiy added a DC solenoid for its magnetic capabilities. But anyone replicating this project can add their own end effector to suit their needs.

The post Ceiling fan becomes a “spaceship” SCARA robot arm appeared first on Arduino Blog.

It may not get as much attention as NASA, Roscosmos, or even CNSA (China National Space Administration), but India’s space program has achieved some impressive goals. Just last year, in August of 2023, ISRO (Indian Space Research Organisation) completed their first soft landing on a celestial object with the Chandrayaan-3’s moon landing. That understandably inspired pride among Indians and the YouTube channel Science 4 U celebrated by building this model of the Chandrayaan-3 launch.

This project can be completed with some everyday materials and a few inexpensive components. When ready, it counts down from 10. At zero, the rocket climbs the launch pad’s structure. That rocket is a small model that makers can fabricate on any 3D printer. The launch pad and structure is mostly foam packing material.

The electronics consist of a low-speed geared DC motor, a relay module, an OLED screen, a battery holder, and an Arduino UNO Rev3 board. The Arduino starts by displaying the numerical countdown on the OLED screen. After the countdown completes, the Arduino switches on the relay. That completes the motor circuit, allowing current to flow from the AA batteries to the motor. The running motor winds in a string that pulls the rocket up the structure.

There doesn’t seem to be any switch or sensor to turn off the motor, so the user will have to program a timer to switch the relay. There also isn’t any hardware to reverse the motor polarity, so the user has to lower the rocket manually after a launch. But this is an inexpensive and fun project that should be perfect for students in India who are excited by Chandrayaan-3.

The post A delightful Chandrayaan-3 rocket launch model appeared first on Arduino Blog.

The objective benefits may be almost nonexistent today, but there is still something satisfying about rowing through the gears in a car with a manual transmission. If that car was made in the past couple of decades, there is a good chance that it has an indicator on the dash to tell you what gear you’re in. But older cars usually don’t have an indicator, which is why you might want to follow Vaclav Krejci’s guide to add one.

The great thing about this project is that it is easy to perform — even for beginners. Gearheads that don’t typically touch electronics can complete this build with some patience. Once done, it will display the current gear and a visual diagram on a small OLED screen, which the user can then mount anywhere in their car. 

This works using an arrangement of four Hall effect sensors that detect the strength of the magnetic field coming from a permanent magnet attached to the gear shift lever. The principle is similar to triangulation, because the values detected by the four sensors can be used to calculate the position of the magnet. That isn’t very precise, but it doesn’t need to be for an application like this.

The four Hall effect sensors mount onto a custom PCB. That connects to an Arduino UNO Rev3, which the user can tuck away inside of a center console. The Arduino performs the calculations, then updates the OLED screen with the results. Krejci even demonstrates how the user can simulate the entire circuit using WOKWI, which is very useful for ironing out kinks before building a hardware prototype. 

The post An easy way to add a gear indicator for your stick shift appeared first on Arduino Blog.

Fans off Wallace and Gromit will all remember two things about the franchise: the sort of creepy — but mostly delightful — stop-motion animation and Wallace’s Rube Goldberg-esque inventions. YouTuber Gregulations was inspired by Wallace’s Autochef breakfast-cooking contraption and decided to build his own robot to prepare morning meals.

Gregulations wanted his Autochef-9000 to churn out traditional full British breakfasts consisted of buttered toast, eggs, beans, and sausage. That was an ambitious goal, because each of those foods requires several steps to prepare. Gregulations’ solution was to, essentially, create one large machine that contains several smaller CNC machines. Each one is distinct and tailored to suit a particular food. In total — if you add up all of the different sections — this is a 12-axis CNC machine.

The Autochef-9000’s central controller is an Arduino Mega 2560 board. But even with the power and number of pins available, that wouldn’t have been able to handle everything. So it divvies out some tasks to Arduino UNO Rev3 boards.

As you would expect, this takes quite a lot of heat to cook everything. That’s why the Autochef-9000 contains several electric heating elements, which the Arduinos control via relays.

Users can order food using a touchscreen menu system or a smartphone interface. Autochef-9000 will then whir to life. It will open and heat a tin of beans, grab and heat a sausage, hard boil an egg, and toast and then butter bread fed from a magazine. Finally, it will deposit all of those items onto a plate.

There is a lot going on inside of this machine and Gregulations breezes past a lot of the technical details, but it is a joy to see in action. And unlike Wallace’s inventions, this one hasn’t caused any serious disasters (yet).

The post Autochef-9000 can cook an entire breakfast automatically appeared first on Arduino Blog.


  • Newsletter

    Sign up for the PlanetArduino Newsletter, which delivers the most popular articles via e-mail to your inbox every week. Just fill in the information below and submit.

  • Like Us on Facebook