Posts | Comments

Planet Arduino

Archive for the ‘fastLED’ Category

Just when we think we’ve seen all possible combinations of 3D printing, microcontrollers, and pretty blinkenlights coming together to form DIY clocks, [Mukesh_Sankhla] goes and builds this geometric beauty. It’s kaleidoscopic, it’s mosaic, and it sorta resembles stained glass, but is way cheaper and easier.

The crucial part of the print does two jobs — it combines a plate full of holes for a string of addressable RGB LEDs with the light-dividing walls that turn the LEDs into triangular pixels. [Mukesh] designed digits for a clock that each use ten triangles. You’d need an ESP8266 to run the clock code, or if you’d rather sit and admire the rainbow light show unabated by the passing of time, just use an Arduino Uno or something similar.

Most of the aesthetic magic here is in the printed pieces and the FastLED library. It has a bunch of really cool animations baked in that look great with this design. Check out the demo video after the break. The audio is really quiet until the very end of the video, so be warned. In our opinion, the audio isn’t necessary to follow along with the build.

The humble clock takes many lovely forms around here, including pop art.

If you’ve got a party coming up and are looking to add a little bit of excitement, you might be interested in this recent project from [Gav Lewis]. The build is based on a commercially available party light, but with some upgraded components the final product is brighter and more dynamic than it was stock.

Realistically, [Gav] has changed out almost every component of this light except for the enclosure and the front lens. The original 5 mm LED array was replaced with a new 8×8 WS2812B panel, and the electronics completely replaced with an Arduino Nano. He’s still using the light’s original power supply, but as it only puts out around 4.2 V, he’s added a boost converter to provide a stable 5 V for the new hardware. He also added a small 12 V cooling fan, which he says is basically silent since it’s only getting half its rated voltage.

[Gav] has developed a number of lighting patterns with FastLED that do a good job of emulating what you might see from a much more expensive laser scanner. In the video after the break, you can see how multiple colored beams of light exit the housing at once, projecting patterns on the opposite wall. He says he’s like to restore the device’s original sound activation mode, but as of yet hasn’t gotten the code sorted out.

This project uses a off-the-shelf 8×8 matrix of WS2812B LEDs, but if you ever find yourself needing to piece together your own array from individual LEDs, we recently covered a great tip for making it a bit easier.

Despite all the incredible advancements made in video game technology over the last few decades, the 8-bit classics never seem to go out of style. Even if you weren’t old enough to experience these games when they were new, it’s impossible not to be impressed by what the early video game pioneers were able to do with such meager hardware. They’re a reminder of what can be accomplished with dedication and technical mastery.

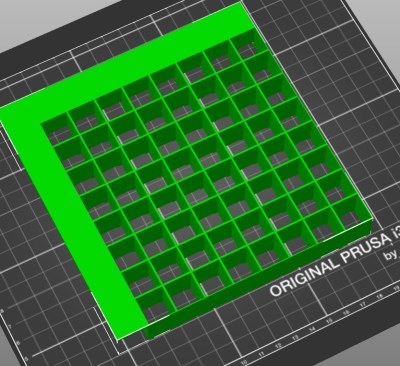
The grid has been split up for easier printing.

If you’d like to put a little retro inspiration on your desk, take a look at this fantastic 16 x 16 LED matrix put together by [Josh Gerdes]. While it’s obviously not the only thing you could use it for, the display certainly seems particularly adept at showing old school video game sprites in all their pixelated glory. There’s something about the internal 3D printed grid that gives the sprites a three dimensional look, while the diffused glow reminds us of nights spent hunched over a flickering CRT.

The best part might be how easy it is to put one of these together for yourself. You’ve probably got most of what you need in the parts bin; essentially it’s just a WS2812B strip long enough to liberate 256 LEDs from and a microcontroller to drive them. [Josh] used an Arduino Nano, but anything compatible with the FastLED library would be a drop-in replacement. You’ll also need a 3D printer to run off the grid, and something to put the whole thing into. The 12×12 shadowbox used here looks great, but we imagine clever folks such as yourselves could make do with whatever might be laying around if you can’t nip off to the arts and crafts store right now.

Beyond looking great, this project is a fantastic reminder of how incredibly handy WS2812 LEDs really are. Whether you’re recreating iconic game sprites or fashioning your own light-up sunglasses, it’s hard to imagine how we managed before these little wonders hit the scene.

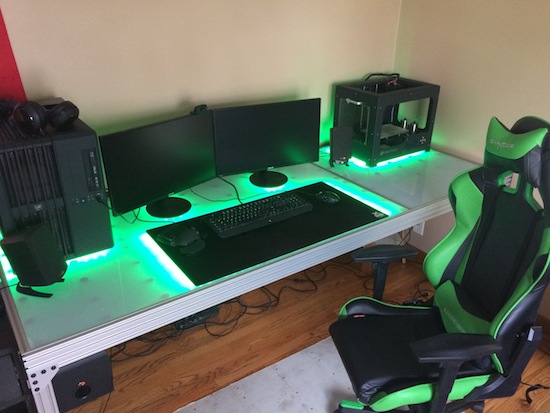
After he’d just finished a project using RGB LEDs, Imgur user nolobot’s brother mentioned he needed a new computer desk. Most people would probably just let their brother buy one, others would make something out of wood, but nolobot instead decided to create something truly amazing using more than 1,200 WS2812 RGB LED modules, an Arduino Mega, aluminum extrusion, and translucent polycarbonate.

The Mega controls these LEDs with the FastLED library, which are sandwiched between a base piece of plywood and a strip of polycarbonate using custom spacers. This diffuses the light nicely, allowing for beautiful light animations directly on the desk’s surface.

You can find more on this awesome build on the project’s Imgur page!

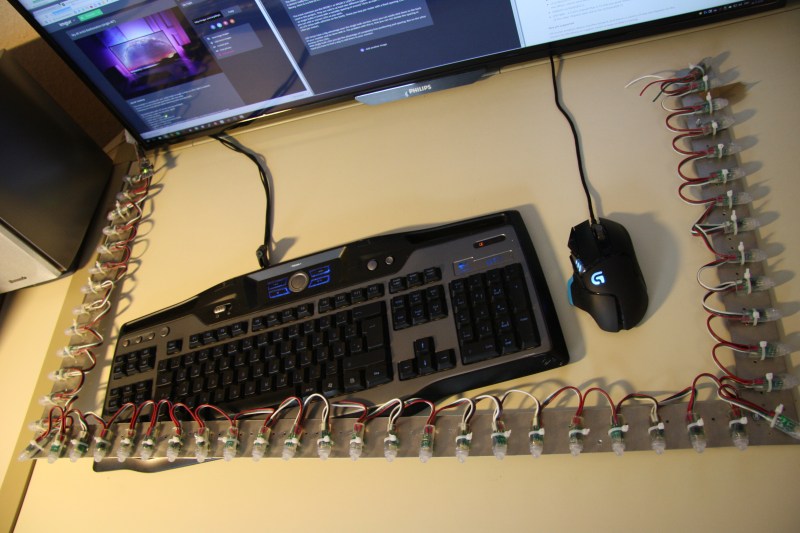
A proper battlestation — or more colloquially, computer desk — setup can sometimes use a bit of technical flair to show off your skills. [fightforlife2] has shared their DIY ambilight monitor backlighting that flows through different colours which mimic what is displayed on the screen.

[fightforlife2]’s setup uses fifty RGB LEDs with individual controllers that support the FastLED library, regulated by an Arduino Nano clone — although any will suffice. The power requirement for the display was a bit trickier, ultimately requiring 3 amperes at 5V; an external power brick can do the trick, but [fightforlife2] also suggests the cavalier solution of using your computer power supply’s 5V line — adding the convenience of shutting off the ambilight display when you shut down your PC!

Ambilight Frame Setup

Connecting the LEDs to the Arduino is simply done, followed by adding the FastLED library and installing and configuring AmbiBox on your PC. For gaming, the software only works with borderless windows for games, but that puts a 5-10% tax on your processor. Be forewarned! — the ambilighing can be distracting when gaming for the first week or so.

If you want to carry this cool idea over into your other pursuits, you can — for example — set up a similar display around your piano.

[via /r/DIY]


Filed under: Arduino Hacks, home entertainment hacks, led hacks


  • Newsletter

    Sign up for the PlanetArduino Newsletter, which delivers the most popular articles via e-mail to your inbox every week. Just fill in the information below and submit.

  • Like Us on Facebook