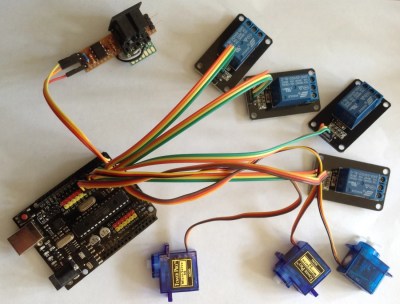
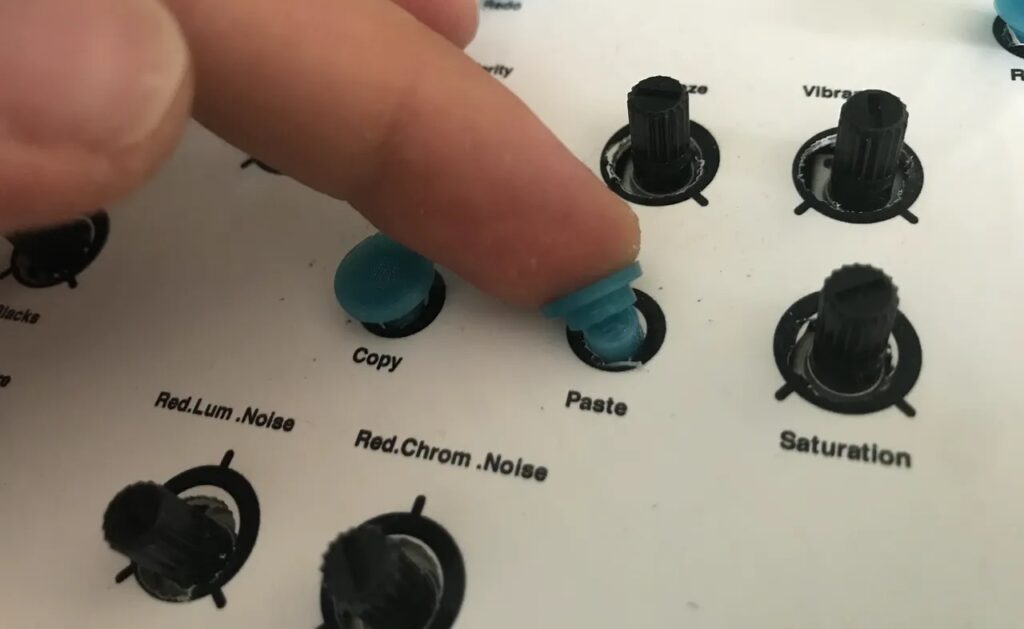
DivingBoard is a homemade MIDI controller aiming to solve the lack of parameter accessibility on the Roland JD-Xi synthesiser. It differs from other solutions – customizability and potential ease-of-use are greater, and general use with a range of synthesisers is possible, rather than just with the JD-Xi.
The project uses an Arduino Nano running Arduino and a Raspberry Pi Zero 2 W running Python.
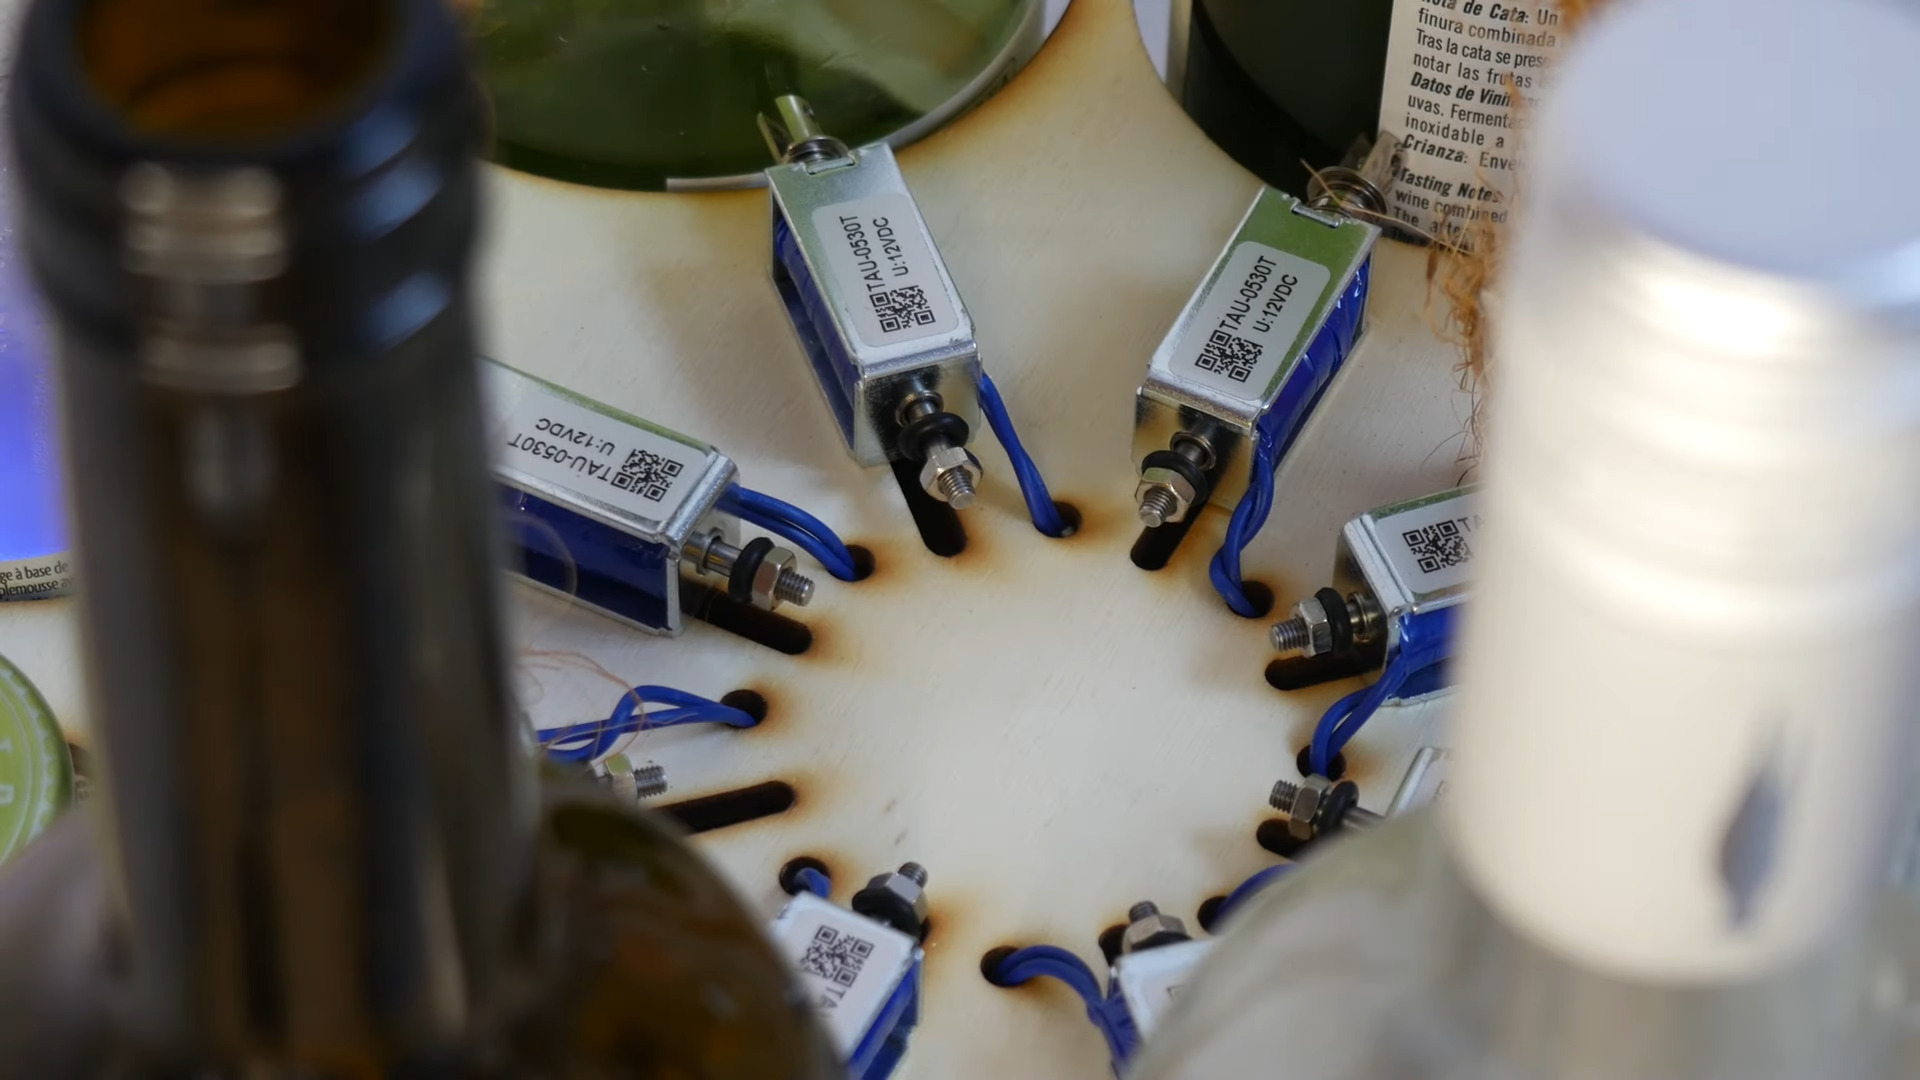
If you have an iota of musicality, you’ve no doubt noticed that you can play music using glass bottles, especially if you have several of different sizes and fill them with varying levels of water. But what if you wanted to accompany yourself on the bottles? Well, then you’d need to build a bottle-playing robot.
First, [Jens Maker Adventures] wrote a song and condensed it down to eight notes. With a whole lot of tinkling with a butter knife against their collection of wine and other bottles, [Jens] was able to figure out the lowest note for a given bottle by filing it with water, and the highest note by emptying it out.
With the bottle notes selected, the original plan was to strike the bottles with sticks. As it turned out, 9g servos weren’t up to the task, so he went with solenoids instead. Using Boxes.py, he was able to parameterize a just-right bottle holder to allow for arranging the bottles in a circle and striking them from the inside, all while hiding the Arduino and the solenoid driver board. Be sure to check it out after the break.
The recorder is a type of flute that is very popular in elementary schools because the instrument is so simple and inexpensive. If you were born in the last four decades and grew up in a western country, then there is a very good chance that you were required to learn how to play some basic melodies on a recorder. But like all instruments, the recorder is difficult to play well. So Luis Marx built a robotic recorder that could do the tricky parts.
Marx still has to blow into the mouthpiece to play this robotic recorder, but it takes care of the rest. A standard recorder has eight holes: seven finger holes on top and one thumb hole on bottom. The player’s spare thumb and finger help them stabilize the instrument. This contraption uses eight solenoids to close or open the holes according a pre-programmed sequence. It doesn’t appear that Marx integrated MIDI capability, but that would make it much easier to play new songs.
The current implementation has the sequence of notes programmed into an Arduino sketch. That sketch runs on an Arduino Nano board, which controls the solenoids through eight MOSFETs. Power comes from a 650mAh LiPo battery and everything attaches to the recorder via a 3D-printed frame. As you can hear in the video, this works quite well. Foam earplugs on the solenoid rams ensure an airtight seal on the finger holes, resulting in clean sound as long as Marx’s blowing technique is good.
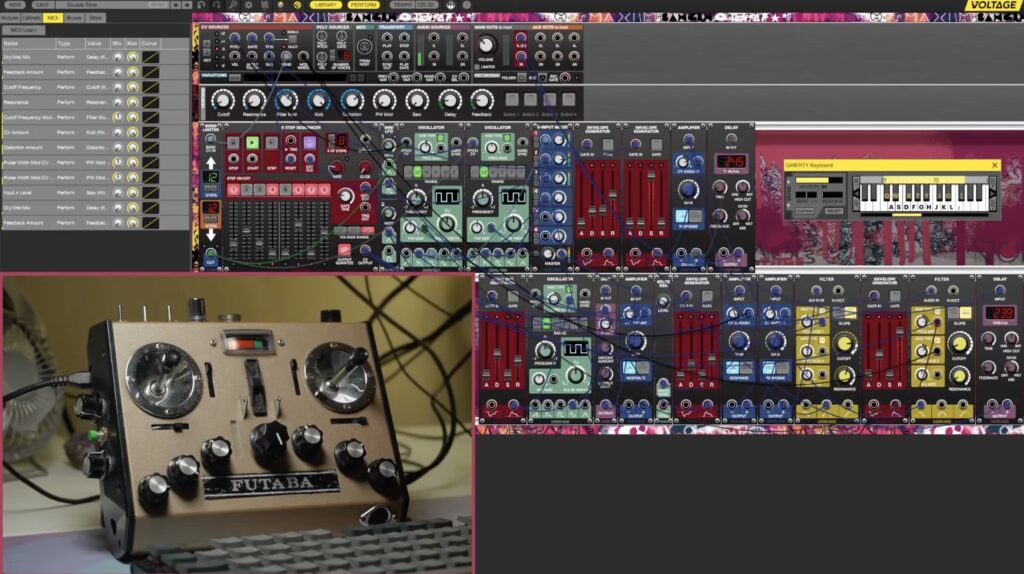
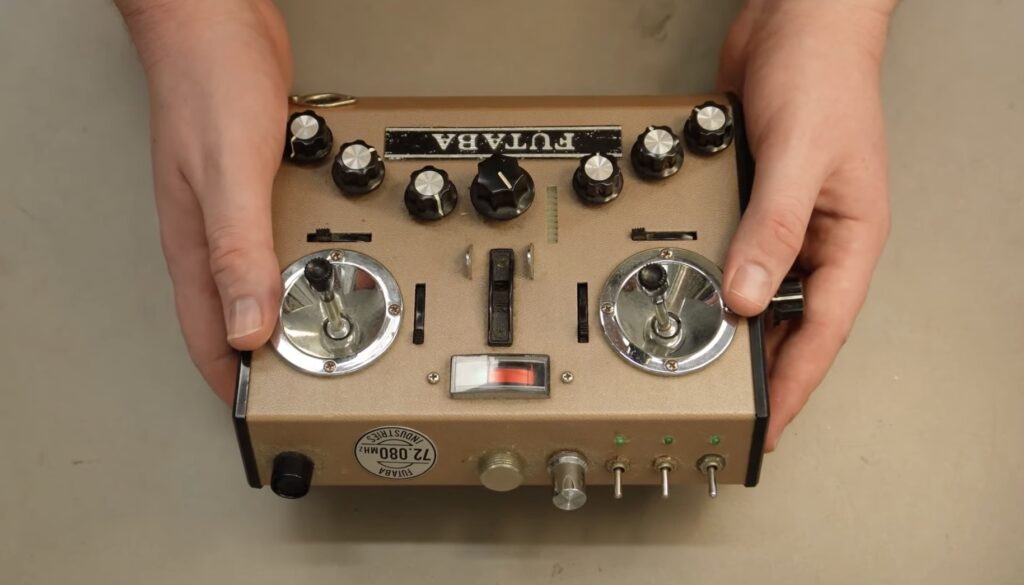
If you’re going to produce electronic music on a PC, you need some sort of input tool. That can be your keyboard and mouse, but most producers prefer to use a dedicated MIDI (Musical Instrument Digital Interface) controller. That will provide a more intuitive and efficient experience. Instead of buying something new, HYPRREAL turned a ’70s Futaba RC transmitter into a MIDI controller.
RC transmitters, like the vintage Futaba model used for this project, are controllers for RC vehicles like planes and cars. While cheap toy RC vehicles tend to come with dedicated transmitters, high-end vehicles work with universal transmitters like this one. They’re of a higher quality and can be used with all the vehicles in a hobbyist’s collection. Being an older model, this unit was quite simple. It only had two potentiometer joysticks and a few sliders. To expand its capability, HYPRREAL added several additional potentiometers.
An Arduino board monitors all of the potentiometers via multiplexers. It runs a MIDI controller library, so it can send MIDI messages to a computer connected through a USB cable. As far as the computer is concerned, the connected device is just a standard MIDI controller. That means that it will work with any MIDI software and HYPRREAL only had to configure the different controls within that software. The result is a useful MIDI controller in a very attractive retro package.
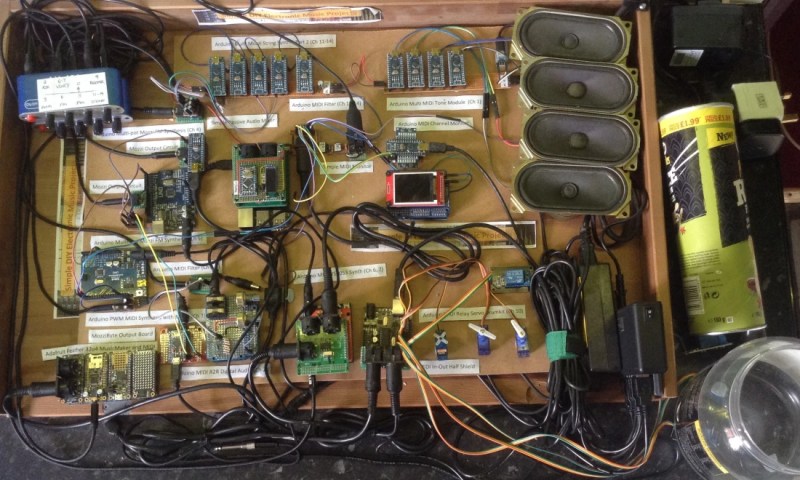
Hardware projects often fall into three categories: Those that flash lights, those that make sounds and those that move. This virtuoso performance by [Kevin]’s “Lo-Fi Orchestra” manages all three, whilst doing an excellent job of reproducing the 1973 musical classic Tubular Bells by Mike Oldfield.
Producing decent polyphonic sounds of different timbres simultaneously is a challenge for simple microcontroller boards like Arduinos, so [Kevin] has embraced the “More is more” philosophy and split up the job of sound generation in much the same way as a traditional orchestra might. Altogether, 11 Arduino Nanos, 6 Arduino Unos, an Arduino Pro Mini, an Adafruit Feather 32u4, and a Raspberry Pi running MT32-Pi make up this electronic ensemble.
Arduino Servo & Relay Drumkit
The servo & relay drumkit is a particular highlight, providing some physical sounds to go along with the otherwise solid-state generation.
The whole project is “conducted” over MIDI and the flashing sequencer in the middle gives a visual indication of the music that is almost hypnotic. The performance is split into two videos (after the break), and will be familiar to fans of 70’s music and classic horror movies alike. We’re astonished how accurately [Kevin] has captured the mood of the original recording.
If this all looks slightly familiar, it may be because we have covered the Lo-Fi Orchestra before, when it entertained us with a rousing rendition of Gustav Holst’s Planets Suite. If you’re more interested in real Tubular Bells than synthesized ones, then check out this MIDI-controlled set from 2013.
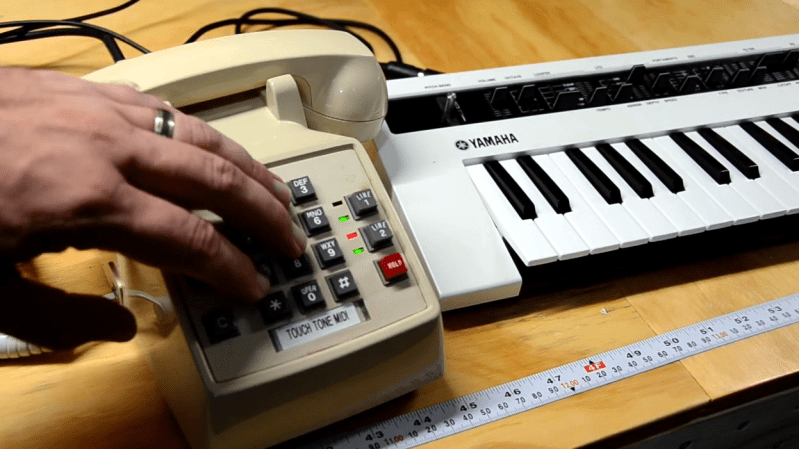
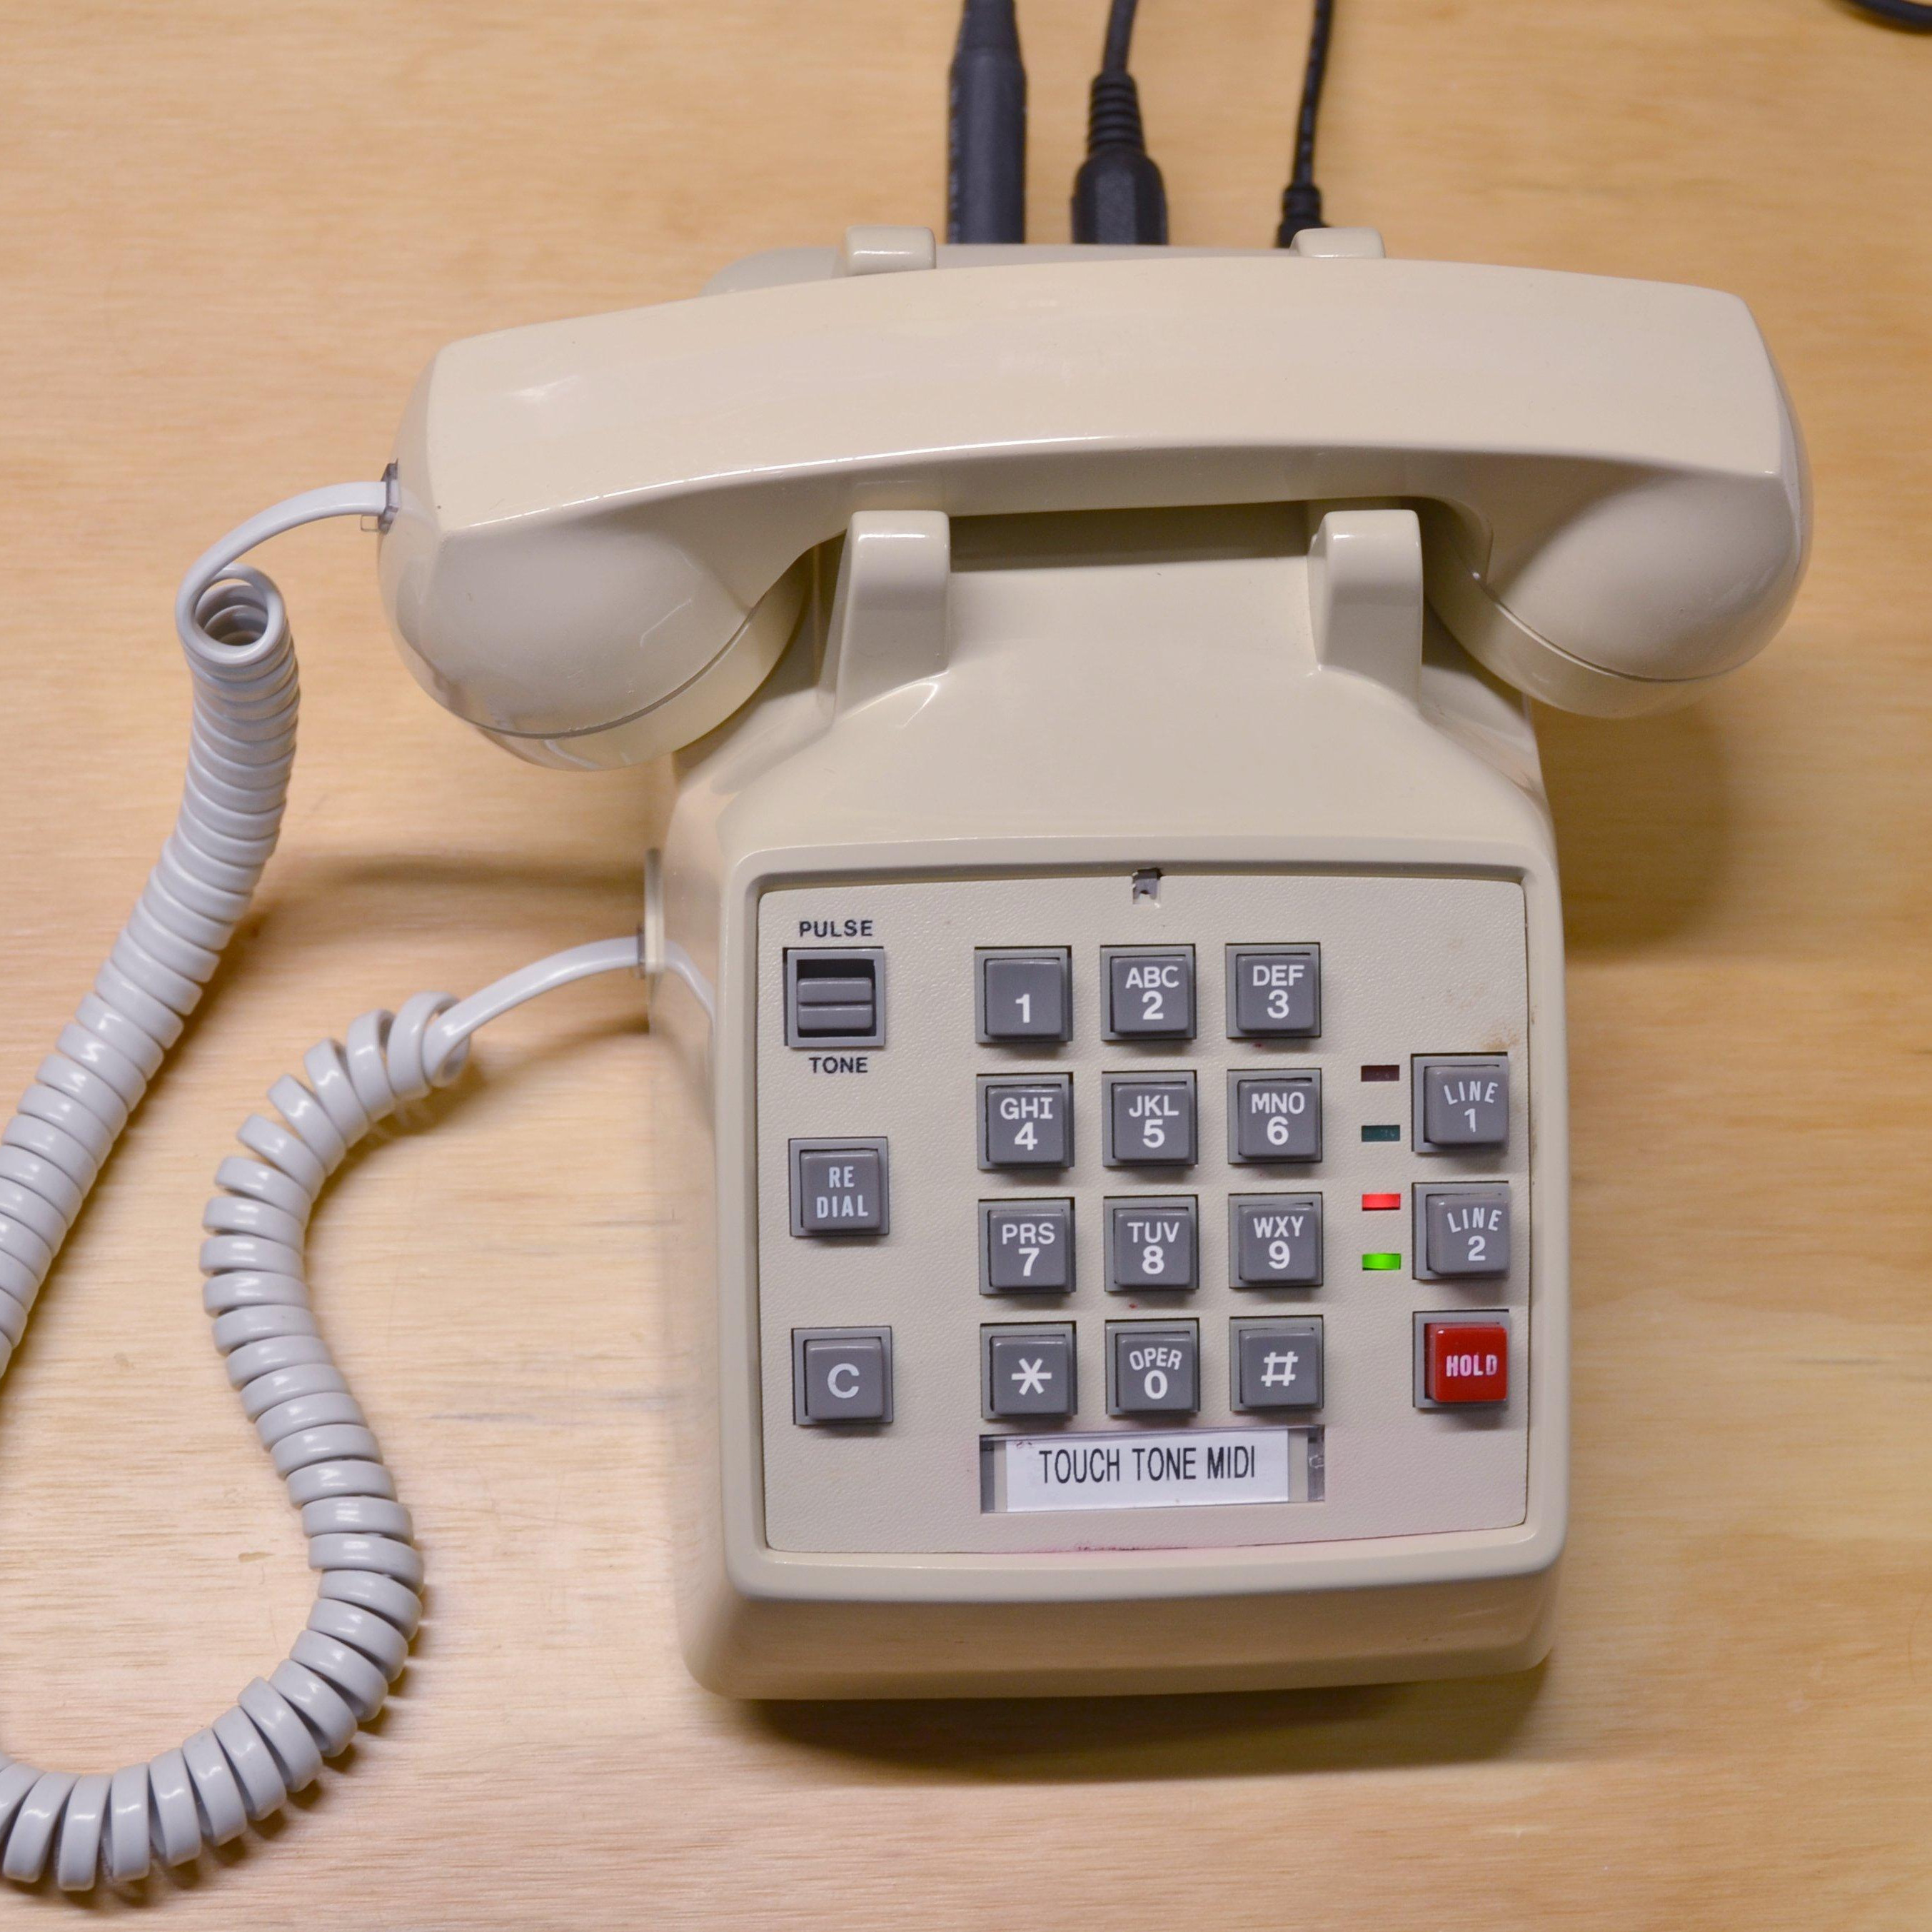
[poprhythm]’s Touch Tone MIDI Phone is a fantastic conversion of an old touch tone phone into a MIDI instrument complete with intact microphone, but this project isn’t just about showing off the result. [poprhythm] details everything about how he interfaced to the keypad, how he used that with an Arduino to create a working MIDI interface, and exactly how he decided — musically speaking — what each button should do. The LEDs on the phone are even repurposed to blink happily depending on what is going on, which is a nice touch.
Of course, it doesn’t end there. [poprhythm] also makes use of the microphone in the phone’s handset. Since the phone is now a MIDI instrument with both a microphone and note inputs, it’s possible to use them together as the inputs to vocoder software, which he demonstrates by covering Around the World by Daft Punk (video).
We love how [poprhythm] explains how he interfaced to everything because hardware work is all about such details, and finding the right resources. Here’s the GitHub repository for the Arduino code and a few links to other resources.
You can admire [poprhythm]’s Touch Tone MIDI Phone in action in the short videos embedded below, with each one showing off a different aspect of the build. It’s great work!
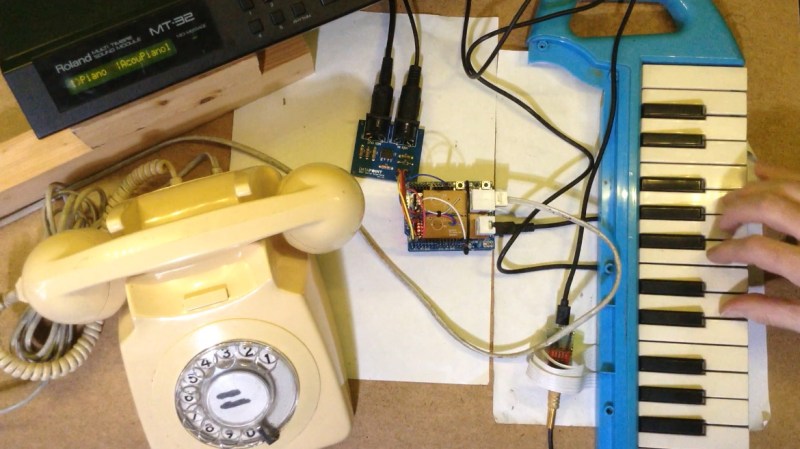
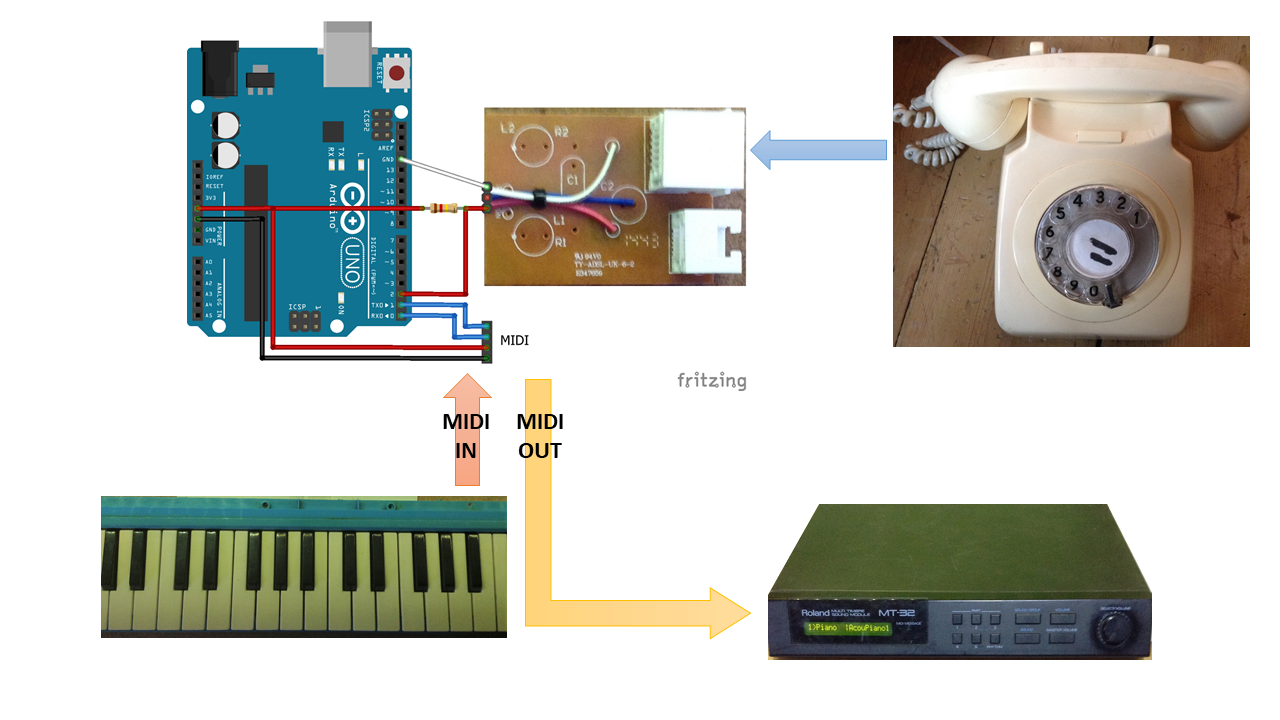
[Kevin] has long wanted to do something musical with a vintage rotary phone and an Arduino, and has finally done so and committed the first of several experiments to HTML in a five-part series. He found a nice old British Telecom number, but it had been converted to plug and socket wiring to work on the modern system. Because of this, [Kevin] wanted to keep it completely functional as a phone. After all, it ought to work fine until 2025, when pulse dialing will no longer be supported in [Kevin]’s locality.
As you can likely understand, [Kevin] was keen to interface with the phone from the outside and leave the inside untouched. He used a sacrificial ADSL filter’s PCB to break out the socket, and added a pull-up resistor between the pin and 5 V.
Pretty quickly, [Kevin] figured out that when the phone is on the hook, it gives a constant high signal, where as the picking up the phone presents as a high signal going low, and dialing each number results in pulses of that quantity that alternate between high and low.
In part two of the series, [Kevin] really gets into decoding the pulse dialing, which is necessary for the third installment when things get musical. Here, [Kevin] adds in a MIDI module and a Roland MT-32 synth to use the dial as a MIDI note generator — each note dialed will sustain until the receiver is replaced on the hook.
Part four focuses on a MIDI patch changer. [Kevin] picks up the phone, dials a code up to three digits long, and hangs up, which this triggers the synth to change to the assigned voice. In part five, the phone becomes a random note sequencer, and each successive spin of the same digit will produce a different, randomly-chosen note. This is really just the beginning, however, so we’ll be checking back for updates. In the meantime, you can listen to the note generator and the random note sequencer demos after the break.
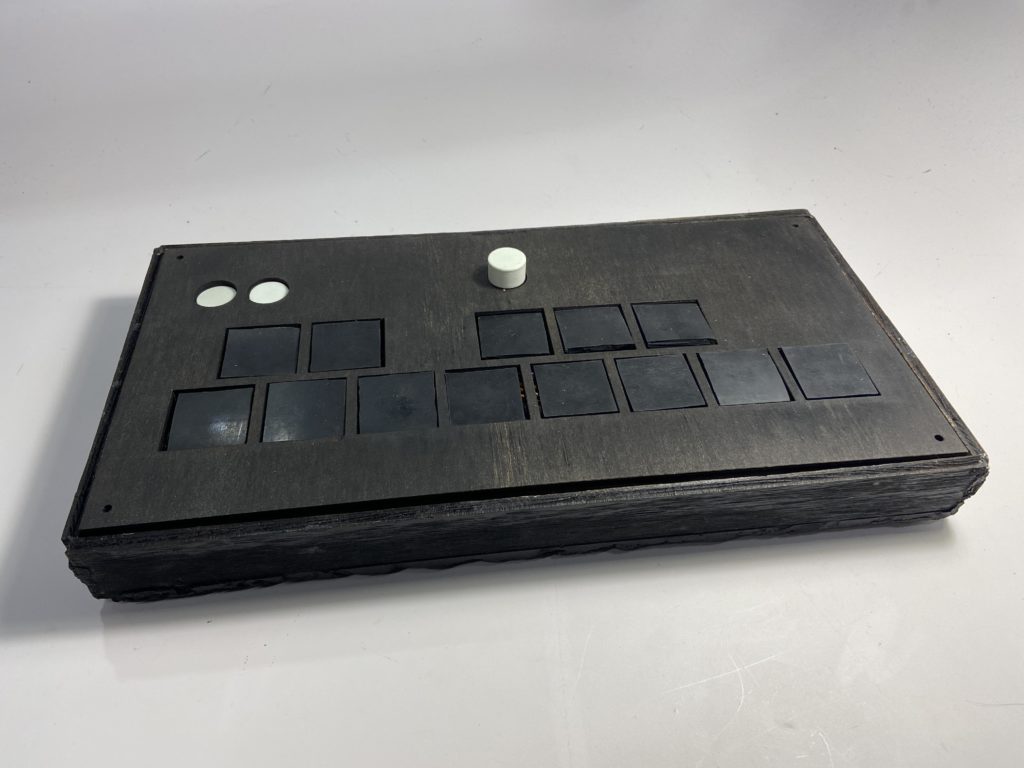
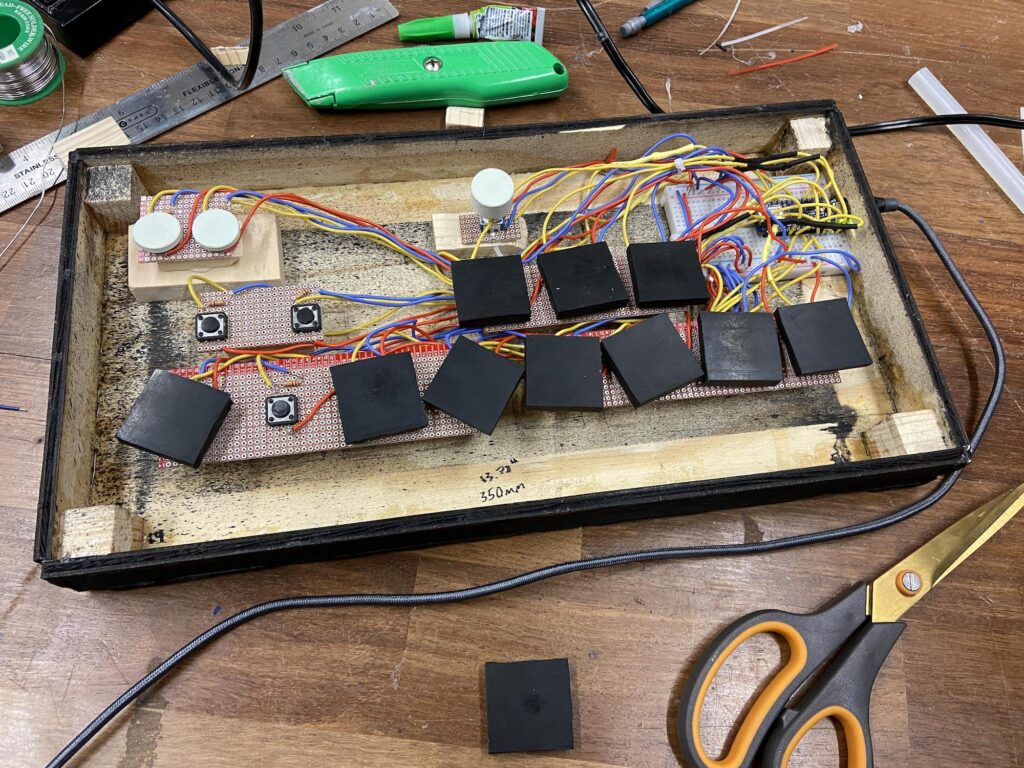
As part of an assigned project in his class, Peter Ashmore and a partner were tasked with making some kind of interactive object, so they decided to go with a MIDI keyboard due to their shared enjoyment of music production. Modeled somewhat after the typical Launchpad, the team’s system incorporated a set of 13 buttons spanning one octave, as well as two buttons for controlling the current octave and a knob that regulates the volume.
The team went with an Arduino Nano 33 IoT as the brains of the operation and wired up the 15 push buttons in a pull-down configuration. After they had finished soldering each component to pieces of perfboard, each element was then assembled into a custom-built chassis that was laser cut from plywood and coated in black spray paint.
To enable the Nano 33 IoT to communicate with Ableton running on the host machine, the team loaded both the Hairless MIDI and loopMIDI programs onto their machine, which create a virtual bridge between the USB connection of the Nano and Ableton. Once tested, the final version of the program was loaded that checks the state of each button and either plays a note or adjusts the octave accordingly.
You can see this project in action below, or you can read more about it here on Instructables.
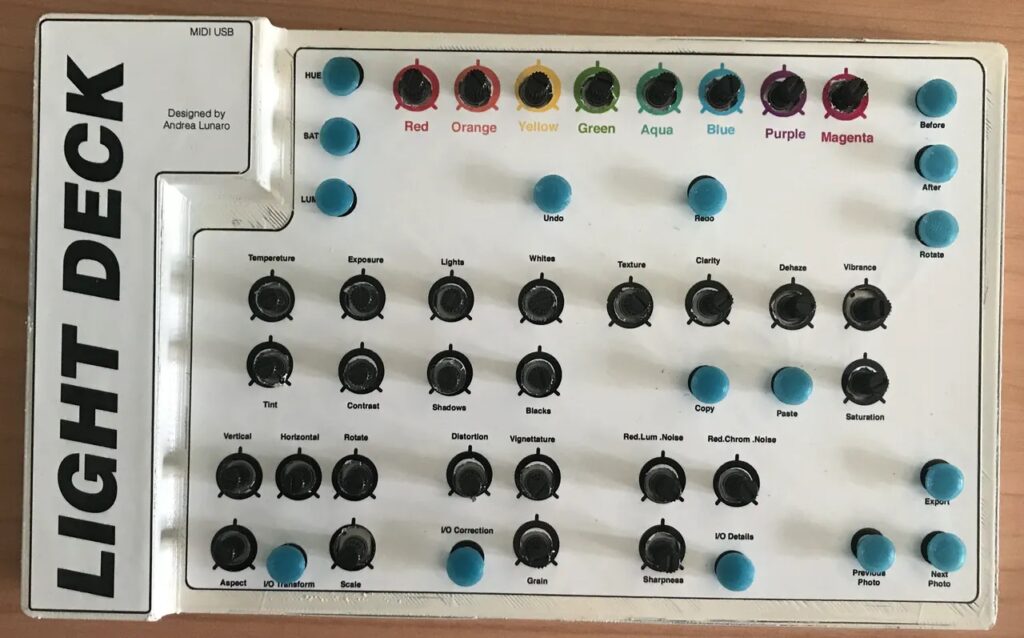
Using Adobe Lightroom can be a tedious process, especially for those who don’t have their keyboards set up with a hundred macro shortcuts. Andrea Lunaro wanted to make this process easier by constructing a large, physical bank of buttons and potentiometers that can be used to perform a whole host of functions within Lightroom. It can output commands to copy/paste, set HSL values, do basic transformations, and navigate around the software in general, all over the MIDI protocol.
This device — called the Light Deck — is powered by a single Arduino Micro, which is connected to several 16-channel 74HC4067 multiplexer ICs that handle both the input and output with the bank of rotary potentiometers and buttons. Data is outputted via USB to the host computer running Lightroom where it is then converted to Lightroom commands with the help of the MISI2Lr plug-in.
Both the PCB and enclosure were custom-designed and assembled, with the enclosure being fully 3D-printed along with its accompanying button/potentiometer covers. As seen in this demonstration video, the Light Deck works really well at providing users with a pleasant analog interface for fine-tuning various image parameters.
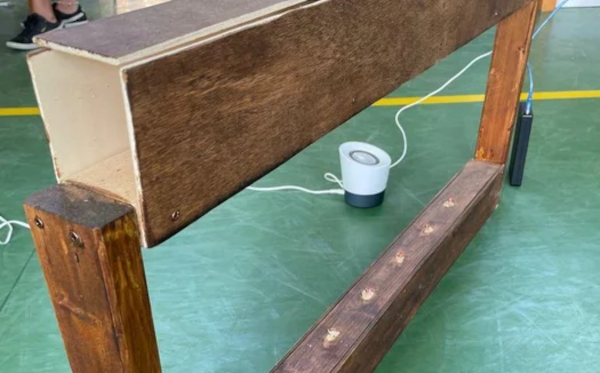
We aren’t sure if you really need lasers to build [HoPE’s] laser harp. It is little more than some photocells and has an Arduino generate tones based on the signals. Still, you need to excite the photocells somehow, and lasers are cheap enough these days.
Mechanically, the device is a pretty large wooden structure. There are six lasers aligned to six light sensors. Each sensor is read by an analog input pin on an Arduino armed with a music-generation shield. We’ve seen plenty of these in the past, but the simplicity of this one is engaging.
We’ve used the copper tape writing trick ourselves and it is quite effective. The tape is often used for stained glass work and sticks to many surfaces. You can solder to it and solder overlaps where you need connections. The results are often as good as a simple single-sided PCB.
The code attached to the post is fairly straightforward and the MIDI shield does the bulk of the work. It should also make it easy to create some really impressive musical effects with a bit of extra coding.
Planet Arduino is, or at the moment is wishing to become, an aggregation of public weblogs from around the world written by people who develop, play, think on Arduino platform and his son. The opinions expressed in those weblogs and hence this aggregation are those of the original authors. Entries on this page are owned by their authors. We do not edit, endorse or vouch for the contents of individual posts. For more information about Arduino please visit www.arduino.cc
You are currently browsing the archives for the Midi category.