Posts | Comments

Planet Arduino

Archive for the ‘arduino hacks’ Category

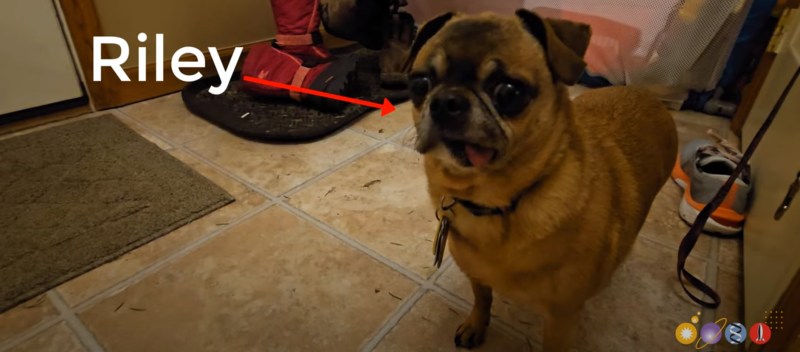
Riley, an 8 lb pug, has more beauty than brains, and a palate as unrefined as crude oil. While we hate criticizing others’ interests and tastes, his penchant for eating cat poop needed to stop. After a thorough exploration of a variety of options, including cat food additives that make its excrement taste worse (HOW? WHY? Clearly taste wasn’t the issue!), automatic litter boxes that stow the secretions, and pet doors that authenticate access to the room with the litter box, [Science Buddies] eventually settled on a solution that was amenable to all members of the family.

The trick was in creating a door mechanism with a blacklist of sorts rather than a whitelist. As the cat didn’t like to push the door open itself, the solution needed to have the pet door open by default. A magnet on Riley’s collar would trip a sensor attached to an Arduino that would control servos to swing the door shut immediately if he attempted to access the defecated delights. Of course safety was a consideration with the door swinging in Riley’s face.

We’ve covered a few pet screeners, including one for the same purpose that used IR sensors (but a much bigger dog also named Riley), and a flock of solutions for chickens. We’ve also seen [Science Buddies] in previous posts, so they’re not on the tips line blacklist.

Video may have killed the radio star, but cell phones and smart phones all but killed the pager. They still exist, of course, but only in very niche applications. [João Santos] wanted a pager-like experience for himself, though, so he enlisted an Arduino and got to work. Watch a video of the system working below.

The build uses an Arduino Uno to drive a simple HD44780 LCD display with 16 characters each across two lines of text. It’s hooked up to a Wemos D1, which uses its WiFi connection to get online. To this end, it’s capable of talking to a web application which allows users to enter text messages. It receives these messages, passes them to the Arduino Uno over I2C, and then the Uno shuttles the message to the display. It’s overkill, but [João] just found it quicker to get everything up and running via this route.

Those who want to message [João] via the system can head to a website that runs on the OutSystems platform. There, they can enter their name and message, and it will be sent to the pager-like device for display.

It’s a fun little thing, and it makes us wonder if pagers could make a comeback. Maybe simple devices could work in a similar way to Sidewalk or Apple AirTags, communicating via a low-power network made up of smartphones in the local area. We’ve seen something similar done with LoRa. If you happen to whip up something along those lines, don’t hesitate to let us know!

You’ve probably played some version of Tetris, but [the Center for Creative Learning] has a different take on it. Their latest version features a cylindrical playing field. While it wouldn’t be simple to wire up all those LEDs, it is a little easier, thanks to LED strips. You can find the code for the game on GitHub.

In all, there are 5 LED strips for a display and 13 strips for the playing area, although you can adjust this as long as there are at least 10 rows. The exact number of LEDs will depend on the diameter of the PVC pipe you build it on.

Using a PS2 controller, the games allow you to play a full-cylinder or in a half-cylinder mode. We were hoping they’d have put up a video showing the gameplay, but we couldn’t find it.

We couldn’t help but think that this would make an excellent display for many purposes. You might even be able to design different games for it.

We’ve seen full-circle Tetris, but it is hardly the same idea. If you want just plain Tetris, you could break out your transistor tester.

Lots of things beep these days. Washing machines, microwaves, fridge — even drill battery chargers. If you’re on Team Makita, it turns out you can actually change the melody of your charger’s beep, thanks to a project from [Real-Time-Kodi].

The hack is for the Makita DR18RC charger, and the implementation of the hack is kind of amusing. [Real-Time-Kodi] starts by cutting the trace to the buzzer inside the charger. Then, an Arduino is installed inside the charger, hooked up to the buzzer itself and the original line that was controlling it. When it detects the charger trying to activate the buzzer, it uses this as a trigger to play its own melody on the charger instead. The Arduino also monitors the LEDs on the charger in order to determine the current charge state, and play the appropriate jingle for the situation.

It’s an amusing hack, and one that could certainly confuse the heck out of anyone expecting the regular tones out of their Makita charger. It also shows that the simple ways work, too — there was no need to dump any firmware or decompile any code.

Even for those of us who are fans of retrocomputing, it’s fair to say that not everyone plays their old-school games on real old-school hardware. The originals are now fragile and expensive, and emulators are good enough that if the gaming experience is all you’re after there’s little point in spending all that cash.

There’s one place in which the originals sometimes have the edge though, the classic controllers are the personal interface with the game. So when [Dome] found a SNES controller in an Akibahara shop, of course he picked it up. How to make it talk to a PC? Tuck an Arduino Pro Micro inside it, of course!

What we like about this project is that instead of ripping out the original electronics it instead hooks the Arduino board onto the original serial interface. We might have made a Nintendo socket to USB box to keep the original cable, but either way, the SNES (technically Super Famicom, because it’s a Japanese market unit) original stays true to its roots. The Arduino polls the clock line at the speed of the console, reads the result, and translates it to a USB interface for the computer. There’s a full run-down of the code and how it was made, should you wish to try.

Of course, if you don’t always have a PC handy, you could also put the whole computer in the controller.

[Heath Paddock] wanted to confound his friends with a game that mimics an escape room in a box. About six months after starting, he had this glorious thing completed. It’s a hardware version of a game called Keep Talking and Nobody Explodes where players have five minutes to defuse a suitcase bomb. This implementation requires at least two players, one with the box-bomb itself, and one who holds all the knowledge but can’t see the box-bomb to defuse it.

The wiring of the Mastermind module.

[Heath]’s version has twice as many modules as the original game, each hand-wired one driven by an Arduino. One of the modules is an LED maze. There are two green anchor LEDs in one of six configurations, and and blue and a red LED.

The object is to move the blue LED next to the red one without touching any walls. Of course, the box-holder can’t see the walls and must describe the configuration of the anchor LEDs to their partner in order to get started.

All of the modules are quite different, which likely makes for an extremely fun and challenging five minutes. [Heath] reports that getting inter-module communication down was a long road. Eventually, [Heath] settled on a mesh network configuration and connected everything in a big loop. Be sure to check out the walk-through video after the break.

This isn’t the first time we’ve seen a hardware implementation of this game. Here’s one that uses a Raspberry Pi.

While simulating an Arduino isn’t a new idea, a recent project by [LRusso] provides an open source JavaScript simulator that runs in your browser. You can try it out live or host it yourself if you prefer.

The simulator looks much like the standard IDE, so there isn’t much to learn. You can select from several targets, including a UNO R3, a MEGA 1280, a MEGA 2560, or a NANO V3. At the bottom of the screen, you’ll see the correct number of digital pins, analog pins, and the serial monitor. The code is relatively new, and we noticed that the digital and output pins seem to work only for outputs. There is no way to modify any of the values from the user interface. You can, however, enter things into the serial monitor.

You can run a canned demo that uses digital and analog output. There is also another sample that uses the serial port. Unlike some other simulators, you can’t really add much external circuitry but, for some purposes, that isn’t a problem.

If you are looking for more, there is Simulide, which is also free. Falstad can do mixed signal simulations with Arduino code. There’s also Wokwi, which we’ve covered a few times before.

There’s nothing fun about a Sisyphean task unless you’re watching one being carried out by someone or something else. In that case, it can be mesmerizing like this Arduino-driven kinetic sand table.

What you can’t see. Image via [thang010146] on YouTube
Like many of these builds, it all started with an ordinary coffee table from the hacker’s favorite furnitüre store. [NewsonsElectronics] opened it up and added a 3mm-thick board to hold the sand and another to hold the rails and magnets.

After designing some pieces to connect the rails and pulleys together, [NewsonsElectronics] let the laser cutter loose on some more 3mm stock. A pair of stepper motors connected to a CNC shield do all of the work, driving around a stack of magnets that causes the ball bearing to trudge beautifully through the sand.

Be sure to check out the videos after the break. The first is a nice demonstration, and the second is the actual build video. In the third video, [NewsonsElectronics] explains how they could write the world’s smallest GRBL code to swing this with a single Arduino. Hint: it involves removing unnecessary data from the g-code generated by Sandify.

Don’t have a laser cutter? Here’s a sand table built from 3D printer parts.

The lovely thing about a hobby like keyboard building is that the melting pot of designs manages to never turn into a nasty porridge. Rather, it remains a tasty chili that keeps getting more flavorful with time. It’s a simple recipe, really; someone becomes dissatisfied enough with their peripherals to do something about it, often trying various designs until they either settle on one, or come up with yet another awesome variant that suits their needs — and possibly someone else’s down the line.

The inimitable [Joe Scotto] has happened upon the katana layout, which has an inverse left-hand row stagger that lends symmetry to the design, and Scotto-ized it into a 33-key build that he says is the best-sounding one yet with lubed Gateron Milky Yellows.

The case and the keycaps are both 3D-printed, and as with all Scotto builds, it is beautifully hand-wired. This one uses an RP2040 Pro Micro, but an ATMega Pro Micro will work, too.

Everything is available on GitHub, and [Joe] promises a typing test soon, as well as a gasket version that foregoes the integrated plate.

Do you need a fast keyboard? Like, ridiculously fast? Then you should use an FPGA.

Via KBD and Make:


  • Newsletter

    Sign up for the PlanetArduino Newsletter, which delivers the most popular articles via e-mail to your inbox every week. Just fill in the information below and submit.

  • Like Us on Facebook