Posts | Comments

Planet Arduino

Archive for the ‘clock hacks’ Category

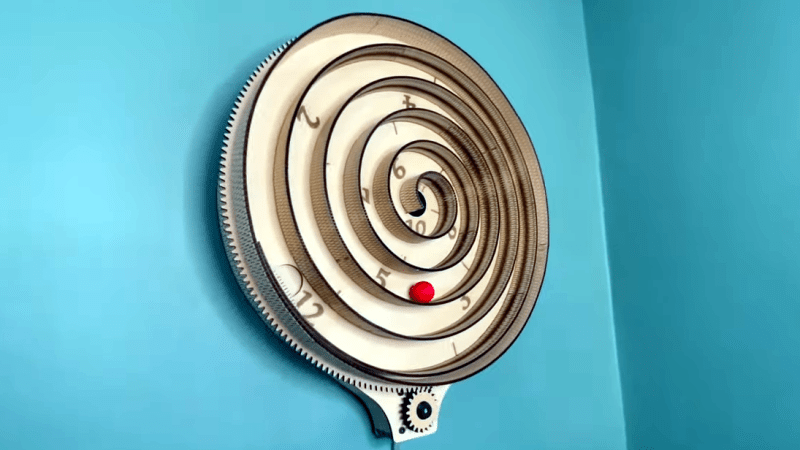
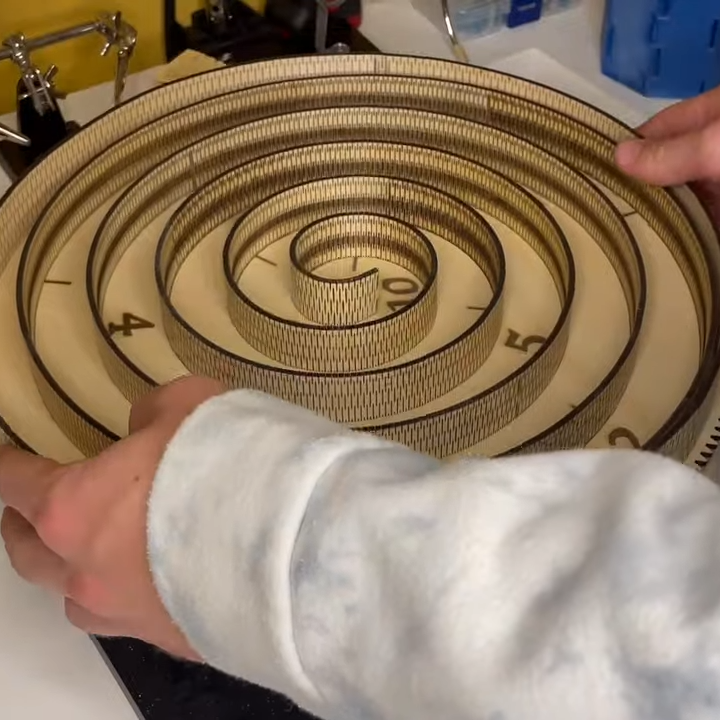
[Build Some Stuff] created an unusual spiral clock that’s almost entirely made from laser-cut wood, even the curved and bendy parts.

The living hinge is one thing, but getting the spacing, gearing, and numbers right also takes work.

The clock works by using a stepper motor and gear to rotate the clock’s face, which consists of a large dial with a spiral structure. Upon this spiral ramp rolls a ball, whose position relative to the printed numbers indicates the time. Each number is an hour, so if the ball is halfway between six and seven, it’s 6:30. At the center of the spiral is a hole, which drops the ball back down to the twelve at the beginning of the spiral so the cycle can repeat.

The video (embedded below) demonstrates the design elements and construction of the clock in greater detail, and of particular interest is how the curved wall of the spiral structure consists of a big living hinge, a way to allow mostly rigid materials to flex far beyond what they are used to. Laser cutting is well-suited to creating living hinges, but it’s a technique applicable to 3D printing, as well.

Thanks to [Kelton] for the tip!

Of course, there’s nothing unusual about using 7-segment displays, especially in a clock. However, [Edison Science Corner] didn’t buy displays. Instead, he fabricated them from a PCB using 0805 LEDs for the segments. You can see the resulting clock project in the video below.

While the idea is good, we might have been tempted to use a pair of LEDs for each segment or used a diffuser to blur the LEDs. The bare look is nice, but it can make reading some numerals slightly confusing.

The remainder of the project is what you’d expect, a 3D-printed case and an Arduino Nano coupled with a DS1307 make the clock part work.

Honestly, with a few changes, we’d like to make up some of these boards for other kinds of custom displays. We can imagine a PCB where the bottoms of the display elements are right at the edge of the board instead of on stalks. You could even create a 14-segment display (we used to call these British flag displays) to make custom text messages. Of course, you can also make custom electroluminescent displays on a PCB reasonably easily, too.

An orange 3D printed four digit clock with rotating segments

[Hans Andersson] has been creating marvelous twisting timepieces for over a decade, and we’re pleased to be able to share his latest mechanical clock contraption with our readers, the Time Twister 5.

In contrast to his previous LEGO-based clocks, version five of the Time Twister uses 3D printed segments, undoubtedly providing greater flexibility in terms of aesthetics and function. Each digit is a mechanical display, five layers vertical and three segments horizontal, with a total of three unique faces. Each layer of each display can be individually rotated by a servo, and this arrangement allows for displaying any number between zero and nine. The whole show is controlled by an Arduino MEGA and a DS3231 real-time clock.

Watching these upended prisms rotate into legible fifteen-segment digits is enjoyable enough already, but the mechanical sound created by this timepiece in motion is arguably even more satisfying. Check out the video below to see (and hear) for yourself. If you want to build one yourself, all the details are here.

We last covered [Hans Andersson] and his very first Time Twister clock way back in November 2011. Since then we’ve come across many impressive mechanical clocks, like this seven-segment work of art. We’re constantly impressed by the outstanding craftsmanship of these mechanical clocks, and it’s inspiring to see one of our OG horologists back in the saddle once more.

A Numitron clock showing "30 degrees C"

While it seems like Nixie tubes get all the attention when it comes to making retro-style displays, there are plenty of other display technologies that can make a good-looking retro design. Take the Numitron tube: introduced by RCA in the early 1970s, these display tubes might look superficially similar to Nixies but work in a completely different way. The Numitron uses incandescent elements that make up seven-segment displays.

The main advantage Numitrons have over Nixes is that they don’t require a high-voltage supply, which makes them much easier to hook up to modern low-voltage electronics. [mircemk] used this to his advantage when he built a simple clock using four numitrons that can display the time, the date, and the ambient temperature.

The brains of the device are formed by an Arduino Nano coupled with a DS3231 battery-backed real-time clock module. For now, the time has to be synchronized by connecting the Arduino to a PC and reprogramming it, but [mircemk] has plans to update the design with pushbuttons to allow the user to set the time manually.

Four shift registers are all that’s needed to interface the microcontroller to the display tubes, thanks to their low-voltage operation. They do need quite a lot of current, so [mircemk] used the high-power TPIC6C595 instead of a  regular 74HC595 chip. We wonder if the tubes’ high power consumption could be the reason why the temperature in his lab seems to hover around 30 °C.

A simple but stylish plastic enclosure completes the design. Since Numitron tubes are relatively low-cost and no other specialized components are needed, this could be one of the cheapest and easiest ways to make a retro display tube clock. Although we’ve seen a couple of Numitron clocks and even watches before, today’s build is a great example of how simple such a design can actually be.

Pomodoro timer helps you focus on tasks without burning out.

Student and hacker [prusteen] recently fell in love with the Pomodoro method of time management. That’s where you concentrate on your task for 25 minutes, then take a five-minute break, and repeat this four times with a longer break at the end. Initially, [prusteen] was keeping track on their phone, but hated having to change the timer value between Pomodoros and break times. In order to keep the flow mode engaged, [prusteen] came up with this darling little study buddy that does it all with the push of a button.

By default, this tomato shows the current time, which we think is a handy and often-overlooked feature of Pomodoro timer builds. Press that momentary switch on the front, and it starts counting upward to 25 minutes. Then it beeps in stereo through a pair of buzzers when the time is up, and automatically starts a five-minute break timer. Press it again and the display goes back to clock mode, although judging by the code, doing this will cancel the timer.

Inside the juicy enclosure is an Arduino Nano, an RTC, and a 7-segment display. We love the attention to detail here, from the little green leaves on top to the anatomically-correct dimple on the underside. And we always like to see lids that snap on with magnets. So satisfying. Check out the brief demo after the break, which unfortunately does not include any lid-snapping action.

Do you need more interaction with your Pomodoro timer? Build yourself a pomo-dachi instead.

Word clock in the style of the Christmas lights from Stranger Things. If you know, you know.

Will Netflix’s nostalgic hit Stranger Things be back for a fourth series anytime soon? We could pull out a Ouija board and ask the spirits, but we’d much rather ask closer to the source, i.e. a spirit in the upside down. And you know that the best way to do that is with LEDs — one for each letter of the alphabet so the spirit can spell out their messages.

Arduino, ESP01, and real-time clock powering this Stranger Things word clockAlthough contact with the Demogorgon’s world isn’t likely with [danjovic]’s open-source Stranger Things board, you are guaranteed to get the time spelled out for you every minute, as in, ‘it’s twenty-five (or six) to four’. And if you want to freak out your unwitting friends, you can covertly send messages to it from your phone.

There are two versions now — the original desktop version, and one that hangs on the wall and uses a high-quality photo print for the background. Both use an ESP-01 and an Arduino to help drive the 26 RGB LEDs, and use a DS2321 real-time clock for timing. We love the enameled wiring job on the wall-mount version, but the coolest part has to be dual language support for English and Brazilian Portuguese. You can check out demos of both after the break.

We’ve seen many a word clock around here, but this is probably one of the few that’s dripping with pop culture. If it’s stunning modernism you want, take a look at this painstakingly-constructed beauty.

The past year has been quite a ride for everyone on Earth. But you never know which day is going to be your last, so you might as well live a little, eh? This clock doesn’t actually know when you’ll kick off, either. But just for fun, it predicts the number of years remaining until you go to that hackerspace in the sky by hazarding a guess that’s based on your current age and the latest life expectancy tables. Don’t like the outcome? It’s completely randomized, so just push the button and get a set of numbers: the age you might die, and the percentage of life elapsed and remaining.

We love the design of this calculated doom clock, and it’s quite simple inside — an Arduino Pro Mini outputs the graph on an 2.9″ e-paper display, and both are powered with a 5.5 V solar panel. Just suction cup that puppy to the window and you’ll get automatic updates about your impending demise on sunny days, and none on cloudy days.

Want a more realistic picture of your mortality? Here’s a clock that counts down to your 80th birthday.

It used to be that building your own watch was either a big project or it meant that you didn’t really care about how something looked on your wrist. But now with modern parts and construction techniques, a good-looking smart watch isn’t out of reach of the home shop. But if you don’t want to totally do it yourself, you can turn to a kit and that’s what [Stephen Cass] did. Writing in IEEE Spectrum, he took a kit called a Watchy and put it through its paces for you.

Watchy is an open source product that uses an ESP32, an E-ink display, and costs about $50. The display is 1.5 inches — good enough for a watch — and it has a real time clock, a vibration motor, an accelerometer, and four buttons. The whole thing runs on a 200 mAh lithium polymer battery. The charger is microUSB and you can also upload software to it using the usual Arduino tools.

However, [Stephen] found that none of the examples he tried would work at first. He found problems with the Mac software, but he also had problems under Windows. The answer? Switching to a Raspberry Pi seemed to work and once the watch was wiped clean, the Mac tools would work, too. It sounds like this isn’t a common problem, but he has to erase the watch with the Pi before each programming cycle.

Unlike a normal Arduino program, all the work in a typical Watchy program happens in setup() so the watch can mostly sleep and it updates the 200×200 typically just once a minute. As an example, [Stephan] wrote a watch face that uses an old Irish alphabet to tell time. He plans to add code to grab online data, too, and the phone has support for connecting wirelessly and parsing JSON to make tasks like that easier.

We always thought the EZ430-Chronos was a good-looking watch, but its screen is dated now. You can also pick up a lot of cheap import watches that can be hacked.

Just when we think we’ve seen all possible combinations of 3D printing, microcontrollers, and pretty blinkenlights coming together to form DIY clocks, [Mukesh_Sankhla] goes and builds this geometric beauty. It’s kaleidoscopic, it’s mosaic, and it sorta resembles stained glass, but is way cheaper and easier.

The crucial part of the print does two jobs — it combines a plate full of holes for a string of addressable RGB LEDs with the light-dividing walls that turn the LEDs into triangular pixels. [Mukesh] designed digits for a clock that each use ten triangles. You’d need an ESP8266 to run the clock code, or if you’d rather sit and admire the rainbow light show unabated by the passing of time, just use an Arduino Uno or something similar.

Most of the aesthetic magic here is in the printed pieces and the FastLED library. It has a bunch of really cool animations baked in that look great with this design. Check out the demo video after the break. The audio is really quiet until the very end of the video, so be warned. In our opinion, the audio isn’t necessary to follow along with the build.

The humble clock takes many lovely forms around here, including pop art.

What could you do with a dual-core 240 MHz ESP32 that supports Arduino-style programming, with 16 MB of flash, 8 MB of PSRAM, and 520 k of RAM? Oh, let’s throw in a touchscreen, an accelerometer, Wifi, and Bluetooth. Besides that, it fits on your wrist and can show the time? That’s the proposition behind Lilygo T Watch 2020. If it sounds like a smartwatch, it is. At around $25 –and you can snag the hardware from a few different places — it is not only cheaper than the latest flagship smartwatch, but it is also infinitely more hackable.

OK, so the screen is only 1.54″, but then again, it is a watch. If Arduino isn’t your thing, you can use anything else that supports the ESP32 like Micropython or even Scratch. There are variants that have LoRA and GPS, at slightly higher prices. You can also find ones with heart rate monitors and other features.

If you would like a preview of the firmware, it is all there on GitHub and there is a smattering of documentation. There are even a few examples, although brush up on your Mandarin. The watch actually looks passable for a smartwatch, although the one blemish is that it is 20 mm thick.  That’s almost double the thickness of an Apple Watch 5 or a Samsung Active 2.

Still, if you want total hackability, that extra 10 mm is probably worth it. You can, of course, hack some watches that are not meant to be used this way. Besides, this watch is a bit more socially acceptable than one that would earn you hacker street cred.


  • Newsletter

    Sign up for the PlanetArduino Newsletter, which delivers the most popular articles via e-mail to your inbox every week. Just fill in the information below and submit.

  • Like Us on Facebook