Posts | Comments

Planet Arduino

Archive for the ‘digital audio hacks’ Category

Jenny did an Ask Hackaday article earlier this month, all about the quest for a cheap computer-based audio mixer. The first attempt didn’t go so well, with a problem that many of us are familiar with: Linux applications really doesn’t like using multiple audio devices at the same time. Jenny ran into this issue, and didn’t come across a way to merge the soundcards in a single application.

I’ve fought this problem for a while, probably 10 years now. My first collision with this was an attempt to record a piano with three mics, using a couple different USB pre-amps. And of course, just like Jenny, I was quickly frustrated by the problem that my recording software would only see one interface at a time. The easy solution is to buy an interface with more channels. The Tascam US-4x4HR is a great four channel input/output audio interface, and the Behringer U-PHORIA line goes all the way up to eight mic pre-amps, expandable to 16 with a second DAC that can send audio over ADAT. But those are semi-pro interfaces, with price tags to match.

But what about Jenny’s idea, of cobbling multiple super cheap interfaces together? Well yes, that’s possible too. I’ll show you how, but first, let’s talk about how we’re going to control this software mixer monster. Yes, you can just use a mouse or keyboard, but the challenge was to build a mixing desk, and to me, that means physical faders and mute buttons. Now, there are pre-built solutions, with the Behringer X-touch being a popular solution. But again, we’re way above the price-point Jenny set for this problem. So, let’s do what we do best here at Hackaday, and build our own.

The Physical Goods

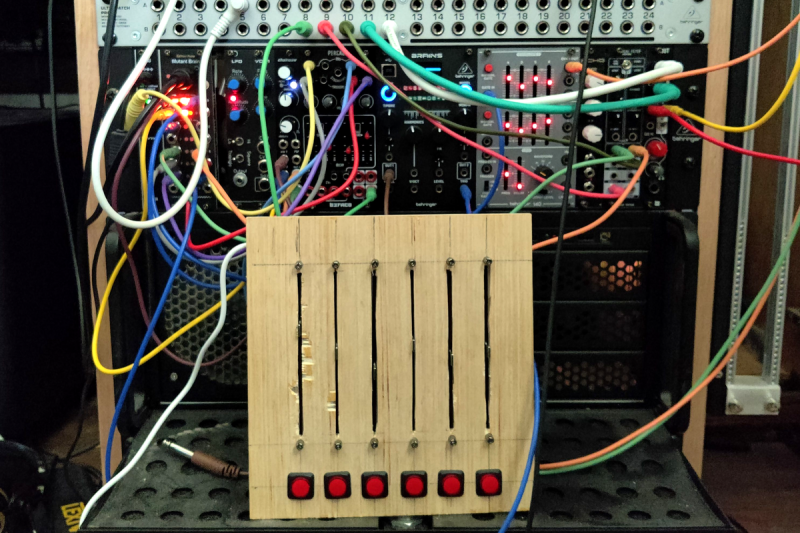
What we need is a microcontroller that has native USB client support, multiple digital I/O pins, and some analog inputs. I went with the Arduino MKRZero for the small size, decent price, and the fact that it’s actually in stock at Mouser. The other items we’ll need are some faders and buttons. I went for the full-sized 100 mm faders, and some LED toggle buttons made by Adafruit. The incidentals, like wire and resistors, was sourced from the local parts bin in the corner.

My first thought was to design and 3D print the panel, but after doing the layout on a scrap piece of plywood, the resulting size proved a bit too large for my printer. So we’re going retro, and making a “wood-grain” mixing desk. This would be a great project for a CNC router, but as I’m not part of that particular cool club yet, it was a drill press, table saw, and oscillating tool to the rescue. The results aren’t quite as pretty as I wanted, but maybe we’ll get a Mark II of this project one day.

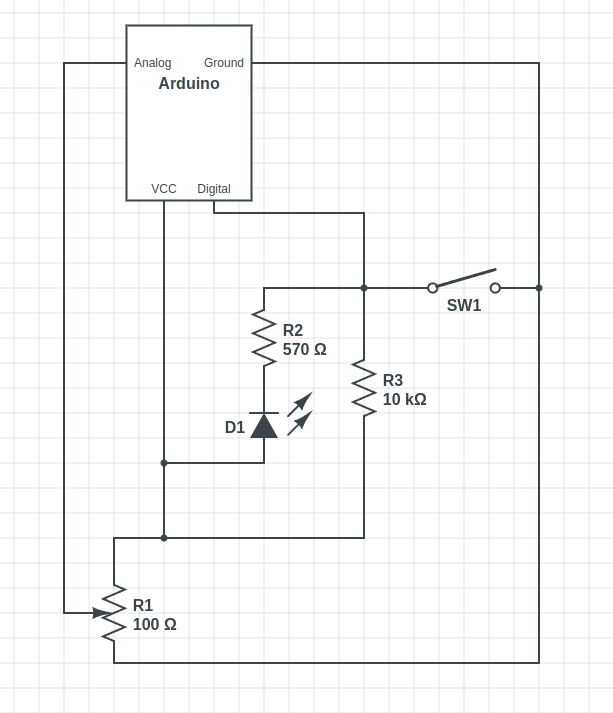
The wiring is relatively straightforward, with a current limiting resistor to protect the LEDs inside the buttons, and a pullup resistor to prevent the digital pin from floating when the button isn’t pushed. Now, that pullup might not be necessary, as I later learned that the Arduino has built-in pullup on its digital pins. And also of note, a 10 Ω resistor is *not* a good choice for a pullup. As Al eloquently put it, that’s a “pull way up resistor”. 10 kΩ is the better choice.

And to finish the build, we’ll need a sketch to run on the Arduino. Thankfully, there’s already a great library for exactly what we want to do: Control Surface. There’s a bunch of ways to set this up, but my sketch is pretty trivial:

#include <Control_Surface.h>
USBMIDI_Interface midi;

CCButtonLatching button1 {11, {MIDI_CC::General_Purpose_Controller_1, CHANNEL_1}, };
CCButtonLatching button2 {10, {MIDI_CC::General_Purpose_Controller_2, CHANNEL_1}, };
CCButtonLatching button3 {9, {MIDI_CC::General_Purpose_Controller_3, CHANNEL_1}, };
CCButtonLatching button4 {8, {MIDI_CC::General_Purpose_Controller_4, CHANNEL_1}, };
CCButtonLatching button5 {7, {MIDI_CC::General_Purpose_Controller_5, CHANNEL_1}, };
CCButtonLatching button6 {6, {MIDI_CC::General_Purpose_Controller_6, CHANNEL_1}, };
  
CCPotentiometer volumePotentiometers[] {
  {A0, {MIDI_CC::Sound_Controller_1, CHANNEL_1} },
  {A1, {MIDI_CC::Sound_Controller_2, CHANNEL_1} },
  {A2, {MIDI_CC::Sound_Controller_3, CHANNEL_1} },
  {A3, {MIDI_CC::Sound_Controller_4, CHANNEL_1} },
  {A4, {MIDI_CC::Sound_Controller_5, CHANNEL_1} },
  {A5, {MIDI_CC::Sound_Controller_6, CHANNEL_1} },
};
void setup() {
    Control_Surface.begin();
}
void loop() {
    Control_Surface.loop();
}

Pipewire to the Rescue

And now on to the meat and potatoes of this project. How do we convince an application to see inputs from multiple devices, and actually do some mixing? The problem here is de-sync. Each device runs on a different clock source, and so the bitstream from each may wander and go out of sync. That’s a serious enough problem that older sound solutions didn’t implement much in the way of card combining. Not long ago, the process of resampling those audio streams to get them to properly sync would have been a very CPU intensive procedure. But these days we all have multi-core behemoths, practical super-computers compared to 20 years ago.

So when Wim Taymans wrote Pipewire, he took a different approach. We have enough cycles to resample, so Pipewire will transparently do so when needed. Pipewire sees all your audio interfaces at once, and implements both the Jack and Pulseaudio APIs. Different distros handle this a bit differently, but generally you need the Pipewire packages, as well as the pipewire-jack and pipewire-pulseaudio packages to get that working.

And here’s the secret: The Jack routing tools work with Pipewire. The big three options are qjackctl, carla, and qpwgraph, though note that qpwgraph is actually Pipewire native. So even if an application can only select a single device at a time, if that app uses the Jack, Pulseaudio, or Pipewire API, you can use one of those routing control programs to arbitrary connect inputs and outputs.

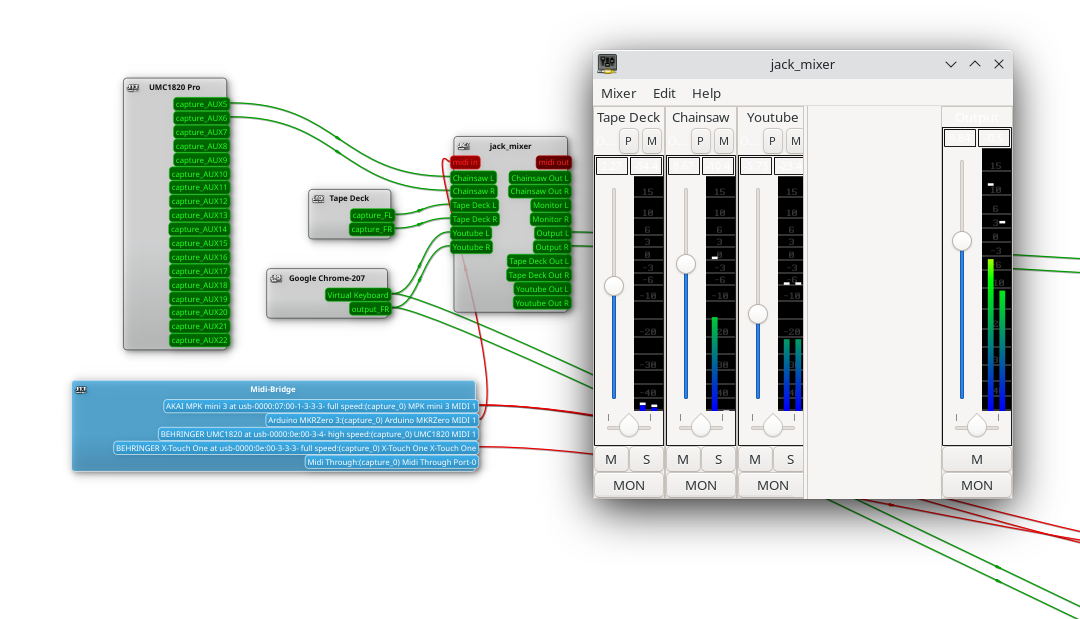
So let’s start with the simplest solution: jack_mixer. Launch the application, and then using your preferred routing controllers, take the MIDI output from our Arduino control surface, and connect it into jack_mixer‘s MIDI input. In jack_mixer, add a new input channel, and give it an appropriate name. Let’s call it “tape deck”, since I have a USB tape deck I’m testing this with. Now the controller magic kicks in: hit the “learn” button for the volume control, and wiggle the first fader on that controller. Then follow with the mute button, and save the new channel. We’ll want to add an output channel, too. Feel free to assign one of your faders to this one, too.

And finally, back to the routing program, and connect your tape deck’s output to jack_mixer input, and route jack_mixer‘s output to your speakers. Play a tape, and enjoy the full control you have over volume and muting! Want to add a Youtube video to the mix? Start the video playing, and just use the routing controller to disconnect it from your speakers, and feed it into a second channel on jack_mixer. Repeat with each of those five cheap and nasty sound cards. Profit!

You Want More?

There’s one more application to mention here. Instead of using jack_mixer, we can use Ardour to do the heavy lifting. To set it up this way, there are two primary Ardour settings, found under preferences: Under the monitoring tab make sure “Record monitoring handled by” is set to Ardour, and the “auto Input does talkback” option is checked. Then add your tracks, set the track input to the appropriate input hardware, and the track output to the master bus. Make sure the master bus is routed to where you want it, and you should be able to live mix with Ardour, too.

This gives you all sorts of goodies to play with, in the form of plugins. Want a compressor or EQ on a sound source? No problem. Want to autotune a source? X42 has a plugin that does that. And of course, Ardour brings recording, looping, and all sorts of other options to the party.

Ardour supports our custom mixing interface, too. Also under preferences, look for the Control Surfaces tab, and make sure General MIDI is checked. Then highlight that and click the “Show Protocol Settings” button. Incoming MIDI should be set to our Arduino device. You can then use the Ctrl + Middle Click shortcut on the channel faders and mute buttons, to put them in learn mode. Wiggle a control to assign it to that task. Or alternatively you can add a .map file to Ardour’s midi_maps directory. Mine looks like this:

 
  <?xml version="1.0" encoding="UTF-8"?>
<ArdourMIDIBindings version="1.1.0" name="Arduino Mapping">
  <Binding channel="1" ctl="16" uri="/route/mute B1"/>
  <Binding channel="1" ctl="70" uri="/route/gain B1"/>
  <Binding channel="1" ctl="17" uri="/route/mute B2"/>
  <Binding channel="1" ctl="71" uri="/route/gain B2"/>
  <Binding channel="1" ctl="18" uri="/route/mute B3"/>
  <Binding channel="1" ctl="72" uri="/route/gain B3"/>
  <Binding channel="1" ctl="19" uri="/route/mute B4"/>
  <Binding channel="1" ctl="73" uri="/route/gain B4"/>
  <Binding channel="1" ctl="80" uri="/route/mute B5"/>
  <Binding channel="1" ctl="74" uri="/route/gain B5"/>
  <Binding channel="1" ctl="81" uri="/route/mute B6"/>
  <Binding channel="1" ctl="75" uri="/route/gain B6"/>
</ArdourMIDIBindings>

The Caveats

Now before you get too excited, and go sink a bunch of money and/or time into a Linux audio setup, there are some things you should know. First is latency. It’s really challenging to get a Pipewire system set up to achieve really low latency, particularly when you’re using USB-based hardware. It’s possible, and work is ongoing on the topic. But so far the best I’ve managed to run stable is a 22 millisecond round-trip measurement — and that took a lot of fiddling with the Pipewire config files to avoid garbled audio. That’s just about usable for self monitoring and live music, and for playing anything pre-recorded, that’s perfectly fine.

The second thing to know is that this was awesome. It’s a bit concerning how much fun it is to combine some decent audio hardware with the amazing free tools that are available. Want to auto-tune your voice for your next Zoom meeting? Easy. Build a tiny MIDI keyboard into your desk? Just a microcontroller and some soldering away. The sky’s the limit. And the future is bright, too. Tools like Pipewire and Ardour are under very active development, and the realtime kernel patches are just about to make it over the finish line. Go nuts, create cool stuff, and then be sure to tell us about it!

In an age of streaming media it’s easy to forget the audio CD, but they still remain as a physical format from the days when the “Play” button was not yet the “Pay” button. A CD player may no longer be the prized possession it once was, but it’s still possible to dabble in the world of 120 mm polycarbonate discs if you have a fancy for it. It’s something [Daniel1111] has done with his Arduino CD player, which uses the little microcontroller board to control a CD-ROM drive via its IDE bus.

The project draws heavily from the work of previous experimenters, notably ATAPIDUINO, but it extends them by taking its audio from the drive’s S/PDIF output. A port expander drives the IDE interface, while a Cirrus Logic WM8805 S/PDIF transceiver handles the digital audio and converts it to an I2S stream. That in turn is fed to a Texas Instruments PCM5102 DAC, which provides a line-level audio output. All the code and schematic can be found in a GitHub repository.

To anyone who worked in the CD-ROM business back in the 1990s this project presses quite a few buttons, though perhaps not enough to dig out all those CDs again. It would be interesting to see whether the I2S stream could be lifted from inside the drive directly, or even if the audio data could be received via the IDE bus. If you’d like to know a bit more about I2S , we have an article for you.

The Samsung PS-WTX500 subwoofer is designed to be used as part of a 5.1 channel home theater system, but not just any system. It contains the amplifiers for all the channels, but they’ll only function when the subwoofer is connected to the matching receiver. [Alejandro Zarate] figured there must be some way to unlock the system’s full functionality without being limited to the original receiver, he just needed to reverse engineer how the subwoofer worked.

All the wires tuck underneath the Arduino

The result is a fantastically well documented write-up that covers the whole process, starting with how [Alejandro] identified and researched the Pulsus PS9829B Digital Audio Processor (DAP). Documentation for this particular chip seems hard to come by, but he was able to find a similar chip from the same manufacturer that was close enough to put him on the right track. From there, he started studying the SPI communications between the DAP and the subwoofer’s S3P70F4 microcontroller.

After analyzing the communication between the two chips, [Alejandro] pulled the S3P70F4 off the board and wired an Arduino Pro Mini 328 in its place. The Arduino was quite a bit larger than the original microcontroller, but with some careful wiring, he manged a very professional looking installation. Short of coming up with a custom PCB adapter, we don’t think it could look much better.

With some relatively straightforward code and a listing of the captured byte sequences, the Arduino was able to power up the PS-WTX500’s amplifiers and handle the incoming audio signal as a stand-alone device.

In the past we’ve seen a similar trick done with the ESP8266, which had the added benefit of enabling WiFi control of the speakers. We’re all for adding modern functionality to older hardware, even if you’ve got to hang it off the back as an external module.

Effects pedals: for some an object of overwhelming addiction, but for many, an opportunity to hack. Anyone who plays guitar (or buys presents for someone who does) knows of the infinite choice of pedals available. There are so many pedals because nailing the tone you hear in your head is an addictive quest, an itch that must be scratched. Rising to meet this challenge are a generation of programmable pedals that can tweak effects in clever ways.

With this in mind, [ElectroSmash] are back at it with another open source offering: the pedalSHIELD MEGA. Aimed at musicians and hackers who want to learn more about audio, DSP and programming, this is an open-hardware/open-software shield for the Arduino MEGA which transforms it into an effects pedal.

The hardware consists of an analog input stage which amplifies and filters the incoming signal before passing it to the Arduino, as well as an output stage which does the DAC-ing from the Arduino’s PWM outputs, and some more filtering/amplifying. Two 8-bit PWM outputs are used simultaneously to make pseudo 16-bit resolution — a technique you can read more about in their handy forum guide.

The list of effects currently implemented covers all the basics you’d expect, and provides a good starting point for writing custom effects. Perhaps a library for some of the commonly used config/operations would be useful? Naturally, there are some computational constraints when using an Arduino for DSP, though it’s up to you whether this is a frustrating fact, or an opportunity to write some nicely optimised code.

[ElectroSmash] don’t just do pedals either: here’s their open source guitar amp.

Do any of you stay awake at night agonizing over how the keytar could get even cooler? The 80s are over, so we know none of us do. Yet here we are, [James Cochrane] has gone out and turned a HP ScanJet Keytar for no apparent reason other than he thought it’d be cool. Don’t bring the 80’s back [James], the world is still recovering from the last time.

Kidding aside (except for the part of not bringing the 80s back), the keytar build is simple, but pretty cool. [James] took an Arduino, a MIDI interface, and a stepper motor driver and integrated it into some of the scanner’s original features. The travel that used to run the optics back and forth now produce the sound; the case of the scanner provides the resonance. He uses a sensor to detect when he’s at the end of the scanner’s travel and it instantly reverses to avoid collision.

A off-the-shelf MIDI keyboard acts as the input for the instrument. As you can hear in the video after the break; it’s not the worst sounding instrument in this age of digital music. As a bonus, he has an additional tutorial on making any stepper motor a MIDI device at the end of the video.

If you don’t have an HP ScanJet lying around, but you are up to your ears in surplus Commodore 64s, we’ve got another build you should check out.


Filed under: Arduino Hacks, digital audio hacks, musical hacks

A stock Arduino isn’t really known for its hi-fi audio generating abilities. For “serious” audio like sample playback, people usually add a shield with hardware to do the heavy lifting. Short of that, many projects limit themselves to constant-volume square waves, which is musically uninspiring, but it’s easy.

[Connor]’s volume-control scheme for the Arduino bridges the gap. He starts off with the tone library that makes those boring square waves, and adds dynamic volume control. The difference is easy to hear: in nature almost no sounds start and end instantaneously. Hit a gong and it rings, all the while getting quieter. That’s what [Connor]’s code lets you do with your Arduino and very little extra work on your part.

The code that accompanies the demo video (which is embedded below) is a good place to start playing around. The Gameboy/Mario sound, for instance, is as simple as playing two tones, and making the second one fade out. Nonetheless, it sounds great.

Behind the scenes, it uses Timer 0 at maximum speed to create the “analog” values (via PWM and the analogWrite() command) and Timer 1 to create the audio-rate square waves. That’s it, really, but that’s enough. A lot of beloved classic arcade games didn’t do much more.

While you can do significantly fancier things (like sample playback) with the same hardware, the volume-envelope-square-wave approach is easy to write code for. And if all you want is some simple, robotic-sounding sound effects for your robot, we really like this approach.

The HackadayPrize2016 is Sponsored by:

Filed under: Arduino Hacks, digital audio hacks, The Hackaday Prize

[Andy] had the idea of turning a mixing desk into a MIDI controller. At first glance, this idea seems extremely practical – mixers are a great way to get a lot of dials and faders in a cheap, compact, and robust enclosure. Exactly how you turn a mixer into a MIDI device is what’s important. This build might not be the most efficient, but it does have the best name ever: digital to analog to digital to analog to digital conversion.

The process starts by generating a sine wave on an Arduino with some direct digital synthesis. A 480 Hz square wave is generated on an ATTiny85. Both of these signals are then fed into a 74LS08 AND gate. According to the schematic [Andy] posted, these signals are going into two different gates, with the other input of the gate pulled high. The output of the gate is then sent through a pair of resistors and combined to the ‘audio out’ signal. [Andy] says this is ‘spine-crawling’ for people who do this professionally. If anyone knows what this part of the circuit actually does, please leave a note in the comments.

The signal from the AND gates is then fed into the mixer and sent out to the analog input of another Arduino. This Arduino converts the audio coming out of the mixer to frequencies using a Fast Hartley Transform. With a binary representation of what’s happening inside the mixer, [Andy] has something that can be converted into MIDI.

[Andy] put up a demo of this circuit working. He’s connected the MIDI out to Abelton and can modify MIDI parameters using an audio mixer. Video of that below if you’re still trying to wrap your head around this one.


Filed under: Arduino Hacks, digital audio hacks

The Beach Buddy

When you venture out onto the beach for a day in the sun, you’re probably not preoccupied with remembering the specifics about your sunscreen’s SPF rating—if you even remembered to apply any. [starwisher] suffered a nasty sunburn after baking in the sunlight beyond her sunscreen’s limits. To prevent future suffering, she developed The Beach Buddy: a portable stereo and phone charger with a handy sunburn calculator to warn you the next time the sun is turning you into barbecue.

After telling the Beach Buddy your skin type and your sunscreen’s SPF rating, a UV sensor takes a reading and an Arduino does a quick calculation that determines how long until you should reapply your sunscreen. Who wants to lug around a boring warning box, though?

[starwisher] went to the trouble of crafting a truly useful all-in-one device by modifying this stereo and this charger to fit together in a sleek custom acrylic enclosure. There’s a switch to activate each function—timer, charger, stereo—a slot on the side to house your phone, and an LCD with some accompanying buttons for setting up the UV timer. You can check out a demo of all the Beach Buddy’s features in a video below.

[via Dangerous Prototypes]


Filed under: Arduino Hacks, digital audio hacks, solar hacks

sound_companionCube

The Enrichment Center likely disapproves of the SoundCube: a portal music box in the form of a Portal Companion Cube. [Andreas] finished this project a couple of years ago, but we’re glad he’s finally had time to give a rundown on the details at his blog.

The build is primarily a modified speaker box cube—constructed out of what appears to be MDF—with four Alpine SXE-1725S speakers placed at the center of the middle faces. The faces were routed out to resembled the Companion Cube, while the electronics mount and the speaker grills were 3d printed. Inside is a homemade amplifier built around an Arduino Mega, with a TDA7560 quad bridge amplifier, a TDA7318 audio processor, a Belkin bluetooth receiver, and a 3.5″ touchscreen for volume control and for input selections.

Two 12v 7.2Ah lead-acid batteries keep the cube functional for an entire weekend of partying, but probably add a few pounds to the already hefty MDF construction. Check out [Andreas's] blog for more pictures and his GitHub for all the necessary code.


Filed under: Arduino Hacks, digital audio hacks, home entertainment hacks


  • Newsletter

    Sign up for the PlanetArduino Newsletter, which delivers the most popular articles via e-mail to your inbox every week. Just fill in the information below and submit.

  • Like Us on Facebook